图像处理-003图像阈值
图像处理-003图像阈值
图像阈值化是一种基于像素亮度的图像二值化方法,二值化在数字图像处理中具有重要意义,尤其在计算机视觉应用中占据机极其重要的位置。阈值化是二值化中一种有效的技术。比如用于图像目标物体的分割将目标对象与背景分割开来,阈值技术的选择是二值化的关键。目前图像阈值处理类型有simple thresholding, adaptive thresholding and Otsu’s thresholding.
simple thresholding
此种阈值变换简单,该种方式对图像中的各像素使用相同的阈值,OpenCV提供cv::threshold 用于该阈值处理。
double cv::threshold(InputArray     src,    #数组表示的源图像, 图像是单通道8bit/32bit浮点型数组
                     OutputArray     dst,    #数组表示的目标图像
                     double     thresh,     #阈值
                     double     maxval,     #阈值类型为THRESH_BINARY,THRESH_BINRY_INV时的最大值.
                     int     type            #阈值类型
                    )
threshold使用的阈值类型有:
-
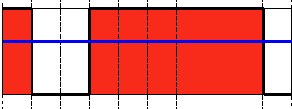
cv.THRESH_BINARY: 二值化操作,源图像中像素点(x,y)处的像素值大于thresh, 则(x,y)处像素值设为maxval,否则设为0;
即: d s t ( x , y ) = { m a x v a l s r c ( x , y ) > t h r e s h 0 其他 即: dst(x, y) = \begin{cases} maxval & src(x, y) > thresh \\ 0 & 其他 \end{cases} 即:dst(x,y)={maxval0src(x,y)>thresh其他
-
cv.THRESH_BINARY_INV: 二值化翻转操作,与cv.THRESH_BINARY相反, 源图像中像素点(x,y)处的像素值大于thresh, 则(x,y)处像素值设为0,否则设为maxval;
即: d s t ( x , y ) = { 0 s r c ( x , y ) > t h r e s h m a x V a l 其他 即: dst(x, y) = \begin{cases} 0 & src(x, y) > thresh \\ maxVal& 其他 \end{cases} 即:dst(x,y)={0maxValsrc(x,y)>thresh其他
-
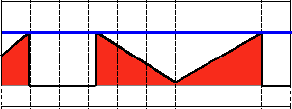
cv.THRESH_TRUNC: 截断操作, 源图像中像素点(x,y)处的像素值大于thresh, 则(x,y)处像素值设为maxval,否则像素值保持不变;
即: d s t ( x , y ) = { m a x V a l s r c ( x , y ) > t h r e s h s r c ( x , y ) 其他 即: dst(x, y) = \begin{cases} maxVal & src(x, y) > thresh \\ src(x, y) & 其他 \end{cases} 即:dst(x,y)={maxValsrc(x,y)src(x,y)>thresh其他
-
cv.THRESH_TOZERO:化零操作,源图像中像素点(x,y)处的像素值大于thresh, 则(x,y)处像素值保持不变,否则像素值设为0;
即: d s t ( x , y ) = { s r c ( x , y ) s r c ( x , y ) > t h r e s h 0 其他 即: dst(x, y) = \begin{cases} src(x, y) & src(x, y) > thresh \\0 & 其他 \end{cases} 即:dst(x,y)={src(x,y)0src(x,y)>thresh其他
-
cv.THRESH_TOZERO_INV:化零操作翻转,源图像中像素点(x,y)处的像素值大于thresh, 则(x,y)处像素值置为0,否则像素值不变;
即: d s t ( x , y ) = { s r c ( x , y ) s r c ( x , y ) > t h r e s h 0 其他 即: dst(x, y) = \begin{cases} src(x, y) & src(x, y) > thresh \\0 & 其他 \end{cases} 即:dst(x,y)={src(x,y)0src(x,y)>thresh其他
此种方法进行阈值变换的步骤如下:
-
读取图像;
-
若图像为非灰度图像则将其转化为灰度图像;
-
调用threshold函数,指定阈值,阈值类型,满足阈值条件的象素应对应的值;
-
显示阈值处理后的图像;
实现代码: C++
/**
 * 简单阈值
 * @param img
 */
void ThresholdTransformation::simpleThreshold(const cv::Mat &img) {
  logger_info("======simple threshold========%d===", img.type());
  Mat img_gray;
//  非灰度图像先转化为灰度
  if (img.type()) {
    cvtColor(img, img_gray, COLOR_RGB2GRAY);
  } else {
    img_gray = img;
  }
  logger_info("======simple threshold========%d===", img_gray.type());
  //简单阈值_二值化
  simple_threshold_binary(img_gray);
  //简单阈值_二值化反转
  simple_threshold_binary_reverse(img_gray);
  //简单阈值_截断
  simple_threshold_trunc(img_gray);
  //简单阈值_化零
  simple_threshold_toZero(img_gray);
  //简单阈值_二化零反转
  simple_threshold_toZero_reverse(img_gray);
}

/**
 * 简单阈值_二值化
 * 二值化操作,源图像中像素点(x,y)处的像素值大于maxval, 则(x,y)处像素值设为maxval,否则设为0;
 * @param img
 */
void ThresholdTransformation::simple_threshold_binary(const cv::Mat &img) {
  logger_info("======simple_threshold_binary===========");
  Mat dst;
  threshold(img, dst, 100, 255, THRESH_BINARY);
  imshow("simple_threshold_binary", dst);
}

/**
 * 二值化翻转操作,与cv.THRESH_BINARY相反, 源图像中像素点(x,y)处的像素值大于maxval, 则(x,y)处像素值设为0,否则设为maxval;
 * @param img
 */
void ThresholdTransformation::simple_threshold_binary_reverse(const cv::Mat &img) {
  logger_info("======simple_threshold_binary_reverse===========");
  Mat dst;
  threshold(img, dst, 100, 255, THRESH_BINARY_INV);
  imshow("simple_threshold_binary_reverse", dst);
}

/**
 * 截断操作, 源图像中像素点(x,y)处的像素值大于maxval, 则(x,y)处像素值设为maxval,否则像素值保持不变;
 * @param img
 */
void ThresholdTransformation::simple_threshold_trunc(const cv::Mat &img) {
  logger_info("======simple_threshold_trunc===========");
  Mat dst;
  threshold(img, dst, 100, 255, THRESH_TRUNC);
  imshow("simple_threshold_trunc", dst);
}

/**
 * 化零操作,源图像中像素点(x,y)处的像素值大于maxval, 则(x,y)处像素值保持不变,否则像素值设为0;
 * @param img
 */
void ThresholdTransformation::simple_threshold_toZero(const cv::Mat &img) {
  logger_info("======simple_threshold_toZero===========");
  Mat dst;
  threshold(img, dst, 100, 255, THRESH_TOZERO);
  imshow("simple_threshold_toZero", dst);
}

/**
 * 化零操作翻转,源图像中像素点(x,y)处的像素值大于maxval, 则(x,y)处像素值置为0,否则像素值不变;
 * @param img
 */
void ThresholdTransformation::simple_threshold_toZero_reverse(const cv::Mat &img) {
  logger_info("======simple_threshold_toZero_reverse===========");
  Mat dst;
  threshold(img, dst, 100, 255, THRESH_TOZERO_INV);
  imshow("simple_threshold_toZero_reverse", dst);
}
实现代码: Python
def simple_threshold(origin_img):
    logger.log.info("====simple threshold=======")
    # 非灰度图像转化维灰度图像

    gray_image = cv.cvtColor(origin_img, cv.COLOR_BGR2GRAY)

    # 简单阈值_二值化
    binary = simple_threshold_binary(gray_image)
    # 简单阈值_二值化反转
    binary_reverse = simple_threshold_binary_reverse(gray_image)
    # 简单阈值_截断
    trunc = simple_threshold_trunc(gray_image)
    # 简单阈值_化零
    to_zero = simple_threshold_to_zero(gray_image)
    # 简单阈值_二化零反转
    to_zero_reverse = simple_threshold_to_zero_reverse(gray_image)

    titles = ['Original Image', "GRAY", 'BINARY', 'BINARY_INV', 'TRUNC', 'TO_ZERO', 'TO_ZERO_INV']
    images = [cv.cvtColor(origin_img, cv.COLOR_BGR2RGB), gray_image, binary, binary_reverse, trunc, to_zero,
              to_zero_reverse]
    for i in range(7):
        plt.subplot(3, 3, i + 1), plt.imshow(images[i], 'gray', vmin=0, vmax=255)
        plt.title(titles[i])
        plt.xticks([]), plt.yticks([])
    plt.show()

    key = cv.waitKey(0)
    while key != ord('q'):
        key = cv.waitKey(0)

    cv.destroyAllWindows()


# 二值化操作,源图像中像素点(x,y)处的像素值大于maxval, 则(x,y)处像素值设为maxval,否则设为0;
def simple_threshold_binary(gray_image):
    ret, dst = cv.threshold(gray_image, 100, 255, cv.THRESH_BINARY)
    cv.imshow("simple_threshold_binary", dst)
    return dst


#  二值化翻转操作,与cv.THRESH_BINARY相反, 源图像中像素点(x,y)处的像素值大于maxval, 则(x,y)处像素值设为0,否则设为maxval;
def simple_threshold_binary_reverse(gray_image):
    ret, dst = cv.threshold(gray_image, 100, 255, cv.THRESH_BINARY_INV)
    cv.imshow("simple_threshold_binary_reverse", dst)
    return dst


# 截断操作, 源图像中像素点(x,y)处的像素值大于maxval, 则(x,y)处像素值设为maxval,否则像素值保持不变;
def simple_threshold_trunc(gray_image):
    ret, dst = cv.threshold(gray_image, 100, 255, cv.THRESH_TRUNC)
    cv.imshow("simple_threshold_trunc", dst)
    return dst


# 化零操作,源图像中像素点(x,y)处的像素值大于maxval, 则(x,y)处像素值保持不变,否则像素值设为0;
def simple_threshold_to_zero(gray_image):
    ret, dst = cv.threshold(gray_image, 100, 255, cv.THRESH_TOZERO)
    cv.imshow("simple_threshold_to_zero", dst)
    return dst


# 化零操作翻转,源图像中像素点(x,y)处的像素值大于maxval, 则(x,y)处像素值置为0,否则像素值不变;
def simple_threshold_to_zero_reverse(gray_image):
    ret, dst = cv.threshold(gray_image, 100, 255, cv.THRESH_TOZERO)
    cv.imshow("simple_threshold_to_zero", dst)
    return dst
阈值转化后的图像如下所示:
adaptive thresholding
simple thresholding只是简单的把图像像素根据固定阈值区分,这样的二值区分比较粗糙。可能会导致图像的信息与特征完全无法提取,或者漏掉一些关键的信息。从下图中看到,图中的背景色无法完全去除,不便于提取图中的人物
自适应阈值是根据像素的邻域块的像素值分布来确定该像素位置上的二值化阈值。这样做的好处:
-
每个像素位置处的二值化阈值不是固定不变的,而是由其周围邻域像素的分布来决定的;
-
亮度较高的图像区域的二值化阈值通常会较高,而亮度低的图像区域的二值化阈值则会相适应的变小;
-
不同亮度、对比度、纹理的局部图像区域将会拥有相对应的局部二值化阈值;
采用adaptive thresholding处理后:
相对于simple thresholding阈值固定,adaptive thresholding由一个固定的阈值和一个可调节的均值决定。均值指某像素点周围一些像素点的均值。如下图所示adaptive thresholding二值化后的效果明显优于simple thresholding的,
void cv::adaptiveThreshold(InputArray     src,  #数组表示的源图像, 图像是单通道8bit/32bit浮点型数组
                           OutputArray     dst, #数组表示的目标图像 与源图像同大小,同类型
                           double     maxValue, #阈值类型为THRESH_BINARY,THRESH_BINARY_INV时满足条件的像素点设置为maxValue
                           int     adaptiveMethod, #邻域内计算阈值的自适应算法, ADAPTIVE_THRESH_MEAN_C 或 ADAPTIVE_THRESH_GAUSSIAN_C
                           int     thresholdType, #阈值二值化类型必须为THRESH_BINARY 或THRESH_BINARY_INV
                           int     blockSize, #分割计算阈值的像素邻域大小,邻域大小,3、5、7 取奇数
                           double     C #一个偏移值调整量,用均值和高斯计算阈值后,再减这个值就是最终阈值。
                          )
adaptive thresholding使用的自适应算法有:
-
ADAPTIVE_THRESH_MEAN_C: 阈值T(x,y)是像素(x,y)邻域块 b l o c k S i z e × b l o c k S i z e blockSize×blockSize blockSize×blockSize的均值与常量C的差;
-
ADAPTIVE_THRESH_GAUSSIAN_C: 阈值T(x,y)是像素(x,y)邻域块blockSize×blockSize的高斯加权和与常量C的差
adaptive thresholding使用的阈值类型有:
-
THRESH_BINARY: 二值化操作,源图像中像素点(x,y)处的像素值大于像素点处的阈值, 则(x,y)处像素值设为maxval,否则设为0;
d s t ( x , y ) = { m a x V a l u e s r c ( x , y ) > T ( x , y ) 0 其他 ,其中 T ( x , y ) 为像素 ( x , y ) 计算得到的阈值 dst(x,y) = \begin{cases} maxValue & src(x,y) > T(x, y) \\\ 0 & 其他 \end{cases}, 其中T(x,y)为像素(x,y)计算得到的阈值 dst(x,y)={maxValue 0src(x,y)>T(x,y)其他,其中T(x,y)为像素(x,y)计算得到的阈值
-
THRESH_BINARY_INV :二值化翻转操作,与cv.THRESH_BINARY相反, 源图像中像素点(x,y)处的像素值大于像素点处的阈值, 则(x,y)处像素值设为0,否则设为maxval;
d s t ( x , y ) = { 0 s r c ( x , y ) > T ( x , y ) m a x V a l u e 其他 ,其中 T ( x , y ) 为像素 ( x , y ) 计算得到的阈值 dst(x,y) = \begin{cases} 0& src(x,y) > T(x, y) \\\ maxValue & 其他 \end{cases}, 其中T(x,y)为像素(x,y)计算得到的阈值 dst(x,y)={0 maxValuesrc(x,y)>T(x,y)其他,其中T(x,y)为像素(x,y)计算得到的阈值
此种方法进行阈值变换的步骤如下:
-
读取图像;
-
若图像为非灰度图像则将其转化为灰度图像;
-
调用adaptiveThreshold函数,指定阈值,自适应算法,阈值类型,邻域块大小,修正常量,满足阈值条件的象素应对应的值;
-
显示阈值处理后的图像;
实现代码: C++
/**
 * 自适应阈值
 * @param img
 */
void ThresholdTransformation::adaptiveThresholding(const Mat &img) {
  logger_info("======adaptiveThresholding========%d===", img.channels());
  Mat img_gray;
  //  非灰度图像先转化为灰度
  if (img.channels() == 3) {
    cvtColor(img, img_gray, COLOR_RGB2GRAY);
  } else {
    img_gray = img;
  }
  logger_info("======adaptiveThresholding========%d===", img_gray.channels());
  //  自适应阈值-二值化操作 邻域均值
  adaptive_threshold_mean_binary(img_gray);
  //  自适应阈值-二值化翻转操作 邻域均值
  adaptive_threshold_mean__binary_reverse(img_gray);

  //  自适应阈值-二值化操作 高斯加权和
  adaptive_threshold_gaussian_binary(img_gray);

//  自适应阈值-二值化翻转操作 高斯加权和
  adaptive_threshold_gaussian__binary_reverse(img_gray);
}
/**
 * 自适应阈值-二值化操作 邻域均值
 * @param img
 */
void ThresholdTransformation::adaptive_threshold_mean_binary(const Mat &img) {
  logger_info("======adaptive_threshold_mean_binary===========");
  Mat dst;
  adaptiveThreshold(img, dst, 255, ADAPTIVE_THRESH_MEAN_C, THRESH_BINARY, 11, -30);
  imshow("adaptive_threshold_mean_binary", dst);
}

/**
 * 自适应阈值-二值化翻转操作 邻域均值
 * @param img
 */
void ThresholdTransformation::adaptive_threshold_mean__binary_reverse(const Mat &img) {
  logger_info("======adaptive_threshold_mean__binary_reverse===========");
  Mat dst;
  adaptiveThreshold(img, dst, 255, ADAPTIVE_THRESH_MEAN_C, THRESH_BINARY_INV, 11, -30);
  imshow("adaptive_threshold_mean__binary_reverse", dst);
}

/**
 * 自适应阈值-二值化操作 高斯加权和
 * @param img
 */
void ThresholdTransformation::adaptive_threshold_gaussian_binary(const Mat &img) {
  logger_info("======adaptive_threshold_gaussian_binary===========");
  Mat dst;
  adaptiveThreshold(img, dst, 255, ADAPTIVE_THRESH_GAUSSIAN_C, THRESH_BINARY, 11, -30);
  imshow("adaptive_threshold_gaussian_binary", dst);
}

/**
 * 自适应阈值-二值化翻转操作 高斯加权和
 * @param img
 */
void ThresholdTransformation::adaptive_threshold_gaussian__binary_reverse(const Mat &img) {
  logger_info("======adaptive_threshold_gaussian__binary_reverse===========");
  Mat dst;
  adaptiveThreshold(img, dst, 255, ADAPTIVE_THRESH_GAUSSIAN_C, THRESH_BINARY_INV, 11, -30);
  imshow("adaptive_threshold_gaussian__binary_reverse", dst);
}
实现代码: Python
# 自适应阈值
def adaptive_thresholding(origin_img):
    logger.log.info("====adaptive threshold=======")
    # 非灰度图像转化维灰度图像
    if origin_img.shape[2] == 3:
        gray_image = cv.cvtColor(origin_img, cv.COLOR_BGR2GRAY)
    else:
        gray_image = origin_img

    # 自适应阈值-二值化操作 邻域均值
    mean_binary = adaptive_threshold_mean_binary(gray_image)
    # 自适应阈值-二值化翻转操作 邻域均值
    mean_binary_reverse = adaptive_threshold_mean_binary_inverse(gray_image)
    # 自适应阈值-二值化操作 高斯加权和
    gaussian_binary = adaptive_threshold_gaussian_binary(gray_image)
    # 自适应阈值-二值化翻转操作 高斯加权和
    gaussian_binary_reverse = adaptive_threshold_gaussian_binary_inverse(gray_image)

    titles = ['Original Image', "GRAY", 'MEAN_BINARY', 'MEAN_BINARY_INV', 'GAUSSIAN_BINARY', 'GAUSSIAN_BINARY_INV']
    images = [cv.cvtColor(origin_img, cv.COLOR_BGR2RGB), gray_image, mean_binary, mean_binary_reverse, gaussian_binary,
              gaussian_binary_reverse]
    for i in range(6):
        plt.subplot(2, 3, i + 1), plt.imshow(images[i], 'gray', vmin=0, vmax=255)
        plt.title(titles[i])
        plt.xticks([]), plt.yticks([])
    plt.show()

    key = cv.waitKey(0)
    while key != ord('q'):
        key = cv.waitKey(0)

    cv.destroyAllWindows()


def adaptive_threshold_mean_binary(gray_image):
    dst = cv.adaptiveThreshold(gray_image, 255, cv.ADAPTIVE_THRESH_MEAN_C, cv.THRESH_BINARY, 11, -30)
    cv.imshow("adaptive_threshold_mean_binary", dst)
    return dst


def adaptive_threshold_mean_binary_inverse(gray_image):
    dst = cv.adaptiveThreshold(gray_image, 255, cv.ADAPTIVE_THRESH_MEAN_C, cv.THRESH_BINARY_INV, 11, -30)
    cv.imshow("adaptive_threshold_mean_binary_inverse", dst)
    return dst


def adaptive_threshold_gaussian_binary(gray_image):
    dst = cv.adaptiveThreshold(gray_image, 255, cv.ADAPTIVE_THRESH_GAUSSIAN_C, cv.THRESH_BINARY, 11, -30)
    cv.imshow("adaptive_threshold_gaussian_binary", dst)
    return dst


def adaptive_threshold_gaussian_binary_inverse(gray_image):
    dst = cv.adaptiveThreshold(gray_image, 255, cv.ADAPTIVE_THRESH_GAUSSIAN_C, cv.THRESH_BINARY_INV, 11, -30)
    cv.imshow("adaptive_threshold_gaussian_binary_inverse", dst)
    return dst
Otsu’s thresholding
在simple thresholding和adaptive thresholding阈值处理方法中,阈值是人为选择的,此时的阈值选择具有较大的随机性,Otsu’s thresholding能自动确定合适的阈值从而避免阈值选择的随意性。
对模态图像(图像中仅有两种不同的象素点组成),做simple thresholding, adaptive thresholding变换后的效果如下所示,从变换后的效果看出:因阈值选择的随意性导致双模态图像采用这两种阈值变换明显无法准确分离目标对象。
为解决上述问题引入了Otsu’s thresholding。变换后可得到图像如下所示,可以看出该方法二值化后的图像效果明显优于simple thresholding和adaptive thresholding。
Otsu’s thresholding通过使用如下公式来找到合适的阈值t,该阈值位于两峰值之间,这使得类间的方差最小。
σ w 2 ( t ) = q 1 ( t ) σ 1 2 ( t ) + q 2 ( t ) σ 2 2 ( t ) \sigma_w^2(t) = q_1(t)\sigma_1^2(t)+q_2(t)\sigma_2^2(t) σw2(t)=q1(t)σ12(t)+q2(t)σ22(t)
其中:
q 1 ( t ) = ∑ i = 1 t P ( i ) & q 2 ( t ) = ∑ i = t + 1 I P ( i ) q_1(t) = \sum_{i=1}^{t} P(i) \quad \& \quad q_2(t) = \sum_{i=t+1}^{I} P(i) q1(t)=i=1∑tP(i)&q2(t)=i=t+1∑IP(i)
μ 1 ( t ) = ∑ i = 1 t i P ( i ) q 1 ( t ) & μ 2 ( t ) = ∑ i = t + 1 I i P ( i ) q 2 ( t ) \mu_1(t) = \sum_{i=1}^{t} \frac{iP(i)}{q_1(t)} \quad \& \quad \mu_2(t) = \sum_{i=t+1}^{I} \frac{iP(i)}{q_2(t)} μ1(t)=i=1∑tq1(t)iP(i)&μ2(t)=i=t+1∑Iq2(t)iP(i)
σ 1 2 ( t ) = ∑ i = 1 t [ i − μ 1 ( t ) ] 2 P ( i ) q 1 ( t ) & σ 2 2 ( t ) = ∑ i = t + 1 I [ i − μ 2 ( t ) ] 2 P ( i ) q 2 ( t ) \sigma_1^2(t) = \sum_{i=1}^{t} [i-\mu_1(t)]^2 \frac{P(i)}{q_1(t)} \quad \& \quad \sigma_2^2(t) = \sum_{i=t+1}^{I} [i-\mu_2(t)]^2 \frac{P(i)}{q_2(t)} σ12(t)=i=1∑t[i−μ1(t)]2q1(t)P(i)&σ22(t)=i=t+1∑I[i−μ2(t)]2q2(t)P(i)
此种方法进行阈值变换的步骤如下:
-
读取图像;
-
若图像为非灰度图像则将其转化为灰度图像;
-
调用threshold函数,调用threshold函数,指定阈值,阈值类型,满足阈值条件的象素应对应的值;
-
显示阈值处理后的图像;
实现代码: C++
/**
 *
 * @param img
 */
void ThresholdTransformation::otsuThresholding(const Mat &img) {
  logger_info("======otsuThresholding===========");
  Mat img_gray;
  //  非灰度图像先转化为灰度
  if (img.channels() == 3) {
    cvtColor(img, img_gray, COLOR_RGB2GRAY);
  } else {
    img_gray = img;
  }
  logger_info("======adaptiveThresholding========%d===", img_gray.channels());
//
  otsu_thresholding_binary(img_gray);
  otsu_thresholding_binary_after_gaussian_blur(img_gray);
}

/**
 *
 * @param img
 */
void ThresholdTransformation::otsu_thresholding_binary(const Mat &img) {
  logger_info("======otsu_thresholding_binary===========");
  Mat dst;
  threshold(img, dst, 0, 255, THRESH_TOZERO_INV + THRESH_OTSU);
  imshow("otsu_thresholding_binary", dst);
}

/**
 *
 * @param img
 */
void ThresholdTransformation::otsu_thresholding_binary_after_gaussian_blur(const Mat &img) {
  logger_info("======otsu_thresholding_binary_after_gaussian_blur===========");
  Mat dst;
  Mat blur;
  GaussianBlur(img, blur, Size(5, 5), 0);
  threshold(blur, dst, 0, 255, THRESH_TOZERO_INV + THRESH_OTSU);
  imshow("otsu_thresholding_binary_after_gaussian_blur", dst);
}
实现代码: python
def otsu_thresholding(origin_img):
    logger.log.info("====otsu_thresholding=======")
    # 非灰度图像转化维灰度图像
    if origin_img.shape[2] == 3:
        gray_image = cv.cvtColor(origin_img, cv.COLOR_BGR2GRAY)
    else:
        gray_image = origin_img

    # global thresholding
    ret1, th1 = cv.threshold(gray_image, 127, 255, cv.THRESH_BINARY)
    # Otsu's thresholding
    ret2, th2 = cv.threshold(gray_image, 0, 255, cv.THRESH_BINARY + cv.THRESH_OTSU)
    # Otsu's thresholding after Gaussian filtering
    blur = cv.GaussianBlur(gray_image, (5, 5), 0)
    ret3, th3 = cv.threshold(blur, 0, 255, cv.THRESH_BINARY + cv.THRESH_OTSU)
    # plot all the images and their histograms
    images = [gray_image, 0, th1,
              gray_image, 0, th2,
              blur, 0, th3]
    titles = ['Original Noisy Image', 'Histogram', 'Global Thresholding (v=127)',
              'Original Noisy Image', 'Histogram', "Otsu's Thresholding",
              'Gaussian filtered Image', 'Histogram', "Otsu's Thresholding"]
    for i in range(3):
        plt.subplot(3, 3, i * 3 + 1), plt.imshow(images[i * 3], 'gray')
        plt.title(titles[i * 3]), plt.xticks([]), plt.yticks([])
        plt.subplot(3, 3, i * 3 + 2), plt.hist(images[i * 3].ravel(), 256)
        plt.title(titles[i * 3 + 1]), plt.xticks([]), plt.yticks([])
        plt.subplot(3, 3, i * 3 + 3), plt.imshow(images[i * 3 + 2], 'gray')
        plt.title(titles[i * 3 + 2]), plt.xticks([]), plt.yticks([])
    plt.show()

    key = cv.waitKey(0)
    while key != ord('q'):
        key = cv.waitKey(0)

    cv.destroyAllWindows()
参考文献:
- https://docs.opencv.org/4.6.0/db/d8e/tutorial_threshold.html
- https://docs.opencv.org/4.6.0/d7/d4d/tutorial_py_thresholding.html
- http://szeliski.org/Book/


