NovelAi本地部署版详细教程
这几天NovelAI模型泄露了。那就凑巧了,就以这个模型为例。完整的介绍一下stable-diffusion-webui本地安装方法几乎是从零开始说起(除了不教操作系统安装)。WebUI就是stable-diffusion的可视化版本!
本地安装的好处是:
- 无限出图不受限。
- 作品尺度不受限。
当然本地安装,相比直接用别人的网页版,难度也增加了。
一、硬件环境
- 1、有N卡的电脑。N卡指的是NVIDIA显卡,1060以上,显存至少在4G,内存16G以上,当然越大越好。
2、硬盘空间准备好至少20G。(Python环境、支持库、模型,特别是模型大概有5.5G)
3. 需要一定的硬件配置,N卡显存4G+
4. 要保证网络通畅,能高速外网那种最好。
5. 需要一些耐心,懂一些命令行。
客观条件准备充分的情况下,根据这篇文章一步一步来,就可以了,大部分人都能搞定。闲话不多说了,搞起来。
为了让新手能更加清晰,我把步骤分得细一点。
二 安装步骤
1、. 安装GIT
2、 安装Python
3、 获取源代码
4、 设置脚本变量
5、 运行脚本
6、 图片生成
7、 其他
1. 安装GIT
GIT是非常流行的分布式代码版本管理工具,因为安装脚本默认使用git来获取源代码,所以要先安装一下这个软件。软件安装虽然有很多选项,但是对我们而言一切默认即可。一路点下一步即可。
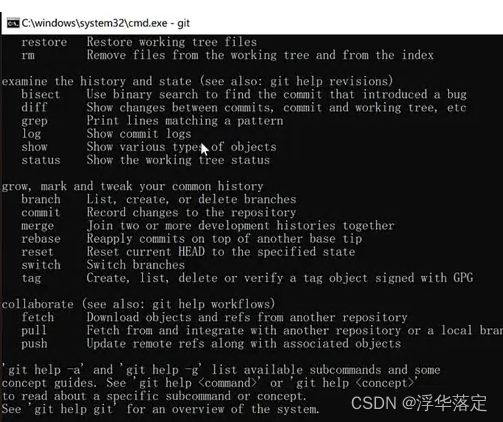
安装完成之后,按win+R或者开始里面搜cmd,打开命令行。输入git后回车。如果出现很多英文帮助信息就证明git一键安装成功并生效。这一步非必须,一般来说安装完了99.9%生效。
2. 安装Python
Python是目前非常流行的编程语音,大部分AI方面的研究都使用该语言,AI画画也不例外。为了支持Python语言的运行,就需要安装Python软件。
Python的安装分默认和自定义。这里选默认一键安装即可。唯一需要注意的是:记住安装路径。
3. 获取源代码
下载这个工程有两种方式:
第一种,直接利用上面安装好的git工具下载即可
git clone https://github.com/AUTOMATIC1111/stable-diffusion-webui.git

第二种:直接下载工程的zip包,然后解压 ,访问GitHub - AUTOMATIC1111/stable-diffusion-webui: Stable Diffusion web UI,然后点击“Download ZIP”,下载完成后进行解压,解压出来后和第一种方式下载的工程是一模一样的。
源代码就是软件或者APP还没有编译之前的样子。目前没有很好的编译版本,所以要用源代码,获取源代码其实可以直接在github上下载压缩包。这里既然装了git,就用一行命令搞定吧。打开系统自带的CMD工具,输入盘符+冒号,切换磁盘,然后输入git获取原代码:
D:git
clone https://github.com/AUTOMATIC1111/stable-diffusion-webui.git
命令执行完会出现Done,然后在D盘自动创建一个stable-diffusion-webui的文件。
4. 设置脚本变量
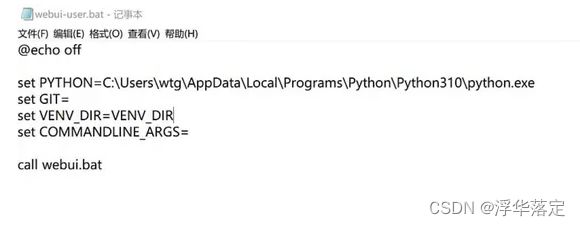
打开stable-diffusion-webui文件夹,里面可以找到一个webui-user.bat的文件,没设置扩展名可见的就没有后面的.bat,这个没关系。
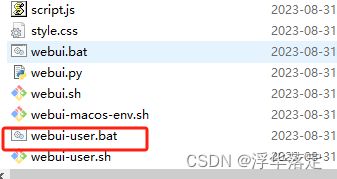
通过右键->编辑,打开这个文件。在 set PYTHON=后面填入你的Python路径。第二步记录的路径+python.exe就是完整的路径。
VENV_DIR=后面填入一个英文名。脚本运行之后会在当前目录生成一个同名文件夹。所有相关的依赖都放在这个文件夹里面。
5. 修改工程launch.py文件
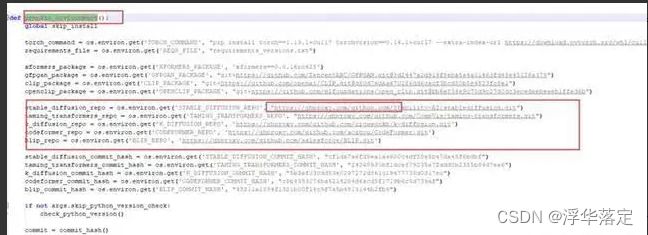
将函数prepare_environment里面的其中五行由https://github.com为https://ghproxy.com/https://github.com
替换后截图:
6. 运行脚本
修改并保存webui-user 之后,双击该文件,就会开始全自动安装了。网络通畅的情况下无需人工干预。但是很可能会遇到网络问题!
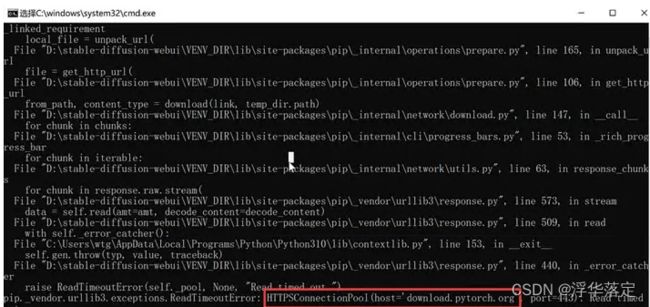
比如出现HttpsConnection这个提示,就是因为网络问题中断了。解决这个问题的方法就是重新运行脚本。当然有快速访问外网的辅助工具那就事半功倍了。
搞个梯子 ,开启cmd代理
在 cmd 环境下设置代理可能不是很常用,但是某些情况下还是可能会用到,比如使用node的npm或者conda配置环境时等等
设置CMD代理模式,只在当前窗口临时有效,不属于系统变量,窗口关闭后就会失效
win+R快捷键,并输入CMD,打开cmd,输入以下指令即可:
set http_proxy=http://192.168.0.18:10809

set https_proxy=http://192.168.0.18:10809
重新执行webui.bat依然报错
RuntimeError: Couldn't install open_clip.
Command: "J:\workspace-open\stable-diffusion-webui\stable-diffusion-webui-master\venv_robin\Scripts\python.exe" -m pip install https://github.com/mlfoundations/open_clip/archive/bb6e834e9c70d9c27d0dc3ecedeebeaeb1ffad6b.zip --prefer-binary
Error code: 1
stdout: Collecting https://github.com/mlfoundations/open_clip/archive/bb6e834e9c70d9c27d0dc3ecedeebeaeb1ffad6b.zip

stderr:   ERROR: HTTP error 403 while getting https://github.com/mlfoundations/open_clip/archive/bb6e834e9c70d9c27d0dc3ecedeebeaeb1ffad6b.zip
ERROR: Could not install requirement https://github.com/mlfoundations/open_clip/archive/bb6e834e9c70d9c27d0dc3ecedeebeaeb1ffad6b.zip because of HTTP error 403 Client Error: Forbidden for url: https://github.com/mlfoundations/open_clip/archive/bb6e834e9c70d9c27d0dc3ecedeebeaeb1ffad6b.zip for URL https://github.com/mlfoundations/open_clip/archive/bb6e834e9c70d9c27d0dc3ecedeebeaeb1ffad6b.zip
手动安装open_clip
如何手动安装cli步骤如下:
1、直接到github下载 open_clip 代码到本地,并进行本地安装
2、从github将open_clip的源文件下载到本地,这一步可以使用git clone也可以直接下载zip文件。下载后,解压(如果用git clone就不需要)到E:\stable diffusion\stable-diffusion-webui\venv_robin\Scripts目录下(E:\stable diffusion\stable-diffusion-webui是你stable diffusion webui项目的根目录,这个地址只是我电脑中的,请根据自己放的位置调整);
3、打开cmd,cd到E:\stable diffusion\stable-diffusion-webui\venv\Scripts\下,执行 activate进入虚拟环境,然后继续cd open_clip-main 进入代码包下,接着执行命令:
…\python.exe setup.py build install安装open_clip;

4、步骤3安装完成后,继续执行 …\pip install clip,至此,open_cli安装完成
![[图片]](http://img.e-com-net.com/image/info8/9a2e70c462b447318b95548aa1dd3b5e.jpg)
5、接着又重新执行webui.bat,这时发现就不会卡在cli安装这里。
依然报错
Cloning Stable Diffusion into J:\workspace-open\stable-diffusion-webui\stable-diffusion-webui-master\repositories\stable-diffusion-stability-ai...
Cloning into 'J:\workspace-open\stable-diffusion-webui\stable-diffusion-webui-master\repositories\stable-diffusion-stability-ai'...
fatal: unable to access 'https://github.com/Stability-AI/stablediffusion.git/': OpenSSL SSL_read: Connection was reset, errno 10054
起因
执行git push 的时候遇到了’: OpenSSL SSL_read: Connection was reset, errno 10054,的错误提示
经过
这是服务器的SSL证书没有经过第三方机构的签署,所以报错。
错误原因可能是网络不稳定,连接超时造成的,如果你试了多次还是报这个错误,建议你执行下面的命令
解决方案
git config --global http.sslVerify "false"
执行后,重新点击webui-user.bat
网络问题解决之后,就会一步一步往下安装,直到我们遇到第二个问题。
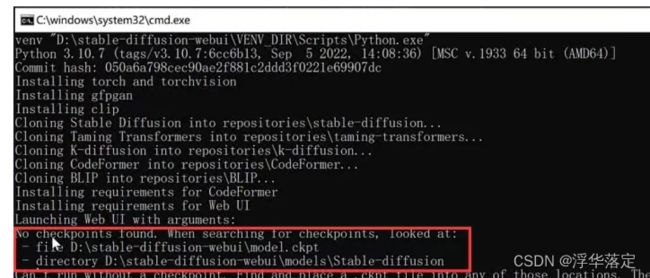
这其实并不是问题。之所以提示是因为我们第一次安装,还没有准备好模型。此时只需将泄露的NovelAI的模型放到指定路径就可以了。红色框中提供了两个自定的路径。一般是放在后面的Stable-diffusion中,文件名名无所谓,只要后缀是CKPT即可。
遇到第二个问题 pip需要升级

J:\workspace-open\stable-diffusion-webui\stable-diffusion-webui-master\venv_robin\Scripts\python.exe -m pip install --upgrade pip
执行此脚本后 , 重现双击webui-user.bat运行
7. 下载模型
模型下载地址:https://civitai.com/,需要科学上网,这里我选择下载古风模型,点击进入后,然后下载,每一个模型都是几个GB

下载好的模型,需要把它放到工程目录下的models\Stable-diffusion\目录下
比如,我工程目录是:E:\stable diffusion\stable-diffusion-webui
那么需要把模型放到:E:\stable diffusion\stable-diffusion-webui\models\Stable-diffusion下面
下载渠道二:novelaileak
原磁力链:magnet:?xt=urn:btih:5bde442da86265b670a3e5ea3163afad2c6f8ecc&dn=novelaileak&tr=udp%3A%2F%2Ftracker.opentrackr.org%3A1337%2Fannounce&tr=udp%3A%2F%2F9.rarbg.com%3A2810%2Fannounce&tr=udp%3A%2F%2Ftracker.openbittorrent.com%3A6969%2Fannounce&tr=http%3A%2F%2Ftracker.openbittorrent.com%3A80%2Fannounce&tr=udp%3A%2F%2Fopentracker.i2p.rocks%3A6969%2Fannounce
在novelai中找到model.ckpt复制到上面的路径中之后,重新双击webui-user。
经过一段时间的等待之后,看到Running On就证明已经安装完成,并且启动成功了。复制后面的本地网址,在浏览其中打开就可以看到可视化的界面了。
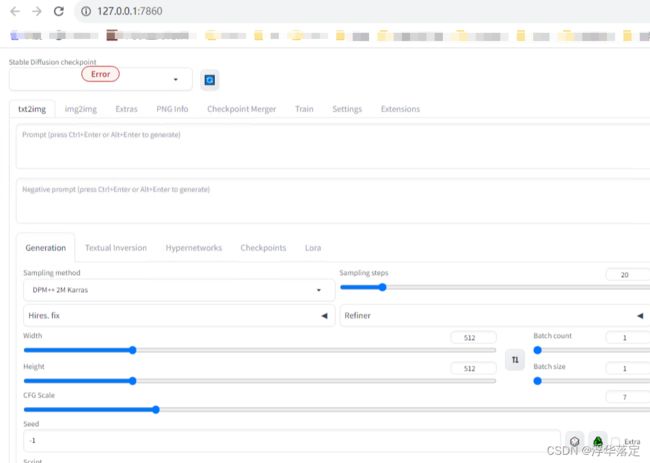
界面是英文版,选项又特别多,第一次看会有点懵。其实并不用太担心!
8. 图片生成
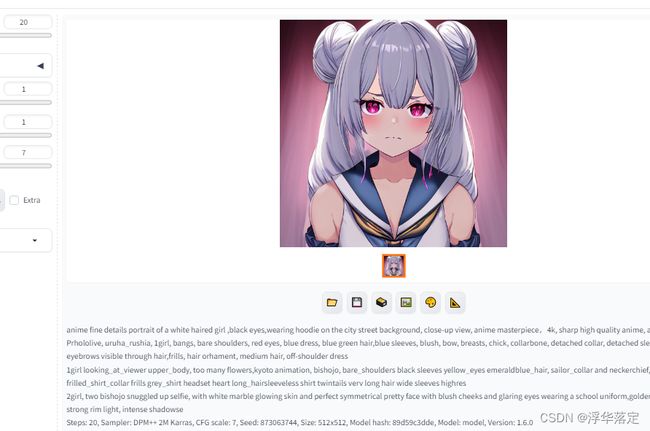
除了界面之后,只需要把提示词(Prompt)输入到相应的位置,然后点击Generate稍等片刻就可以生成图片了。刚开始肯定不知道输入什么词吧,可以参考一下内容:
anime fine details portrait of a white haired girl ,black eyes,wearing hoodie on the city street background, close-up view, anime masterpiece,4k, sharp high quality anime, artstation
Prhololive, uruha_rushia, 1girl, bangs, bare shoulders, red eyes, blue dress, blue green hair,blue sleeves, blush, bow, breasts, chick, collarbone, detached collar, detached sleeves, double bun, eyebrows visible through hair,frills, hair orhament, medium hair, off-shoulder dress
1girl looking_at_viewer upper_body, too many flowers,kyoto animation, bishojo, bare_shoulders black sleeves yellow_eyes emeraldblue_hair, sailor_collar and neckerchief, detached_sleeves frilled_shirt_collar frills grey_shirt headset heart long_hairsleeveless shirt twintails verv long hair wide sleeves highres
2girl, two bishojo snuggled up selfie, with white marble glowing skin and perfect symmetrical pretty face with blush cheeks and glaring eyes wearing a school uniform,golden hour lighting, strong rim light, intense shadowse
生成图片报错
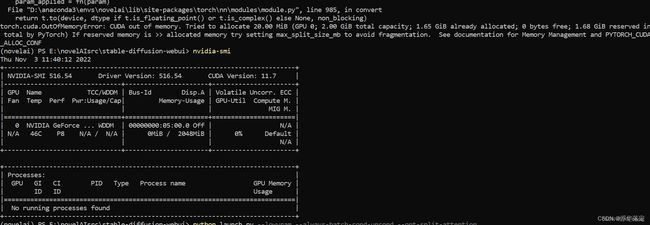
torch.cuda.OutOfMemoryError: CUDA out of memory. Tried to allocate 20.00 MiB (GPU 0; 4.00 GiB total capacity; 3.26 GiB already allocated; 0 bytes free; 3.30 GiB reserved in total by PyTorch) If reserved memory is >> allocated memory try setting max_split_size_mb to avoid fragmentation. See documentation for Memory Management and PYTORCH_CUDA_ALLOC_CONF
机器硬件
![[图片]](http://img.e-com-net.com/image/info8/eaed336832834bbbba737ad64e97cb79.jpg)
intel hd graphics 630
但是我出现了torch.cuda.OutOfMemoryError的错误,尤其是我使用nvidia-smi查看发现gpu内存没有被占用。
在网上查怎么办,大多解决方法是中止进程释放资源,但是我根本没有进程(no running processes found)
我灵机一动,意识到是不是自己的GPU显存太小,只有2G。确实如此。
Novelai 保姆级免费部署和最全使用教程 (含资源与常见错误大全)(一) 三.常见错误
如果显存小于等于4GB可通过低速模式进行运行,请参考以下建议:
翻译自stable-diffusion-webui wiki)
- 如果您有 4GB VRAM,并且想要制作 512x512(或最高 640x640)的图像,请使用 。–medvram
- 如果您有 4GB VRAM 并希望制作 512x512 图像,但出现内存不足错误,请改用 。–medvram–medvram --opt-split-attention
- 如果您有 4GB VRAM 并想要制作 512x512 图像,但仍然收到内存不足错误,请改用。–lowvram --always-batch-cond-uncond --opt-split-attention
- 如果您有 4GB 的 VRAM,并且希望使图像比 使用 时更大,请使用 。–medvram–lowvram --opt-split-attention
- 如果您有更多 VRAM,并且想要制作比通常更大的图像(例如,1024x1024 而不是 512x512),请使用 。您也可以使用,但效果可能几乎不明显。–medvram --opt-split-attention–lowvram
- 否则,请勿使用其中任何一个。
我在运行的时候输入:
python launch.py --lowvram --always-batch-cond-uncond --opt-split-attention 成功运行。
效果图如下,完全搞不懂生成的是个啥

生成图片不理想,在Negative prompt 添加如下关键词
lowres, bad anatomy, bad hands, text,error, missing fngers,extra digt ,fewer digits,cropped, wort quality ,low quality,normal quality, jpeg artifacts,signature,watermark, username, blurry, bad feet
默认情况下生成的图像为512x512,同构下面的Width和Height可以修改图片大小,当然图片越大合成时间就越长,还可以修改Sampling Steps 提示合成质量。
如果你有什么大胆的想法,可以在提示词中加入NSFW。
到这里基本配置和使用就已经完成了。不过对于NovelAI配置,网上的教程中还包含了其他文件的拷贝。
就是将novelaileak\stableckpt\animefull-final-pruned
中的model.ckpt文件重命名为final-pruned.ckpt
将novelaileak\stableckpt
中的animevae.pt改为final-pruned.vae.pt
model.ckpt->final-pruned.ckpt
animevae.pt->final-pruned.vae.pt
然后全部放到
stable-diffusion-webui\models\Stable-diffusion
然后将
novelaileak\stableckpt\modules\modules
中的文件全部复制到
stable-diffusion-webui\models\hypernetworks
复制完成之后关闭之前webui-user的窗口,重新运行,刷新页面。点击页面顶部的Setting进入设置页面,往下滚动找到Stable Diffusion。
在这里选择Checkpoiont 和 hypernetwork 。Checkpoiont 就是不同的模型。hypernetwork 应该是在模型上的微调,就是风格会有一些不一样。作为一个二次元小白,对我而言不选的效果看起来就挺好的。
WebUI有很多选项,我也是刚装完还没深入研究。包括Prompt的提示技巧也有待研究。有兴趣的可以一起交流。

