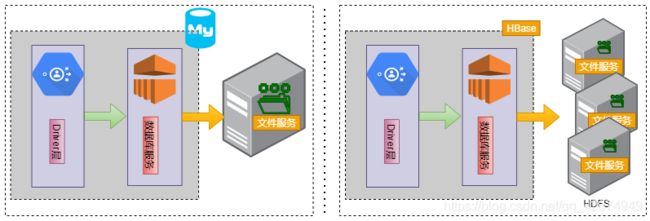
HBase分布式数据库(NoSQL)
Apache HBase
介绍
HBase是一个分布式的、面向列的开源数据库,该技术来源于 Fay Chang 所撰写的Google论文“Bigtable:一个结构化数据的分布式存储系统”。就像Bigtable利用了Google文件系统(File System)所提供的分布式数据存储一样,HBase在Hadoop的HDFS之上提供了类似于Bigtable的能力。
HDFS和HBase之间的关系
HBase的全称Hadoop Database,HBase是构建在HDFS之上的一款数据存储服务,所有的物理数据都是存储在HDFS之上,HBase仅仅是提供了对HDFS上数据的索引能力,继而实现对海量数据的随机读写。相比较于HDFS文件系统仅仅只是提供了海量数据的存储和下载,并不能实现海量数据的交互,例如:用户想修改HDFS中一条文本记录。
HDFS is a distributed file system that is well suited for the storage of large files. Its documentation states that it is not, however, a general purpose file system, and does not provide fast individual record lookups in files. HBase, on the other hand, is built on top of HDFS and provides fast record lookups (and updates) for large tables. This can sometimes be a point of conceptual confusion. HBase internally puts your data in indexed “StoreFiles” that exist on HDFS for high-speed lookups.
什么时候使用HBase
- 用户需要存储海量数据,例如:数十亿条记录
- 大多数RDBMS所具备特性可能HBase都没有例如:数据类型,二级索引,事务,高级查询。用户无法直接将数据迁移到HBase中,需要用户重新设计所有库表。
- 确保用户手里有足够多的硬件,因为HBase在生产环境下需要部署在HDFS的集群上,对于HDFS的集群而言一般来说DataNode节点一般至少需要5台,外加上一个NameNode节点。
First, make sure you have enough data. If you have hundreds of millions or billions of rows, then HBase is a good candidate. If you only have a few thousand/million rows, then using a traditional RDBMS might be a better choice due to the fact that all of your data might wind up on a single node (or two) and the rest of the cluster may be sitting idle.
Second, make sure you can live without all the extra features that an RDBMS provides (e.g., typed columns, secondary indexes, transactions, advanced query languages, etc.) An application built against an RDBMS cannot be “ported” to HBase by simply changing a JDBC driver, for example. Consider moving from an RDBMS to HBase as a complete redesign as opposed to a port.
Third, make sure you have enough hardware. Even HDFS doesn’t do well with anything less than 5 DataNodes (due to things such as HDFS block replication which has a default of 3), plus a NameNode.
HBase can run quite well stand-alone on a laptop - but this should be considered a development configuration only.
特性
HBase是NoSQL数据库中面向列存储的代表,在NoSQL设计中遵循CP设计原则(CAP定理),其中HBase之所以能够高性能的一个非常关键的因素。面向列存储旨在提升系统磁盘利用率和IO利用率,其中所有NoSQL产品一般都能够很好提升磁盘利用率,因为所有的NoSQL产品都支持稀疏存储(null值不占用存储空间)。
环境构建
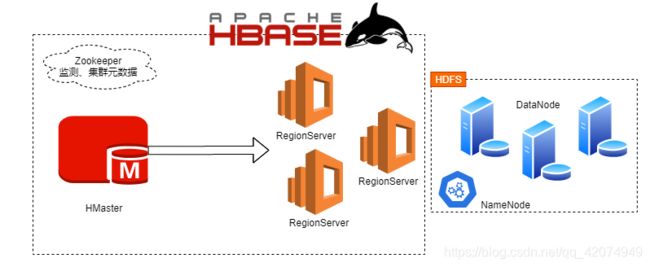
架构草图
单机搭建
1、安装配置Zookeeper,确保Zookeeper运行 ok
- 上传zookeeper的安装包,并解压在/usr目录下
[root@CentOS ~]# tar -zxf zookeeper-3.4.6.tar.gz -C /usr/
- 配置Zookepeer的zoo.cfg
[root@CentOS ~]# cd /usr/zookeeper-3.4.6/
[root@CentOS zookeeper-3.4.6]# cp conf/zoo_sample.cfg conf/zoo.cfg
[root@CentOS zookeeper-3.4.6]# vi conf/zoo.cfg
# The number of milliseconds of each tick
tickTime=2000
# The number of ticks that the initial
# synchronization phase can take
initLimit=10
# The number of ticks that can pass between
# sending a request and getting an acknowledgement
syncLimit=5
# the directory where the snapshot is stored.
# do not use /tmp for storage, /tmp here is just
# example sakes.
dataDir=/root/zkdata
# the port at which the clients will connect
clientPort=2181
# the maximum number of client connections.
# increase this if you need to handle more clients
#maxClientCnxns=60
#
# Be sure to read the maintenance section of the
# administrator guide before turning on autopurge.
#
# http://zookeeper.apache.org/doc/current/zookeeperAdmin.html#sc_maintenance
#
# The number of snapshots to retain in dataDir
#autopurge.snapRetainCount=3
# Purge task interval in hours
# Set to "0" to disable auto purge feature
#autopurge.purgeInterval=1
- 创建zookeeper的数据目录
[root@CentOS zookeeper-3.4.6]# mkdir /root/zkdata
- 启动zookeeper服务
[root@CentOS zookeeper-3.4.6]# ./bin/zkServer.sh start zoo.cfg
JMX enabled by default
Using config: /usr/zookeeper-3.4.6/bin/../conf/zoo.cfg
Starting zookeeper ... STARTED
- 查看zookeeper服务是否正常
[root@CentOS zookeeper-3.4.6]# jps
7121 Jps
6934 QuorumPeerMain
[root@CentOS zookeeper-3.4.6]# ./bin/zkServer.sh status zoo.cfg
JMX enabled by default
Using config: /usr/zookeeper-3.4.6/bin/../conf/zoo.cfg
Mode: standalone
2、启动HDFS
start-dfs.sh
3、安装配置HBase服务
- 上传Hbase安装包,并解压到/usr目录下
[root@CentOS ~]# tar -zxf hbase-1.2.4-bin.tar.gz -C /usr/
- 配置Hbase环境变量HBASE_HOME
[root@CentOS ~]# vi .bashrc


JAVA_HOME=/usr/java/latest
HADOOP_HOME=/usr/hadoop-2.9.2/
HBASE_HOME=/usr/hbase-1.2.4/
PATH=$PATH:$JAVA_HOME/bin:$HADOOP_HOME/bin:$HADOOP_HOME/sbin:$HBASE_HOME/bin
CLASSPATH=.
export JAVA_HOME
export PATH
export CLASSPATH
export HADOOP_HOME
export HBASE_HOME

[root@CentOS ~]# source .bashrc
- 配置hbase-site.xml
[root@CentOS ~]# cd /usr/hbase-1.2.4/
[root@CentOS hbase-1.2.4]# vi conf/hbase-site.xml
<property>
    <name>hbase.rootdirname>
    <value>hdfs://CentOS2:9000/hbasevalue>
property>
<property>
    <name>hbase.cluster.distributedname>
    <value>truevalue>
property>
<property>
    <name>hbase.zookeeper.quorumname>
    <value>CentOS2value>
property>
<property>
    <name>hbase.zookeeper.property.clientPortname>
    <value>2181value>
property>
- 修改hbase-env.sh,将
HBASE_MANAGES_ZK修改为false
[root@CentOS hbase-1.2.4]# grep -i HBASE_MANAGES_ZK conf/hbase-env.sh
# export HBASE_MANAGES_ZK=true
将128行的注释去掉,并且将true修改为false,大家可以在选择模式下使用set nu显示行号
[root@CentOS hbase-1.2.4]# vi conf/hbase-env.sh
:/MANA
export HBASE_MANAGES_ZK=false
- 修改regionservers配置文件
[root@CentOS hbase-1.2.4]# vi conf/regionservers
CentOS2
- 启动Hbase
[root@CentOS ~]# start-hbase.sh
starting master, logging to /usr/hbase-1.2.4//logs/hbase-root-master-CentOS.out
Java HotSpot(TM) 64-Bit Server VM warning: ignoring option PermSize=128m; support was removed in 8.0
Java HotSpot(TM) 64-Bit Server VM warning: ignoring option MaxPermSize=128m; support was removed in 8.0
CentOS: starting regionserver, logging to /usr/hbase-1.2.4//logs/hbase-root-regionserver-CentOS.out
- 检验是否安装
[root@CentOS ~]# jps
13328 Jps
12979 HRegionServer
6934 QuorumPeerMain
8105 NameNode
12825 HMaster
8253 DataNode
8509 SecondaryNameNode
然后可以访问:http://主机:16010访问HBase主页
技巧
一般HBase数据存储在HDFS上和Zookeeper上 ,由于用户的非正常操作导致Zookeeper数据和HDFS中的数据不一致,这可能会导致无法正常使用HBase的服务,因此大家可以考虑:
- 停掉HBase服务
[root@CentOS ~]# stop-hbase.sh
stopping hbase...........
- 清理HDFS和Zookeeper的残留数据
[root@CentOS ~]# hbase clean
Usage: hbase clean (--cleanZk|--cleanHdfs|--cleanAll)
Options:
        --cleanZk   cleans hbase related data from zookeeper.
        --cleanHdfs cleans hbase related data from hdfs.
        --cleanAll  cleans hbase related data from both zookeeper and hdfs.
例如这里我们需要同时清理HDFS和Zookeeper中的数据,因此我们可以执行如下指令
[root@CentOS ~]# hbase clean --cleanAll
- 重新启动HBase服务即可
[root@CentOS ~]# start-hbase.sh
starting master, logging to /usr/hbase-1.2.4//logs/hbase-root-master-CentOS.out
Java HotSpot(TM) 64-Bit Server VM warning: ignoring option PermSize=128m; support was removed in 8.0
Java HotSpot(TM) 64-Bit Server VM warning: ignoring option MaxPermSize=128m; support was removed in 8.0
CentOS: starting regionserver, logging to /usr/hbase-1.2.4//logs/hbase-root-regionserver-CentOS.out
如果用户希望排查具体启动失败的原因,可以使用tail -f指令查看HBase安装目录下的logs/目录下文件
※HBase Shell
1、进入HBase的交互窗口
[root@CentOS ~]# hbase shell
...
HBase Shell; enter 'help' for list of supported commands.
Type "exit" to leave the HBase Shell
Version 1.2.4, rUnknown, Wed Feb 15 18:58:00 CST 2019

hbase(main):001:0>
2、查看HBase提供交互命令
hbase(main):001:0> help
HBase Shell, version 1.2.4, rUnknown, Wed Feb 15 18:58:00 CST 2017
Type 'help "COMMAND"', (e.g. 'help "get"' -- the quotes are necessary) for help on a specific command.
Commands are grouped. Type 'help "COMMAND_GROUP"', (e.g. 'help "general"') for help on a command group.
常用命令
1、查看系统状态
hbase(main):001:0> status
1 active master, 0 backup masters, 1 servers, 0 dead, 2.0000 average load

hbase(main):024:0> status 'simple'
active master:  CentOS:16000 1602225645114
0 backup masters
1 live servers
    CentOS:16020 1602225651113
        requestsPerSecond=0.0, numberOfOnlineRegions=2, usedHeapMB=18, maxHeapMB=449, numberOfStores=2, numberOfStorefiles=2, storefileUncompressedSizeMB=0, storefileSizeMB=0, memstoreSizeMB=0, storefileIndexSizeMB=0, readRequestsCount=9, writeRequestsCount=4, rootIndexSizeKB=0, totalStaticIndexSizeKB=0, totalStaticBloomSizeKB=0, totalCompactingKVs=0, currentCompactedKVs=0, compactionProgressPct=NaN, coprocessors=[MultiRowMutationEndpoint]
0 dead servers
Aggregate load: 0, regions: 2
2、查看系统版本
[root@CentOS ~]# hbase version
HBase 1.2.4
Source code repository file:///usr/hbase-1.2.4 revision=Unknown
Compiled by root on Wed Feb 15 18:58:00 CST 2017
From source with checksum b45f19b5ac28d9651aa2433a5fa33aa0
或者
hbase(main):002:0> version
1.2.4, rUnknown, Wed Feb 15 18:58:00 CST 2017
3、查看当前HBase的用户
hbase(main):003:0> whoami
root (auth:SIMPLE)
    groups: root
namespace操作
Hbase底层通过namespace管理表,所有的表都需要指定所属的namespace,这里的namespace类似于MySQL当中的database的概念,如果用户不指定namespace,默认所有的表会自动归类为default命名空间。
1、查看所有的namespace
List all namespaces in hbase. Optional regular expression parameter could be used to filter the output.
hbase(main):006:0> list_namespace
NAMESPACE
default # 默认namespace
hbase # 系统namespace,不要改动
2 row(s) in 0.0980 seconds

hbase(main):007:0> list_namespace '^de.*'
NAMESPACE
default
1 row(s) in 0.0200 seconds
2、查看namespace下的表
hbase(main):010:0> list_namespace_tables 'hbase'
TABLE
meta
namespace
2 row(s) in 0.0460 seconds
其中meta会保留所有用户表的Region信息内容;namespace表存储系统有关namespace相关性内容,大家可以简单的理解这两张表属于系统的索引表,一般由HMaster服务负责操作这两张表。
3、创建一张namespace
后面的词典信息是可以省略的,注意在HBase中=>表示的=
hbase(main):013:0> create_namespace 'baizhi',{'Creator'=>'zhangsan'}
 create_namespace 'baizhi',{'Creator'=>'zhangsan'}

0 row(s) in 0.0720 seconds
4、查看namescpace信息
hbase(main):018:0> describe_namespace 'baizhi'
DESCRIPTION
{NAME => 'baizhi', Creator => 'zhangsan'}
1 row(s) in 0.0090 seconds
5、修改namespace
目前HBase针对于namespace仅仅提供了词典的修改
hbase(main):015:0> alter_namespace 'baizhi',{METHOD=>'set','Creator' => 'lisi'}
0 row(s) in 0.0500 seconds
删除creator属性
hbase(main):019:0> alter_namespace 'baizhi',{METHOD=>'unset',NAME => 'Creator'}
0 row(s) in 0.0220 seconds
6、删除namespace
hbase(main):022:0> drop_namespace 'baizhi'
0 row(s) in 0.0530 seconds

hbase(main):023:0> list_namespace
NAMESPACE
default
hbase
2 row(s) in 0.0260 seconds
该命令无法删除系统namespace例如:hbase、default,仅仅只能删除空的namespace。
DDL操作
- create
Creates a table. Pass a table name, and a set of column family specifications (at least one), and, optionally, table configuration. Column specification can be a simple string (name), or a dictionary (dictionaries are described below in main help output), necessarily including NAME attribute.
hbase(main):027:0> create 'baizhi:t_user','cf1','cf2'
0 row(s) in 2.3230 seconds

=> Hbase::Table - baizhi:t_user
如果按照上诉方式创建的表,所有配置都是默认配置,可以通过UI或者脚本查看
hbase(main):028:0> describe 'baizhi:t_user'
Table baizhi:t_user is ENABLED
baizhi:t_user
COLUMN FAMILIES DESCRIPTION
{NAME => 'cf1', BLOOMFILTER => 'ROW', VERSIONS => '1', IN_MEMORY => 'false', KEEP_DELETED_CELLS => 'FALSE', DATA_BLOCK_ENCODING => 'NONE', TTL => 'FOREVER', COMPRESSION => 'NONE', MIN_VERSIONS => '0', BLOCK
CACHE => 'true', BLOCKSIZE => '65536', REPLICATION_SCOPE => '0'}
{NAME => 'cf2', BLOOMFILTER => 'ROW', VERSIONS => '1', IN_MEMORY => 'false', KEEP_DELETED_CELLS => 'FALSE', DATA_BLOCK_ENCODING => 'NONE', TTL => 'FOREVER', COMPRESSION => 'NONE', MIN_VERSIONS => '0', BLOCK
CACHE => 'true', BLOCKSIZE => '65536', REPLICATION_SCOPE => '0'}
2 row(s) in 0.0570 seconds
当然我们可以通过建表的时候指定列簇一些配置信息
hbase(main):032:0> create 'baizhi:t_user',{NAME=>'cf1',VERSIONS => '3',IN_MEMORY => 'true',BLOOMFILTER => 'ROWCOL'},{NAME=>'cf2',TTL => 300 }
 create 'baizhi:t_user',{NAME=>'cf1',VERSIONS=>'3',IN_MEMORY=>                                                                                                                              'true',BLOOMFILTER=>'ROWCOL'},{NAME='cf2',TTL=>300}
0 row(s) in 2.2930 seconds

=> Hbase::Table - baizhi:t_user
- drop
hbase(main):029:0> drop 'baizhi:t_user'

ERROR: Table baizhi:t_user is enabled. Disable it first.

Here is some help for this command:
Drop the named table. Table must first be disabled:
  hbase> drop 't1'
  hbase> drop 'ns1:t1'


hbase(main):030:0> disable 'baizhi:t_user'
0 row(s) in 2.2700 seconds

hbase(main):031:0> drop 'baizhi:t_user'
0 row(s) in 1.2670 seconds
- enable_all/disable_all
hbase(main):029:0> disable_all 'baizhi:.*'
baizhi:t_user

Disable the above 1 tables (y/n)?
y
1 tables successfully disabled

hbase(main):030:0> enable
enable                     enable_all                 enable_peer                enable_table_replication
hbase(main):030:0> enable_all 'baizhi:.*'
baizhi:t_user

Enable the above 1 tables (y/n)?
y
1 tables successfully enabled
- list
该指令仅仅返回用户表信息
hbase(main):031:0> list
TABLE
baizhi:t_user
1 row(s) in 0.0390 seconds

=> ["baizhi:t_user"]
- alter
hbase(main):041:0> alter 'baizhi:t_user',{NAME=>'cf2',TTL=>100}
Updating all regions with the new schema...
1/1 regions updated.
Done.
0 row(s) in 2.1740 seconds

hbase(main):042:0> alter 'baizhi:t_user',NAME=>'cf2',TTL=>120
Updating all regions with the new schema...
1/1 regions updated.
Done.
0 row(s) in 2.1740 seconds
DML操作
- put - 既可以做插入也可做更新,后面可以选择性给时间戳,如果不给系统自动计算。
hbase(main):047:0> put 'baizhi:t_user','001','cf1:name','zhangsan'
0 row(s) in 0.1330 seconds

hbase(main):048:0> get 'baizhi:t_user','001'
COLUMN                                               CELL
 cf1:name                                            timestamp=1602230783435, value=zhangsan
1 row(s) in 0.0330 seconds

hbase(main):055:0> put 'baizhi:t_user','001','cf1:sex','true',1602230783435
0 row(s) in 0.0160 seconds


hbase(main):049:0> put 'baizhi:t_user','001','cf1:name','zhangsan1',1602230783434
0 row(s) in 0.0070 seconds

hbase(main):056:0> get 'baizhi:t_user','001'
COLUMN                                               CELL
 cf1:name                                            timestamp=1602230783435, value=zhangsan
 cf1:sex                                             timestamp=1602230783435, value=true
不难看出,一般情况下用户无需指定时间戳,因为默认情况下,HBase会优先返回时间戳最新的记录。一般使用默认策略,系统会自动追加当前时间作为Cell插入数据库时间。
- get - 获取某个Column的所有Cell信息
hbase(main):056:0> get 'baizhi:t_user','001'
COLUMN                                               CELL
 cf1:name                                            timestamp=1602230783435, value=zhangsan
 cf1:sex                                             timestamp=1602230783435, value=true
默认返回该Rowkey的所有Cell的最新记录,如果用户需要获取所有的记录,可以在后面指定VERSIONS参数
hbase(main):057:0> get 'baizhi:t_user','001',{COLUMN=>'cf1',VERSIONS=>100}
COLUMN                                               CELL
 cf1:name                                            timestamp=1602230783435, value=zhangsan
 cf1:name                                            timestamp=1602230783434, value=zhangsan1
 cf1:sex                                             timestamp=1602230783435, value=true
如果含有多个列簇的值,可以使用[]
hbase(main):059:0> get 'baizhi:t_user','001',{COLUMN=>['cf1:name','cf2'],VERSIONS=>100}
COLUMN                                               CELL
 cf1:name                                            timestamp=1602230783435, value=zhangsan
 cf1:name                                            timestamp=1602230783434, value=zhangsan1
3 row(s) in 0.0480 seconds
如果需要查询指定时间版本的数据,可以指定TIMESTAMP参数
hbase(main):067:0> get 'baizhi:t_user','001',{TIMESTAMP=>1602230783434}
COLUMN                                               CELL
 cf1:name                                            timestamp=1602230783434, value=zhangsan1
1 row(s) in 0.0140 seconds
如果用户需要查询指定版本区间的数据,该区间是前闭后开时间区间
hbase(main):071:0> get 'baizhi:t_user', '001', {COLUMN => 'cf1:name', TIMERANGE => [1602230783434, 1602230783436], VERSIONS =>3}
COLUMN                                               CELL
 cf1:name                                            timestamp=1602230783435, value=zhangsan
 cf1:name                                            timestamp=1602230783434, value=zhangsan1
2 row(s) in 0.0230 seconds
- delete/delteall
如果delete后面跟时间戳,删除当前时间戳以及该时间戳之前的所有版本数据,去过不给时间戳,直接删除最新版本以及最新版本之前的数据。
hbase(main):079:0> delete 'baizhi:t_user','001' ,'cf1:name', 1602230783435
0 row(s) in 0.0700 seconds
deleteall删除row对应的所有列
hbase(main):092:0> deleteall 'baizhi:t_user','001'
0 row(s) in 0.0280 seconds
- append -主要是针对字符串结果,在后面追加内容
hbase(main):104:0> append 'baizhi:t_user','001','cf1:follower','001,'
0 row(s) in 0.0260 seconds

hbase(main):104:0> append 'baizhi:t_user','001','cf1:follower','002,'
0 row(s) in 0.0260 seconds

hbase(main):105:0> get 'baizhi:t_user','001',{COLUMN=>'cf1',VERSIONS=>100}
COLUMN                                               CELL
 cf1:follower                                        timestamp=1602232477546, value=001,002,
 cf1:follower                                        timestamp=1602232450077, value=001

2 row(s) in 0.0090 seconds
- incr -基于数字类型做加法运算
hbase(main):107:0> incr 'baizhi:t_user','001','cf1:salary',2000
COUNTER VALUE = 2000
0 row(s) in 0.0260 seconds

hbase(main):108:0> incr 'baizhi:t_user','001','cf1:salary',2000
COUNTER VALUE = 4000
0 row(s) in 0.0150 seconds
- count- 统计一张表里的rowkey数目
hbase(main):111:0> count 'baizhi:t_user'
1 row(s) in 0.0810 seconds

=> 1
- scan - 扫描表
直接扫描默认返回左右column
hbase(main):116:0> scan 'baizhi:t_user'
ROW                                                  COLUMN+CELL
 001                                                 column=cf1:follower, timestamp=1602232477546, value=002,003,004,005,
 001                                                 column=cf1:salary, timestamp=1602232805425, value=\x00\x00\x00\x00\x00\x00\x0F\xA0
 002                                                 column=cf1:name, timestamp=1602233218583, value=lisi
 002                                                 column=cf1:salary, timestamp=1602233236927, value=\x00\x00\x00\x00\x00\x00\x13\x88
2 row(s) in 0.0130 seconds
一般用户可以指定查询的column和版本号
hbase(main):118:0> scan 'baizhi:t_user',{COLUMNS=>['cf1:salary']}
ROW                                                  COLUMN+CELL
 001                                                 column=cf1:salary, timestamp=1602232805425, value=\x00\x00\x00\x00\x00\x00\x0F\xA0
 002                                                 column=cf1:salary, timestamp=1602233236927, value=\x00\x00\x00\x00\x00\x00\x13\x88
2 row(s) in 0.0090 seconds
还可以指定版本或者版本区间
hbase(main):120:0> scan 'baizhi:t_user',{COLUMNS=>['cf1:salary'],TIMERANGE=>[1602232805425,1602233236927]}
ROW                                                  COLUMN+CELL
 001                                                 column=cf1:salary, timestamp=1602232805425, value=\x00\x00\x00\x00\x00\x00\x0F\xA0
1 row(s) in 0.0210 seconds
用户还可以使用LIMIT配合STARTROW完成分页
hbase(main):121:0> scan 'baizhi:t_user',{LIMIT=>2}
ROW                                                  COLUMN+CELL
 001                                                 column=cf1:follower, timestamp=1602232477546, value=002,003,004,005,
 001                                                 column=cf1:salary, timestamp=1602232805425, value=\x00\x00\x00\x00\x00\x00\x0F\xA0
 002                                                 column=cf1:name, timestamp=1602233218583, value=lisi
 002                                                 column=cf1:salary, timestamp=1602233236927, value=\x00\x00\x00\x00\x00\x00\x13\x88
2 row(s) in 0.0250 seconds

hbase(main):123:0> scan 'baizhi:t_user',{LIMIT=>2,STARTROW=>'002'}
ROW                                                  COLUMN+CELL
 002                                                 column=cf1:name, timestamp=1602233218583, value=lisi
 002                                                 column=cf1:salary, timestamp=1602233236927, value=\x00\x00\x00\x00\x00\x00\x13\x88
1 row(s) in 0.0170 seconds
上面的例子中系统默认返回的是ROWKEY大于或者等于002的所有记录,如果用户需要查询的小于或者等于002的所有记录可以添加REVERSED属性
hbase(main):124:0> scan 'baizhi:t_user',{LIMIT=>2,STARTROW=>'002',REVERSED=>true}
ROW                                                  COLUMN+CELL
 002                                                 column=cf1:name, timestamp=1602233218583, value=lisi
 002                                                 column=cf1:salary, timestamp=1602233236927, value=\x00\x00\x00\x00\x00\x00\x13\x88
 001                                                 column=cf1:follower, timestamp=1602232477546, value=002,003,004,005,
 001                                                 column=cf1:salary, timestamp=1602232805425, value=\x00\x00\x00\x00\x00\x00\x0F\xA0
2 row(s) in 0.0390 seconds
√Java API
需要在maven工程中导入如下依赖:
<dependency>
    <groupId>org.apache.hbasegroupId>
    <artifactId>hbase-clientartifactId>
    <version>1.2.4version>
dependency>

<dependency>
    <groupId>org.apache.hbasegroupId>
    <artifactId>hbase-serverartifactId>
    <version>1.2.4version>
dependency>
在链接HBase服务的时候,我们需要创建Connection对象,该对象主要负责实现数据的DML,如果用户需要执行DDL指令需要创建Admin对象,如果需要执行DML创建Table对象
public class HBaseDDLTest {
    private Admin admin;
    private Connection conn;
    private Table table;
    @Before
    public void before() throws IOException {
        Configuration conf= HBaseConfiguration.create();
        conf.set(HConstants.ZOOKEEPER_QUORUM,"CentOS");
        conf.set(HConstants.ZOOKEEPER_CLIENT_PORT,"2181");
        conn= ConnectionFactory.createConnection(conf);
        admin=conn.getAdmin();
        table=conn.getTable(TableName.valueOf("baizhi:t_user"));
    }


    @After
    public void after() throws IOException {
        admin.close();
        conn.close();
    }
}
常规访问
DDL
1、查看所有的namespace
NamespaceDescriptor[] descriptors = admin.listNamespaceDescriptors();
for (NamespaceDescriptor descriptor : descriptors) {
    System.out.println(descriptor.getName());
}
2、创建Namespace
//create_namespace 'zpark' ,{‘creator’=>'zhangsan'}
NamespaceDescriptor namespaceDescriptor=NamespaceDescriptor.create("zpark")
    .addConfiguration("creator","zhangsan")
    .build();
admin.createNamespace(namespaceDescriptor);
3、修改Namespace
//alter_namespace 'zpark' ,{METHOD=>'unset',NAME=>'creator'}
NamespaceDescriptor namespaceDescriptor=NamespaceDescriptor.create("zpark")
    .removeConfiguration("creator")
    .build();
admin.modifyNamespace(namespaceDescriptor);
4、查看namespace下的表
//list_namespace_tables 'baizhi'
TableName[] tables = admin.listTableNamesByNamespace("baizhi");
for (TableName tableName : tables) {
    System.out.println(tableName.getNameAsString());
}
5、删除namespace
//drop_namespace 'zpark'
admin.deleteNamespace("zpark");
6、创建table
//create 'zpark:t_user',{NAME=>'cf1',VERSIONS=>3,IN_MEMORY=>true,BLOOMFILTER=>'ROWCOL'},{NAME=>'cf2',TTL=>60}
HTableDescriptor tableDescriptor=new HTableDescriptor(TableName.valueOf("zpark:t_user"));

HColumnDescriptor cf1=new HColumnDescriptor("cf1");
cf1.setMaxVersions(3);
cf1.setInMemory(true);
cf1.setBloomFilterType(BloomType.ROWCOL);

HColumnDescriptor cf2=new HColumnDescriptor("cf2");
cf2.setTimeToLive(60);

tableDescriptor.addFamily(cf1);
tableDescriptor.addFamily(cf2);

admin.createTable(tableDescriptor);
7、删除Table
//disable 'zpark:t_user'
//drop  'zpark:t_user'
TableName tableName = TableName.valueOf("zpark:t_user");
boolean exists = admin.tableExists(tableName);
if(!exists){
    return;
}
boolean disabled = admin.isTableDisabled(tableName);
if(!disabled){
    admin.disableTable(tableName);
}
admin.deleteTable(tableName);
8、截断表 删除表的数据但保留表的结构
TableName tableName = TableName.valueOf("baizhi:t_user");
boolean disabled = admin.isTableDisabled(tableName);
if(!disabled){
    admin.disableTable(tableName);
}
admin.truncateTable(tableName,false);
DML
1、插入/更新-put
String[] depts=new String[]{"search","sale","manager"};
for(Integer i=0;i<=1000;i++){
    DecimalFormat format = new DecimalFormat("0000");
    String rowKey=format.format(i);

    Put put=new Put(toBytes(rowKey));
    put.addColumn(toBytes("cf1"),toBytes("name"),toBytes("user"+rowKey));
    put.addColumn(toBytes("cf1"),toBytes("salary"),toBytes(100.0 * i));
    put.addColumn(toBytes("cf1"),toBytes("dept"),toBytes(depts[new Random().nextInt(3)]));

    table.put(put);
}
String[] depts=new String[]{"search","sale","manager"};
//实现批量更新、修改
BufferedMutator bufferedMutator = conn.getBufferedMutator(TableName.valueOf("baizhi:t_user"));
for(Integer i=1000;i<=2000;i++){
    DecimalFormat format = new DecimalFormat("0000");
    String rowKey=format.format(i);

    Put put=new Put(toBytes(rowKey));
    put.addColumn(toBytes("cf1"),toBytes("name"),toBytes("user"+rowKey));
    put.addColumn(toBytes("cf1"),toBytes("salary"),toBytes(100.0 * i));
    put.addColumn(toBytes("cf1"),toBytes("dept"),toBytes(depts[new Random().nextInt(3)]));

    bufferedMutator.mutate(put);
    if(i%500==0 && i>1000){//执行刷新
        bufferedMutator.flush();
    }
}
bufferedMutator.close();
2、查询某一行(含有多个Cell)-get
(默认最新一行数据)
Get get=new Get(toBytes("2000"));

Result result = table.get(get);//一行记录,包含多个Cell

byte[] bname = result.getValue(toBytes("cf1"), toBytes("name"));
byte[] bdept = result.getValue(toBytes("cf1"), toBytes("dept"));
byte[] bsalary = result.getValue(toBytes("cf1"), toBytes("salary"));

String name= Bytes.toString(bname);
String dept= Bytes.toString(bdept);
Double salary= Bytes.toDouble(bsalary);

System.out.println(name+" "+dept+" "+salary);
获取Result的Cell方式有很多,其中getValue方法最常用,用户必须制定Column信息。对于Result遍历可以使用CellScanner或者listCells方法(可以获取多版本数据)
Get get=new Get(toBytes("2000"));

Result result = table.get(get);//一行记录,包含多个Cell
CellScanner cellScanner = result.cellScanner();
while (cellScanner.advance()){
    Cell cell = cellScanner.current();
    //获取Cell的列名字
    String qualifier = Bytes.toString(cloneQualifier(cell));
    //获取值
    Object value=null;
    if(qualifier.equals("salary")){
        value=toDouble(cloneValue(cell));
    }else{
        value=Bytes.toString(cloneValue(cell));
    }
    //获取RowKey
    String rowKey=Bytes.toString(cloneRow(cell));
    System.out.println(rowKey+" "+qualifier+" "+value);
}
Get get=new Get(toBytes("2000"));

Result result = table.get(get);//一行记录,包含多个Cell
List<Cell> cells = result.listCells();
for (Cell cell : cells) {
    //获取Cell的列名字
    String qualifier = Bytes.toString(cloneQualifier(cell));
    //获取值
    Object value=null;
    if(qualifier.equals("salary")){
        value=toDouble(cloneValue(cell));
    }else{
        value=Bytes.toString(cloneValue(cell));
    }
    //获取RowKey
    String rowKey=Bytes.toString(cloneRow(cell));
    System.out.println(rowKey+" "+qualifier+" "+value);
}
用户还可以使用getColumnCells方法获取某个Cell的多个版本的数据
Get get=new Get(toBytes("2000"));
get.setMaxVersions(3);
get.setTimeStamp(1602299440060L);

Result result = table.get(get);//一行记录,包含多个Cell

List<Cell> salaryCells = result.getColumnCells(toBytes("cf1"), toBytes("salary"));
for (Cell salaryCell : salaryCells) {
    System.out.println(toDouble(cloneValue(salaryCell)));
}
3、给某个Cell增加值-incr
Increment increment=new Increment(toBytes("2000"));
increment.addColumn(toBytes("cf1"),toBytes("salary"),1000L);
table.increment(increment);
4、删除数据-delete/deleteall
- deleteall
Delete delete=new Delete(toBytes("2000"));
table.delete(delete);
- delete
Delete delete=new Delete(toBytes("2000"));
delete.addColumn(toBytes("cf1"),toBytes("salary"));
table.delete(delete);
5、表扫描-scan
Scan scan = new Scan();


ResultScanner scanner = table.getScanner(scan);
Iterator<Result> resultIterator = scanner.iterator();
while (resultIterator.hasNext()){
    Result result = resultIterator.next();

    byte[] bname = result.getValue(toBytes("cf1"), toBytes("name"));
    byte[] bdept = result.getValue(toBytes("cf1"), toBytes("dept"));
    byte[] bsalary = result.getValue(toBytes("cf1"), toBytes("salary"));

    String name= Bytes.toString(bname);
    String dept= Bytes.toString(bdept);
    Double salary= Bytes.toDouble(bsalary);
    String rowKey=Bytes.toString(result.getRow());
    System.out.println(rowKey+" " +name+" "+dept+" "+salary);
}
我们可以尝试配置Scan对象定制查询条件,完成复查查询需求
Scan scan = new Scan();

scan.setStartRow(toBytes("1000"));
scan.setStopRow(toBytes("1100"));

//scan.setRowPrefixFilter(toBytes("108"));
Filter filter1=new RowFilter(CompareFilter.CompareOp.EQUAL,new RegexStringComparator("09$"));
Filter filter2=new RowFilter(CompareFilter.CompareOp.EQUAL,new SubstringComparator("80"));
FilterList filter=new FilterList(FilterList.Operator.MUST_PASS_ONE,filter1,filter2);

scan.setFilter(filter);

ResultScanner scanner = table.getScanner(scan);
Iterator<Result> resultIterator = scanner.iterator();
while (resultIterator.hasNext()){
    Result result = resultIterator.next();

    byte[] bname = result.getValue(toBytes("cf1"), toBytes("name"));
    byte[] bdept = result.getValue(toBytes("cf1"), toBytes("dept"));
    byte[] bsalary = result.getValue(toBytes("cf1"), toBytes("salary"));

    String name= Bytes.toString(bname);
    String dept= Bytes.toString(bdept);
    Double salary= Bytes.toDouble(bsalary);
    String rowKey=Bytes.toString(result.getRow());
    System.out.println(rowKey+" " +name+" "+dept+" "+salary);
}
更多Filter参考:https://www.jianshu.com/p/bcc54f63abe4
MapReduce集成
HBase提供了和MapReduce框架集成输入和输出格式TableInputFormat/TableOutputFormat实现。用户只需要按照输入和输出格式定制代码即可。
这里需要注意,由于使用了TableInputFormat所需在任务提交初期,程序需要计算任务的切片信息,因此需要在提交节点上配置HABASE的类路径
[root@CentOS ~]# vi .bashrc
JAVA_HOME=/usr/java/latest
HADOOP_HOME=/usr/hadoop-2.9.2/
HBASE_HOME=/usr/hbase-1.2.4/
PATH=$PATH:$JAVA_HOME/bin:$HADOOP_HOME/bin:$HADOOP_HOME/sbin:$HBASE_HOME/bin
CLASSPATH=.
export JAVA_HOME
export PATH
export CLASSPATH
export HADOOP_HOME
export HBASE_HOME
HBASE_CLASSPATH=$(/usr/hbase-1.2.4/bin/hbase classpath)
HADOOP_CLASSPATH=$HBASE_CLASSPATH:/root/mysql-connector-java-5.1.49.jar
export HADOOP_CLASSPATH
[root@CentOS ~]# source .bashrc
public class AvgSalaryApplication extends Configured implements Tool {
    public int run(String[] strings) throws Exception {
        Configuration conf=getConf();
        conf= HBaseConfiguration.create(conf);
        conf.set(HConstants.ZOOKEEPER_QUORUM,"CentOS");

        conf.setBoolean("mapreduce.map.output.compress",true);
        conf.setClass("mapreduce.map.output.compress.codec", GzipCodec.class, CompressionCodec.class);

        Job job= Job.getInstance(conf,"AvgSalaryApplication");
        job.setJarByClass(AvgSalaryApplication.class);

        job.setInputFormatClass(TableInputFormat.class);
        job.setOutputFormatClass(TableOutputFormat.class);

        TableMapReduceUtil.initTableMapperJob(
                "baizhi:t_user",new Scan(),AvgSalaryMapper.class,
                Text.class,
                DoubleWritable.class,
                job
        );

        TableMapReduceUtil.initTableReducerJob(
                "baizhi:t_result",
                AvgSalaryReducer.class,
                job
        );

        job.setNumReduceTasks(3);

        return job.waitForCompletion(true)?0:1;
    }

    public static void main(String[] args) throws Exception {
        ToolRunner.run(new AvgSalaryApplication(),args);
    }
}
public class AvgSalaryMapper extends TableMapper<Text, DoubleWritable> {
    @Override
    protected void map(ImmutableBytesWritable key, Result value, Context context) throws IOException, InterruptedException {
        String dept= Bytes.toString(value.getValue(Bytes.toBytes("cf1"),Bytes.toBytes("dept")));
        Double salary= Bytes.toDouble(value.getValue(Bytes.toBytes("cf1"),Bytes.toBytes("salary")));

        context.write(new Text(dept),new DoubleWritable(salary));
    }
}
public class AvgSalaryReducer  extends TableReducer<Text, DoubleWritable, NullWritable> {

    @Override
    protected void reduce(Text key, Iterable<DoubleWritable> values, Context context) throws IOException, InterruptedException {
        double sum=0.0;
        int count=0;
        for (DoubleWritable value : values) {
            count++;
            sum+=value.get();
        }
        Put put = new Put(key.getBytes());
        put.addColumn("cf1".getBytes(),"avg".getBytes(),((sum/count)+"").getBytes());

        context.write(null,put);
    }
}
这里需要注意,默认TableInputFormat计算切片数目等于表的Region的数目。
[root@CentOS ~]# hadoop jar HBase-1.0-SNAPSHOT.jar com.baizhi.mapreduce.AvgSalaryApplication
协处理器(高级)
Hbase 作为列族数据库最经常被人诟病的特性包括:无法轻易建立“二级索引”,难以执 行求和、计数、排序等操作。比如,在旧版本的(<0.92)Hbase 中,统计数据表的总行数,需 要使用 Counter 方法,执行一次 MapReduce Job 才能得到。虽然 HBase 在数据存储层中集成 了 MapReduce,能够有效用于数据表的分布式计算。然而在很多情况下,做一些简单的相 加或者聚合计算的时候,如果直接将计算过程放置在 server 端,能够减少通讯开销,从而获 得很好的性能提升。于是,HBase 在 0.92 之后引入了协处理器(coprocessors),实现一些激动 人心的新特性:能够轻易建立二次索引、复杂过滤器(谓词下推)以及访问控制等。
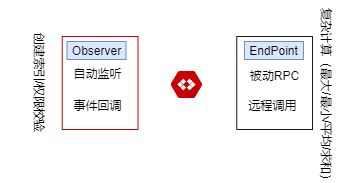
总体来说其包含两种协处理器:Observers和Endpoint
Observer
Observer 类似于传统数据库中的触发器,当发生某些事件的时候这类协处理器会被 Server 端调用。Observer Coprocessor 就是一些散布在 HBase Server 端代码中的 hook 钩子, 在固定的事件发生时被调用。比如:put 操作之前有钩子函数 prePut,该函数在 put 操作执 行前会被 Region Server 调用;在 put 操作之后则有 postPut 钩子函数。
需求:当有用户订阅某个明星的时候,系统能够自动的将该用户添加到该明星的粉丝列表
1、编写观察者
public class UserAppendObServer extends BaseRegionObserver {
    private final static Log LOG= LogFactory.getLog(UserAppendObServer.class);
    static Connection conn = null;
    static {
        Configuration conf = HBaseConfiguration.create();
        conf.set("hbase.zookeeper.quorum", "CentOS");
        try {
            LOG.info("create connection successfully");
            conn = ConnectionFactory.createConnection(conf);
        } catch (IOException e) {
            e.printStackTrace();
        }
    }

    @Override
    public Result preAppend(ObserverContext<RegionCoprocessorEnvironment> e, Append append) throws IOException {
        LOG.info("User Append SomeThing ~~~~~~~~~~~~~~");

        CellScanner cellScanner = append.cellScanner();
        while (cellScanner.advance()){
            Cell cell = cellScanner.current();
            if(Bytes.toString(CellUtil.cloneQualifier(cell)).equals("subscribe")){
                String followerID= Bytes.toString(CellUtil.cloneRow(cell));
                String userID=Bytes.toString(CellUtil.cloneValue(cell));
                userID=userID.substring(0,userID.length()-1);

                Append newAppend=new Append(userID.getBytes());
                newAppend.add("cf1".getBytes(),"followers".getBytes(),(followerID+"|").getBytes());
                Table table = conn.getTable(TableName.valueOf("zpark:t_follower"));
                table.append(newAppend);
                table.close();
                LOG.info(userID+" add a new follower "+followerID);
            }
        }

        return null;
    }
}
2、将代码打包,上传至HDFS
[root@CentOS ~]# hdfs dfs -mkdir /libs
[root@CentOS ~]# hdfs dfs -put HBase-1.0-SNAPSHOT.jar /libs/
3、启动hbase,并且实时查看RegionServer的启动日志
[root@CentOS ~]# rm -rf /usr/hbase-1.2.4/logs/*
[root@CentOS ~]# start-hbase.sh
[root@CentOS ~]# tail -f /usr/hbase-1.2.4/logs/hbase-root-regionserver-CentOS2.log
4、给zpark:t_user添加协处理器
[root@CentOS ~]# hbase shell
hbase(main):001:0> disable 'zpark:t_user'

hbase(main):003:0> alter 'zpark:t_user' , METHOD =>'table_att','coprocessor'=>'hdfs:///libs/HBase-1.0-SNAPSHOT.jar|observer.UserAppendObserver|1001'
Updating all regions with the new schema...
1/1 regions updated.
Done.
0 row(s) in 2.0830 seconds
hbase(main):004:0> enable 'zpark:t_user'
0 row(s) in 1.2890 seconds
参数解释:alter 表名字,METHOD=>'table_att','coprocessor'=>'jar路径|全限定名|优先级|[可选参数]'
5、测试监听器是否生效
hbase(main):005:0> desc 'zpark:t_user'
Table zpark:t_user is ENABLED
zpark:t_user, {TABLE_ATTRIBUTES => {coprocessor$1 => 'hdfs:///libs/HBase-1.0-SNAPSHOT.jar|com.baizhi.observer.UserAppendObServer|1001'}
COLUMN FAMILIES DESCRIPTION
{NAME => 'cf1', BLOOMFILTER => 'ROW', VERSIONS => '1', IN_MEMORY => 'false', KEEP_DELETED_CELLS => 'FALSE', DATA_BLOCK_ENCODING => 'NONE', TTL => 'FOREVER', COMPRESSION => 'NONE', MIN_VERSIONS => '0', BLO
CKCACHE => 'true', BLOCKSIZE => '65536', REPLICATION_SCOPE => '0'}
{NAME => 'cf2', BLOOMFILTER => 'ROW', VERSIONS => '1', IN_MEMORY => 'false', KEEP_DELETED_CELLS => 'FALSE', DATA_BLOCK_ENCODING => 'NONE', TTL => 'FOREVER', COMPRESSION => 'NONE', MIN_VERSIONS => '0', BLO
CKCACHE => 'true', BLOCKSIZE => '65536', REPLICATION_SCOPE => '0'}
2 row(s) in 0.0490 seconds
6、尝试执行Append命令,注意观察日志输出
hbase(main):003:0> append  'zpark:t_user','001','cf1:subscribe','002|'
0 row(s) in 0.2140 seconds
2020-10-10 17:23:20,847 INFO [B.defaultRpcServer.handler=3,queue=0,port=16020] observer.UserAppendObServer: User Append SomeThing ~~~~~~~~~~~~~~
Endpoint
Endpoint 协处理器类似传统数据库中的存储过程,客户端可以调用这些 Endpoint 协处 理器执行一段 Server 端代码,并将 Server 端代码的结果返回给客户端进一步处理,最常见 的用法就是进行聚合操作。
如果没有协处理器,当用户需要找出一张表中的最大数据,即 max 聚合操作,就必须进行全表扫描,在客户端代码内遍历扫描结果,并执行求最大值的 操作。这样的方法无法利用底层集群的并发能力,而将所有计算都集中到 Client 端统一执行, 势必效率低下。
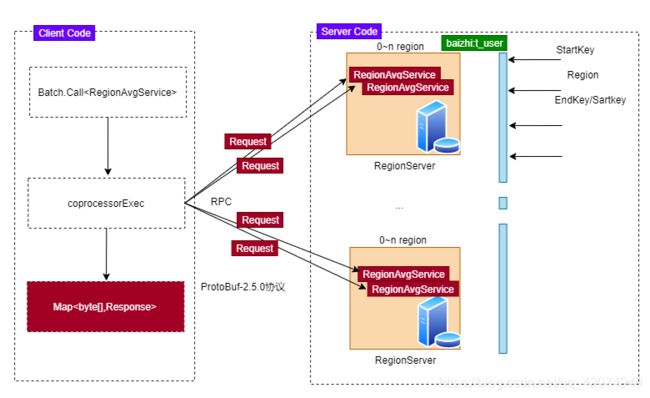
利用 Coprocessor,用户可以将求最大值的代码部署到 HBase Server 端,HBase 将利用底层 cluster 的多个节点并发执行求最大值的操作。在每个 Region 范围内执行求最 大值的代码,将每个 Region 的最大值在 Region Server 端计算出,仅仅将该 max 值返回给客 户端。在客户端进一步将多个 Region 的最大值进一步处理而找到其中的最大值。这样整体 的执行效率就会提高很多。
需求 - 按照部门计算员工的平均薪资。
老版本的 HBase(即 HBase 0.96 之前) 采用 Hadoop RPC 进行进程间通信。在 HBase 0.96 版本以后,引入了新的进程间通信机制 protobuf RPC,基于 Google 公司的 protocol buffer 开源软件。HBase 需要使用 Protobuf 2.5.0 版本。我们需要借助Protobuf生成协议所需的一些代码片段。
1、安装protobuf-2.5.0.tar.gz,目的是能够使用protoc产生代码片段
[root@CentOS ~]# yum install -y gcc-c++
[root@CentOS ~]# tar -zxf protobuf-2.5.0.tar.gz
[root@CentOS ~]# cd protobuf-2.5.0
[root@CentOS protobuf-2.5.0]# ./configure
[root@CentOS protobuf-2.5.0]# make
[root@CentOS protobuf-2.5.0]# make install
2、确保安装成功,用户可以执行
[root@CentOS ~]# protoc --version
libprotoc 2.5.0
3、编写RPC所需的服务和实体类 RegionAvgService.proto
option java_package = "com.baizhi.endpoint";

option java_outer_classname = "RegionAvgServiceInterface";
option java_multiple_files = true;
option java_generic_services = true;
option optimize_for = SPEED;

message Request{
 required string groupFamillyName = 1;
 required string groupColumnName = 2;
 required string avgFamillyName = 3;
 required string avgColumnName = 4;
 required string startRow = 5;
 required string stopRow = 6;
}
message KeyValue{
  required string groupKey=1;
  required int64 count = 2;
  required double sum = 3;
}

message Response{
 repeated KeyValue arrays = 1;
}


service RegionAvgService {
 rpc queryResult(Request)
 returns(Response);
}
[root@CentOS protobuf-2.5.0]# touch RegionAvgService.proto
[root@CentOS protobuf-2.5.0]# vi RegionAvgService.proto
4、生成计算所需的代码片段
[root@CentOS ~]# protoc --java_out=./ RegionAvgService.proto
[root@CentOS ~]# tree com
com
└── baizhi
    └── endpoint
        ├── KeyValue.java
        ├── KeyValueOrBuilder.java
        ├── RegionAvgServiceInterface.java
        ├── RegionAvgService.java
        ├── Request.java
        ├── RequestOrBuilder.java
        ├── Response.java
        └── ResponseOrBuilder.java

2 directories, 8 files
附注:有关proto文件语法的说明参考https://blog.csdn.net/u014308482/article/details/52958148
5、开发所需的远程服务代码
public class UserRegionAvgEndpoint extends RegionAvgService implements Coprocessor, CoprocessorService {
    private RegionCoprocessorEnvironment env;
    private final static Log LOG= LogFactory.getLog(UserRegionAvgEndpoint.class);
    /**
     * RCP远程调用方法的实现,用户需要在该方法中实现局部计算
     * @param controller
     * @param request
     * @param done
     */
    public void queryResult(RpcController controller, Request request, RpcCallback<Response> done) {
        LOG.info("===========queryResult===========");
        try {
            //获取对应的Region
            Region region = env.getRegion();
            LOG.info("Get DataFrom Region :"+region.getRegionInfo().getRegionNameAsString());
            //查询区域的数据
            Scan scan = new Scan();
            //仅仅只查询 分组、聚合字段
            scan.setStartRow(toBytes(request.getStartRow()));
            scan.setStopRow(toBytes(request.getStopRow()));
            scan.addColumn(toBytes(request.getGroupFamillyName()),toBytes(request.getGroupColumnName()));
            scan.addColumn(toBytes(request.getAvgFamillyName()),toBytes(request.getAvgColumnName()));
            RegionScanner regionScanner = region.getScanner(scan);

            //遍历结果
            Map<String,KeyValue> keyValueMap=new HashMap<String, KeyValue>();
            boolean hasMore=false;
            List<Cell> result=new ArrayList<Cell>();

            while(hasMore=regionScanner.nextRaw(result)){

                Cell groupCell = result.get(0);
                Cell avgCell = result.get(1);

                String groupKey = Bytes.toString(cloneValue(groupCell));
                Double avgValue = Bytes.toDouble(cloneValue(avgCell));

                LOG.info(groupKey+"\t"+avgValue);

                //判断keyValueMap是否存在groupKey
                if(!keyValueMap.containsKey(groupKey)){

                    KeyValue.Builder keyValueBuilder = KeyValue.newBuilder();
                    keyValueBuilder.setCount(1);
                    keyValueBuilder.setSum(avgValue);
                    keyValueBuilder.setGroupKey(groupKey);

                    keyValueMap.put(groupKey,keyValueBuilder.build());
                }else{
                    //获取历史数据
                    KeyValue keyValueBuilder = keyValueMap.get(groupKey);
                    KeyValue.Builder newKeyValueBuilder = KeyValue.newBuilder();
                    //进行累计
                    newKeyValueBuilder.setSum(avgValue+keyValueBuilder.getSum());
                    newKeyValueBuilder.setCount(keyValueBuilder.getCount()+1);
                    newKeyValueBuilder.setGroupKey(keyValueBuilder.getGroupKey());

                    //覆盖历史数据
                    keyValueMap.put(groupKey,newKeyValueBuilder.build());
                }

                //清空result
                result.clear();
            }

            //构建返回结果
            Response.Builder responseBuilder = Response.newBuilder();
            for (KeyValue value : keyValueMap.values()) {
                responseBuilder.addArrays(value);
            }
            Response response = responseBuilder.build();
            done.run(response);//将结果传输给客户端
        } catch (IOException e) {
            e.printStackTrace();
            LOG.error(e.getMessage());
        }

    }

    /**
     * 这是系统的生命周期回调方法,每个Region都会创建一个UserRegionAvgEndpoint实例
     * @param env
     * @throws IOException
     */
    public void start(CoprocessorEnvironment env) throws IOException {
        LOG.info("===========start===========");
        if(env instanceof RegionCoprocessorEnvironment){
            this.env= (RegionCoprocessorEnvironment) env;
        }else{
            throw new CoprocessorException("Env Must be RegionCoprocessorEnvironment!");
        }
    }

    /**
     * 这是系统的生命周期回调方法,每个Region都会创建一个UserRegionAvgEndpoint实例
     * @param env
     * @throws IOException
     */
    public void stop(CoprocessorEnvironment env) throws IOException {
        LOG.info("===========stop===========");
    }

    /**
     * 给框架返回RegionAvgService实例
     * @return
     */
    public Service getService() {
        LOG.info("===========getService===========");
        return this;
    }
}
6、给目标表添加该协处理器
rm -rf /usr/hbase-1.2.4/logs/*
start-hbase.sh
tail -f /usr/hbase-1.2.4/logs/hbase-root-regionserver-CentOS2.log
出现这个错,检查代码
hbase(main):002:0> disable 'baizhi:t_user'
0 row(s) in 2.6280 seconds

hbase(main):003:0> alter 'baizhi:t_user' , METHOD =>'table_att','coprocessor'=>'hdfs:///libs/HBase-1.0-SNAPSHOT.jar|com.baizhi.endpoint.UserRegionAvgEndpoint|1001'
Updating all regions with the new schema...
1/1 regions updated.
Done.

hbase(main):005:0> enable 'baizhi:t_user'
0 row(s) in 1.3390 seconds
参数解释:alter 表名字,METHOD=>'table_att','coprocessor'=>'jar路径|全限定名|优先级|[可选参数]'
⑦编写客户端代码进行远程调用
Configuration conf= HBaseConfiguration.create();
conf.set(HConstants.ZOOKEEPER_QUORUM,"CentOS");
Connection conn = ConnectionFactory.createConnection(conf);
Table table = conn.getTable(TableName.valueOf("baizhi:t_user"));

//调用协处理器RegionAvgServiceEndpoint-> RegionAvgService
//这两个参数用于定位Region,如果用户给null,系统则会调用所有region上的RegionAvgService
byte[] starKey="0000".getBytes();
byte[] endKey="0010".getBytes();

Batch.Call<RegionAvgService, Response> batchCall = new Batch.Call<RegionAvgService, Response>() {
    RpcController rpcController=new ServerRpcController();
    BlockingRpcCallback<Response> rpcCallback=new BlockingRpcCallback<Response>();
    //只需要在这个方法内部,构建Request,在利用instance获取远程结果即可
    public Response call(RegionAvgService proxy) throws IOException {
        System.out.println(proxy.getClass());
        Request.Builder requestBuilder = Request.newBuilder();
        requestBuilder.setStartRow("0000");
        requestBuilder.setStopRow("0010");
        requestBuilder.setGroupFamillyName("cf1");
        requestBuilder.setGroupColumnName("dept");
        requestBuilder.setAvgFamillyName("cf1");
        requestBuilder.setAvgColumnName("salary");

        Request request = requestBuilder.build();

        proxy.queryResult(rpcController,request,rpcCallback);
        Response response = rpcCallback.get();
        return response;
    }
};

//调用协处理器 region信息
Map<byte[], Response> responseMaps = table.coprocessorService(RegionAvgService.class, starKey, endKey, batchCall);
Map<String,KeyValue>  toalAvgMap=new HashMap<String, KeyValue>();
//迭代所有Region的返回信息,进行汇总
for (Response value : responseMaps.values()) {
    //某一个Region的返回局部结果
    List<KeyValue> keyValues = value.getArraysList();
    for (KeyValue keyValue : keyValues) {
        if(!toalAvgMap.containsKey(keyValue.getGroupKey())){
            toalAvgMap.put(keyValue.getGroupKey(),keyValue);
        }else{
            KeyValue historyKeyValue = toalAvgMap.get(keyValue.getGroupKey());
            KeyValue.Builder newKeyValue = KeyValue.newBuilder();
            newKeyValue.setGroupKey(keyValue.getGroupKey());
            newKeyValue.setCount(historyKeyValue.getCount()+keyValue.getCount());
            newKeyValue.setSum(historyKeyValue.getSum()+keyValue.getSum());
        }
    }
}
//最终结果
Collection<KeyValue> values = toalAvgMap.values();
System.out.println("部门\t平均薪资");
for (KeyValue value : values) {
    System.out.println(value.getGroupKey()+"\t"+value.getSum()/value.getCount());
}

table.close();
conn.close();
※Hbase 架构 & HA
架构
1、宏观架构
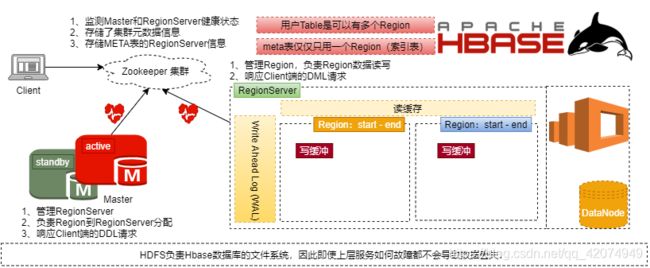
2、Table 和 Region
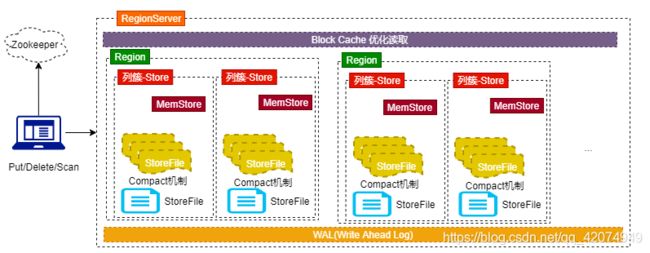
3、RegionServer和Region
推荐阅读:http://www.blogjava.net/DLevin/archive/2015/08/22/426877.html
HA构建
1、必须保证所有物理主机的系统时钟同步,否则集群构建容易失败
[root@CentOSX ~]# yum install -y ntp
[root@CentOSX ~]# ntpdate time.apple.com
[root@CentOSX ~]# clock -w
2、确保HDFS正常运行-先启动ZK、然后启动HDFS
启动zookeeper
/usr/zookeeper-3.4.6/bin/zkServer.sh start zoo.cfg
查看状态
/usr/zookeeper-3.4.6/bin/zkServer.sh status zoo.cfg
启动hdfs
start-dfs.sh
3、搭建HBase集群
①解压并配置HBASE_HOME环境变量
 tar -zxf hbase-1.2.4-bin.tar.gz -C /usr/

[root@CentOSX ~]# vi .bashrc

HADOOP_HOME=/usr/hadoop-2.9.2
HBASE_HOME=/usr/hbase-1.2.4
JAVA_HOME=/usr/java/latest
PATH=$PATH:$JAVA_HOME/bin:$HADOOP_HOME/bin:$HADOOP_HOME/sbin:$HBASE_HOME/bin
CLASSPATH=.
export JAVA_HOME
export CLASSPATH
export PATH
export HADOOP_HOME
export HBASE_HOME

[root@CentOSX ~]# source .bashrc
②配置hbase-site.xml
[root@CentOSX ~]# vi /usr/hbase-1.2.4/conf/hbase-site.xml
<configuration>
    <property>
        <name>hbase.rootdirname>
        <value>hdfs://mycluster/hbasevalue>
    property>
    <property>
        <name>hbase.cluster.distributedname>
        <value>truevalue>
    property>
    <property>
        <name>hbase.zookeeper.quorumname>
        <value>CentOSA,CentOSB,CentOSCvalue>
    property>
    <property>
        <name>hbase.zookeeper.property.clientPortname>
        <value>2181value>
    property>
configuration>
③修改regionservers
[root@CentOSX ~]# vi /usr/hbase-1.2.4/conf/regionservers
CentOSA
CentOSB
CentOSC
④修改hbase-env.sh将# export HBASE_MANAGES_ZK=true去除注释,改成false
vi /usr/hbase-1.2.4/conf/hbase-env.sh
/MANA搜索
⑤启动HBase集群
cd /usr/hbase-1.2.4/
[root@CentOSB hbase-1.2.4]# ./bin/hbase-daemon.sh start master
[root@CentOSC hbase-1.2.4]# ./bin/hbase-daemon.sh start master
[root@CentOSX hbase-1.2.4]# ./bin/hbase-daemon.sh start regionserver
Phoenix集成
Phoenix是构建在HBase上的一个SQL层,能让我们用标准的JDBC APIs而不是HBase客户端APIs来创建表,插入数据和对HBase数据进行查询。Phoenix完全使用Java编写,作为HBase内嵌的JDBC驱动。Phoenix查询引擎会将SQL查询转换为一个或多个HBase扫描,并编排执行以生成标准的JDBC结果集。下载apache-phoenix-4.10.0-HBase-1.2-bin.tar.gz,注意下载的Phoenix版本必须和hbase目标版本保持一致。
安装
1、确保HDFS/HBase正常运行
2、解压Phoenix的安装包,将phoenix-[version]-server.jar和phoenix-[version]-client.jar拷贝到所有运行HBase的节点的lib目录下
[root@CentOS ~]# tar -zxf apache-phoenix-4.10.0-HBase-1.2-bin.tar.gz -C /usr/
[root@CentOS ~]# mv  /usr/apache-phoenix-4.10.0-HBase-1.2-bin/ /usr/phoenix-4.10.0
[root@CentOS ~]# cd /usr/phoenix-4.10.0/
[root@CentOS phoenix-4.10.0]# cp phoenix-4.10.0-HBase-1.2-client.jar /usr/hbase-1.2.4/lib/
[root@CentOS phoenix-4.10.0]# cp phoenix-4.10.0-HBase-1.2-server.jar /usr/hbase-1.2.4/lib/
[root@CentOS phoenix-4.10.0]#
3、强烈建议大家将HBase的历史残余数据给清楚之后再启动HBase
start-dfs.sh
启动zookeeper
cd /usr/zookeeper-3.4.6/
./bin/zkServer.sh start zoo.cfg


[root@CentOS ~]# hbase clean --cleanAll
[root@CentOS ~]# rm -rf /usr/hbase-1.2.4/logs/*
[root@CentOS ~]# start-hbase.sh

看日志
tail -f /usr/hbase-1.2.4/logs/hbase-root-regionserver-CentOS2.log
4、通过sqlline.py链接Hbase
cd /usr/phoenix-4.10.0/
[root@CentOS phoenix-4.10.0]# ./bin/sqlline.py CentOS2
Setting property: [incremental, false]
Setting property: [isolation, TRANSACTION_READ_COMMITTED]
issuing: !connect jdbc:phoenix:CentOS none none org.apache.phoenix.jdbc.PhoenixDriver
Connecting to jdbc:phoenix:CentOS
....
Connected to: Phoenix (version 4.10)
Driver: PhoenixEmbeddedDriver (version 4.10)
Autocommit status: true
Transaction isolation: TRANSACTION_READ_COMMITTED
Building list of tables and columns for tab-completion (set fastconnect to true to skip)...
91/91 (100%) Done
Done
sqlline version 1.2.0
0: jdbc:phoenix:CentOS>
5、退出交互窗口
0: jdbc:phoenix:CentOS> !quit
基本使用
1、查看所有表
0: jdbc:phoenix:CentOS> !tables
2、创建表
create table t_user(
id integer primary key,
name varchar(32),
age integer,
sex boolean
);

0: jdbc:phoenix:CentOS> create table t_user(
. . . . . . . . . . . >   id integer primary key,
. . . . . . . . . . . >   name varchar(32),
. . . . . . . . . . . >   age integer,
. . . . . . . . . . . >   sex boolean
. . . . . . . . . . . > );
No rows affected (1.348 seconds)
3、查看表的字段信息
0: jdbc:phoenix:CentOS> !column t_user
4、插入/更新数据
0: jdbc:phoenix:CentOS> upsert into t_user values(1,'jiangzz',18,false);
1 row affected (0.057 seconds)
0: jdbc:phoenix:CentOS> upsert into t_user values(1,'jiangzz',18,true);
1 row affected (0.006 seconds)
0: jdbc:phoenix:CentOS> upsert into t_user values(2,'lisi',20,true);
1 row affected (0.023 seconds)
0: jdbc:phoenix:CentOS> upsert into t_user values(3,'wangwu',18,false);
1 row affected (0.006 seconds)

0: jdbc:phoenix:CentOS> select * from t_user;
+-----+----------+------+--------+
| ID  |   NAME   | AGE  |  SEX   |
+-----+----------+------+--------+
| 1   | jiangzz  | 18   | true   |
| 2   | lisi     | 20   | true   |
| 3   | wangwu   | 18   | false  |
+-----+----------+------+--------+
3 rows selected (0.085 seconds)
5、更改某个字段值
0: jdbc:phoenix:CentOS> upsert into  t_user(id,name) values(1,'win7');
1 row affected (0.024 seconds)

0: jdbc:phoenix:CentOS> select * from t_user;
+-----+---------+------+--------+
| ID  |  NAME   | AGE  |  SEX   |
+-----+---------+------+--------+
| 1   | win7    | 18   | true   |
| 2   | lisi    | 20   | true   |
| 3   | wangwu  | 18   | false  |
+-----+---------+------+--------+
3 rows selected (0.201 seconds)
6、执行某些统计操作
0: jdbc:phoenix:CentOS> select sex,avg(age),max(age),min(age),sum(age) from t_user group by sex;
+--------+-----------+-----------+-----------+-----------+
|  SEX   | AVG(AGE)  | MAX(AGE)  | MIN(AGE)  | SUM(AGE)  |
+--------+-----------+-----------+-----------+-----------+
| false  | 18        | 18        | 18        | 18        |
| true   | 19        | 20        | 18        | 38        |
+--------+-----------+-----------+-----------+-----------+
2 rows selected (0.123 seconds)
0: jdbc:phoenix:CentOS> select sex,avg(age),max(age),min(age),sum(age) total from t_user group by sex order by total  desc;
+--------+-----------+-----------+-----------+--------+
|  SEX   | AVG(AGE)  | MAX(AGE)  | MIN(AGE)  | TOTAL  |
+--------+-----------+-----------+-----------+--------+
| true   | 19        | 20        | 18        | 38     |
| false  | 18        | 18        | 18        | 18     |
+--------+-----------+-----------+-----------+--------+
2 rows selected (0.072 seconds)
0: jdbc:phoenix:CentOS>
7、数据库操作
0: jdbc:phoenix:CentOS> create schema if not exists baizhi;
提示必须同时修改HASE_HOME/conf/hbase-site.xml文件和 PHOENIX_HOME/bin/hbase-site.xml文件,修改完成重启Hbase服务
stop-hbase.sh
vi /usr/hbase-1.2.4/conf/hbase-site.xml

<property>
  <name>phoenix.schema.isNamespaceMappingEnabledname>
  <value>truevalue>
property>
<property>
  <name>phoenix.schema.mapSystemTablesToNamespacename>
  <value>truevalue>
property>


vi /usr/phoenix-4.10.0/bin/hbase-site.xml


<property>
  <name>phoenix.schema.isNamespaceMappingEnabledname>
  <value>truevalue>
property>
<property>
  <name>phoenix.schema.mapSystemTablesToNamespacename>
  <value>truevalue>
property>

start-hbase.sh
cd /usr/phoenix-4.10.0/
./bin/sqlline.py CentOS2
0: jdbc:phoenix:CentOS> create schema if not exists baizhi;
No rows affected (0.046 seconds)
0: jdbc:phoenix:CentOS> use baizhi;
No rows affected (0.049 seconds)

create table if not exists t_user(
id integer primary key,
name varchar(128),
sex boolean,
birthday date,
salary decimal(7,2)
);

0: jdbc:phoenix:CentOS> create table if not exists t_user(
. . . . . . . . . . . >  id integer primary key ,
. . . . . . . . . . . >  name varchar(128),
. . . . . . . . . . . >  sex boolean,
. . . . . . . . . . . >  birthDay date,
. . . . . . . . . . . >  salary decimal(7,2)
. . . . . . . . . . . > );
如果用户不指定schema,默认使用的是default数据库
8、查看建表详情,等价!column
0: jdbc:phoenix:CentOS> !desc baizhi.t_user;
9、删除表
0: jdbc:phoenix:CentOS> drop table if exists baizhi.t_user;
No rows affected (3.638 seconds)
如果有其他表指向该表,我们可以在删除的表时候添加cascade关键字
0: jdbc:phoenix:CentOS> drop table if exists baizhi.t_user cascade;
No rows affected (0.004 seconds)
10、修改表
①添加字段
0: jdbc:phoenix:CentOS> alter table t_user add age integer;
No rows affected (5.994 seconds)
②删除字段
0: jdbc:phoenix:CentOS> alter table t_user drop column age;
No rows affected (1.059 seconds)
③设置表的TimeToLive
0: jdbc:phoenix:CentOS> alter table t_user set TTL=100;
No rows affected (5.907 seconds)
0: jdbc:phoenix:CentOS> upsert into t_user(id,name,sex,birthDay,salary) values(1,'jiangzz',true,'1990-12-16',5000.00);
1 row affected (0.031 seconds)
0: jdbc:phoenix:CentOS> select * from t_user;
+-----+----------+-------+--------------------------+---------+
| ID  |   NAME   |  SEX  |         BIRTHDAY         | SALARY  |
+-----+----------+-------+--------------------------+---------+
| 1   | jiangzz  | true  | 1990-12-16 00:00:00.000  | 5E+3    |
+-----+----------+-------+--------------------------+---------+
1 row selected (0.074 seconds)
11、数据DML
①插入&更新
0: jdbc:phoenix:CentOS> upsert into t_user(id,name,sex,birthDay,salary) values(1,'jiangzz',true,'1990-12-16',5000.00);
1 row affected (0.014 seconds)
②删除记录
0: jdbc:phoenix:CentOS> delete from t_user where name='jiangzz';
1 row affected (0.014 seconds)
0: jdbc:phoenix:CentOS> select * from t_user;
+-----+-------+------+-----------+---------+
| ID  | NAME  | SEX  | BIRTHDAY  | SALARY  |
+-----+-------+------+-----------+---------+
+-----+-------+------+-----------+---------+
No rows selected (0.094 seconds)
③查询数据
0: jdbc:phoenix:CentOS> select * from t_user;
+-----+-----------+--------+--------------------------+---------+
| ID  |   NAME    |  SEX   |         BIRTHDAY         | SALARY  |
+-----+-----------+--------+--------------------------+---------+
| 1   | jiangzz   | true   | 1990-12-16 00:00:00.000  | 5E+3    |
| 2   | zhangsan  | false  | 1990-12-16 00:00:00.000  | 6E+3    |
+-----+-----------+--------+--------------------------+---------+
2 rows selected (0.055 seconds)
0: jdbc:phoenix:CentOS> select * from t_user where name like '%an%' order by salary desc limit 10;
+-----+-----------+--------+--------------------------+---------+
| ID  |   NAME    |  SEX   |         BIRTHDAY         | SALARY  |
+-----+-----------+--------+--------------------------+---------+
| 2   | zhangsan  | false  | 1990-12-16 00:00:00.000  | 6E+3    |
| 1   | jiangzz   | true   | 1990-12-16 00:00:00.000  | 5E+3    |
+-----+-----------+--------+--------------------------+---------+
2 rows selected (0.136 seconds)
√代码集成Phoenix
JDBC集成
①将phoenix-{version}-client.jar驱动jar安装到本地maven仓库
C:\Users\513jiaoshiji>mvn  install:install-file   -DgroupId=org.apche.phoenix    -DartifactId=phoenix   -Dversion=phoenix-4.10-hbase-1.2   -Dpackaging=jar    -Dfile=E:\大数据课程\笔记\hadoop生态系列课程\hbase分布式数据库\apache-phoenix-4.10.0-HBase-1.2-bin\phoenix-4.10.0-HBase-1.2-client.jar
[INFO] Scanning for projects...
[INFO]
[INFO] ------------------< org.apache.maven:standalone-pom >-------------------
[INFO] Building Maven Stub Project (No POM) 1
[INFO] --------------------------------[ pom ]---------------------------------
[INFO]
[INFO] --- maven-install-plugin:2.4:install-file (default-cli) @ standalone-pom ---
[INFO] Installing C:\Users\513jiaoshiji\Desktop\phoenix-4.10.0-HBase-1.2-client.jar to D:\m2\org\apche\phoenix\phoenix\phoenix-4.10-hbase-1.2\phoenix-phoenix-4.10-hbase-1.2.jar
[INFO] Installing C:\Users\513JIA~1\AppData\Local\Temp\mvninstall6381038564796043649.pom to D:\m2\org\apche\phoenix\phoenix\phoenix-4.10-hbase-1.2\phoenix-phoenix-4.10-hbase-1.2.pom
[INFO] ------------------------------------------------------------------------
[INFO] BUILD SUCCESS
[INFO] ------------------------------------------------------------------------
[INFO] Total time:  0.657 s
[INFO] Finished at: 2020-10-13T11:39:16+08:00
[INFO] ------------------------------------------------------------------------
mvn install:install-file -DgroupId=groupID -DartifactId=artifactID -Dversion=版本 -Dpackaging=jar -Dfile=jar路径
②将hbase-site.xml文件导入到项目的Resource资源目录
③编写jdbc代码
Class.forName("org.apache.phoenix.jdbc.PhoenixDriver");
Connection conn = DriverManager.getConnection("jdbc:phoenix:CentOS:2181");
PreparedStatement pstm = conn.prepareStatement("select * from baizhi.t_user");
ResultSet resultSet = pstm.executeQuery();
while(resultSet.next()){
    String name = resultSet.getString("name");
    Integer id = resultSet.getInt("id");
    System.out.println(id+"\t"+name);
}
resultSet.close();
pstm.close();
conn.close();
需要注意Phoenix的JDBC在执行修改的时候,默认情况下自动提交时false,这一点和MySQL或者Oracle不同。
Class.forName("org.apache.phoenix.jdbc.PhoenixDriver");
Connection conn = DriverManager.getConnection("jdbc:phoenix:CentOS:2181");
conn.setAutoCommit(true);//必须设置,否则数据不提交!

PreparedStatement pstm = conn.prepareStatement("upsert into baizhi.t_user(id,name,sex,birthDay,salary) values(?,?,?,?,?)");
pstm.setInt(1,2);
pstm.setString(2,"张三1");
pstm.setBoolean(3,true);
pstm.setDate(4,new Date(System.currentTimeMillis()));
pstm.setBigDecimal(5,new BigDecimal(1000.0));
pstm.execute();


pstm.close();
conn.close();
MapReduce集成
①准备输入表/输出表
CREATE TABLE IF NOT EXISTS STOCK (
    STOCK_NAME VARCHAR NOT NULL ,
    RECORDING_YEAR INTEGER NOT  NULL,
    RECORDINGS_QUARTER DOUBLE array[] CONSTRAINT pk PRIMARY KEY (STOCK_NAME , RECORDING_YEAR)
);
CREATE TABLE IF NOT EXISTS STOCK_STATS (
    STOCK_NAME VARCHAR NOT NULL ,
    MAX_RECORDING DOUBLE CONSTRAINT pk PRIMARY KEY (STOCK_NAME)
);
②插入模拟数据
UPSERT into STOCK values ('AAPL',2009,ARRAY[85.88,91.04,88.5,90.3]);
UPSERT into STOCK values ('AAPL',2008,ARRAY[199.27,200.26,192.55,194.84]);
UPSERT into STOCK values ('AAPL',2007,ARRAY[86.29,86.58,81.90,83.80]);
UPSERT into STOCK values ('CSCO',2009,ARRAY[16.41,17.00,16.25,16.96]);
UPSERT into STOCK values ('CSCO',2008,ARRAY[27.00,27.30,26.21,26.54]);
UPSERT into STOCK values ('CSCO',2007,ARRAY[27.46,27.98,27.33,27.73]);
UPSERT into STOCK values ('CSCO',2006,ARRAY[17.21,17.49,17.18,17.45]);
UPSERT into STOCK values ('GOOG',2009,ARRAY[308.60,321.82,305.50,321.32]);
UPSERT into STOCK values ('GOOG',2008,ARRAY[692.87,697.37,677.73,685.19]);
UPSERT into STOCK values ('GOOG',2007,ARRAY[466.00,476.66,461.11,467.59]);
UPSERT into STOCK values ('GOOG',2006,ARRAY[422.52,435.67,418.22,435.23]);
UPSERT into STOCK values ('MSFT',2009,ARRAY[19.53,20.40,19.37,20.33]);
UPSERT into STOCK values ('MSFT',2008,ARRAY[35.79,35.96,35.00,35.22]);
UPSERT into STOCK values ('MSFT',2007,ARRAY[29.91,30.25,29.40,29.86]);
UPSERT into STOCK values ('MSFT',2006,ARRAY[26.25,27.00,26.10,26.84]);
UPSERT into STOCK values ('YHOO',2009,ARRAY[12.17,12.85,12.12,12.85]);
UPSERT into STOCK values ('YHOO',2008,ARRAY[23.80,24.15,23.60,23.72]);
UPSERT into STOCK values ('YHOO',2007,ARRAY[25.85,26.26,25.26,25.61]);
UPSERT into STOCK values ('YHOO',2006,ARRAY[39.69,41.22,38.79,40.91]);
③编写代码
public class PhoenixStockApplication extends Configured implements Tool {

    public int run(String[] strings) throws Exception {
        //1.创建job
        Configuration conf = getConf();
        conf.set(HConstants.ZOOKEEPER_QUORUM,"CentOS");
        conf= HBaseConfiguration.create(conf);
        Job job= Job.getInstance(conf,"PhoenixStockApplication");
        job.setJarByClass(PhoenixStockApplication.class);

        //2.设置输入输出格式
        job.setInputFormatClass(PhoenixInputFormat.class);
        job.setOutputFormatClass(PhoenixOutputFormat.class);

        //3.设置数据读入和写出路径
        String selectQuery = "SELECT STOCK_NAME,RECORDING_YEAR,RECORDINGS_QUARTER FROM STOCK ";
        PhoenixMapReduceUtil.setInput(job, StockWritable.class, "STOCK",  selectQuery);
        PhoenixMapReduceUtil.setOutput(job, "STOCK_STATS", "STOCK_NAME,MAX_RECORDING");

        //4.设置代码片段
        job.setMapperClass(StockMapper.class);
        job.setReducerClass(StockReducer.class);

        //5.设置Mapper和Reducer端的输出key,value类型
        job.setMapOutputKeyClass(Text.class);
        job.setMapOutputValueClass(DoubleWritable.class);
        job.setOutputKeyClass(NullWritable.class);
        job.setOutputValueClass(StockWritable.class);

        TableMapReduceUtil.addDependencyJars(job);

        //6.任务提交
        return job.waitForCompletion(true)?0:1;
    }

    public static void main(String[] args) throws Exception {
        ToolRunner.run(new PhoenixStockApplication(),args);
    }
}
public class StockWritable implements DBWritable {
    private String stockName;
    private int year;
    private double[] recordings;

    private double maxPrice;

    public void write(PreparedStatement pstmt) throws SQLException {
        pstmt.setString(1, stockName);
        pstmt.setDouble(2, maxPrice);
    }

    public void readFields(ResultSet rs) throws SQLException {
        stockName = rs.getString("STOCK_NAME");
        year = rs.getInt("RECORDING_YEAR");
        Array recordingsArray = rs.getArray("RECORDINGS_QUARTER");
        recordings = (double[])recordingsArray.getArray();
    }

    //get/set
}
public class StockMapper extends Mapper<NullWritable,StockWritable, Text, DoubleWritable> {

    @Override
    protected void map(NullWritable key, StockWritable value, Context context) throws IOException, InterruptedException {
        double[] recordings = value.getRecordings();
        double maxPrice = Double.MIN_VALUE;
        for (double recording : recordings) {
            if(maxPrice<recording){
                maxPrice=recording;
            }
        }
        context.write(new Text(value.getStockName()),new DoubleWritable(maxPrice));
    }
}
public class StockReducer extends Reducer<Text, DoubleWritable, NullWritable,StockWritable> {
    @Override
    protected void reduce(Text key, Iterable<DoubleWritable> values, Context context) throws IOException, InterruptedException {
      Double maxPrice=Double.MIN_VALUE;
        for (DoubleWritable value : values) {
            double v = value.get();
            if(maxPrice<v){
                maxPrice=v;
            }
        }
        StockWritable stockWritable = new StockWritable();
        stockWritable.setStockName(key.toString());
        stockWritable.setMaxPrice(maxPrice);

        context.write(NullWritable.get(),stockWritable);
    }
}
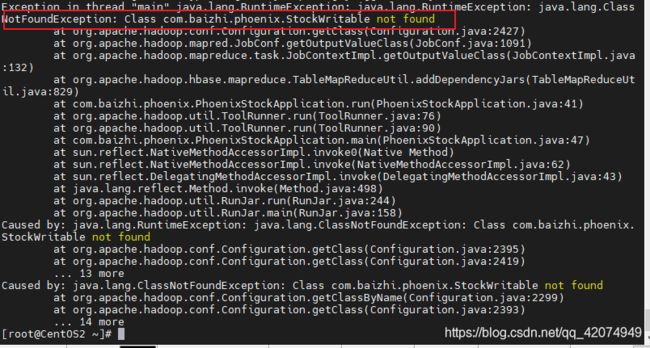
需要将运行的jar添加到hadoop的类路径下。
Caused by: java.lang.RuntimeException: java.lang.ClassNotFoundException: Class com.baizhi.phoenix.StockWritable not found
解决添加jar
vi .bashrc
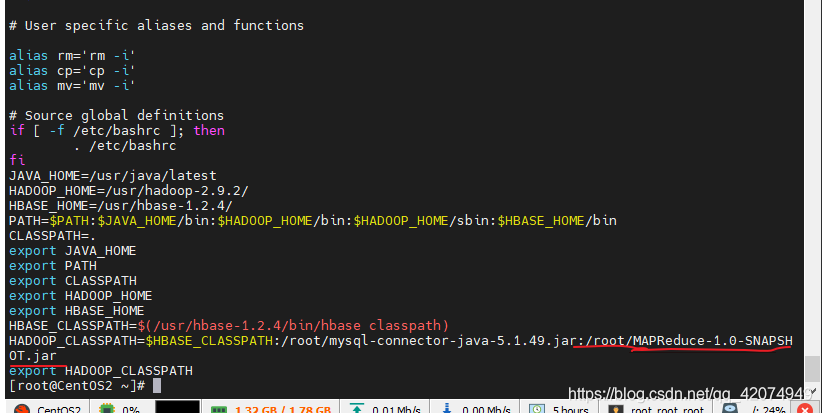
source .bashrc
hadoop jar MAPReduce-1.0-SNAPSHOT.jar com.baizhi.phoenix.PhoenixStockApplication
Phoenix GUI使用
如果您希望使用客户端GUI与Phoenix进行交互,请下载并安装SQuirrel。由于Phoenix是JDBC驱动程序,因此与此类工具的集成是无缝的。以下是下载和安装步骤:
点击:http://squirrel-sql.sourceforge.net/
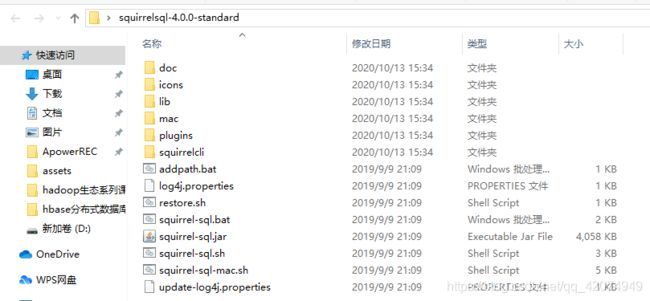
1、下载客户端软件包,然后解压
2、将phoenix-{version}-client.jar拷贝到该软件的lib目录下
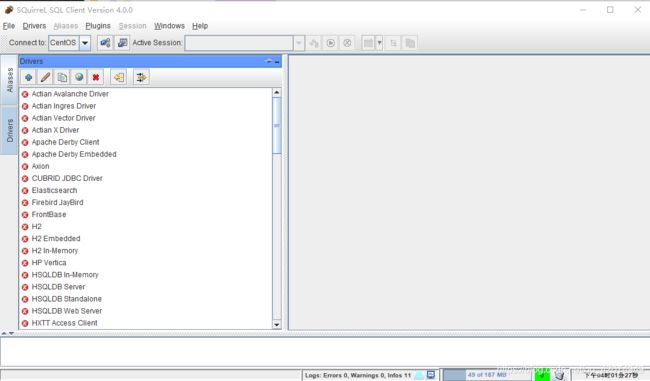
3、直接点击该软件下的squirrel-sql.bat 如果是mac或者linux系统用户,可以直接运行squirrel-sql.sh
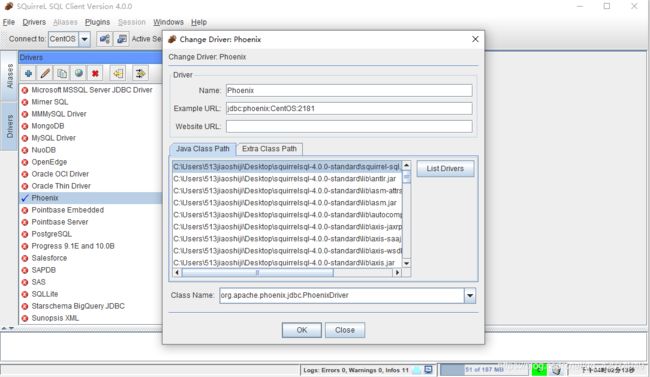
4、点击Dirver选项卡,点击+号,添加驱动
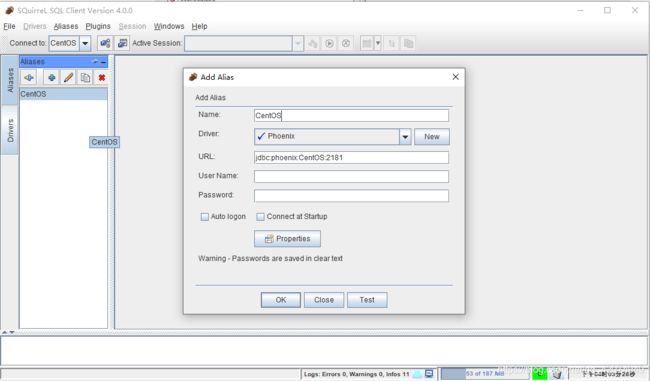
5、填写相关模板参数
6、点击Aliasses选项卡,添加+号,添加驱动
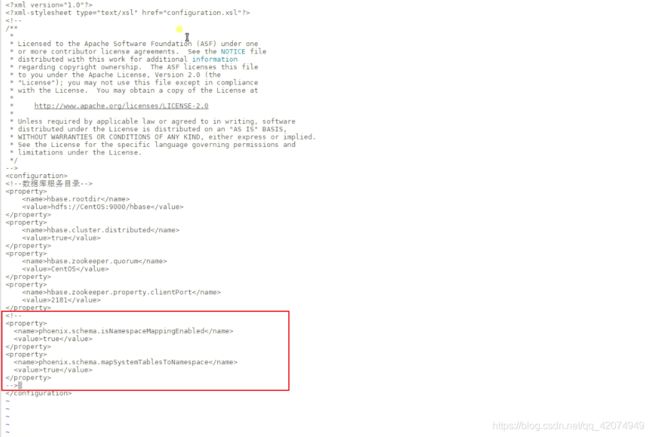
该客户端存在缺陷,不支持自定义Schema映射,因此需要将Hbase的schame映射给关闭才可以使用。
vi /usr/hbase-1.2.4/conf/hbase-site.xml




![[外链图片转存失败,源站可能有防盗链机制,建议将图片保存下来直接上传(img-Ey0M3VIo-1628496414058)(C:\Users\Administrator\AppData\Roaming\Typora\typora-user-images\image-20210808192240119.png)]](http://img.e-com-net.com/image/info8/1c67ae1cc83b4164a45bad90a71effdb.jpg)



![[外链图片转存失败,源站可能有防盗链机制,建议将图片保存下来直接上传(img-w0XlgphW-1628496414066)(assets/image-20201013110015170.png)]](http://img.e-com-net.com/image/info8/9b0c5f539d814c95ba937447b6bd4c54.jpg)
![[外链图片转存失败,源站可能有防盗链机制,建议将图片保存下来直接上传(img-TbZzKVsE-1628496414067)(assets/image-20201013110345801.png)]](http://img.e-com-net.com/image/info8/cdb76baf83f940dba18e2d7ed30ef6af.jpg)

![[外链图片转存失败,源站可能有防盗链机制,建议将图片保存下来直接上传(img-hQH8mfSt-1628496414071)(assets/image-20201013112332087.png)]](http://img.e-com-net.com/image/info8/a2530990c83c41619fce721abb9b56d3.jpg)
