Libigl学习笔记——二、第一章——Libigl官方教程学习

Libigl学习笔记——二、2.1 Libigl官方教程学习

  • 0 Libigl官方教程地址
  • 第一章
    • 1.0 Libigl设计原则
    • 1.1 网格表示(101)
    • 1.2 可视化曲面(102)
    • 1.3 与键盘和鼠标的交互(103)
    • 1.4 标量场可视化 Scalar Field Visualization(104)
    • 1.5 叠加 Overlays(105)
    • 1.6 产看器菜单 Viewer Menu(106)
    • 1.7 多个网格 Multiple Meshes(107)
    • 1.8 多个视图 Multiple Views(108)
    • 1.9 Guizmos 查看器Viewer Guizmos(109)
    • 1.10 Msh 查看器 Msh Viewer(110)
    • 1.11 材质捕获 Material Captures(111)
    • 1.12 鼠标选中显示 Selection(112)

0 Libigl官方教程地址

官方教程地址:

  • https://libigl.github.io/tutorial/
  • Libigl 是一个用于几何加工研究和开发的开源C++库
  • 放弃了传统几何库的繁重数据结构,libigl 是一个简单的封装函数的仅标头库
  • 这结合了 Matlab 或 Python 程序员熟悉的快速原型设计与C++的性能和多功能性
  • 本教程是对 libigl 的独立实践介绍
    • 通过交互式分步示例,我们演示了如何完成常见的几何处理任务
      • 微分量和算子的计算
      • 实时变形
      • 参数化
      • 数值优化
      • 重新划分网格
    • 讲义的每个部分都链接到跨平台的示例应用程序
    • 通过一系列自成一体的例子来介绍libigl
    • 每个示例的目的是展示libigl的一个特征,同时应用于几何加工中的实际问题
    • Libigl学习笔记——二、第一章——Libigl官方教程学习_第1张图片

第一章

本章中内容:

  • 介绍 libigl 的基本概念
  • 介绍一个简单的网格查看器,该查看器允许可视化表面网格及其属性
  • 所有的教程示例都是跨平台的,可以在MacOSX,Linux和Windows上编译

1.0 Libigl设计原则

进入示例之前,我们总结了 libigl 的主要设计原则

  1. 没有复杂的数据类型。我们主要使用矩阵和向量。这极大地有利于代码的可重用性,并强制函数作者公开算法使用的所有参数
  2. 最少的依赖关系。我们只在必要时使用外部库,并将它们包装在一小组函数中
  3. 仅头文件。使用我们的库很简单,因为它只是您项目中的一个附加包含目录。(如果担心编译速度,也可以把库构建成静态库)
  4. 函数封装。每个函数(包括其完整实现)都包含在一对具有相同函数名称的 .h/.cpp 文件中
  5. libigl 仅支持 Microsoft Visual Studio 2015 编译器及更高版本的 64 位模式。它不适用于 32 位版本,也不适用于旧版本的 Visual Studio。

1.1 网格表示(101)

libigl 使用特征库对向量和矩阵进行编码。我们建议您在阅读本教程中的示例时保留密集且稀疏的快速参考指南。
1. 三角形网格编码为一对矩阵

Eigen::MatrixXd V;
Eigen::MatrixXi F;
  • V 是一个 #N x 3 矩阵,用于存储顶点的坐标
    • 每行存储顶点的坐标,其 x,y 和 z 坐标分别位于第一、第二和第三列中
  • 矩阵 F 存储三角形连通性
    • 每 F 行表示一个三角形,其 3 个顶点表示为指向 行 V 的索引
    • 顶 F 点索引的顺序决定了三角形的方向
    • 因此对于整个表面,它应该是一致的
  • Libigl学习笔记——二、第一章——Libigl官方教程学习_第2张图片由 2 个三角形和 4 个顶点组成的简单网格
  • 这种简单的表示形式具有许多优点
    • 它内存高效且缓存友好
    • 使用索引而不是指针大大简化了调试
    • 数据可以简单地复制和序列化

2. Libigl 提供输入 [输出] 函数来读取 [写入]许多常见的网格格式:

  • IO 函数包含在文件 read*.h 和 write*.h 中
  • 作为一般规则,每个 libigl 函数都包含在一对具有相同名称的 .h/.cpp 文件中
  • 默认情况下,.h 文件包含相应的 cpp 文件,使库标头仅存在
  • 示例101包含从OFF到OBJ格式的简单网格转换器
    • 从文件中读取网格需要单个 libigl 函数调用:
      igl::readOFF(TUTORIAL_SHARED_PATH "/cube.off", V, F);
      
    • 读取网格立方体.off并填充提供的 V 矩阵 F 。同样,可以使用以下命令在 OBJ 文件中写入网格:
      igl::writeOBJ("cube.obj",V,F);
      
    • Libigl学习笔记——二、第一章——Libigl官方教程学习_第3张图片Libigl学习笔记——二、第一章——Libigl官方教程学习_第4张图片正方体8个顶点12条边转换

3. 文件格式介绍
3.1 物体文件格式(.off)文件

  • 用于表示给定了表面多边形的模型的几何体
  • 这里的多边形可以有任意数量的顶点

Banchmark中的.off文件遵循以下标准

  • OFF文件全是以OFF关键字开始的ASCII文件
  • 下一行说明顶点的数量、面片的数量、边的数量
  • 边的数量可以安全地省略
  • 顶点按每行一个列出x、y、z坐标
  • 在顶点列表后,面片按照每行一个列表
  • 对于每个面片,顶点的数量是指定的,接下来是顶点的索引列表
    • 详见下面的例子
      • OFF
        顶点数 面片数 边数
        x y z
        x y z

        顶点个数N v1 v2 v3 … vn
        顶点个数M v1 v2 v3 … vm
      • 一个立方体的简单例子:
        OFF
        8 6 0
        -0.500000 -0.500000 0.500000
        0.500000 -0.500000 0.500000
        -0.500000 0.500000 0.500000
        0.500000 0.500000 0.500000
        -0.500000 0.500000 -0.500000
        0.500000 0.500000 -0.500000
        -0.500000 -0.500000 -0.500000
        0.500000 -0.500000 -0.500000
        4 0 1 3 2
        4 2 3 5 4
        4 4 5 7 6
        4 6 7 1 0
        4 1 7 5 3
        4 6 0 2 4

3.2 OBJ文件格式
OBJ文件是Alias|Wavefront公司为它的一套基于工作站的3D建模和动画软件"Advanced Visualizer"开发的一种标准3D模型文件格式,很适合用于3D软件模型之间的互导,也可以通过Maya读写。

  • OBJ文件是一种文本文件,可以直接用写字板打开进行查看和编辑修改
  • OBJ3.0文件格式支持直线(Line)、多边形(Polygon)、表面(Surface)和自由形态曲线(Free-form Curve)
    • 直线和多角形通过它们的点来描述
    • 曲线和表面则根据它们的控制点和依附于曲线类型的额外信息来定义,这些信息支持规则和不规则的曲线,包括:
      • 基于贝塞尔曲线(Bezier)
      • B样条(B-spline)
      • 基数(Cardinal/Catmull-Rom)
      • 泰勒方程(Taylor equations)的曲线
  • 特点如下
    • OBJ文件是一种3D模型文件。不包含动画、材质特性、贴图路径、动力学、粒子等信息
    • OBJ文件主要支持多边形(Polygons)模型
      • 虽然也支持曲线(Curves)、表面(Surfaces)、点组材质(Point Group Materials),但Maya导出的OBJ文件并不包括这些信息
    • OBJ文件支持三个点以上的面,这一点很有用
      • 很多其它的模型文件格式只支持三个点的面,所以导入Maya的模型经常被三角化了,这对于我们对模型进行再加工甚为不利
    • OBJ文件支持法线和贴图坐标
      • 在其它软件中调整好贴图后,贴图坐标信息可以存入OBJ文件中,这样文件导入Maya后只需指定一下贴图文件路径就行了,不需要再调整贴图坐标

OBJ文件基本结构

  • OBJ文件不需要任何种文件头(File Header),尽管经常使用几行文件信息的注释作为文件的开头
  • OBJ文件由一行行文本组成,注释行以符号“#”为开头,空格和空行可以随意加到文件中以增加文件的可读性
  • 有字的行都由一两个标记字母也就是关键字(Keyword)开头,关键字可以说明这一行是什么样的数据
  • 多行可以逻辑地连接在一起表示一行,方法是在每一行最后添加一个连接符()。 注意连接符()后面不能出现空格或Tab格,否则将导致文件出错
  • 关键字可以在OBJ文件使用:
    • 顶点数据(Vertex data):
      • v 几何体顶点(Geometric vertices)
      • vt 贴图坐标点(Texture vertices)
      • vn 顶点法线(Vertex normals)
      • vp 参数空格顶点 (Parameter space vertices)
    • 自由形态曲线(Free-form curve)/表面属性(surface attributes):
      • deg 度(Degree)
      • bmat 基础矩阵(Basis matrix)
      • step 步尺寸(Step size)
      • cstype 曲线或表面类型 (Curve or surface type)
    • 元素(Elements):
      • p 点(Point)
      • l 线(Line)
      • f 面(Face)
      • curv 曲线(Curve)
      • curv2 2D曲线(2D curve)
      • surf 表面(Surface)
    • 自由形态曲线(Free-form curve)/表面主体陈述(surface body statements):
      • parm 参数值(Parameter values )
      • trim 外部修剪循环(Outer trimming loop)
      • hole 内部整修循环(Inner trimming loop)
      • scrv 特殊曲线(Special curve)
      • sp 特殊的点(Special point)
      • end 结束陈述(End statement)
    • 自由形态表面之间的连接(Connectivity between free-form surfaces):
      • con 连接 (Connect)
    • 成组(Grouping):
      • g 组名称(Group name)

      • s 光滑组(Smoothing group)

      • mg 合并组(Merging group)

      • o 对象名称(Object name)

    • 显示(Display)/渲染属性(render attributes):
      • bevel 导角插值(Bevel interpolation)
      • c_interp 颜色插值(Color interpolation)
      • d_interp 溶解插值(Dissolve interpolation)
      • lod 细节层次(Level of detail)
      • usemtl 材质名称(Material name)
      • mtllib 材质库(Material library)
      • shadow_obj 投射阴影(Shadow casting)
      • trace_obj 光线跟踪(Ray tracing)
      • ctech 曲线近似技术(Curve approximation technique)
      • stech 表面近似技术 (Surface approximation technique)

OBJ文件示例
创建一个OBJ文件,内容为一个四边形

  • 用写字板来创建
  • 打开写字板,把下面的5行代码写入,可以适当加一点注释
  • 代码最后一定要按一下回车把光标切换到下一行,就是说加一个换行符(\n)。否则会看到错误信息
  • 保存文件为文本格式,文件名为"myObj.obj"
    • v -0.58 0.84 0
    • v 2.68 1.17 0
    • v 2.84 -2.03 0
    • v -1.92 -2.89 0
    • f 1 2 3 4

1.2 可视化曲面(102)

Libigl 提供了一个基于 glfw 的 OpenGL 3.2 查看器,用于可视化表面、其属性和其他调试信息。
示例 102:是本教程中将使用的所有示例的基本框架

  • 它是一个独立的应用程序,用于加载网格并使用查看器对其进行渲染。
#include 
#include 

Eigen::MatrixXd V;
Eigen::MatrixXi F;

int main(int argc, char *argv[])
{
  // Load a mesh in OFF format
  igl::readOFF(TUTORIAL_SHARED_PATH "/bunny.off", V, F);

  // Plot the mesh
  igl::opengl::glfw::Viewer viewer;
  viewer.data().set_mesh(V, F);
  viewer.launch();
}

Libigl学习笔记——二、第一章——Libigl官方教程学习_第5张图片示例 102)加载并绘制网格

  • 函数 set_mesh 将网格复制到查看器中
  • Viewer.launch() 创建一个窗口,一个OpenGL上下文,然后启动绘制循环
  • 默认摄像机运动模式为 2 轴 ( ROTATION_TYPE_TWO_AXIS_VALUATOR_FIXED_UP ),可以通过添加以下行将其更改为 3 轴轨迹球样式:
    viewer.core().set_rotation_type(igl::opengl::ViewerCore::ROTATION_TYPE_TRACKBALL);
    
  • 可以在网格上绘制其他属性(我们将在后面看到),并且可以使用标准OpenGL代码扩展查看器
  • 有关更多详细信息,请参阅 Viewer.h 中的文档

1.3 与键盘和鼠标的交互(103)

键盘和鼠标事件触发可在查看器中注册的回调
查看器支持以下回调

bool (*callback_pre_draw)(Viewer& viewer);
bool (*callback_post_draw)(Viewer& viewer);
bool (*callback_mouse_down)(Viewer& viewer, int button, int modifier);
bool (*callback_mouse_up)(Viewer& viewer, int button, int modifier);
bool (*callback_mouse_move)(Viewer& viewer, int mouse_x, int mouse_y);
bool (*callback_mouse_scroll)(Viewer& viewer, float delta_y);
bool (*callback_key_down)(Viewer& viewer, unsigned char key, int modifiers);
bool (*callback_key_up)(Viewer& viewer, unsigned char key, int modifiers);

键盘回调可用于可视化多个网格或算法的不同阶段
示例 103 所示键盘回调根据按下的键更改可视化网格

#include 
#include 
#include 

Eigen::MatrixXd V1,V2;
Eigen::MatrixXi F1,F2;

// This function is called every time a keyboard button is pressed
bool key_down(igl::opengl::glfw::Viewer& viewer, unsigned char key, int modifier)
{
  std::cout<<"Key: "<<key<<" "<<(unsigned int)key<<std::endl;
  if (key == '1')
  {
    // Clear should be called before drawing the mesh
    viewer.data().clear();
    // Draw_mesh creates or updates the vertices and faces of the displayed mesh.
    // If a mesh is already displayed, draw_mesh returns an error if the given V and
    // F have size different than the current ones
    viewer.data().set_mesh(V1, F1);
    viewer.core().align_camera_center(V1,F1);
  }
  else if (key == '2')
  {
    viewer.data().clear();
    viewer.data().set_mesh(V2, F2);
    viewer.core().align_camera_center(V2,F2);
  }

  return false;
}

int main(int argc, char *argv[])
{
  // Load two meshes
  igl::readOFF(TUTORIAL_SHARED_PATH "/bumpy.off", V1, F1);
  igl::readOFF(TUTORIAL_SHARED_PATH "/fertility.off", V2, F2);
  std::cout<<R"(
1 Switch to bump mesh
2 Switch to fertility mesh
    )";

  igl::opengl::glfw::Viewer viewer;
  // Register a keyboard callback that allows to switch between
  // the two loaded meshes
  viewer.callback_key_down = &key_down;
  viewer.data().set_mesh(V1, F1);
  viewer.launch();
}
  • 按下键盘“1”:
  • Libigl学习笔记——二、第一章——Libigl官方教程学习_第6张图片
  • 按下键盘“2”
  • Libigl学习笔记——二、第一章——Libigl官方教程学习_第7张图片
    回调在查看器中注册,如下所示:
viewer.callback_key_down = &key_down;

请注意,在使用set_mesh之前会清除网格

  • 每次绘制网格的顶点或面数发生变化时,都必须调用此值。每个回调都会返回一个布尔值,该值告诉查看器事件是否已由插件处理,或者查看器是否应该正常处理它。这很有用,例如:
  • 如果要直接在代码中控制相机,则可以禁用默认的鼠标事件处理。

可以使用插件扩展查看器

  • 插件是实现所有查看器回调的类
  • 有关更多详细信息,请参阅Viewer_plugin。

1.4 标量场可视化 Scalar Field Visualization(104)

可以使用以下 set_colors 函数将颜色关联到面或顶点

viewer.data().set_colors(C);

C 是一个 #C x 3 矩阵,每行一种 RGB 颜色

  • C 行数必须与网格的面数或顶点数一样多
  • 根据 C 的大小 ,查看器将颜色应用于面或顶点

示例 104 中,网格顶点的颜色根据其笛卡尔坐标进行设置

#include 
#include 

Eigen::MatrixXd V;
Eigen::MatrixXi F;
Eigen::MatrixXd C;

int main(int argc, char *argv[])
{
  // Load a mesh in OFF format
  igl::readOFF(TUTORIAL_SHARED_PATH "/screwdriver.off", V, F);

  // Plot the mesh
  igl::opengl::glfw::Viewer viewer;
  viewer.data().set_mesh(V, F);

  // Use the (normalized) vertex positions as colors
  C =
    (V.rowwise()            - V.colwise().minCoeff()).array().rowwise()/
    (V.colwise().maxCoeff() - V.colwise().minCoeff()).array();

  // Add per-vertex colors
  viewer.data().set_colors(C);

  // Launch the viewer
  viewer.launch();
}

Libigl学习笔记——二、第一章——Libigl官方教程学习_第8张图片(例104)设置网格的颜色。

每个顶点标量字段可以使用以下功能直接 set_data 可视化

viewer.data().set_data(D);
  • D 是一个 #V x 1 向量,每个顶点对应一个值
  • set_data 将根据线性插值三角形内的数据进行着色(在片段着色器中),并使用此插值数据在颜色映射表(存储为纹理)中查找颜色
  • 颜色映射表默认为 igl::COLOR_MAP_TYPE_VIRIDIS 21 个离散间隔
  • 可以使用 set_colormap 设置自定义颜色图

1.5 叠加 Overlays(105)

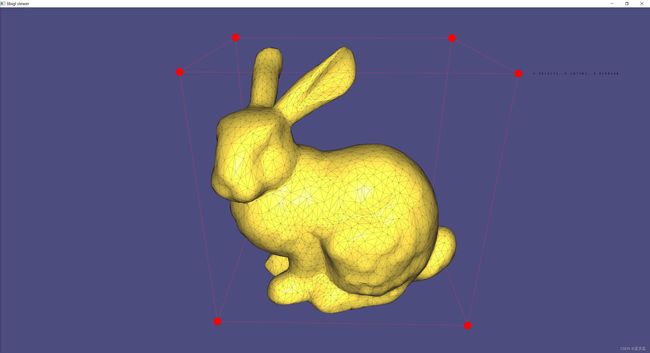
  1. 除了绘制表面外,查看器还支持点、线和文本标签的可视化:在开发几何处理算法以绘制调试信息时,这些叠加非常有用:
viewer.data().add_points(P,Eigen::RowVector3d(r,g,b));
  1. 为 P 的每一行绘制一个颜色点 r,g,b
  • 该点放置在 P 的每一行中指定的坐标处,P是 3 #P 矩阵
  • 点的大小(以像素为单位)可以通过设置 viewer.data().point_size 全局更改
viewer.data().add_edges(P1,P2,Eigen::RowVector3d(r,g,b));
  1. 为 P1 和 P2 的每一行绘制一条颜色为 r,g,b 的线,它将 3D 点连接到 P2 中的点。P1 和 P2 的大小均为 #P x 3
viewer.data().add_label(p,str);
  1. 绘制一个标签,其中包含位置 p 处的字符串 str,该向量长度为 3。
  2. 示例 105 演示了这些功能
  • 其中使用直线和点绘制网格的边界框
  • 使用矩阵对网格及其属性进行编码,可以为许多操作编写简短而高效的代码,避免编写循环
    • 例如,网格的边界框可以通过取 : V
      Eigen::Vector3d m = V.colwise().minCoeff();
      Eigen::Vector3d M = V.colwise().maxCoeff();
      
#include 
#include 
#include 
#include 
#include 

Eigen::MatrixXd V;
Eigen::MatrixXi F;

int main(int argc, char *argv[])
{
  // Load a mesh in OFF format
  igl::readOFF(TUTORIAL_SHARED_PATH "/bunny.off", V, F);

  // Find the bounding box
  Eigen::Vector3d m = V.colwise().minCoeff();
  Eigen::Vector3d M = V.colwise().maxCoeff();

  // Corners of the bounding box
  Eigen::MatrixXd V_box(8,3);
  V_box <<
  m(0), m(1), m(2),
  M(0), m(1), m(2),
  M(0), M(1), m(2),
  m(0), M(1), m(2),
  m(0), m(1), M(2),
  M(0), m(1), M(2),
  M(0), M(1), M(2),
  m(0), M(1), M(2);

  // Edges of the bounding box
  Eigen::MatrixXi E_box(12,2);
  E_box <<
  0, 1,
  1, 2,
  2, 3,
  3, 0,
  4, 5,
  5, 6,
  6, 7,
  7, 4,
  0, 4,
  1, 5,
  2, 6,
  7 ,3;

  // Plot the mesh
  igl::opengl::glfw::Viewer viewer;
  viewer.data().set_mesh(V, F);

  // Plot the corners of the bounding box as points
  viewer.data().add_points(V_box,Eigen::RowVector3d(1,0,0));

  // Plot the edges of the bounding box
  for (unsigned i=0;i<E_box.rows(); ++i)
    viewer.data().add_edges
    (
      V_box.row(E_box(i,0)),
      V_box.row(E_box(i,1)),
      Eigen::RowVector3d(1,0,0)
    );

  // Plot labels with the coordinates of bounding box vertices
  std::stringstream l1;
  l1 << m(0) << ", " << m(1) << ", " << m(2);
  viewer.data().add_label(m+Eigen::Vector3d(-0.007, 0, 0),l1.str());
  std::stringstream l2;
  l2 << M(0) << ", " << M(1) << ", " << M(2);
  viewer.data().add_label(M+Eigen::Vector3d(0.007, 0, 0),l2.str());
  // activate label rendering
  viewer.data().show_custom_labels = true;

  // Rendering of text labels is handled by ImGui, so we need to enable the ImGui
  // plugin to show text labels.
  igl::opengl::glfw::imgui::ImGuiPlugin plugin;
  viewer.plugins.push_back(&plugin);
  igl::opengl::glfw::imgui::ImGuiMenu menu;
  plugin.widgets.push_back(&menu);
  menu.callback_draw_viewer_window = [](){};

  // Launch the viewer
  viewer.launch();
}

Libigl学习笔记——二、第一章——Libigl官方教程学习_第9张图片(例105)网格的边界框使用叠加显示

1.6 产看器菜单 Viewer Menu(106)

从最新版本开始,查看器使用新菜单,并将AntTweakBar和nanogui 完全替换为Dear ImGui

  • 要扩展查看器的默认菜单并显示更多用户定义的变量,您必须实现自定义接口,如示例 106 所示
// Add content to the default menu window
menu.callback_draw_viewer_menu = [&]()
{
  // Draw parent menu content
  menu.draw_viewer_menu();

  // Add new group
  if (ImGui::CollapsingHeader("New Group", ImGuiTreeNodeFlags_DefaultOpen))
  {
    // Expose variable directly ...
    ImGui::InputFloat("float", &floatVariable, 0, 0, 3);

    // ... or using a custom callback
    static bool boolVariable = true;
    if (ImGui::Checkbox("bool", &boolVariable))
    {
      // do something
      std::cout << "boolVariable: " << std::boolalpha << boolVariable << std::endl;
    }

    // Expose an enumeration type
    enum Orientation { Up=0, Down, Left, Right };
    static Orientation dir = Up;
    ImGui::Combo("Direction", (int *)(&dir), "Up\0Down\0Left\0Right\0\0");

    // We can also use a std::vector defined dynamically
    static int num_choices = 3;
    static std::vector<std::string> choices;
    static int idx_choice = 0;
    if (ImGui::InputInt("Num letters", &num_choices))
    {
      num_choices = std::max(1, std::min(26, num_choices));
    }
    if (num_choices != (int) choices.size())
    {
      choices.resize(num_choices);
      for (int i = 0; i < num_choices; ++i)
        choices[i] = std::string(1, 'A' + i);
      if (idx_choice >= num_choices)
        idx_choice = num_choices - 1;
    }
    ImGui::Combo("Letter", &idx_choice, choices);

    // Add a button
    if (ImGui::Button("Print Hello", ImVec2(-1,0)))
    {
      std::cout << "Hello\n";
    }
  }
};
  • 如果需要单独的新菜单窗口,实现:
// Draw additional windows
menu.callback_draw_custom_window = [&]()
{
  // Define next window position + size
  ImGui::SetNextWindowPos(ImVec2(180.f * menu.menu_scaling(), 10), ImGuiSetCond_FirstUseEver);
  ImGui::SetNextWindowSize(ImVec2(200, 160), ImGuiSetCond_FirstUseEver);
  ImGui::Begin(
      "New Window", nullptr,
      ImGuiWindowFlags_NoSavedSettings
  );

  // Expose the same variable directly ...
  ImGui::PushItemWidth(-80);
  ImGui::DragFloat("float", &floatVariable, 0.0, 0.0, 3.0);
  ImGui::PopItemWidth();

  static std::string str = "bunny";
  ImGui::InputText("Name", str);

  ImGui::End();
};
  • 完整106示例代码
#include 
#include 
#include 
#include 
#include 
#include 

int main(int argc, char *argv[])
{
  Eigen::MatrixXd V;
  Eigen::MatrixXi F;

  // Load a mesh in OFF format
  igl::readOFF(TUTORIAL_SHARED_PATH "/bunny.off", V, F);

  // Init the viewer
  igl::opengl::glfw::Viewer viewer;

  // Attach a menu plugin
  igl::opengl::glfw::imgui::ImGuiPlugin plugin;
  viewer.plugins.push_back(&plugin);
  igl::opengl::glfw::imgui::ImGuiMenu menu;
  plugin.widgets.push_back(&menu);

  // Customize the menu
  double doubleVariable = 0.1f; // Shared between two menus

  // Add content to the default menu window
  menu.callback_draw_viewer_menu = [&]()
  {
    // Draw parent menu content
    menu.draw_viewer_menu();

    // Add new group
    if (ImGui::CollapsingHeader("New Group", ImGuiTreeNodeFlags_DefaultOpen))
    {
      // Expose variable directly ...
      ImGui::InputDouble("double", &doubleVariable, 0, 0, "%.4f");

      // ... or using a custom callback
      static bool boolVariable = true;
      if (ImGui::Checkbox("bool", &boolVariable))
      {
        // do something
        std::cout << "boolVariable: " << std::boolalpha << boolVariable << std::endl;
      }

      // Expose an enumeration type
      enum Orientation { Up=0, Down, Left, Right };
      static Orientation dir = Up;
      ImGui::Combo("Direction", (int *)(&dir), "Up\0Down\0Left\0Right\0\0");

      // We can also use a std::vector defined dynamically
      static int num_choices = 3;
      static std::vector<std::string> choices;
      static int idx_choice = 0;
      if (ImGui::InputInt("Num letters", &num_choices))
      {
        num_choices = std::max(1, std::min(26, num_choices));
      }
      if (num_choices != (int) choices.size())
      {
        choices.resize(num_choices);
        for (int i = 0; i < num_choices; ++i)
          choices[i] = std::string(1, 'A' + i);
        if (idx_choice >= num_choices)
          idx_choice = num_choices - 1;
      }
      ImGui::Combo("Letter", &idx_choice, choices);

      // Add a button
      if (ImGui::Button("Print Hello", ImVec2(-1,0)))
      {
        std::cout << "Hello\n";
      }
    }
  };

  // Draw additional windows
  menu.callback_draw_custom_window = [&]()
  {
    // Define next window position + size
    ImGui::SetNextWindowPos(ImVec2(180.f * menu.menu_scaling(), 10), ImGuiCond_FirstUseEver);
    ImGui::SetNextWindowSize(ImVec2(200, 160), ImGuiCond_FirstUseEver);
    ImGui::Begin(
        "New Window", nullptr,
        ImGuiWindowFlags_NoSavedSettings
    );

    // Expose the same variable directly ...
    ImGui::PushItemWidth(-80);
    ImGui::DragScalar("double", ImGuiDataType_Double, &doubleVariable, 0.1, 0, 0, "%.4f");
    ImGui::PopItemWidth();

    static std::string str = "bunny";
    ImGui::InputText("Name", str);

    ImGui::End();
  };

  // Plot the mesh
  viewer.data().set_mesh(V, F);
  viewer.data().add_label(viewer.data().V.row(0) + viewer.data().V_normals.row(0).normalized()*0.005, "Hello World!");
  viewer.launch();
}

Libigl学习笔记——二、第一章——Libigl官方教程学习_第10张图片例106)可以轻松自定义查看器的 UI

1.7 多个网格 Multiple Meshes(107)

Libigl为渲染多个网格 igl::opengl::glfw::Viewer 提供了基本支持

  • 选择哪个网格通过 viewer.selected_data_index 场进行控制
  • 默认情况下,索引设置为 0 ,因此在单个网格的典型情况下,返回 igl::ViewerData 对应于唯一网格 viewer.data() 的网格
  • 示例107完整展示
#include 
#include 
#include 
#include 
#include 

int main(int argc, char * argv[])
{
  igl::opengl::glfw::Viewer viewer;
  const auto names =
    {"cube.obj","sphere.obj","xcylinder.obj","ycylinder.obj","zcylinder.obj"};
  std::map<int, Eigen::RowVector3d> colors;
  int last_selected = -1;
  for(const auto & name : names)
  {
    viewer.load_mesh_from_file(std::string(TUTORIAL_SHARED_PATH) + "/" + name);
    colors.emplace(viewer.data().id, 0.5*Eigen::RowVector3d::Random().array() + 0.5);
  }

  viewer.callback_key_down =
    [&](igl::opengl::glfw::Viewer &, unsigned int key, int mod)
  {
    if(key == GLFW_KEY_BACKSPACE)
    {
      int old_id = viewer.data().id;
      if (viewer.erase_mesh(viewer.selected_data_index))
      {
        colors.erase(old_id);
        last_selected = -1;
      }
      return true;
    }
    return false;
  };

  // Refresh selected mesh colors
  viewer.callback_pre_draw =
    [&](igl::opengl::glfw::Viewer &)
  {
    if (last_selected != viewer.selected_data_index)
    {
      for (auto &data : viewer.data_list)
      {
        data.set_colors(colors[data.id]);
      }
      viewer.data_list[viewer.selected_data_index].set_colors(Eigen::RowVector3d(0.9,0.1,0.1));
      last_selected = viewer.selected_data_index;
    }
    return false;
  };

  viewer.launch();
  return EXIT_SUCCESS;
}

Libigl学习笔记——二、第一章——Libigl官方教程学习_第11张图片例107) igl::opengl::glfw::Viewer 可以渲染多个网格,每个网格都有自己的属性,如颜色。

1.8 多个视图 Multiple Views(108)

  1. Libigl 为 igl::opengl::glfw::Viewer 渲染具有多个视图的网格提供了基本支持

  2. 可以使用该方法 Viewer::append_core() 将新的视图核心添加到查看器中

  • 在任何查看器的整个生命周期中最多可以创建 31 个内核
  • 每个内核都分配有一个 unsigned int 保证唯一的 ID
  • 可以通过调用该方法的 Viewer::core(id) id 访问内核
  1. 当有多个视图核心时,用户负责通过设置其 viewport 属性来指定每个视口的大小和位置。用户还必须指示如何在窗口大小更改时调整每个视口的大小。例如:
viewer.callback_post_resize = [&](igl::opengl::glfw::Viewer &v, int w, int h) {
  v.core( left_view).viewport = Eigen::Vector4f(0, 0, w / 2, h);
  v.core(right_view).viewport = Eigen::Vector4f(w / 2, 0, w - (w / 2), h);
  return true;
};
  1. 请注意,可以使用该方法 Viewer::selected_core_index() 选择鼠标当前悬停的视口,然后可以通过调用 viewer.core_list[viewer.selected_core_index] 来访问选定的视图核心
  2. 最后,给定视图核心上网格的可见性由每个网格的位掩码标志控制。可以通过调用该方法轻松控制此属性
viewer.data(mesh_id).set_visible(false, view_id);
  1. 追加新网格或新视图核心时,可选参数控制现有对象相对于新网格/视图的可见性。有关更多详细信息,请参阅 和 Viewer::append_core() 的文档 Viewer::append_mesh()
  2. 108示例完整展示
#include 
#include 
#include 
#include 
#include 

int main(int argc, char * argv[])
{
  igl::opengl::glfw::Viewer viewer;

  viewer.load_mesh_from_file(std::string(TUTORIAL_SHARED_PATH) + "/cube.obj");
  viewer.load_mesh_from_file(std::string(TUTORIAL_SHARED_PATH) + "/sphere.obj");

  unsigned int left_view, right_view;
  int cube_id = viewer.data_list[0].id;
  int sphere_id = viewer.data_list[1].id;
  viewer.callback_init = [&](igl::opengl::glfw::Viewer &)
  {
    viewer.core().viewport = Eigen::Vector4f(0, 0, 640, 800);
    left_view = viewer.core_list[0].id;
    right_view = viewer.append_core(Eigen::Vector4f(640, 0, 640, 800));
    return false;
  };

  viewer.callback_key_down = [&](igl::opengl::glfw::Viewer &, unsigned int key, int mod)
  {
    if(key == GLFW_KEY_SPACE)
    {
      // By default, when a core is appended, all loaded meshes will be displayed in that core.
      // Displaying can be controlled by calling viewer.data().set_visible().
      viewer.data(cube_id).set_visible(false, left_view);
      viewer.data(sphere_id).set_visible(false, right_view);
    }
    return false;
  };

  viewer.callback_post_resize = [&](igl::opengl::glfw::Viewer &v, int w, int h) {
    v.core( left_view).viewport = Eigen::Vector4f(0, 0, w / 2, h);
    v.core(right_view).viewport = Eigen::Vector4f(w / 2, 0, w - (w / 2), h);
    return true;
  };

  viewer.launch();
  return EXIT_SUCCESS;
}

Libigl学习笔记——二、第一章——Libigl官方教程学习_第12张图片Libigl学习笔记——二、第一章——Libigl官方教程学习_第13张图片例108)可以使用 igl::opengl::glfw::Viewer 多个视图渲染同一场景,每个视图都有自己的属性,如颜色和单独的网格可见性

1.9 Guizmos 查看器Viewer Guizmos(109)

  1. 目前不可能同时激活多个与 ImGui 相关的查看器插件(包括 ImGuiMenu 和 ImGuizmoPlugin SelectionPlugin )
  2. 查看器与ImGuizmo集成,以提供用于操作网格的小部件。网格操作包括平移、旋转和缩放,其中 W,w 、 E,e 和 R,r 分别用于在它们之间切换
  3. 首先,向查看器注册 ImGuizmoPlugin 插件:
#include 

// ImGuizmoPlugin replaces the ImGuiMenu plugin entirely
igl::opengl::glfw::imgui::ImGuizmoPlugin plugin;
vr.plugins.push_back(&plugin);
  1. 初始化时,必须为ImGuizmo提供网格质心,如示例109所示:
// Initialize ImGuizmo at mesh centroid
plugin.T.block(0,3,3,1) = 
  0.5*(V.colwise().maxCoeff() + V.colwise().minCoeff()).transpose().cast<float>();
  1. 为了应用 guizmos 调用的网格操作,需要计算生成的转换矩阵,并通过查看器的 API 显式应用于输入几何数据:
// Update can be applied relative to this remembered initial transform
const Eigen::Matrix4f T0 = plugin.T;
// Attach callback to apply imguizmo's transform to mesh
plugin.callback = [&](const Eigen::Matrix4f & T)
{
  const Eigen::Matrix4d TT = (T*T0.inverse()).cast<double>().transpose();
  vr.data().set_vertices(
    (V.rowwise().homogeneous()*TT).rowwise().hnormalized());
  vr.data().compute_normals();
};
  1. 109案例完整展示:
#include 
#include 
#include 
#include 
#include 
#include 

int main(int argc, char *argv[])
{
  // Load a mesh from file
  Eigen::MatrixXd V;
  Eigen::MatrixXi F;
  igl::read_triangle_mesh(argc>1?argv[1]: TUTORIAL_SHARED_PATH "/cow.off",V,F);
  // Set up viewer
  igl::opengl::glfw::Viewer vr;
  vr.data().set_mesh(V,F);
 
  igl::opengl::glfw::imgui::ImGuiPlugin imgui_plugin;
  vr.plugins.push_back(&imgui_plugin);

  // Add a 3D gizmo plugin
  igl::opengl::glfw::imgui::ImGuizmoWidget gizmo;
  imgui_plugin.widgets.push_back(&gizmo);
  // Initialize ImGuizmo at mesh centroid
  gizmo.T.block(0,3,3,1) =
    0.5*(V.colwise().maxCoeff() + V.colwise().minCoeff()).transpose().cast<float>();
  // Update can be applied relative to this remembered initial transform
  const Eigen::Matrix4f T0 = gizmo.T;
  // Attach callback to apply imguizmo's transform to mesh
  gizmo.callback = [&](const Eigen::Matrix4f & T)
  {
    const Eigen::Matrix4d TT = (T*T0.inverse()).cast<double>().transpose();
    vr.data().set_vertices(
      (V.rowwise().homogeneous()*TT).rowwise().hnormalized());
    vr.data().compute_normals();
  };
  // Maya-style keyboard shortcuts for operation
  vr.callback_key_pressed = [&](decltype(vr) &,unsigned int key, int mod)
  {
    switch(key)
    {
      case ' ': gizmo.visible = !gizmo.visible; return true;
      case 'W': case 'w': gizmo.operation = ImGuizmo::TRANSLATE; return true;
      case 'E': case 'e': gizmo.operation = ImGuizmo::ROTATE;    return true;
      case 'R': case 'r': gizmo.operation = ImGuizmo::SCALE;     return true;
    }
    return false;
  };

  igl::opengl::glfw::imgui::ImGuiMenu menu;
  imgui_plugin.widgets.push_back(&menu);

  std::cout<<R"(
W,w  Switch to translate operation
E,e  Switch to rotate operation
R,r  Switch to scale operation
)";
  vr.launch();
}

Libigl学习笔记——二、第一章——Libigl官方教程学习_第14张图片([示例 109](https://github.com/libigl/libigl/tree/main/tutorial/109_ImGuizmo/main.cpp))Libigl Viewer与ImGuizmo集成以提供转换小部件

1.10 Msh 查看器 Msh Viewer(110)

Libigl 可以读取以 Gmsh.msh 版本 2 文件格式存储的混合网格

  • 这些文件可以包含不同网格的混合,以及在元素级别和顶点级别定义的其他标量和矢量字段
Eigen::MatrixXd X; // Vertex coorinates (Xx3)
Eigen::MatrixXi Tri; // Triangular elements (Yx3)
Eigen::MatrixXi Tet; // Tetrahedral elements (Zx4)
Eigen::VectorXi TriTag; // Integer tags defining triangular submeshes
Eigen::VectorXi TetTag; // Integer tags defining tetrahedral submeshes

std::vector<std::string> XFields; // headers (names) of fields defined on vertex level
std::vector<std::string> EFields; // headers (names) of fields defined on element level

std::vector<Eigen::MatrixXd> XF;   // fields defined on vertex 
std::vector<Eigen::MatrixXd> TriF; // fields defined on triangular elements
std::vector<Eigen::MatrixXd> TetF; // fields defined on tetrahedral elements

// loading mixed mesh from Gmsh file
igl::readMSH("hand.msh", X, Tri, Tet, TriTag, TetTag, XFields, XF, EFields, TriF, TetF);
  • 但是,交互式查看器无法直接绘制四面体
  • 因此,出于可视化目的,每个四面体可以转换为四个三角形
  • 110案例完整展示
#include 
#include 
#include 

#include 
#include 


Eigen::MatrixXd X,B;
Eigen::MatrixXi Tri;
Eigen::MatrixXi Tet;
Eigen::VectorXi TriTag;
Eigen::VectorXi TetTag;

Eigen::VectorXd D;

std::vector<std::string> XFields;
std::vector<std::string> EFields;

std::vector<Eigen::MatrixXd> XF;
std::vector<Eigen::MatrixXd> TriF;
std::vector<Eigen::MatrixXd> TetF;


// This function is called every time a keyboard button is pressed
bool key_down(igl::opengl::glfw::Viewer& viewer, unsigned char key, int modifier)
{
  using namespace std;
  using namespace Eigen;

  if (key >= '1' && key <= '9')
  {
    double t = double((key - '1')+1) / 9.0;

    VectorXd v = B.col(2).array() - B.col(2).minCoeff();
    v /= v.col(0).maxCoeff();

    vector<int> s;

    for (unsigned i=0; i<v.size();++i)
      if (v(i) < t && v(i)>(t-0.1)) // select a thick slab
        s.push_back(i);

    MatrixXd V_temp(s.size()*4,3);
    MatrixXi F_temp(s.size()*4,3);
    VectorXd D_temp(s.size()*4);

    for (unsigned i=0; i<s.size();++i)
    {
      V_temp.row(i*4+0) = X.row(Tet(s[i],0));
      V_temp.row(i*4+1) = X.row(Tet(s[i],1));
      V_temp.row(i*4+2) = X.row(Tet(s[i],2));
      V_temp.row(i*4+3) = X.row(Tet(s[i],3));

      F_temp.row(i*4+0) << (i*4)+0, (i*4)+1, (i*4)+3;
      F_temp.row(i*4+1) << (i*4)+0, (i*4)+2, (i*4)+1;
      F_temp.row(i*4+2) << (i*4)+3, (i*4)+2, (i*4)+0;
      F_temp.row(i*4+3) << (i*4)+1, (i*4)+2, (i*4)+3;

      D_temp(i*4+0) = D(s[i]);
      D_temp(i*4+1) = D(s[i]);
      D_temp(i*4+2) = D(s[i]);
      D_temp(i*4+3) = D(s[i]);
    }

    viewer.data().clear();
    viewer.data().set_mesh(V_temp, F_temp);

    Eigen::MatrixXd C;
    igl::colormap(igl::COLOR_MAP_TYPE_VIRIDIS, D_temp, true, C);
    viewer.data().set_face_based(true);
    viewer.data().set_colors(C);

  }

  return false;
}

int main(int argc, char *argv[])
{
  using namespace Eigen;
  using namespace std;

  igl::readMSH(argc > 1 ? argv[1] : TUTORIAL_SHARED_PATH "/hand.msh", X, Tri, Tet, TriTag, TetTag, XFields, XF, EFields, TriF, TetF);

  for(auto i:EFields)
    std::cout<<i<<"\t";
  std::cout<<std::endl;

  // search for a predefined field name "E"
  for(int i=0;i<EFields.size();++i)
  {
    if(EFields[i]=="E")
      D = TetF[i].rowwise().norm(); // take a row-wise norm
  }
  std::cout<<"D:"<<D.rows()<<"x"<<D.cols()<<std::endl;

  // generate fake data
  if(D.rows()==0)
    D = TetTag.cast<double>();

  // Compute barycenters
  igl::barycenter(X, Tet, B);

  // Plot the generated mesh
  igl::opengl::glfw::Viewer viewer;

  viewer.callback_key_down = &key_down;
  key_down(viewer,'5',0);
  viewer.launch();
}

Libigl学习笔记——二、第一章——Libigl官方教程学习_第15张图片(例110)显示四面体网格的切片,其中标量场在元素级别定义

1.11 材质捕获 Material Captures(111)

MatCaps(材质捕获),也称为环境贴图,是一种简单的基于图像的渲染技术,无需复杂的着色器程序即可实现复杂的照明
使用离线渲染甚至绘画程序,可以创建渲染单位球体的图像,例如在工作室照明下查看的带有玉石材质的球体图像:
-在这里插入图片描述

Libigl学习笔记——二、第一章——Libigl官方教程学习_第16张图片

渲染非球形形状时

  • 在片段着色器中,我们计算法线向量 ^n ,然后使用其 x− 和 y− 组件作为纹理坐标来查找 matcap 图像中的相应点
  • 在片段着色器中无需完成光照模型或光照计算,它只是纹理查找,但我们使用每个片段的法线,而不是需要模型的 UV 映射(参数化)
  • 通过使用相对于相机坐标系的法线,我们可以“免费”获得与视图相关的复杂照明:
  • 案例111完整展示
#include 
#include 
#include 

int main(int argc, char *argv[])
{
  igl::opengl::glfw::Viewer v;
  Eigen::MatrixXd V;
  Eigen::MatrixXi F;
  igl::read_triangle_mesh(
    argc>1?argv[1]: TUTORIAL_SHARED_PATH "/armadillo.obj",V,F);
  Eigen::Matrix<unsigned char,Eigen::Dynamic,Eigen::Dynamic> R,G,B,A;
  igl::png::readPNG(argc>2?argv[2]: TUTORIAL_SHARED_PATH "/jade.png",R,G,B,A);
  v.data().set_mesh(V,F);
  v.data().set_texture(R,G,B,A);
  v.data().use_matcap = true;
  v.data().show_lines = false;
  v.launch();
}
  • 示例 111 演示如何使用一个玉材质捕捉器向 libigl 查看器添加复杂的照明
  • 在 libigl 中,如果 matcap 图像的 rgba 数据存储在 R、G、B 和 A (作为输出,例如 igl::png::readPNG by )中 R ,那么可以通过将其设置为纹理数据然后打开 matcap 渲染来附加到 : igl::opengl::ViewerData
viewer.data().set_texture(R,G,B,A);
viewer.data().use_matcap = true;

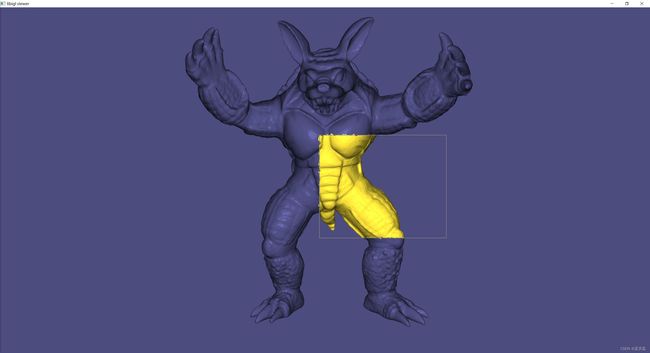
1.12 鼠标选中显示 Selection(112)

  • 112案例完整展示
#include 
#include 
#include 
#include 
#include 
#include 

#include 
#include 

int main(int argc, char *argv[])
{
  // Inline mesh of a cube
  Eigen::MatrixXd V;
  Eigen::MatrixXi F;
  igl::read_triangle_mesh(
    argc>1?argv[1]: TUTORIAL_SHARED_PATH "/armadillo.obj",V,F);

  // Plot the mesh
  igl::opengl::glfw::Viewer vr;
  igl::opengl::glfw::imgui::ImGuiPlugin imgui_plugin;
  vr.plugins.push_back(&imgui_plugin);
  igl::opengl::glfw::imgui::SelectionWidget widget;
  imgui_plugin.widgets.push_back(&widget);

  Eigen::VectorXd W = Eigen::VectorXd::Zero(V.rows());
  Eigen::Array<double,Eigen::Dynamic,1> and_visible = 
    Eigen::Array<double,Eigen::Dynamic,1>::Zero(V.rows());
  const Eigen::MatrixXd CM = (Eigen::MatrixXd(2,3)<<
      0.3,0.3,0.5,                 
      255.0/255.0,228.0/255.0,58.0/255.0).finished();
  bool only_visible = false;
  const auto update = [&]()
  {
    const bool was_face_based = vr.data().face_based;
    Eigen::VectorXd S = W;
    if(only_visible) { S.array() *= and_visible; }
    vr.data().set_data(S,0,1,igl::COLOR_MAP_TYPE_PLASMA,2);
    vr.data().face_based = was_face_based;
    vr.data().set_colormap(CM);
  };
  igl::AABB<Eigen::MatrixXd, 3> tree;
  tree.init(V,F);
  widget.callback = [&]()
  {
    screen_space_selection(V,F,tree,vr.core().view,vr.core().proj,vr.core().viewport,widget.L,W,and_visible);
    update();
  };
  vr.callback_key_pressed = [&](decltype(vr) &,unsigned int key, int mod)
  {
    switch(key)
    {
      case ' ': only_visible = !only_visible; update(); return true;
      case 'D': case 'd': W.setZero(); update(); return true;
    }
    return false;
  };
  std::cout<<R"(
Usage:
  [space]  Toggle whether to take visibility into account
  D,d      Clear selection
)";
  vr.data().set_mesh(V,F);
  vr.data().set_face_based(true);
  vr.core().background_color.head(3) = CM.row(0).head(3).cast<float>();
  vr.data().line_color.head(3) = (CM.row(0).head(3)*0.5).cast<float>();
  vr.data().show_lines = F.rows() < 20000;
  update();
  vr.launch();
}

Libigl学习笔记——二、第一章——Libigl官方教程学习_第17张图片初始打开状态
Libigl学习笔记——二、第一章——Libigl官方教程学习_第18张图片鼠标框选,显示颜色
Libigl学习笔记——二、第一章——Libigl官方教程学习_第19张图片

你可能感兴趣的:(Libigl学习笔记,学习,笔记)