【Redis】使用 Java 客户端连接 Redis
一、三种客户端比较
Jedis : 学习成本低,以 Redis 命令作为方法名称,但是其线程不安全
lettuce:基于 Netty 实现,支持同步、异步、响应式编程(SpringBoot),并且线程安全。支持 Redis 的哨兵模式、集群模式和管道模式。
Redisson: 基于 Redis 实现的分布式、可伸缩的 Java 数据结构集合。
二、Jedis 基础使用
- 引入依赖
        <dependency>
            <groupId>redis.clientsgroupId>
            <artifactId>jedisartifactId>
            <version>4.3.1version>
        dependency>
- 使用单元测试进行测试
package com.example.redis;

import lombok.Data;
import org.junit.jupiter.api.BeforeEach;
import org.junit.jupiter.api.Test;
import org.springframework.boot.test.context.SpringBootTest;
import redis.clients.jedis.Jedis;


@SpringBootTest
class RedisApplicationTests {

    private Jedis jedis;
    @BeforeEach
    void setUp(){
        jedis = new Jedis("192.168.33.10", 6379); // new 一个 jedis 对象
        jedis.select(0);
    }
    @Test
    void contextLoads() {
        jedis.set("testJedis", "存入成功");
        String haha = jedis.get("testJedis");
        System.out.printf(haha);
    }

}
三、SpringDataRedis
1. SpringDataRedis 基础概况

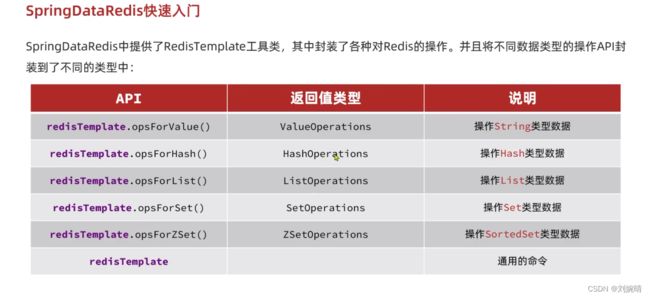
2. 使用步骤
1)导入依赖
        <dependency>
            <groupId>org.springframework.bootgroupId>
            <artifactId>spring-boot-starter-data-redisartifactId>
        dependency>
        <dependency>
            <groupId>org.apache.commonsgroupId>
            <artifactId>commons-pool2artifactId>
            <version>2.11.1version>
        dependency>
2)编写配置文件
spring:
  redis:
    host: 192.168.33.10 # 你的 redis 地址
    #数据库索引
    database: 0
    port: 6379
    #password:
    #连接超时时间(ms)
    timeout: 5000
    # 自定义redis默认过期时间(单位:时)
    expire-time: 24
    jedis:
      pool:
        # 连接池最大连接数(使用负值表示没有限制)
        max-active: -1
        # 连接池最大阻塞等待时间(使用负值表示没有限制)
        max-wait: -1
3) 测试连接
package com.example.redis;

import lombok.Data;
import org.junit.jupiter.api.BeforeEach;
import org.junit.jupiter.api.Test;
import org.springframework.beans.factory.annotation.Autowired;
import org.springframework.boot.test.context.SpringBootTest;
import org.springframework.data.redis.core.RedisTemplate;
import redis.clients.jedis.Jedis;


@SpringBootTest
class RedisApplicationTests {

    @Autowired //自动注入即可
    private RedisTemplate redisTemplate;

    @Test
    void contextLoads() {
        redisTemplate.opsForValue().set("testRedisTemplate", "测试成功");
        redisTemplate.opsForValue().get("testRedisTemplate");
    }

}
4) 对象类型序列化存储
———— 方式一:
redisTemplate 的 key 和 value 都是对象类型。key 和 value 会先被序列化,然后存储 ,若是自己不定义序列化方式,会用默认的 jdk 的序列化器 。这种方式序列化出来的 key 和 value 往往是读不友好的,因此我们要自定义序列化方式。
在具体实现时,我们将 key 固定为 String 类型 ( key 一般情况都是 String 类型),将 Value 固定为 Object 类型,key 使用 RedisSerializer.string() 方式序列化,value 使用 GenericJackson2JsonRedisSerializer 序列化器序列化。
- 为容器中注入一配置类设置 RedisTemplate序列化方式:
package com.example.redis.config;

import org.springframework.context.annotation.Bean;
import org.springframework.context.annotation.Configuration;
import org.springframework.data.redis.connection.RedisConnectionFactory;
import org.springframework.data.redis.core.RedisTemplate;
import org.springframework.data.redis.serializer.GenericJackson2JsonRedisSerializer;
import org.springframework.data.redis.serializer.RedisSerializer;

@Configuration
public class RedisConfig {
    @Bean
    public RedisTemplate<String, Object> redisTemplate(RedisConnectionFactory redisConnectionFactory){
        // 创建 RedisTemplate 对象
        RedisTemplate<String, Object> redisTemplate = new RedisTemplate<>();
        // 设置连接工厂
        redisTemplate.setConnectionFactory(redisConnectionFactory);
        // 创建 JSON 序列化工具
        GenericJackson2JsonRedisSerializer genericJackson2JsonRedisSerializer = new GenericJackson2JsonRedisSerializer();
        // 设置 key 的序列化 (用 String 类型的序列化)
        redisTemplate.setKeySerializer(RedisSerializer.string());
        redisTemplate.setHashKeySerializer(RedisSerializer.string());
        // 设置 value 的序列化 (用 jack 类型的序列化)
        redisTemplate.setValueSerializer(genericJackson2JsonRedisSerializer);
        redisTemplate.setHashKeySerializer(genericJackson2JsonRedisSerializer);

        return redisTemplate;
    }
}
- 存储读取对象测试:
// City 对象
package com.example.redis.bean;

import lombok.Data;

import java.io.Serializable;

@Data
public class City implements Serializable {
    private int id;
    private String name;
    private String countryCode;
    private String district;
    private String population;
}
	// 测试类
    @Autowired
    private RedisTemplate<String, Object> redisTemplate;

    @Test
    void contextLoads() {
        City city = new City();
        city.setId(1);
        city.setName("沈阳");
        city.setPopulation("10000");
        city.setDistrict("haha");
        city.setCountryCode("中国");

        redisTemplate.opsForValue().set("city:1", city);

        City c = (City) redisTemplate.opsForValue().get("city:1");
        System.out.printf("*********************************************" + c + "************************************");
    }
结果截图:

———— 方式二:
GenericJackson2JsonRedisSerializer 的问题:
GenericJackson2JsonRedisSerializer 存储对象时夹带了私货 , @class 占用了额外内存空间,但是但是不加 @class 就不能自动反序列化,因此我们提出方式二。
解决 GenericJackson2JsonRedisSerializer 空间占用问题:
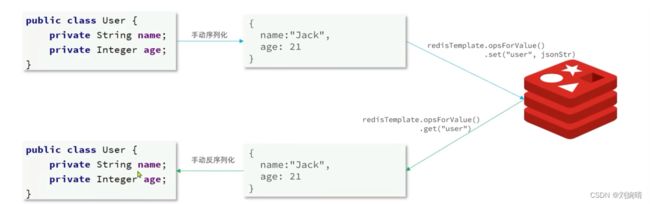
存储对象时对对象进行 手动序列化 和 反序列化,具体实现时,使用SpringMVC 提供的 ObjectMapper 类的 writeValueAsString 和 readValue 方法对对象进行序列化和反序列化。
示例代码如下:
import com.example.redis.bean.City;
import com.fasterxml.jackson.core.JsonProcessingException;
import com.fasterxml.jackson.databind.ObjectMapper;
import org.junit.jupiter.api.Test;
import org.springframework.beans.factory.annotation.Autowired;
import org.springframework.boot.test.context.SpringBootTest;
import org.springframework.data.redis.core.RedisTemplate;
import org.springframework.data.redis.core.StringRedisTemplate;
@SpringBootTest
class RedisStringApplicationTests {
@Autowired
private StringRedisTemplate redisTemplate;
// SpringMVC 中手动序列化的工具
private static final ObjectMapper mapper = new ObjectMapper();
@Test
void contextLoads() throws JsonProcessingException {
// 创建对象
City city = new City();
city.setId(1);
city.setName("沈阳");
city.setPopulation("10000");
city.setDistrict("haha");
city.setCountryCode("中国");
// 手动序列化
String json = mapper.writeValueAsString(city);
// 写入数据
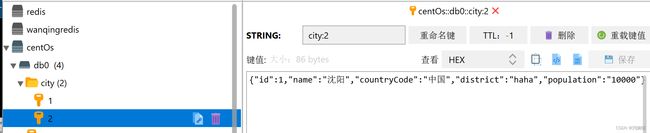
redisTemplate.opsForValue().set("city:2", json);
// 获取数据
String getCityJson = redisTemplate.opsForValue().get("city:2");
// 手动反序列化为对象
City c = mapper.readValue(getCityJson, City.class);
System.out.println("****************************" + c + "************************");
}
}
结果截图:
通过这种方式存储的对象数据就清清爽爽了
5) Hash 数据结构操作测试
@SpringBootTest
class RedisHashApplicationTests {
    @Autowired
    private StringRedisTemplate stringRedisTemplate;
    @Test
    void contextLoads() {
        // 存数据
        stringRedisTemplate.opsForHash().put("city:3", "id", "3");
        stringRedisTemplate.opsForHash().put("city:3", "name", "北京");

        // 取数据
        Map<Object, Object> entries =  stringRedisTemplate.opsForHash().entries("city:3");

        System.out.printf("*********************************************" + entries);
    }
}