电子密码锁仿真系统
西电A测:电子密码仿真系统
- 目录
-
- Question
- 软件安装
- 具体步骤
-
- 1. 在Proteus中添加arduino元件:
- 2. 下载Arduino扩展库keypad:
- 3. Arduino编程
- 4. 导出.HEX文件
- 5. Proteus仿真
目录
Question
通过键盘输入密码,LCD 上显示输入密码,Arduino UNO(Atmega328P)
判断密码是否正确。如果密码正确,LCD 上显示开锁成功,绿灯亮,连接继电
器的黄灯亮。如果密码错误,LCD 上显示开锁失败,红灯亮,连接继电器的黄
灯灭。
软件安装
- Proteus 8 professional仿真软件
链接:https://pan.baidu.com/s/1_Ukq7oCbwa9mcaw-DQpCNw?pwd=dui5
提取码:dui5 - Arduino IDE
链接:https://pan.baidu.com/s/1znMlDU614QBs7uuEH-SO3g?pwd=facb
提取码:facb
具体步骤
1. 在Proteus中添加arduino元件:
链接:https://pan.baidu.com/s/14nQTUWOH-0cNKUREGsoLKQ?pwd=dx8a
提取码:dx8a
压缩包内的文件:

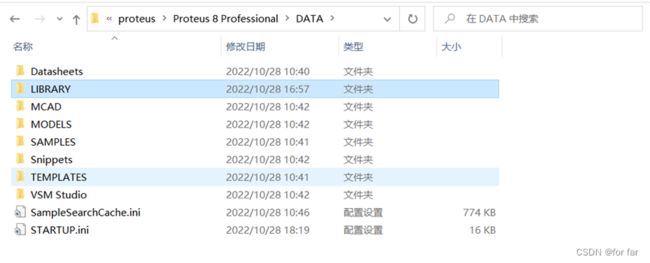
将文件夹中的问价拷贝到Proteus 8 Professional的LIBRARY的目录下

重新启动Proteus即可。
2. 下载Arduino扩展库keypad:
上述安装无效的话:
下载keypad插件
链接:https://pan.baidu.com/s/1CvlvASdm8YYd66uIVFh5kg?pwd=9iqq
提取码:9iqq
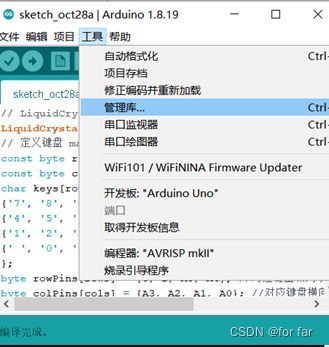
点击“项目”—>“加载库—>“添加.ZIP库”,找到刚刚下载的ZIP文件,重启即可。
3. Arduino编程
#include <LiquidCrystal.h>
#include <Keypad.h>
LiquidCrystal lcd(9, 8, 7, 6, 5, 4);
const byte rows = 4;
const byte cols = 4;
char keys[rows][cols] = {
{'7', '8', '9', '/'},
{'4', '5', '6', '*'},
{'1', '2', '3', '-'},
{' ', '0', '=', '+'} };
byte rowPins[rows] = {3, 2, A5, A4};
byte colPins[cols] = {A3, A2, A1, A0};
Keypad keypad = Keypad(makeKeymap(keys), rowPins, colPins, rows, cols);
String inputKey = "";
String pwd = "0000"; // 学号后四位
void setup() {
pinMode(11, OUTPUT);
pinMode(10, OUTPUT);
pinMode(12, OUTPUT);
lcd.begin(16, 2);
lcd.println("PASSWORD");
Serial.begin(9600);}
void loop() {
char key = keypad.getKey();
if (!key){
  return;}
if (key != NO_KEY) {
    lcd.print(key);}
lcd.clear();
lcd.print("PASSWORD");
if (key == ' '){
  inputKey = "";
  return;}
inputKey += key;
lcd.setCursor(0, 1);
lcd.print(String(inputKey));
if (inputKey.length() == 4){
  inputKey.trim();
  if (inputKey == pwd){
  	delay(1000);
	lcd.setCursor(0, 1);
	lcd.print("OPEN");
	digitalWrite(11, LOW);
	digitalWrite(10, HIGH);
	digitalWrite(12, HIGH);}
  else {
  	delay(900);
	lcd.setCursor(0,1);
	lcd.print("INVALID");
	digitalWrite(11, HIGH);
	digitalWrite(10, LOW);
	digitalWrite(12, LOW);}
  inputKey = "";}}
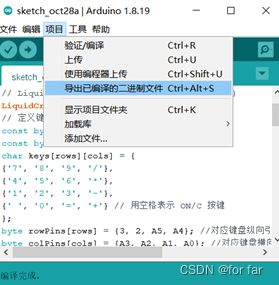
4. 导出.HEX文件
5. Proteus仿真
双击左上角芯片,修改“Program File”的文件,改为刚刚Arduino导出的.hex文件

点击左下角仿真按钮,在右下角的键盘上输入学号后四位,显示屏出现“OPEN”

(PS:本人纯纯的照葫芦画瓢,欢迎大佬指正!)


