SpringIOC源码学习DayTwo
类是如何注册成bean定义的
- 准备工作
-
- 配置类的解析过程
- invokeBeanFactoryPostProcessors详解
- 为什么要给配置类实现动态代理?@Configuration注解加与不加的区别
- 配置类怎么进行解析
- @Configuration、@Component 、@Bean的区别
准备工作
本篇主要是讲,类是如何注册成beanDefinition。
MainConfig.java:
@Configuration
@ComponentScan(basePackages = {"com.tuling.iocbeanlifecicle"})
        //excludeFilters={@ComponentScan.Filter(type=FilterType.ANNOTATION,value={Controller.class})})

public class MainConfig {

    /*@Bean("car")
    public Car car(){

        Car car = new Car();
        car.setName("xushu");
        car.setTank(tank());
        // 如果不去ioc 容器中拿   是不是每次都会创建新的
        // 都会先根据方法名  getBean("car")
        return car;
    }

    @Bean
    public Tank tank(){
        return new Tank();
    }*/
}
Car类:
@Component
public  class Car {

	private String name;

	private Tank tank;

	public void setTank(Tank tank) {
		this.tank = tank;
	}

	public Tank getTank() {
		return tank;
	}

	public String getName() {
		return name;
	}


	public void setName(String name) {
		this.name = name;
	}

	public Car() {
		System.out.println("car加载....");
	}

	public Car(String name) {
		this.name = name;
	}
}
Tank类
@Component
public class Tank  {


	private Integer index;

	private String name;

	public String getName() {
		return name;
	}

	public void setName(String name) {
		this.name = name;
	}

	public Integer getIndex() {
		return index;
	}

	public void setIndex(Integer index) {
		this.index = index;
	}


	public Tank() {
		System.out.println("tank加载");
	}

}
main:
public class MainStarter {

	public static void main(String[] args)   {
		// 加载spring上下文
		AnnotationConfigApplicationContext context = new AnnotationConfigApplicationContext(MainConfig.class);
		Car car =  (Car) context.getBean("car");
		/*Car car1 =  (Car) context.getBean("car");*/
		System.out.println(car.getName());
	}

}
配置类的解析过程
public AnnotationConfigApplicationContext(Class<?>... annotatedClasses) {
		//调用构造函数
		this();
		//注册我们的配置类
		register(annotatedClasses);
		//IOC容器刷新接口
		refresh();
}
在构造函数的reader里已经有了处理解析类的后置处理器ConfigurationClassPostProcessor,接下来通过register(annotatedClasses);把配置类注册到了BeaDefinitionMap里。
public void register(Class<?>... annotatedClasses) {
		Assert.notEmpty(annotatedClasses,
		"At least one annotated class must be specified");
		this.reader.register(annotatedClasses);
}
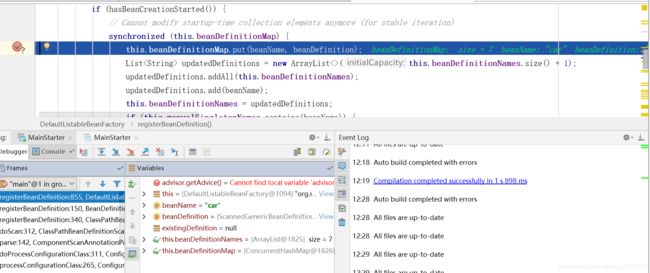
把配置类注册到BeanDefinitionMap当中

这时解析配置类的后置处理器,以及配置类都有了。注册完了,然后会在哪里调用呢?refresh方法
// 调用我们的bean工厂的后置处理器.
1. 会在此将class扫描成beanDefinition
2.bean工厂的后置处理器调用
invokeBeanFactoryPostProcessors(beanFactory);

我们看下beanFactory里都有什么

解析注解的类就是创世纪类
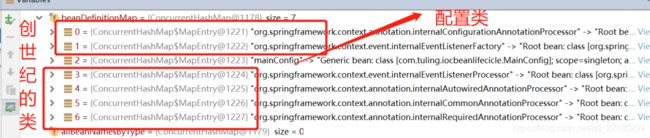
只有第一个internalConfigurationAnnotationProcessor实现了bean工厂的后置处理器,会在这里调用,这个类的作用:
在这个类中,会解析加了@Configuration的配置类,
还会解析@ComponentScan、@ComponentScans注解扫描的包,以及解析@Import等注解。
invokeBeanFactoryPostProcessors详解
那么配置类有了Mainconfig.java,解析配置类的ConfigurationClassPostProcessor也有了,那么在哪里调用呢?就是在invokeBeanFactoryPostProcessors这个方法里
在这里传了一个当前的bean工厂的后置处理器:getBeanFactoryPostProcessors()这个是空的。这个list是怎么来的呢,是通过context.addBeanFactoryPostProcessor();我们的代码里没有,所以是空的。
看下总体:会分为俩大步:
- BeanDefinitionRegistryPostProcessor,带注册功能
- BeanFactoryPostProcessor
去容器中获取BeanDefinitionRegistryPostProcessor的bean的处理器名称
String[] postProcessorNames =
	beanFactory.getBeanNamesForType(
			BeanDefinitionRegistryPostProcessor.class, true, false);
相当于拿到ConfigurationClassPostProcessor,因为
可以看到拿到了
拿到了之后断是否实现了PriorityOrdered接口的,最优先调用,再来看下ConfigurationClassPostProcessor结构


放到集合当中,然后排序sortPostProcessors
最后在这里调用
invokeBeanDefinitionRegistryPostProcessors(currentRegistryProcessors, registry);
怎么调用的先不看,先整体过一下。
调用内置实现PriorityOrdered接口ConfigurationClassPostProcessor完毕,优先级No1。然后调用实现order接口的,并且不在之前的processedBeans里。所以在上边调用下边的就会排除。

然后是调用没有实现任何优先级接口的BeanDefinitionRegistryPostProcessor
//定义一个重复处理的开关变量 默认值为true
	boolean reiterate = true;
	//第一次就可以进来
	while (reiterate) {
		//进入循环马上把开关变量给改为false
		reiterate = false;
		//去容器中获取BeanDefinitionRegistryPostProcessor的bean的处理器名称
		postProcessorNames = beanFactory.getBeanNamesForType(BeanDefinitionRegistryPostProcessor.class, true, false);
		//循环上一步获取的BeanDefinitionRegistryPostProcessor的类型名称
		for (String ppName : postProcessorNames) {
			//没有被处理过的
			if (!processedBeans.contains(ppName)) {
				//显示的调用getBean()的方式获取出该对象然后加入到currentRegistryProcessors集合中去
				currentRegistryProcessors.add(beanFactory.getBean(ppName, BeanDefinitionRegistryPostProcessor.class));
				//同时也加入到processedBeans集合中去
				processedBeans.add(ppName);
				//再次设置为true
				reiterate = true;
			}
		}
		//对currentRegistryProcessors集合中BeanDefinitionRegistryPostProcessor进行排序
		sortPostProcessors(currentRegistryProcessors, beanFactory);
		//把他加入到用于保存到registryProcessors中
		registryProcessors.addAll(currentRegistryProcessors);
		//调用他的后置处理方法
		invokeBeanDefinitionRegistryPostProcessors(currentRegistryProcessors, registry);
		//进行clear
		currentRegistryProcessors.clear();
	}
最后是invokeBeanFactoryPostProcessors。那我们先来看

调用bean工厂的后置处理器的这个方法postProcessBeanFactory
@Override
	public void postProcessBeanFactory(ConfigurableListableBeanFactory beanFactory) {
		int factoryId = System.identityHashCode(beanFactory);
		if (this.factoriesPostProcessed.contains(factoryId)) {
			throw new IllegalStateException(
					"postProcessBeanFactory already called on this post-processor against " + beanFactory);
		}
		this.factoriesPostProcessed.add(factoryId);
		if (!this.registriesPostProcessed.contains(factoryId)) {
			// BeanDefinitionRegistryPostProcessor hook apparently not supported...
			// Simply call processConfigurationClasses lazily at this point then.
			processConfigBeanDefinitions((BeanDefinitionRegistry) beanFactory);
		}
		// 使用cglib对配置类进行代理,因为@Bean方法到时候要进行创建Bean的实例
		enhanceConfigurationClasses(beanFactory);
		beanFactory.addBeanPostProcessor(new ImportAwareBeanPostProcessor(beanFactory));
	}
这里进行了很重要的事,对我们的配置类进行了cglib动态代理,也就是对配置类上加了@Configuration注解的,
为什么要给配置类实现动态代理?@Configuration注解加与不加的区别
    @Bean("car")
    public Car car(){

        Car car = new Car();
        car.setName("xushu");
        car.setTank(tank());
        // 如果不去ioc 容器中拿,每次都会创建新的
        // 当实现了动态代理,都会先根据方法名  getBean("car")
        return car;
    }

    @Bean
    public Tank tank(){
        return new Tank();
    }
这样的话就不用每次去new了
- 大概的逻辑就是
1. 容器里面有就从容器里面返回
2. 容器里面没有就getBean创建一个返回

所以这个方法就是给我们的配置类创建cglib动态代理
如果不加@Configuration注解,在上面的代码里就会重复的new Tank;
总结:
只有full版配置类才会创建cglib代理
虽然我们在指定配置的时候不标注@Configuration也行,所以加不加注解的区别就在这里。
那么加了@Configuration和不加有本质上有什么区别的?
当在配置类中一个@Bean 使用方法的方式引用另一个Bean如果不加注解就会重复加载Bean
如果加了@Configuration 则会在这里创建cglib代理,当调用@Bean方法时会先检测容器中是否存在。
配置类怎么进行解析
主要是看看@ComponentScan怎么进行解析的。再回到上边的话题,看看解析配置类的ConfigurationClassPostProcessor是如何解析的


判断是不是一个完整的配置类,或者不完整的配置类,
进行正在的解析判断是不是完全的配置类 还是一个非正式的配置类
else if (ConfigurationClassUtils.checkConfigurationClassCandidate(beanDef, this.metadataReaderFactory)) {
				//满足添加 就加入到候选的配置类集合中
				configCandidates.add(new BeanDefinitionHolder(beanDef, beanName));
			}
带@Configuration注解的是完整配置类
@Component是Lite

configCandidates里放的就是筛选出来的配置类,然后就是解析配置类
解析配置类

/**
	 * 真的解析我们的配置类
	 * @param metadata 配置类的源信息
	 * @param beanName 当前配置类的beanName
	 * @throws IOException
	 */
	protected final void parse(AnnotationMetadata metadata, String beanName) throws IOException {
		/**
		 * 第一步:把我们的配置类源信息和beanName包装成一个ConfigurationClass 对象
		 */
		processConfigurationClass(new ConfigurationClass(metadata, beanName));
	}
@Nullable
	protected final SourceClass doProcessConfigurationClass(ConfigurationClass configClass, SourceClass sourceClass)
			throws IOException {

		// Recursively process any member (nested) classes first
		processMemberClasses(configClass, sourceClass);

		//处理我们的@propertySource注解的
		for (AnnotationAttributes propertySource : AnnotationConfigUtils.attributesForRepeatable(
				sourceClass.getMetadata(), PropertySources.class,
				org.springframework.context.annotation.PropertySource.class)) {
			if (this.environment instanceof ConfigurableEnvironment) {
				processPropertySource(propertySource);
			}
			else {
				logger.warn("Ignoring @PropertySource annotation on [" + sourceClass.getMetadata().getClassName() +
						"]. Reason: Environment must implement ConfigurableEnvironment");
			}
		}

		//解析我们的 @ComponentScan 注解

		//从我们的配置类上解析处ComponentScans的对象集合属性
		Set<AnnotationAttributes> componentScans = AnnotationConfigUtils.attributesForRepeatable(
				sourceClass.getMetadata(), ComponentScans.class, ComponentScan.class);
		if (!componentScans.isEmpty() &&
				!this.conditionEvaluator.shouldSkip(sourceClass.getMetadata(), ConfigurationPhase.REGISTER_BEAN)) {
			//循环解析 我们解析出来的AnnotationAttributes
			for (AnnotationAttributes componentScan : componentScans) {
				//把我们扫描出来的类变为bean定义的集合 真正的解析
				Set<BeanDefinitionHolder> scannedBeanDefinitions =
						this.componentScanParser.parse(componentScan, sourceClass.getMetadata().getClassName());
				//循环处理我们包扫描出来的bean定义
				for (BeanDefinitionHolder holder : scannedBeanDefinitions) {
					BeanDefinition bdCand = holder.getBeanDefinition().getOriginatingBeanDefinition();
					if (bdCand == null) {
						bdCand = holder.getBeanDefinition();
					}
					//判断当前扫描出来的bean定义是不是一个配置类,若是的话 直接进行递归解析
					if (ConfigurationClassUtils.checkConfigurationClassCandidate(bdCand, this.metadataReaderFactory)) {
						//递归解析 因为@Component算是lite配置类
						parse(bdCand.getBeanClassName(), holder.getBeanName());
					}
				}
			}
		}

		// 处理 @Import annotations
		processImports(configClass, sourceClass, getImports(sourceClass), true);

		// 处理 @ImportResource annotations
		AnnotationAttributes importResource =
				AnnotationConfigUtils.attributesFor(sourceClass.getMetadata(), ImportResource.class);
		if (importResource != null) {
			String[] resources = importResource.getStringArray("locations");
			Class<? extends BeanDefinitionReader> readerClass = importResource.getClass("reader");
			for (String resource : resources) {
				String resolvedResource = this.environment.resolveRequiredPlaceholders(resource);
				configClass.addImportedResource(resolvedResource, readerClass);
			}
		}

		// 处理 @Bean methods 获取到我们配置类中所有标注了@Bean的方法
		Set<MethodMetadata> beanMethods = retrieveBeanMethodMetadata(sourceClass);

		for (MethodMetadata methodMetadata : beanMethods) {
			configClass.addBeanMethod(new BeanMethod(methodMetadata, configClass));
		}

		// 处理配置类接口 默认方法的@Bean
		processInterfaces(configClass, sourceClass);

		// 处理配置类的父类的 ,循环再解析
		if (sourceClass.getMetadata().hasSuperClass()) {
			String superclass = sourceClass.getMetadata().getSuperClassName();
			if (superclass != null && !superclass.startsWith("java") &&
					!this.knownSuperclasses.containsKey(superclass)) {
				this.knownSuperclasses.put(superclass, configClass);
				// Superclass found, return its annotation metadata and recurse
				return sourceClass.getSuperClass();
			}
		}

		// 没有父类解析完成
		return null;
	}
重点看下解析@ComponentScan 注解


这个scanner
容器当中的scanner和解析配置类的并不是一个
把包路径转为资源路径


最后把beanDefinition注册到beanDefinitionMap里

类最后注册成beanDinfintion后,就是创建bean了,下篇讲
@Configuration、@Component 、@Bean的区别
ConfigurationClassPostProcessor都会把这三个都是注册成beanDefinition。唯一的区别就是为@Configuration注解的创建cglib动态代理