【微服务】springboot整合neo4j使用详解
一、前言
在上一篇我们详细了解了neo4j的使用,从搭建到相关的语法操作,本篇紧接着之前的内容,来详细聊聊如何在springboot应用中集成和使用neo4j。
二、Spring Data Neo4j
和很多其他的中间件类似,都提供了类似jpa的方式与springboot进行集成,比如大家熟悉的springdata-jpa,操作es的jpa,操作mongo的jpa等,而 Neo4j也提供了与springboot整合的jpa方式,即Spring Data Neo4j,接下来就来演示springboot中如何集成和使用Spring Data Neo4j。
三、环境准备
提前搭建neo4j服务,参考上一篇文章,有详细的搭建步骤;
springboot版本,2.3.5;
提前准备一个springboot的工程;
四、整合步骤
按照下面的步骤进行操作
4.1 导入必须的maven依赖
            org.springframework.boot
            spring-boot-starter-test
            test


            cn.hutool
            hutool-all
            5.8.15


            org.springframework.boot
            spring-boot-starter-web
            ${boot-web.version}


            org.springframework.boot
            spring-boot-starter-data-neo4j


            org.projectlombok
            lombok
            ${lomok.version}
4.2 添加配置文件
更多的配置参考官网,下面给出的是基本的连续配置。
server.port=8088

spring.data.neo4j.uri= bolt://IP:7687
spring.data.neo4j.username=neo4j
spring.data.neo4j.password=neo4j
4.3 自定义节点与实体类映射
比如在本次演示案例中,有两个节点操作对象,分别为Person和PersonRelation,两者之间具有一定的关系,然后通过程序对其完成相关的crud操作。
自定义Person类
@Data
@Builder
@NodeEntity("person")
public class Person implements Serializable {
    @Id
    @GeneratedValue
    private Long id;

    @Property("name")
    private String name;
}
PersonRelation类
@Data
@NoArgsConstructor
@RelationshipEntity(type = "徒弟")
public class PersonRelation implements Serializable {
    @Id
    @GeneratedValue
    private Long id;
    @StartNode
    private Person parent;
    @EndNode
    private Person child;
    @Property
    private String relation;

    public PersonRelation(Person parent, Person child, String relation) {
        this.parent = parent;
        this.child = child;
        this.relation = relation;
    }
}
4.4 自定义jpa
分别自定义两个操作节点对象的Repository,继承Neo4jRepository接口,使用jpa开发过的同学对此应该不陌生。
PersonRepository
public interface PersonRepository extends Neo4jRepository {

    /**
     * 查询某个节点的所有子节点
     * @param pId
     * @return
     */
    @Query("Match (p:person) -[*]->(s:person) where id(p)={0} return s")
    List findChildList(Long pId);

    @Query("Match (p:person {name:{0}}) -[*]->(s:person) return s")
    List findChildList(String name);

    /**
     * 查询当前节点的父节点
     * @param name
     * @return
     */
    @Query("Match (p:person) -[*]->(s:person {name:{0}}) return p")
    List findParentList(String name);

    List findByName(String name);

}
PersonRelationRepository
public interface PersonRelationRepository  extends Neo4jRepository {

}
五、整合测试
下面编写单元测试对上面的代码进行效果测试
5.1 保存Person以及关系数据
import com.congge.entity.Person;
import com.congge.entity.PersonRelation;
import com.congge.repository.PersonRelationRepository;
import com.congge.repository.PersonRepository;
import org.junit.jupiter.api.Test;
import org.junit.runner.RunWith;
import org.springframework.beans.factory.annotation.Autowired;
import org.springframework.boot.test.context.SpringBootTest;
import org.springframework.test.context.junit4.SpringRunner;

import java.util.ArrayList;
import java.util.Arrays;
import java.util.List;
import java.util.Optional;

@SpringBootTest
@RunWith(SpringRunner.class)
public class PersonTest {

    @Autowired
    private PersonRepository personRepository;

    @Autowired
    private PersonRelationRepository personRelationRepository;

    @Test
    public void testSave() {
        Person person = Person.builder().name("唐僧").build();
        Person person2 = Person.builder().name("孙悟空").build();
        Person person3 = Person.builder().name("猪八戒").build();
        Person person4 = Person.builder().name("沙僧").build();
        Person person5 = Person.builder().name("白龙马").build();
        List personList = new ArrayList<>(Arrays.asList(
                person, person2, person3, person4, person5));
        personRepository.saveAll(personList);
        System.out.println("person 数据保存成功");

        PersonRelation personRelation = new PersonRelation(person, person2, "徒弟");
        PersonRelation personRelation2 = new PersonRelation(person, person3, "徒弟");
        PersonRelation personRelation3 = new PersonRelation(person, person4, "徒弟");
        PersonRelation personRelation4 = new PersonRelation(person, person5, "徒弟");
        List personRelationList = new ArrayList<>(Arrays.asList(
                personRelation, personRelation2, personRelation3,
                personRelation4
        ));
        // 保存关系数据
        personRelationRepository.saveAll(personRelationList);
        System.out.println("person 关系数据保存成功");
    }

}
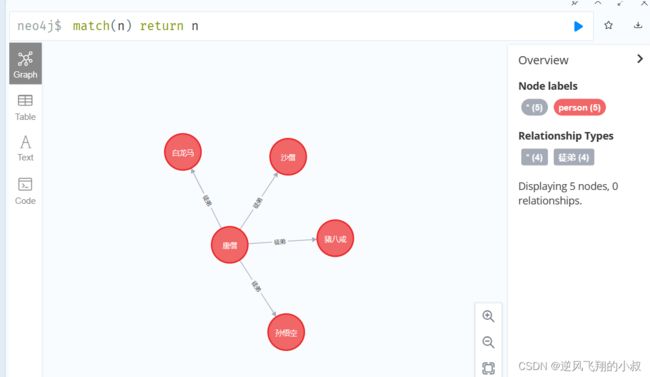
运行上面的代码
执行成功后,可以去web界面上检查刚刚保存的数据
5.2 查询数据
@Test
    public void testDelete(){
        // 删除所有person节点
        personRepository.deleteAll();
        // 删除所有personRelation关系数据
        personRelationRepository.deleteAll();
        //根据id删除
        personRepository.deleteById(0l);
    }

    /**
     * 查询所有
     */
    @Test
    public void testFindAll() {
        Iterable allPerson = personRepository.findAll();
        allPerson.forEach(item -> {
            System.out.println(item.getId());
            System.out.println(item.getName());
            System.out.println();
        });
    }

    /**
     * 根据id查询
     */
    @Test
    public void testFindById() {
        Optional personOptional = personRepository.findById(0l);
        if (personOptional.isPresent()) {
            System.out.println(personOptional.get().getName());
        }
    }

    /**
     * 分页查询
     */
    @Test
    public void testPage() {
        //设置分页、排序条件,page从0开始
        PageRequest pageRequest = PageRequest.of(1, 2, Sort.by(Sort.Order.desc("id")));
        Page page = personRepository.findAll(pageRequest);
        page.getContent().forEach(person -> {
            System.out.println(person.getId() + ":" + person.getName());
        });
    }


    @Test
    public void testFindByName() {
        List personList = personRepository.findByName("唐僧");
        for(Person p : personList){
            System.out.println(p.getName());
        }
    }
如果jpa中常用的方法还不能满足要求的话,可以尝试自定义编写语句进行实现。
5.3 JPA自定义方法规则
使用jpa中的规则,进行自定义查询,下面总结了一些常用的jpa使用规则,可以利用这些API完成一些更高级的业务场景开发
| Keyword | Sample | Cypher snippet |
|---|---|---|
| After | findByLaunchDateAfter(Date date) | n.launchDate > date |
| Before | findByLaunchDateBefore(Date date) | n.launchDate < date |
| Containing (String) | findByNameContaining(String namePart) | n.name CONTAINS namePart |
| Containing (Collection) | findByEmailAddressesContains(Collection addresses) findByEmailAddressesContains(String address) | ANY(collectionFields IN [addresses] WHERE collectionFields in n.emailAddresses) ANY(collectionFields IN address WHERE collectionFields in n.emailAddresses) |
| In | findByNameIn(Iterable names) | n.name IN names |
| Between | findByScoreBetween(double min, double max) findByScoreBetween(Range range) | n.score >= min AND n.score <= max Depending on the Range definition n.score >= min AND n.score <= max or n.score > min AND n.score < max |
| StartingWith | findByNameStartingWith(String nameStart) | n.name STARTS WITH nameStart |
| EndingWith | findByNameEndingWith(String nameEnd) | n.name ENDS WITH nameEnd |
| Exists | findByNameExists() | EXISTS(n.name) |
| True | findByActivatedIsTrue() | n.activated = true |
| False | findByActivatedIsFalse() | NOT(n.activated = true) |
| Is | findByNameIs(String name) | n.name = name |
| NotNull | findByNameNotNull() | NOT(n.name IS NULL) |
| Null | findByNameNull() | n.name IS NULL |
| GreaterThan | findByScoreGreaterThan(double score) | n.score > score |
| GreaterThanEqual | findByScoreGreaterThanEqual(double score) | n.score >= score |
| LessThan | findByScoreLessThan(double score) | n.score < score |
| LessThanEqual | findByScoreLessThanEqual(double score) | n.score <= score |
| Like | findByNameLike(String name) | n.name =~ name |
| NotLike | findByNameNotLike(String name) | NOT(n.name =~ name) |
| Near | findByLocationNear(Distance distance, Point point) | distance( point(n),point({latitude:lat, longitude:lon}) ) < distance |
| Regex | findByNameRegex(String regex) | n.name =~ regex |
| And | findByNameAndDescription(String name, String description) | n.name = name AND n.description = description |
| Or | findByNameOrDescription(String name, String description) | n.name = name OR n.description = description (Cannot be used to OR nested properties) |
六、写在文末
本文详细总结了如何在springboot中集成与使用neo4j,并通过代码演示了如何使用,更多的用法有兴趣的同学还可以深入研究。

