SpringCloud--链路追踪之Sleuth的简单使用
Sleuth分布式请求链路跟踪简单使用
文章目录
-
- Sleuth分布式请求链路跟踪简单使用
-
- 一、简介
-
- 1. 什么是Sleuth?
- 2. 什么是Zipkin?
- 二、准备
-
- 1. 启动ZipKin服务
- 2. 访问客户端页面
- 三、使用
-
- 1. 引入依赖
- 2. yml配置
- 3. 编写controller
- 4. 编写service
- 5. 启动项目测试
一、简介
1. 什么是Sleuth?
Sleuth是Spring Cloud的组件之一,它为Spring Cloud实现了一种分布式追踪解决方案,兼容Zipkin,HTrace和其他基于日志的追踪系统,例如 ELK(Elasticsearch 、Logstash、 Kibana)。
2. 什么是Zipkin?
Zipkin是一个分布式跟踪系统。它有助于收集解决服务架构中延迟问题所需的计时数据。特性包括此数据的收集和查找。
如果日志文件中有跟踪ID,则可以直接跳转到它。也可以根据服务、操作名称、标签、持续时间等属性进行查询。将为您总结一些有趣的数据,例如花费在服务上的时间百分比,以及操作是否失败。
二、准备
本次演示结合ZipKin进行使用,为了方便期间,我们使用现成的zipkin-server服务。
1. 启动ZipKin服务
下载jar包
下载地址,注选择exec.jar

启动服务
直接将Jar包运行就行,执行
java -jar zipkin-server-2.12.9-exec.jar
2. 访问客户端页面
默认页面地址:
http://localhost:9411

三、使用
本次演示结合了OpenFegin进行服务之间的调用,以及通过Hytrix进行熔断的方式进行演示,这样我们只需一个工程就可以演示不同服务之间的调用了。
1. 引入依赖
本次演示版本的饿springboot喝springcloud版本均为
2.2.1.RELEASE
   <dependencies>
        <dependency>
            <groupId>org.springframework.bootgroupId>
            <artifactId>spring-boot-starter-webartifactId>
        dependency>
        <dependency>
            <groupId>org.springframework.bootgroupId>
            <artifactId>spring-boot-starter-testartifactId>
            <scope>testscope>
        dependency>

        <dependency>
            <groupId>org.springframework.cloudgroupId>
            <artifactId>spring-cloud-starter-openfeignartifactId>
            <version>2.2.1.RELEASEversion>
        dependency>

        <dependency>
            <groupId>org.springframework.cloudgroupId>
            <artifactId>spring-cloud-starter-netflix-hystrixartifactId>
            <version>2.2.1.RELEASEversion>
        dependency>

        <dependency>
            <groupId>org.springframework.cloudgroupId>
            <artifactId>spring-cloud-starter-sleuthartifactId>
            <version>2.2.1.RELEASEversion>
        dependency>
        <dependency>
            <groupId>org.springframework.cloudgroupId>
            <artifactId>spring-cloud-starter-zipkinartifactId>
            <version>2.2.1.RELEASEversion>
        dependency>
    dependencies>
2. yml配置
spring:
  application:
    name: student-server
  zipkin:
    base-url: http://localhost:9411
  sleuth:
    sampler:
     #采样率值介于 0 到 1 之间,1 则表示全部采集
      probability: 1

feign:
#设置feign开启hystrix
  hystrix:
    enabled: true
# Hystrix settings
hystrix:
  command:
    default:
      execution:
        isolation:
          strategy: THREAD
          thread:
            # 配置默认的超时时间,线程超时3秒,调用Fallback方法
            timeoutInMilliseconds: 3000
      metrics:
        rollingStats:
          timeInMilliseconds: 3000
      circuitBreaker:
        # 10秒内出现3个以上请求(已临近阀值),并且出错率在50%以上,开启断路器.断开服务,调用Fallback方法
        requestVolumeThreshold: 3
        sleepWindowInMilliseconds: 10000
3. 编写controller
@RestController
@RequestMapping(path = "/api/v1/student")
public class StudentController {

    private StudentA studentA;

    @Autowired
    private StudentService studentService;
    @GetMapping("/notice")
    public SingleResponse<String> getTeacherNotice(){

//        throw new NullPointerException("请求异常");
        String notice = studentService.getNotice();
        return SingleResponse.buildSuccess(notice);
    }
 }
代码中的SingleResponse可以去掉或者自行封装。
4. 编写service
此处要编写两个service,一个为OpenFeign远程调用的StudentService另一个为熔断的StudentHytrixService.
StudentService:
/**
 * @author gf
 * @date 2022/11/3
 */
@FeignClient(name = "teacher-server", url = "localhost:8085/api/v1/teacher", fallback=StudentHytrixService.class)
@Component
public interface StudentService {

    @GetMapping("/getNotice")
    public String getNotice();
}
StudentHytrixService
@Component
public class StudentHytrixService implements StudentService {
@Override
public String getNotice() {
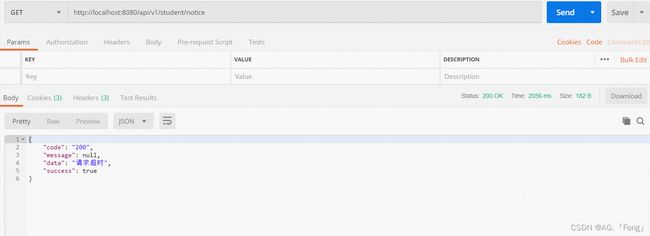
return "请求超时";
}
}
我们在配置文件里设置了3秒超时的熔断,所以对于OpenFeign的调用来说,作为演示,我们无需将精力花费在其他服务的创建上。
OpenFeign的调用请参考:SpringBoot集成OpenFeign
Hytrix的熔断请参考:SpringBoot集成OpenFeign+ Hystrix
5. 启动项目测试
我们需要在启动类上加上OpenFeign和Hytrix的相关注解
@SpringBootApplication
@EnableFeignClients
@EnableHystrix
public class StudentServerApplication {

    public static void main(String[] args) {
        SpringApplication.run(StudentServerApplication.class, args);
    }

}
Postman或者浏览器输入地址测试
然后在我们的Zinkin服务中查看请求过程及相关数据。
-
链路流程

-
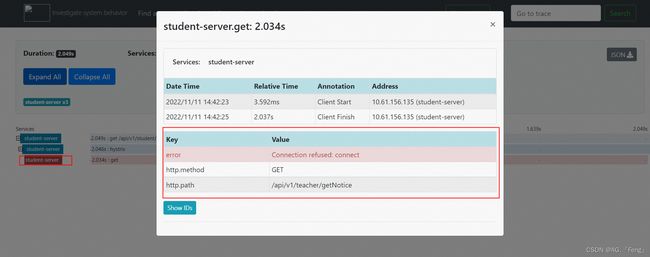
被调服务链路

从图中我们可以看到被调服务的时间,IP,请求方式,请求url以及类名和方法名等信息。这有助于我们快速的定位和查找服务调用过程中问题出现在哪个环节。
- 其他服务链路
这里时其他服务的i信息。
OpenFeign的调用请参考:SpringBoot集成OpenFeign
Hytrix的熔断请参考:SpringBoot集成OpenFeign+ Hystrix