【iOS】计算器App仿写
源码在文末!!!
️️️
目录
-
- 前言
- UI界面(View)
- 表达式计算(Model)
- 事件函数的逻辑(Controller)
- Git源码
前言
仿写了iPhone上的计算器,可以进行四则运算多项式的计算。
- 整体设计模式为MVC模式
- UI布局调用了CocoPods中的Masonry库
- 计算思路详见这篇文章:实现简易四则运算
运行结果:
UI界面(View)
先配置好Masonry:
先来看看接口界面的代码(.h文件):
@interface CalculatorView : UIView

//用于传给Controller
@property (nonatomic, strong) NSArray* operArray;
@property (nonatomic, strong) NSMutableArray* buttonArray;

@property (nonatomic, strong) UITextField* showField;

@property (nonatomic, strong) UIButton* ACButton;
@property (nonatomic, strong) UIButton* equalButton;
@property (nonatomic, strong) UIButton* pointButton;

@end
operArray存储字符:加、减、乘、除、括号、清除。
ACButton, equalButton, pointButton分别存储AC按钮、等于按钮和小数点按钮。
buttonArray存储除上面3个以外的其他按钮,方便打包传给Controller界面。
显示数字的界面用textField显示。
如下是实现界面(.m文件):
#import "CalculatorView.h"
#import "Masonry.h"
#define SIZE 85
#define WIDTH [UIScreen mainScreen].bounds.size.width
@implementation CalculatorView
/*
// Only override drawRect: if you perform custom drawing.
// An empty implementation adversely affects performance during animation.
- (void)drawRect:(CGRect)rect {
// Drawing code
}
*/
- (instancetype)initWithFrame:(CGRect)frame {
self = [super initWithFrame: frame];
if (self) {
[self setupUI];
}
return self;
}
- (void)setupUI {
self.backgroundColor = [UIColor blackColor];
self.operArray = [[NSArray alloc] initWithObjects: @"+", @"-", @"×", @"÷", @"AC", @"(", @")", nil];
//1 2 3 + 4 5 6 - 7 8 9 * ( ) /
self.buttonArray = [[NSMutableArray alloc] init];
self.showField = [[UITextField alloc] init];
self.showField.backgroundColor = [UIColor blackColor];
self.showField.textColor = [UIColor whiteColor];
self.showField.textAlignment = NSTextAlignmentRight;
self.showField.font = [UIFont systemFontOfSize: 60];
//不可交互
self.showField.userInteractionEnabled = NO;
//字体大小自适应
self.showField.adjustsFontSizeToFitWidth = YES;
[self addSubview:self.showField];
[self.showField mas_makeConstraints:^(MASConstraintMaker *make) {
make.bottom.equalTo(self).offset(-600);
make.width.equalTo(@(WIDTH));
}];
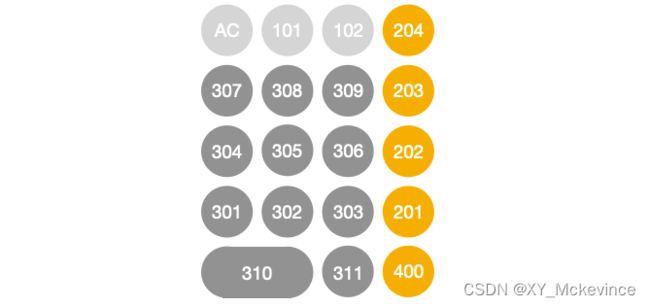
for (int i = 0; i < 4; i++) {
for (int j = 0; j < 4; j++) {
UIButton* button = [UIButton buttonWithType: UIButtonTypeRoundedRect];
button.titleLabel.font = [UIFont systemFontOfSize: 42];
button.layer.cornerRadius = SIZE / 2;
[self addSubview: button];
[button mas_makeConstraints:^(MASConstraintMaker *make) {
make.bottom.equalTo(self).offset(-(70 + (SIZE + 15) * (i + 1)));
make.left.equalTo(self).offset(3 + (SIZE + 15) * j);
make.size.equalTo(@SIZE);
}];
if (i == 3 && j < 3) { //AC和括号 101 102
button.backgroundColor = [UIColor grayColor];
[button setTitle: self.operArray[i + j + 1] forState: UIControlStateNormal];
[button setTitleColor: [UIColor blackColor] forState: UIControlStateNormal];
button.tag = 100 + j;
if (j == 0) {
self.ACButton = button;
} else {
[self.buttonArray addObject: button];
}
} else if (j == 3) { //操作符
button.backgroundColor = [UIColor colorWithRed: 251.0f / 255.0f green:151.0f / 255.0f blue:15.0f / 255.0f alpha: 1.0];
[button setTitle: self.operArray[i] forState: UIControlStateNormal];
[button setTitleColor:[UIColor whiteColor] forState:UIControlStateNormal];
button.tag = 200 + i + 1;
[self.buttonArray addObject: button];
} else { //数字
button.backgroundColor = [UIColor colorWithRed:0.2 green:0.2 blue:0.2 alpha:1];
NSString* title = [NSString stringWithFormat:@"%d", j + 3 * i + 1];
[button setTitle:title forState:UIControlStateNormal];
[button setTitleColor:[UIColor whiteColor] forState:UIControlStateNormal];
button.tag = 300 + i * 3 + j + 1;
[self.buttonArray addObject: button];
}
}
}
for (int i = 0; i < 3; i++) { //0 . =
UIButton* button = [UIButton buttonWithType: UIButtonTypeRoundedRect];
button.titleLabel.font = [UIFont systemFontOfSize: 42];
button.layer.cornerRadius = SIZE / 2;
[button setTitleColor: [UIColor whiteColor] forState: UIControlStateNormal];
[self addSubview: button];
if (i == 0) {
[button mas_makeConstraints:^(MASConstraintMaker *make) {
make.bottom.equalTo(self).offset(-70);
make.left.equalTo(self).offset(0);
make.width.equalTo(@(SIZE * 2 + 15));
make.height.equalTo(@SIZE);
}];
[button setTitle:@" 0 " forState:UIControlStateNormal];
button.backgroundColor = [UIColor colorWithRed:0.2 green:0.2 blue:0.2 alpha:1];
button.tag = 310;
[self.buttonArray addObject:button];
} else {
[button mas_makeConstraints:^(MASConstraintMaker *make) {
make.bottom.equalTo(self).offset(-70);
make.left.equalTo(self).offset(200 + (SIZE + 15) * (i - 1));
make.size.equalTo(@SIZE);
}];
if (i == 1) {
[button setTitle:@"." forState:UIControlStateNormal];
button.backgroundColor = [UIColor colorWithRed:0.2 green:0.2 blue:0.2 alpha:1];
button.tag = 311;
self.pointButton = button;
} else {
[button setTitle:@"=" forState:UIControlStateNormal];
button.backgroundColor = [UIColor colorWithRed:251.0f / 255.0f green:151.0f / 255.0f blue:15.0f / 255.0f alpha:1];
button.tag = 400;
self.equalButton = button;
}
}
}
}
@end
双层循环创建上侧4x4个按钮,从1开始,最后遍历到÷
0、.、=按钮单独在循环中创建
要给每个按钮设置tag值,以便点击事件函数识别传进来的是哪个按钮
这里可以将textField的adjustsFontSizeToFitWidth属性值设置为YES,作用时当字符串宽度超过屏幕宽度时,字体大小自动适应,效果如下:
表达式计算(Model)
之前用C语言做了一个简易的四则运算表达式的计算程序,下面继续沿用程序中的中缀转后缀这一思路,用OC语言编写程序
OC的Foundation框架提供了集合类数据结构如NSMutableArray,我们可以用NSMutableArray存储运算数、操作符这些字符串对象,模拟一个栈
Stack.h
@interface Stack : NSObject {
    NSMutableArray<NSMutableString *>* _stack;
}

- (void)pushStack: (NSMutableString *)element;
- (NSMutableString *)popStack;
- (NSMutableString *)getTop;
- (BOOL)isEmpty;

@end
Stack.m
#import "Stack.h"

@implementation Stack

- (instancetype)init {
    self = [super init];
    if (self) {
        _stack = [[NSMutableArray alloc] init];
    }
    return self;
}

- (void)pushStack: (NSMutableString *)element {
    [_stack addObject: element];
}

- (NSMutableString *)popStack {
    if ([_stack count] > 0) {
        NSMutableString* lastString = [_stack lastObject];
        [_stack removeLastObject];
        return lastString;
    }
    return nil;
}

- (NSMutableString *)getTop {
    if ([_stack count] > 0) {
        NSMutableString* lastString = [_stack lastObject];
        return lastString;
    }
    return nil;
}

- (BOOL)isEmpty {
    return _stack.count == 0;
}

@end
大体思路为:
- 输入NSMutableString中缀表达式字符串
-
(3.5+(-2.8))*4.2+0-1.6*1/2
- 分隔字符串,将连续的运算数、操作符依次存入NSMutableArray里
-
( 3.5 + ( -2.8 ) ) * 4.2 + 0 - 1.6 * 1 / 2, nil
- 将NSMutableArray里的中缀顺序转换成后缀顺序
-
3.5 2.8 - + 4.2 * 0 + 1.6 1 * 2 / -, nil
- 计算后缀表达式
核心代码:
- (NSMutableString *)Calculate:(NSMutableString *)inputFix  {
    //分隔
    NSMutableArray* processedArray = [[NSMutableArray alloc] init];
    processedArray = [self processFix: inputFix];

    //中缀转后缀
    NSMutableArray* postfix = [[NSMutableArray alloc] init];
    postfix = [self infixToPostfix: processedArray];

    //计算后缀
    NSMutableString* answerString = [[NSMutableString alloc] init];
    answerString = [self calculatePostfix: postfix];

    return answerString;
}
具体实现见文末源码
一些方法函数可根据需要选择公开或者不公开
如若有NSString,可拷贝其mutableCopy的可变副本进行使用
- 加减乘除运算数据类型用的是
NSDecimalNumber,精确度贼高,可精确到小数点后30多位,可实现较大数字的运算
- (NSDecimalNumber *)jJcC: (NSString *)ope aValue: (NSDecimalNumber *)a bValue: (NSDecimalNumber *)b {
    if ([ope isEqualToString: @"×"]) {
        return [b decimalNumberByMultiplyingBy: a];
    } else if ([ope isEqualToString: @"÷"]) {
        return  [b decimalNumberByDividingBy: a];
    } else if ([ope isEqualToString: @"+"]) {
        return [b decimalNumberByAdding: a];
    } else if ([ope isEqualToString: @"-"]) {
        return [b decimalNumberBySubtracting: a];
    } else {
        return nil;
    }
}
最后调用NSDecimalNumber的stringValue方法将对象转换成字符串
- 比较巧妙的是一个字典就可以判断运算符以及其优先级的比较:
NSDictionary* priority = @{@"+": @(1), @"-": @(1), @"×": @(2), @"÷": @(2)};

//判断运算符
if ([priority.allKeys containsObject: string]) {
    return YES;
} else {
    return NO;
}

//得到string字符的优先级(value值)
NSInteger x = [priority[string] intValue];
事件函数的逻辑(Controller)
这部分主要实现按钮的点击反馈,表达式的判错,运算符输入的限制,并将View和Model的信息集合起来
ViewController.h
#import <UIKit/UIKit.h>
#import "CalculatorView.h"
#import "CalculatorModel.h"

@interface ViewController : UIViewController

@property (nonatomic, strong)CalculatorView* calculatorView;
@property (nonatomic, strong)CalculatorModel* calculatorModel;

@property (nonatomic, assign)BOOL operateLimit;
@property (nonatomic, assign)BOOL pointLimitByNum;
@property (nonatomic, assign)BOOL pointLimitByOper;
@property (nonatomic, assign)BOOL equalPressed;

@end
operateLimit限制了只能输入一个运算符,当点击另一运算符时直接切换
pointLimitByNum、pointLimitByOper前者限制小数点只能出现在数字后面、后者限制两个小数点之间必需要有一个运算符,综合这两点就可以达到一个数字仅包含一个小数点的效果
equalPressed限制了等号输入
- 以下是点击等号的事件函数,其余都是字符串输入有关的方法
- (void)pressEqualButton: (UIButton *)button {
    if ([self.calculatorView.showField.text isEqualToString: @""]) return;

    if  ([self isInfixLogical: self.calculatorView.showField.text]) {
        NSMutableString* showText = [self.calculatorView.showField.text mutableCopy];
        NSString* answer = [self.calculatorModel Calculate: showText];
        NSLog(@"%@", answer);
        self.calculatorView.showField.text = answer;
    } else {
        self.calculatorView.showField.text = @"ERROR";
        //0.77秒后自动AC
        NSTimer *timer = [NSTimer scheduledTimerWithTimeInterval: 0.77 target:self selector:@selector(pressACButton:) userInfo:nil repeats:NO];
    }
}
Git源码
计算器App源码: 【Github】CalculatorImitate