【python脚本】ICer的脚本入门训练——gen_tc
前言
【python脚本】ICer的脚本入门训练——svn_back
上一篇博客的目的,是通过处理固定流程的事物来体现脚本的必要性。而后这篇博客的目的,是熟悉脚本里的一些基本的处理思路。
gen_tc是一个芯片前端验证很常见的脚本,作用是:
1.根据已有的tc生成新的tc文件;
2.修改内部关键字;
3.输出文件;
在这个过程中,我们需要涉及到的处理包括:吃命令行,遍历输入文件,正则匹配与替换,文件输出等过程,作为我第一个学习的脚本,几十行的内容简直最合适作为入门训练。
要求
假定目前我们有一个case,文件名为:sanity_case.sv,内容就是个普普通通的case如下:
`ifndef SANITY_CASE_SV
`define SANITY_CASE_SV

class sanity_case_seq extends my_sequence;

	extern function new(string name = "sanity_case_seq");
	extern virtual task body();

	`uvm_object_utils(sanity_case_seq)
endclass: sanity_case_seq

function sanity_case_seq::new(string name = "sanity_case_seq");
	super.new(name);
endfunction: new

task sanity_case_seq::body();
	repeat(10000) begin
		`uvm_do_with(my_tr, {my_tr.par_err == 0;})
	end
	#100;
endtask: body

class sanity_case extends base_test;

	extern function new(string name = "base_test", uvm_component parent=null);
	extern virtual function void build_phase(uvm_phase phase);

	`uvm_component_utils(sanity_case)
endclass: sanity_case

function sanity_case::new(string name = "base_test", uvm_component parent=null);
    super.new(name, parent);
endfunction: new

function void sanity_case::build_phase(uvm_phase phase);
	super.build_phase(phase);
	uvm_config_db #(uvm_object_wrapper)::set(
		this,
		"env.i_agt0.sqr.main_phase",
		"default_sequence",
		sanity_case_seq::type_id::get()
	);
    uvm_config_db #(uvm_object_wrapper)::set(
		this,
		"env.i_agt1.sqr.main_phase",
		"default_sequence",
		sanity_case_seq::type_id::get()
	);

endfunction: build_phase

`endif
那么我们要做的就是,编写一个脚本 gen_tc,在当前目录执行gen_tc sanity_case.v new_case.v之后,在当前目录生成新的文件new_case.v。
实操
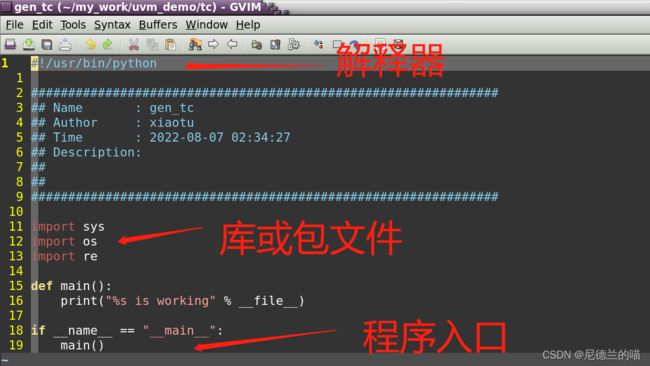
1.新建文件gen_tc
键入以下内容作为初始:
之后修改文件属性为可执行属性chmod a+x gen_tc,然后你就会发现你的脚本绿了:
![]()
敲一下,确认可执行,然后继续下一步:
2.读取命令参数
gen_tc脚本要吃两个参数,一般处理参数有两种常用的方式:sys.argv数组和argparse库。使用argparse的典型方式,如下面的代码,具体功能我们不做探究:
import argparse
def input_args_proc():
    parser = argparse.ArgumentParser(description="argparse info")
    parser.add_argument('-o', action='store_true', default=False, help='open this script')
    result = parser.parse_args()
    if result.o == True:
        os.system("gvim %s" % __file__)
        sys.exit(0)
gen_tc的输入参数情况比较简单,两个参数必须输入,因此不需要使用argparse,直接使用sys.argv数组即可。比如目前的输入获取方式:
def input_sys():
    if len(sys.argv) > 2:
        from_tc = sys.argv[1]
        to_tc = sys.argv[2]
    else:
        print("Input error")
        sys.exit(0)
    return from_tc, to_tc
sys.argv[0]不要使用,那是脚本自身名称。在main函数中接受该函数的返回值,读取输入参数的操作就完成了。
from_tc, to_tc = input_sys()3.读取并修改参考tc
可以通过以下的形式形式来读取文件:
def modify_tc(file):
    with open(file, "r") as handle:
        hd = handle.readlines()
        for line in hd:
            line = line.strip("\n")
            print(line)
读取文件后,在没一行内匹配“sanity_case”或“SANITY_CASE”关键字,并将其替换为“new_case”和“NEW_CASE”,而后将字符串暂存于数组中,作为函数返回值:
def modify_tc(frm, to):
    frm_key = re.sub("\.sv","",frm) #得到sanity_case.sv里的sanity_case
    frm_uc = frm_key.upper() #纯小写
    frm_lc = frm_key.lower() #纯大写,执行的时候把这块注释删了

    to_key  = re.sub("\.sv","",to)
    to_uc = to_key.upper()
    to_lc = to_key.lower()

    out_file = []
    with open(frm, "r") as handle:
        hd = handle.readlines()
        for line in hd:
            line = line.strip("\n")
            line = re.sub(frm_uc, to_uc, line)
            line = re.sub(frm_lc, to_lc, line)
            out_file.append(line)
    return out_file
main函数中接收返回值:
out_file = modify_tc(from_tc, to_tc)4.输出文件
输出文件的函数比较固定:
def write_list(lst, out):
    with open(out, "w") as handle:
        for line in lst:
            handle.write(line+"\n")
在main中把out_file和to_tc作为参数传给该函数即可:
write_list(out_file, to_tc)5.执行脚本
代码编写完成后,执行脚本,打开文件new_case.sv:
`ifndef NEW_CASE_SV
`define NEW_CASE_SV

class new_case_seq extends my_sequence;

	extern function new(string name = "new_case_seq");
	extern virtual task body();

	`uvm_object_utils(new_case_seq)
endclass: new_case_seq

function new_case_seq::new(string name = "new_case_seq");
	super.new(name);
endfunction: new

task new_case_seq::body();
	repeat(10000) begin
		`uvm_do_with(my_tr, {my_tr.par_err == 0;})
	end
	#100;
endtask: body

class new_case extends base_test;

	extern function new(string name = "base_test", uvm_component parent=null);
	extern virtual function void build_phase(uvm_phase phase);

	`uvm_component_utils(new_case)
endclass: new_case

function new_case::new(string name = "base_test", uvm_component parent=null);
    super.new(name, parent);
endfunction: new

function void new_case::build_phase(uvm_phase phase);
	super.build_phase(phase);
	uvm_config_db #(uvm_object_wrapper)::set(
		this,
		"env.i_agt0.sqr.main_phase",
		"default_sequence",
		new_case_seq::type_id::get()
	);
    uvm_config_db #(uvm_object_wrapper)::set(
		this,
		"env.i_agt1.sqr.main_phase",
		"default_sequence",
		new_case_seq::type_id::get()
	);

endfunction: build_phase

`endif
