VScode配置c++版本opencv(亲测)
1. 下载安装包
(1)vscode官网下载
(2)opencv及其拓展库源码下载
本人下载的是455版本,注意opencv版本与opencv-contrib版本需一致
(3)MinGW下载
![]()
(4)cmake下载
2. vscode编译
(1)解压缩四个安装包,将mingw64的bin添加到环境变量
win+R打开cmd,输入gcc --version,如图所示表明安装成功
(2)vscode编译
- 运行c-make包bin目录下
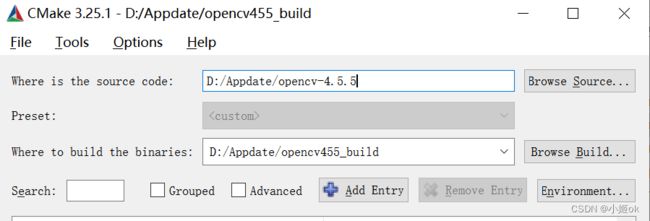
cmake-gui.exe
- 选择要编译的源码路径,再选择编译存放的路径(自己新建一个文件夹)。
- 点击
configure,选择MinGW Makefiles、Specify native compilers。 - 点击
Next,编译器选择,C选择MinGW-w64的bin目录下gcc.exe,C++则选择g++.exe - 点击
Finish,然后自动开始配置。 - 搜索extra,添加扩展路径(opencv_contrib-4.5.3\modules的路径)
- 再点击
configure,配置完成点击generate。 - 完成后,进入之前自己创建的编译结果存放的文件夹,按住shift再按鼠标右键,选择在此进入powershell窗口。
- 输入MinGW32-make -j4 开始编译,大致要1个小时。
(-j参数控制同时编译的cpu核数,这里选择4,根据自己电脑情况)。 - 编译完成后,再输入MinGW32-make install进行安装。
- 添加编译好的opencv环境变量
(3).vscode配置
- c_cpp_properties.json
{
    "configurations": [
        {
            "name": "Win32",
            "includePath": [
                "${workspaceFolder}/**",
                "D:/application/opencv4.5.3_bulid/install/include",
                "D:/application/opencv4.5.3_bulid/install/include/opencv2"

            ],
            "defines": [
                "_DEBUG",
                "UNICODE",
                "_UNICODE"
            ],
            "compilerPath": "D:/application/mingw64/bin/gcc.exe",
            "cStandard": "c11",
            "cppStandard": "c++17",
            "intelliSenseMode": "clang-x64"
        }
    ],
    "version": 4
}
- launch.json
// https://code.visualstudio.com/docs/cpp/launch-json-reference
{
    "version": "0.2.0",
    "configurations": [
    {
        "name": "(gdb) Launch", // 配置名称,将会在启动配置的下拉菜单中显示
        "type": "cppdbg", // 配置类型,cppdbg对应cpptools提供的调试功能;可以认为此处只能是cppdbg
        "request": "launch", // 请求配置类型,可以为launch(启动)或attach(附加)
        "program": "C:\\Windows\\System32\\cmd.exe", // 将要进行调试的程序的路径
        "args": [
            "/C",
                "${fileDirname}\\${fileBasenameNoExtension}.exe",
                "&",
                "echo.",
                "&",
                "pause"
        ], // 程序调试时传递给程序的命令行参数,一般设为空即可
        "stopAtEntry": false, // 设为true时程序将暂停在程序入口处,相当于在main上打断点
        "cwd": "${workspaceFolder}", // 调试程序时的工作目录,此为工作区文件夹;改成${fileDirname}可变为文件所在目录
        "environment": [], // 环境变量
        "externalConsole": true, // 使用单独的cmd窗口,与其它IDE一致;为false时使用内置终端
        "internalConsoleOptions": "neverOpen", // 如果不设为neverOpen,调试时会跳到“调试控制台”选项卡,你应该不需要对gdb手动输命令吧?
        "MIMode": "gdb", // 指定连接的调试器,可以为gdb或lldb。
        "miDebuggerPath": "D:/Appdate/mingw64/bin/gdb.exe", // 调试器路径,Windows下后缀不能省略,Linux下则不要
        "setupCommands": [
            { // 模板自带,好像可以更好地显示STL容器的内容,具体作用自行Google
                "description": "Enable pretty-printing for gdb",
                "text": "-enable-pretty-printing",
                "ignoreFailures": false
            }
        ],
        "preLaunchTask": "Compile" // 调试会话开始前执行的任务,一般为编译程序。与tasks.json的label相对应
    }]
}
- tasks.json
{
    "version": "2.0.0",
    "tasks": [
        {
            "label": "Compile",
            "command": "D:/Appdate/mingw64/bin/g++.exe",
            "args": [
                "${file}",
                "-o",
                "${fileDirname}/${fileBasenameNoExtension}.exe",
                "-g",
                "-m64",
                "-Wall",
                "-static-libgcc",
                "-finput-charset=UTF-8",
                "-fexec-charset=GBK",
                "-std=c++17",
                "-I",
                "D:/Appdate/opencv455_build/install/include",
                "-I",
                "D:/Appdate/opencv455_build/install/include/opencv2",
                "-L",
                "D:/Appdate/opencv455_build/install/x64/mingw/lib",
                "-l",
                "libopencv_calib3d455",
                "-l",
                "libopencv_core455",
                "-l",
                "libopencv_dnn455",
                "-l",
                "libopencv_features2d455",
                "-l",
                "libopencv_flann455",
                "-l",
                "libopencv_gapi455",
                "-l",
                "libopencv_highgui455",
                "-l",
                "libopencv_imgcodecs455",
                "-l",
                "libopencv_imgproc455",
                "-l",
                "libopencv_ml455",
                "-l",
                "libopencv_objdetect455",
                "-l",
                "libopencv_photo455",
                "-l",
                "libopencv_stitching455",
                "-l",
                "libopencv_video455",
                "-l",
                "libopencv_videoio455",
                "-l",
                "libopencv_ximgproc455"
            ],
            "type": "process",
            "group": {
                "kind": "build",
                "isDefault": true
            },
            "presentation": {
                "echo": true,
                "reveal": "always",
                "focus": false,
                "panel": "shared"
            },
            "problemMatcher": "$gcc"
        }
    ]
}- 测试代码
#include
#include
using namespace cv;

int main()
{
    Mat img = imread("C:/users/14537/desktop/4K.jpg");
    Mat resize_img(img);
    resize(img, resize_img, Size(img.cols/7, img.rows/7));
    imshow("4K", resize_img);
    waitKey(0);
    return 0;
}
参考
(158条消息) VSCode搭建OpenCV的c++环境(windows10)_you_zai的博客-CSDN博客_vscode opencv


