Spring Boot : Spring Boot 整合 RabbitMQ
1. 前言
RabbitMQ 是一个消息队列,说到消息队列,大家可能多多少少有听过,它主要的功能是用来实现应用服务的异步与解耦,同时也能起到削峰填谷、消息分发的作用。
消息队列在比较主要的一个作用是用来做应用服务的解耦,消息从消息的生产者传递到消息队列,消费者从消息队列中获取消息并进行消费,生产者不需要管是谁在消费消息,消费者也无需关注消息是由谁来生产的。在分布式的系统中,消息队列也会被用在其他地方,比如分布式事务的支持,代表如阿里开源的 RocketMQ 。
当然,我们本篇文章的主角还是 RabbitMQ 。
2. RabbitMQ 介绍
RabbitMQ 是实现 AMQP(高级消息队列协议)的消息中间件的一种,最初起源于金融系统,用于在分布式系统中存储转发消息,在易用性、扩展性、高可用性等方面表现不俗。 RabbitMQ 主要是为了实现系统之间的双向解耦而实现的。当生产者大量产生数据时,消费者无法快速消费,那么需要一个中间层。保存这个数据。
AMQP,即 Advanced Message Queuing Protocol,高级消息队列协议,是应用层协议的一个开放标准,为面向消息的中间件设计。消息中间件主要用于组件之间的解耦,消息的发送者无需知道消息使用者的存在,反之亦然。AMQP 的主要特征是面向消息、队列、路由(包括点对点和发布/订阅)、可靠性、安全。
RabbitMQ 是一个开源的 AMQP 实现,服务器端用Erlang语言编写,支持多种客户端,如:Python、Ruby、.NET、Java、JMS、C、PHP、ActionScript、XMPP、STOMP 等,支持 AJAX。用于在分布式系统中存储转发消息,在易用性、扩展性、高可用性等方面表现不俗。
3. 概念介绍
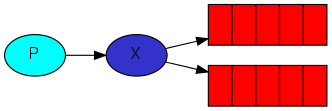
在普通的消息队列的设计中,一般会有这么几个概念:生产者、消费者和我们的队列。但是在 RabbitMQ 中,中间增加了一层,叫交换机(Exchange),这样,消息的投递就不由生产者来决定投递至哪个队列,而消息是直接投递至交换机的,由交换机根据调度策略来决定这个消息需要投递到哪个队列。如图:
- 左侧的 P 代表消息的生产者
- 紫色的 X 代表交换机
- 右侧红色的代表队列
4. 交换机(Exchange)
那么为什么我们需要 Exchange 而不是直接将消息发送至队列呢?
AMQP 协议中的核心思想就是生产者和消费者的解耦,生产者从不直接将消息发送给队列。生产者通常不知道是否一个消息会被发送到队列中,只是将消息发送到一个交换机。先由 Exchange 来接收,然后 Exchange 按照特定的策略转发到 Queue 进行存储。
Exchange 收到消息时,他是如何知道需要发送至哪些 Queue 呢?这里就需要了解 Binding 和 RoutingKey 的概念:
Binding 表示 Exchange 与 Queue 之间的关系,我们也可以简单的认为队列对该交换机上的消息感兴趣,绑定可以附带一个额外的参数 RoutingKey。Exchange 就是根据这个 RoutingKey 和当前 Exchange 所有绑定的 Binding 做匹配,如果满足匹配,就往 Exchange 所绑定的 Queue 发送消息,这样就解决了我们向 RabbitMQ 发送一次消息,可以分发到不同的 Queue。RoutingKey 的意义依赖于交换机的类型。
下面就来了解一下 Exchange 的三种主要类型:Fanout、Direct 和 Topic。
4.1 Direct Exchange
Direct Exchange 是 RabbitMQ 默认的 Exchange,完全根据 RoutingKey 来路由消息。设置 Exchange 和 Queue 的 Binding 时需指定 RoutingKey(一般为 Queue Name),发消息时也指定一样的 RoutingKey,消息就会被路由到对应的Queue。
4.2 Topic Exchange
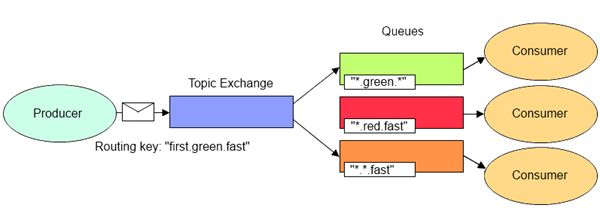
Topic Exchange 和 Direct Exchange 类似,也需要通过 RoutingKey 来路由消息,区别在于Direct Exchange 对 RoutingKey 是精确匹配,而 Topic Exchange 支持模糊匹配。分别支持 * 和 # 通配符,* 表示匹配一个单词, # 则表示匹配没有或者多个单词。
4.3 Headers Exchange
Headers Exchange 会忽略 RoutingKey 而根据消息中的 Headers 和创建绑定关系时指定的 Arguments 来匹配决定路由到哪些 Queue。
Headers Exchange 的性能比较差,而且 Direct Exchange 完全可以代替它,所以不建议使用。
4.4 Default Exchange
Default Exchange 是一种特殊的 Direct Exchange。当你手动创建一个队列时,后台会自动将这个队列绑定到一个名称为空的 Direct Exchange 上,绑定 RoutingKey 与队列名称相同。有了这个默认的交换机和绑定,使我们只关心队列这一层即可,这个比较适合做一些简单的应用。
5. Spring Boot 整合 RabbitMQ
Spring Boot 整合 RabbitMQ 非常简单,如果只是简单的使用配置非常少,Spring Boot 提供了 spring-boot-starter-amqp 项目对消息各种支持。
5.1 简单使用
引入依赖
代码清单:spring-boot-rabbitmq/pom.xml
    org.springframework.boot
    spring-boot-starter-amqp
配置文件 application.yml 如下:
代码清单:spring-boot-rabbitmq/src/main/resources/application.yml
server:
  port: 8080
spring:
  application:
    name: spring-boot-rabbitmq
  rabbitmq:
    host: localhost
    port: 5672
    username: admin
    password: admin
队列配置
代码清单:spring-boot-rabbitmq/src/main/java/com/springboot/springbootrabbitmq/config/QueueConfig.java
@Configuration
public class QueueConfig {
    @Bean
    public Queue simpleQueue() {
        return new Queue("simple");
    }

    @Bean
    public Queue simpleOneToMany() {
        return new Queue("simpleOneToMany");
    }
}
消息提供者
代码清单:spring-boot-rabbitmq/src/main/java/com/springboot/springbootrabbitmq/simple/SimpleSend.java
@Component
public class SimpleSend {

    private final Logger logger = LoggerFactory.getLogger(this.getClass());

    @Autowired
    private AmqpTemplate amqpTemplate;

    public void send() {
        SimpleDateFormat simpleDateFormat = new SimpleDateFormat("yyyy-MM-dd HH:mm:ss");
        String message = "Hello Spring Boot " + simpleDateFormat.format(new Date());
        amqpTemplate.convertAndSend("simple", message);
        logger.info("消息推送成功!");
    }
}
消息消费者
代码清单:spring-boot-rabbitmq/src/main/java/com/springboot/springbootrabbitmq/simple/SimpleReceive.java
@Component
@RabbitListener(queues = "simple")
public class SimpleReceive {

    private final Logger logger = LoggerFactory.getLogger(this.getClass());

    @RabbitHandler
    public void process(String message) {
        logger.info("Receive :{}", message);
    }

}
测试
代码清单:spring-boot-rabbitmq/src/test/java/com/springboot/springbootrabbitmq/DemoApplicationTests.java
@RunWith(SpringRunner.class)
@SpringBootTest
public class DemoApplicationTests {

    @Autowired
    SimpleSend simpleSend;

    @Test
    public void simpleSend() {
        simpleSend.send();
    }

}
5.2 一对多使用
如果有一个消息的生产者,有 N 个消息的消费者,会发生什么呢?
对上面的代码稍作改动,增加一个消息的消费者。
测试代码如下:
@Test
public void simpleOneSend() {
    for (int i = 0; i < 100; i ++) {
        simpleManySend.send(i);
    }
}
测试可以看到结果是两个消费者平均的消费了生产者生产的消息。
5.3 多对多使用
我们再增加一个消息的生产者,测试代码如下:
@Test
public void simpleManySend() {
    for (int i = 0; i < 100; i ++) {
        simpleManySend.send(i);
        simpleManySend1.send(i);
    }
}
测试可以看到结果是两个消费者平均的消费了两个生产者生产的消息。
5.4 Topic Exchange
首先还是先配置 Topic ,配置代码如下:
代码清单:spring-boot-rabbitmq/src/main/java/com/springboot/springbootrabbitmq/config/TopicConfig.java
@Configuration
public class TopicConfig {

    private final String message = "topic.message";
    private final String messages = "topic.messages";

    @Bean
    public Queue queueMessage() {
        return new Queue(this.message);
    }

    @Bean
    public Queue queueMessages() {
        return new Queue(this.messages);
    }

    @Bean
    TopicExchange exchange() {
        return new TopicExchange("topicExchange");
    }

    @Bean
    Binding bindingExchangeMessage(Queue queueMessage, TopicExchange exchange) {
        return BindingBuilder.bind(queueMessage).to(exchange).with("topic.message");
    }

    @Bean
    Binding bindingExchangeMessages(Queue queueMessages, TopicExchange exchange) {
        return BindingBuilder.bind(queueMessages).to(exchange).with("topic.#");
    }
}
这里队列 queueMessages 可以同时匹配两个 route_key ,而队列 queueMessage 只能匹配 topic.message 。
消息的生产者代码如下:
代码清单:spring-boot-rabbitmq/src/main/java/com/springboot/springbootrabbitmq/topic/TopicSend.java
@Component
public class TopicSend {

    private final Logger logger = LoggerFactory.getLogger(this.getClass());

    @Autowired
    private AmqpTemplate rabbitTemplate;

    public void send1() {
        String message = "message 1";
        logger.info("send:{}", message);
        rabbitTemplate.convertAndSend("topicExchange", "topic.message", message);
    }

    public void send2() {
        String message = "message 2";
        logger.info("send:{}", message);
        rabbitTemplate.convertAndSend("topicExchange", "topic.messages", message);
    }
}
调用 send1() 消息会由 Exchange 同时转发到两个队列, 而调用 send2() 则只会转发至 receive2 。
5.5 Fanout Exchange
Fanout 就是我们熟悉的广播模式或者订阅模式,给 Fanout 交换机发送消息,绑定了这个交换机的所有队列都收到这个消息。
Fanout 配置如下:
代码清单:spring-boot-rabbitmq/src/main/java/com/springboot/springbootrabbitmq/config/FanoutConfig.java
@Configuration
public class FanoutConfig {
    @Bean
    public Queue MessageA() {
        return new Queue("fanout.A");
    }

    @Bean
    public Queue MessageB() {
        return new Queue("fanout.B");
    }

    @Bean
    public Queue MessageC() {
        return new Queue("fanout.C");
    }

    @Bean
    FanoutExchange fanoutExchange() {
        return new FanoutExchange("fanoutExchange");
    }

    @Bean
    Binding bindingExchangeA(Queue MessageA, FanoutExchange fanoutExchange) {
        return BindingBuilder.bind(MessageA).to(fanoutExchange);
    }

    @Bean
    Binding bindingExchangeB(Queue MessageB, FanoutExchange fanoutExchange) {
        return BindingBuilder.bind(MessageB).to(fanoutExchange);
    }

    @Bean
    Binding bindingExchangeC(Queue MessageC, FanoutExchange fanoutExchange) {
        return BindingBuilder.bind(MessageC).to(fanoutExchange);
    }
}
消息生产者代码如下:
代码清单:spring-boot-rabbitmq/src/main/java/com/springboot/springbootrabbitmq/fanout/FanoutSend.java
@Component
public class FanoutSend {

    private final Logger logger = LoggerFactory.getLogger(this.getClass());

    @Autowired
    private AmqpTemplate rabbitTemplate;

    public void send() {
        String message = "Hello FanoutSend.";
        logger.info("send:{}", message);
        this.rabbitTemplate.convertAndSend("fanoutExchange","", message);
    }
}
测试代码如下:
代码清单:spring-boot-rabbitmq/src/test/java/com/springboot/springbootrabbitmq/DemoApplicationTests.java
@Test
public void fanoutSend() {
    fanoutSend.send();
}
测试结果为绑定到 fanout 交换机上面的队列都收到了消息。


