ubuntu下安装大恒相机驱动并调用程序采集图像
一.ubuntu下安装大恒相机驱动
1.大恒GigE摄像头Ubuntu环境下的配置
大恒GigE摄像头Ubuntu环境下的配置 - Tzbubble - 博客园
2.官方的Linux版SDK常见问题解答
3. Ubuntu16.04使用大恒工业相机
Ubuntu16.04使用大恒工业相机_Liu Zongyuan的博客-CSDN博客
4.NVIDIA Jetson Xavier配置大恒相机驱动(gige接口火星系列)
NVIDIA Jetson Xavier配置大恒相机驱动(gige接口火星系列)_zhaosh_的博客-CSDN博客_大恒相机驱动
二.python接口采集相机图像
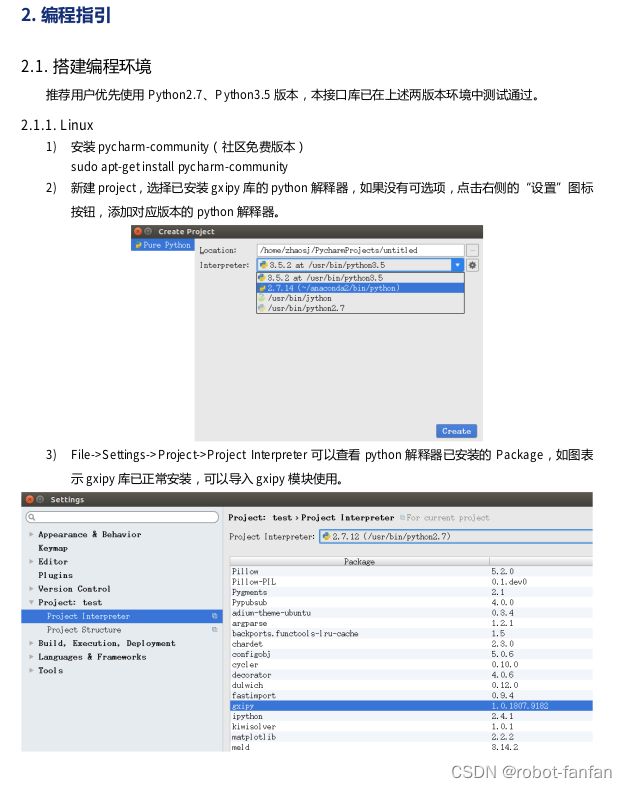
主要参考下载下来的python接口说明书以及readme文件
1.安装python开发程序(版本一和版本二只需要一个就行)
版本一:Python2.7 gxipy installation
====================
1.Install python2.7 & python2.7-dev
(1) sudo apt-get install python2.7
(2) sudo apt-get install python2.7-dev
2.Install the python-setuptools toolkit
(1) sudo apt-get install python-setuptools
3.Install gxipy library
(1) cd ./api
(2) python setup.py build
(3) sudo python setup.py install
4.Install numpy library
(1)First method by pip:
1)sudo apt-get install python-pip
2)sudo pip install numpy
(2)Second method by numpy source code:
1)Download source code
wget http://jaist.dl.sourceforge.net/project/numpy/NumPy/1.9.0/numpy-1.9.0.zip
2)unzip numpy-1.9.0.zip
3)cd numpy-1.9.0
4)sudo python setup.py install
版本二:Python3.5 gxipy installation
====================
1.Install python3.5 & python3.5-dev
(1) sudo apt-get install python3.5
(2) sudo apt-get install python3.5-dev
2.Install the python3-setuptools toolkit
(1) sudo apt-get install python3-setuptools
3.Install gxipy library
(1) cd ./api
(2) python3 setup.py build
(3) sudo python3 setup.py install
4.Install numpy library
(1)First method by pip:
1)sudo apt-get install python3-pip
2)sudo pip3 install numpy
(2)Second method by numpy source code:
1)Download source code
wget http://jaist.dl.sourceforge.net/project/numpy/NumPy/1.9.0/numpy-1.9.0.zip
2)unzip numpy-1.9.0.zip
3)cd numpy-1.9.0
4)sudo python3 setup.py install
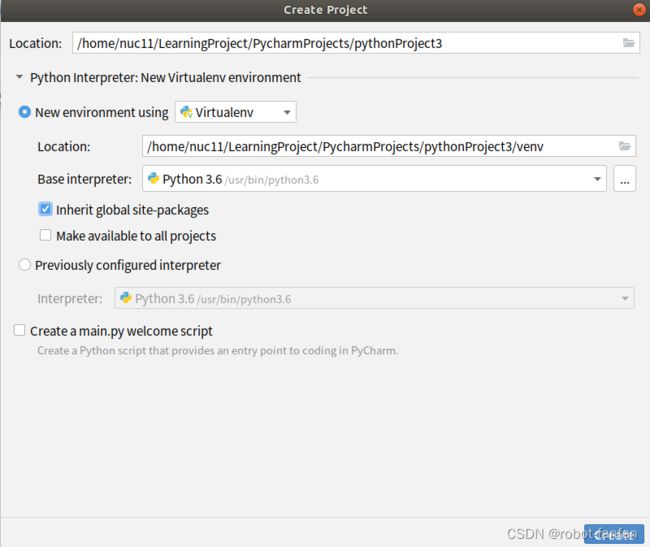
2.Pycharm里新建工程,选择已安装gxipy库的解释器
3.工程里写入程序进行测试
import gxipy as gx
import sys
import numpy as np
from PIL import Image
import cv2
import math
#
device_manager = gx.DeviceManager()
# update_all_device_list()
dev_num,dev_info_list = device_manager.update_all_device_list()
if dev_num == 0:
sys.exit(1)
print(dev_num)
print(dev_info_list)
# 打开设备
# 方法一
# 获取设备基本信息列表
# str_sn = dev_info_list[0].get("sn")
# print (str_sn)
# 通过***打开设备
# cam = device_manager.open_device_by_sn(str_sn)
# 方法二
# 通过用户 ID 打开设备
# str_user_id = dev_info_list[0].get("user_id")
# cam = device_manager.open_device_by_user_id(str_user_id)
# 方法三
# 通过索引打开设备
# str_index = dev_info_list[0].get("index")
# cam = device_manager.open_device_by_index(str_index)
# 下面为只针对千兆网相机使用的打开方式
# 方法四
for i in dev_info_list:
# 通过 ip 地址打开设备
str_ip= i.get("ip")
print(str_ip)
cam = device_manager.open_device_by_ip(str_ip)
# 方法五
# 通过 mac 地址打开设备
# str_mac = dev_info_list[0].get("mac")
# print(str_mac)
# cam = device_manager.open_device_by_mac(str_mac)
# 开始采集
cam.stream_on()
# 获取流通道个数
# 如果 int_channel_num == 1,设备只有一个流通道,列表 data_stream 元素个数为 1
# 如果 int_channel_num > 1,设备有多个流通道,列表 data_stream 元素个数大于 1
# 目前千兆网相机、USB3.0、USB2.0 相机均不支持多流通道
int_channel_num = cam.get_stream_channel_num()
print(int_channel_num)
# 获取数据
# num 为采集图片次数
num = 1
for i in range(num):
# 打开第 0 通道数据流
raw_image = cam.data_stream[0].get_image()
if raw_image.get_status() == gx.GxFrameStatusList.INCOMPLETE:
print("incomplete frame")
# 停止采集
image = np.array(raw_image)
print("image",image)
print(type(raw_image))
# 从黑白原始图像获取 numpy 数组
numpy_image = raw_image.get_numpy_array()
if numpy_image is None:
continue
# 之后,用户可根据获取的 numpy_array 显示、保存图像
print(numpy_image)
# 显示并保存获得的黑白图片
image = Image.fromarray(numpy_image, 'L')
image.show()
image.save("acquisition_mono_image.jpg")
# 停止采集
cam.stream_off()
# 关闭设备
cam.close_device()
print("over")
4.一些体会
(1)利用pycharm新建工程的时候,选择虚拟环境,解释器一定选择已经安装好gxipy的python解释器。然后在这个环境下,可以随意安装2022-12-30 22-13-09屏幕截图一些库,比如Pillow,opencv-python等,不和本地其他地方程序干扰。
5.主要参考文档
(1) ubunut下用Python连接多个大恒图像2D相机,获取图像信息。 - 灰信网(软件开发博客聚合)
(2) Python调用大恒相机采集图片(Ubuntu16.04)_Liu Zongyuan的博客-CSDN博客_安装gxipy
(3)使用大恒USB工业相机PythonSDK进行逐帧率图片采集
使用大恒USB工业相机PythonSDK进行逐帧率图片采集_虫无涯的博客-CSDN博客_工业相机自动采集脚本
(4)大恒相机图像采集 linux+python
大恒相机图像采集 linux+python_Bungehurst的博客-CSDN博客_get_numpy_array()


