selenium完成对豆瓣的滑块验证码登录验证
本文使用的是selenium 4.9.1 可能会遇到打开浏览器闪退的问题,如要保持浏览器打开可以加入input().
完成对滑块验证的处理使用的是OpenCV。
其余只需要简单的py基础便可完成。注意需要一定的selenium基础。
1.首先完成对豆瓣首页登录界面的处理。
我们使用的豆瓣网址是:
https://www.douban.com/

首先是常规操作,加载driver和使用get方法,我们使用密码登录,短信验证我们以后再说。
wd = webdriver.Chrome(service=Service(r"E:\pc\driver\chromedriver_win32\chromedriver.exe"))
wd.get('https://www.douban.com/')
wd.implicitly_wait(1)
然后观察这个网页,我们需要先点到密码登录,但是直接点击却不能点到,会报错,我们仔细观察一下会发现这个登录页面是一个iframe,需要跳转进去。代码如下:
wd.switch_to.frame(wd.find_element(By.XPATH, '//*[@id="anony-reg-new"]/div/div[1]/iframe'))
# wd.switch_to.frame(wd.find_element(By.TAG_NAME,'iframe'))
# wd.switch_to.frame(0)
我们使用了三种方式,只需要选其中一种就行,第一种是使用xpath选取,第二种是使用类型选取,第三种则是使用index选取,这个ifarm是第一个,就使用0.
然后进行简单的点击:
wd.find_element(By.CSS_SELECTOR,
                'body > div.account-main.account-body.login-wrap.login-start.account-anonymous > div.account-body-tabs > ul.tab-start > li.account-tab-account').click()
然后使用send_key输入信息:单引号双引号无所谓,点击登录按钮。
wd.find_element(By.CSS_SELECTOR, '#username').send_keys("")
wd.find_element(By.CSS_SELECTOR, '#password').send_keys('')
wd.find_element(By.CSS_SELECTOR,
                'body > div.account-main.account-body.login-wrap.login-start.account-anonymous > div.account-tabcon-start > div.account-form > div.account-form-field-submit > a').click()
在点击登录后会加载出一个滑块验证码:
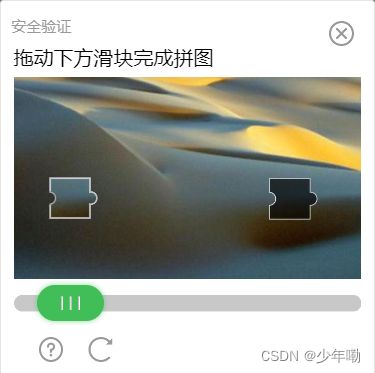
这就我们的重头戏,要解决这个滑块验证码,有很多方法,在ddddocr模块里有一个简答的滑块验证码的处理,但是对于豆瓣的这个滑块验证码则行不通,因为豆瓣为了防止被爬更新了滑块验证码,将滑块的小块图片进行了更改,现在小的图片的导出图片是下面这样的:

并不是一个单独的小图像,而是包含了滑块。那么我们就使用opencv自己写一个方法来完成滑块的拖动。
首先新弹出的验证码区域是一个新的ifarme,我们先使用switch_to.farme进入:然后在进入前先进行等待,不然可能找不到目标elemen。
wd.implicitly_wait(4)
# wd.switch_to.frame(wd.find_element(By.XPATH,'//*[@id="tcaptcha_iframe_dy"]'))
wd.switch_to.frame(wd.find_element(By.ID,'tcaptcha_iframe_dy'))
# wd.switch_to.frame("tcaptcha_iframe_dy")
我们使用switch_to.farme有好几种方法,这里使用了xpath、id、和直接使用id。
那么我们要等到这个验证码区域出现,总是等一个固定的时间会很不智能,我们可以使用条件等待。很简单,先导入包。
from selenium.webdriver.support.wait import WebDriverWait
from selenium.webdriver.support import expected_conditions as  EC


WebDriverWait(wd, 10).until(EC.visibility_of_element_located((By.ID, 'slideBg')))
然后使用.until是等待类,后面的visibility_of_element_located是条件等待方法,这里使用的是等什么element出现时。我们使用的是验证码的大图片出现时。同时前面的(wd,10)说了最多等10秒
接下来就是对验证码图片的处理,我们要对图像进行处理首先要得到他们。
bg = wd.find_element(By.ID, 'slideBg')
bgs = bg.get_attribute('style')

path = 'background-image: url\(\"(.*?)\"\);'
pathed = re.findall(path, bgs, re.S)[0]

request.urlretrieve(pathed, 'bgimg.png')
我们首先观察网页的构成,发现大图片的link藏在元素的style中,我们先定位到element,然后获取style信息,对这一串数据进行正则表达式,截取出link。
导入一个新的包urllib
from urllib import request
使用方法urlretrieve将图片存下来。
同理保存小的图片:
limg = wd.find_element(By.CSS_SELECTOR, '#tcOperation > div:nth-child(7)')
limgpath = limg.get_attribute('style')
lpathed = re.findall(path, limgpath, re.S)[0]
# print(lpathed)
# if lpathed.find('htpps')==-1:
#     lpathed='https://t.capcha.qq.com/'+lpathed
request.urlretrieve(lpathed, 'limg.png')
其中的注释是因为豆瓣的验证码使用的是腾讯的资源,有的时候返回的链接是不带qq的域名的,需要自己加上,但是这种情况很少遇到。
再获取到两个目标图片后我们就可以对其进行处理了,使用OpenCV的方法。构造一个函数:
def get_pos(imgsrc):
    img = cv2.imread(imgsrc)
    gs = cv2.GaussianBlur(img, (5, 5), 0)
    canny = cv2.Canny(gs, 0, 100)
    contours, hierarchy = cv2.findContours(canny, cv2.RETR_TREE, cv2.CHAIN_APPROX_SIMPLE)
    # print(len(contours))
    # print(hierarchy)
    # print(contours)
    for contour in contours:
        area = cv2.contourArea(contour)
        length = cv2.arcLength(contour, True)
        if 5025 < area < 7255 and 300 < length < 380:
            x, y, w, h = cv2.boundingRect(contour)
            cv2.rectangle(img, (x, y), (x + w, y + h), (0, 0, 255), 2)
            cv2.imwrite('end.jpg', img)
            # cv2.imwrite('z.jpg', gs)
            # cv2.imwrite('c.jpg',canny)
            return x
    return 0
这个方法很简单,我们一步一步看,第一步是读入图片imread。
第二步是使用高斯滤波,去掉图像的一些特征,让后面的轮廓选取更加准确。
第三步是轮廓检画出轮廓。
第四步是将返回两个值,第一个是每个轮廓信息的向量,在一个list中,第二个和第一个差不多是第一个向量内每一个元素包含了4个int型变量。我们用不到。
然后我们将contours的值每个都取出来进行计算。其实contours的结果就是我们目标图像上的轮廓结果的集合,我们需要找出我们需要的那个。
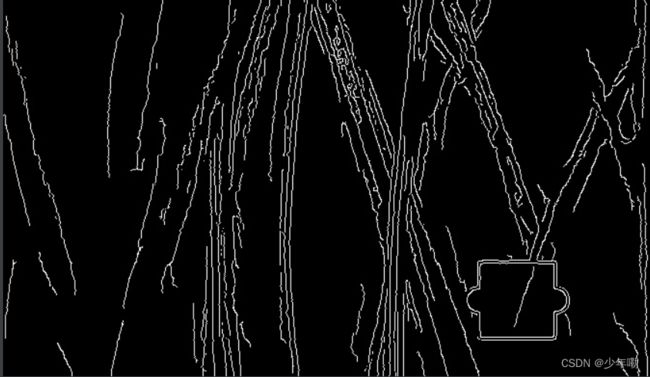
我们可以看到,我们只要找出那个封闭的框就行,怎么找呢。按照他的面积和周长进行确定,area就不多讲了,注意一下lenght后面的一个参数true,代表这是一个封闭图像。
然后我们打开图片,查看大小,对大图片的的缺口进行长宽的计算,这个得打开图片手算。很简单,会小学数学就行。然后计算周长,也没有难度,记得是在大图片里计算缺口大小,这一步计算完成后使用简单的if条件判断,给算出的结果上下加点误差,自己看加多少,也可以直接用图里的。然后就是使用boundingRect输出这个被选中的contour的x坐标y坐标,宽,高。
接下来需要我们讨论一个问题,就是如何模拟人来拖动这个滑块,将其放在合适的位置,我们计算缺口的x坐标,获取小块的x坐标,将缺口的x坐标减去左边空的距离,就能得到需要移动的x轴距离。
我们首先需要获取到缺口的x轴坐标,首先在算法里我们对选取的框的正确性进行一下验证,对缺口进行一个框取,使用rectangle进行绘制矩形,需要矩形左上角的坐标和右下角的坐标。我们已经得到了。如何绘制的没有问题,就返回x。

得到x的坐标后,小块的x轴坐标很容易获取,因为它是和滑块同步的,我们获取到滑块的坐标就行,使用元素的location['x']就能或取到:
L = get_pos('bgimg.png')
button = wd.find_element(By.CSS_SELECTOR, '#tcOperation > div.tc-fg-item.tc-slider-normal')
excpet_L = button.location['x']
先将保存的图片输入方法中,然后定位按钮,获得x值。
这个时候需要主要,我们实际的图片大小和页面展示的图片大小是1不一样的,有一定比例缩放,我们f12查看图片元素,然后和保存的图片大小进行比对,进行计算:
L = int(L * 278 / 672 - excpet_L)接下来进行鼠标的操作,按住移动松开:
ActionChains(wd).click_and_hold(button).perform()
i = 0
moved = 0
while moved <= L:
    x = random.randint(3, 10)
    moved += x
    ActionChains(wd).move_by_offset(xoffset=x, yoffset=0).perform()
ActionChains(wd).release().perform()
导入
from selenium.webdriver.common.action_chains import ActionChains使用click and hold进行操作,为了不被检测到不是人为,我们每次移动一个随机值,3到10,每次移动一小点,最终移动到目标位置。
综上便可完成对豆瓣的登录部分的ui自动化。
下面放完整源码:(前端改变比较大,截止2023-6-15日是能够完成的,后面豆瓣更新可能会报错)
from time import sleep

import cv2
from selenium import webdriver
from selenium.webdriver.chrome.service import Service
from selenium.webdriver.common.by import By
from selenium.webdriver.support.wait import WebDriverWait
from selenium.webdriver.support import expected_conditions as  EC
from selenium.webdriver.common.action_chains import ActionChains
import re
import random
from urllib import request
import ddddocr


def get_pos(imgsrc):
    img = cv2.imread(imgsrc)
    gs = cv2.GaussianBlur(img, (5, 5), 0)
    canny = cv2.Canny(gs, 0, 100)
    contours, hierarchy = cv2.findContours(canny, cv2.RETR_TREE, cv2.CHAIN_APPROX_SIMPLE)
    # print(len(contours))
    # print(hierarchy)
    # print(contours)
    for contour in contours:
        area = cv2.contourArea(contour)
        length = cv2.arcLength(contour, True)
        if 5025 < area < 7255 and 300 < length < 380:
            x, y, w, h = cv2.boundingRect(contour)
            cv2.rectangle(img, (x, y), (x + w, y + h), (0, 0, 255), 2)
            cv2.imwrite('end.jpg', img)
            # cv2.imwrite('z.jpg', gs)
            # cv2.imwrite('c.jpg',canny)
            return x
    return 0


# print(x)
wd = webdriver.Chrome(service=Service(r"E:\pc\driver\chromedriver_win32\chromedriver.exe"))
wd.get('https://www.douban.com/')
wd.implicitly_wait(1)
wd.switch_to.frame(wd.find_element(By.XPATH, '//*[@id="anony-reg-new"]/div/div[1]/iframe'))
# wd.switch_to.frame(wd.find_element(By.TAG_NAME,'iframe'))
# wd.switch_to.frame(0)
wd.find_element(By.CSS_SELECTOR,
                'body > div.account-main.account-body.login-wrap.login-start.account-anonymous > div.account-body-tabs > ul.tab-start > li.account-tab-account').click()
# wd.find_element(By.CSS_SELECTOR,'body > div.account-main.account-body.login-wrap.login-start.account-anonymous > div.account-body-tabs > ul.tab-start > li.account-tab-account').click()
wd.find_element(By.CSS_SELECTOR, '#username').send_keys("")
wd.find_element(By.CSS_SELECTOR, '#password').send_keys('')
wd.find_element(By.CSS_SELECTOR,
                'body > div.account-main.account-body.login-wrap.login-start.account-anonymous > div.account-tabcon-start > div.account-form > div.account-form-field-submit > a').click()
wd.implicitly_wait(4)
# wd.switch_to.frame(wd.find_element(By.XPATH,'//*[@id="tcaptcha_iframe_dy"]'))
wd.switch_to.frame(wd.find_element(By.ID,'tcaptcha_iframe_dy'))
# wd.switch_to.frame("tcaptcha_iframe_dy")
# wd.switch_to.frame("tcaptcha_iframe_dy")

WebDriverWait(wd, 10).until(EC.visibility_of_element_located((By.ID, 'slideBg')))

bg = wd.find_element(By.ID, 'slideBg')
bgs = bg.get_attribute('style')
# print(bgs)
path = 'background-image: url\(\"(.*?)\"\);'
pathed = re.findall(path, bgs, re.S)[0]
# print(pathed)
request.urlretrieve(pathed, 'bgimg.png')

# find litter img
limg = wd.find_element(By.CSS_SELECTOR, '#tcOperation > div:nth-child(7)')
limgpath = limg.get_attribute('style')
lpathed = re.findall(path, limgpath, re.S)[0]
# print(lpathed)
# if lpathed.find('htpps')==-1:
#     lpathed='https://t.capcha.qq.com/'+lpathed
request.urlretrieve(lpathed, 'limg.png')
#
# det = ddddocr.DdddOcr(det=False,ocr=False)
# with open("limg.png",'rb') as f:
#     target_bytes =f.read()
# with open('bgimg.png','rb')as f:
#     background_bytes=f.read()
# # img=cv2.imread('bgimg.png')
# res=det.slide_match(target_bytes,background_bytes,simple_target=True)
# print(res)
# print(type(res))
sleep(1)
L = get_pos('bgimg.png')
button = wd.find_element(By.CSS_SELECTOR, '#tcOperation > div.tc-fg-item.tc-slider-normal')
excpet_L = button.location['x']
L = int(L * 278 / 672 - excpet_L)
ActionChains(wd).click_and_hold(button).perform()
i = 0
moved = 0
while moved <= L:
    x = random.randint(3, 10)
    moved += x
    ActionChains(wd).move_by_offset(xoffset=x, yoffset=0).perform()
ActionChains(wd).release().perform()
input()