第五章 KubeSphere3.3.0 + MySQL8.0.25 集群部署
第五章 KubeSphere3.3.0 + MySQL8.0.25 集群部署
文章目录
- 第五章 KubeSphere3.3.0 + MySQL8.0.25 集群部署
- 前言
- 一、添加Radondb应用仓库
- 二、部署 RadonDB MySQL Operator
- 三、部署 RadonDB MySQL 集群
-
- 3.1、下载集群部署yaml配置文件
- 3.2、安装部署
- 3.3、设置外网访问
- 四、总结
- 五、其他文章传送门
前言
MySQL是一个关系型数据库管理系统,由瑞典MySQL AB 公司开发,属于 Oracle 旗下产品。MySQL 是最流行的关系型数据库管理系统之一,在 WEB 应用方面,MySQL是最好的 RDBMS (Relational Database Management System,关系数据库管理系统) 应用软件之一(来源百度百科),官网地址:https://www.mysql.com/。本节内容我使用kubesphere 3.3.0 平台构建 MySQL8.0.25集群部署。使用Radondb2.2.0 部署集群,RadonDB MySQL 是一款基于 MySQL 的开源、高可用、云原生集群解决方案。支持一主多从高可用架构,并具备安全、自动备份、监控告警、自动扩容等全套管理功能,官网地址:http://www.radondb.com/ 。
一、添加Radondb应用仓库
- 用企业空间管理员账号登录 KubeSphere 的 Web 控制台。
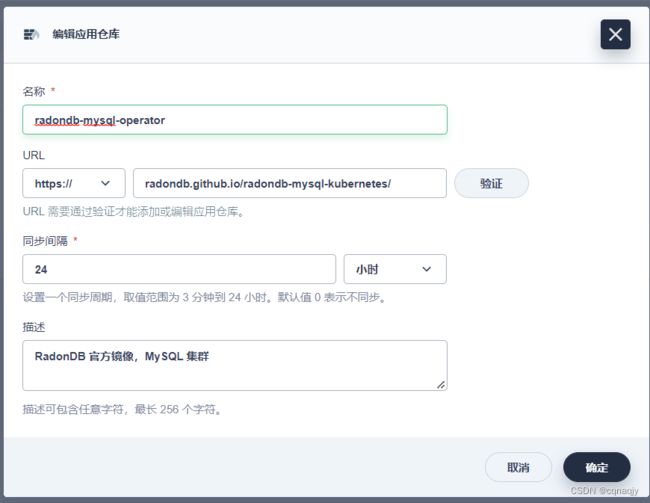
- 在自己的企业空间中,进入应用管理下的应用仓库页面,点击添加,弹出仓库配置对话框。
- 输入仓库名称和仓库 URL。
- 输入 radondb-mysql-operator 作为应用仓库名称。
- 输入 https://radondb.github.io/radondb-mysql-kubernetes/ 作为仓库的 URL,
并点击验证以验证 URL,在 URL 旁边呈现一个绿色的对号,验证通过后,点击确定继续。
- 将仓库成功导入到 KubeSphere 之后,在列表中即可查看 RadonDB MySQL 仓库。

二、部署 RadonDB MySQL Operator
-
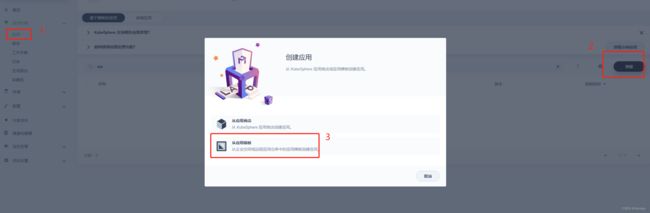
从应用模板开始创建应用
-
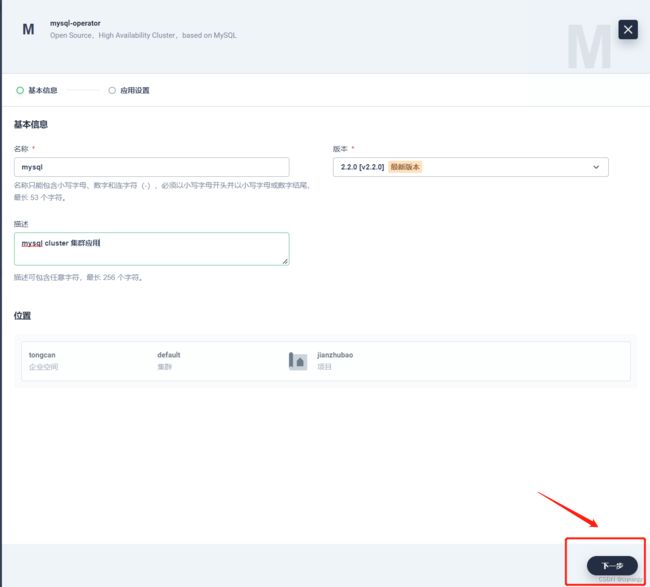
选择模板

-
选择最新版本

-
修改和编辑value.yaml配置文件,点击安装(serviceAccount 下的 name 可以自己命名一个,不命名也会默认生成)

-
应用创建中

-
在工作负载和服务中查询是否安装成功


三、部署 RadonDB MySQL 集群
3.1、下载集群部署yaml配置文件
下载地址:https://github.com/radondb/radondb-mysql-kubernetes/releases/
- mysql5+版本:mysql_v1alpha1_mysqlcluster.yaml
- mysql8+版本:mysql_v1alpha1_mysqlcluster_mysql8.yaml
- mysql5+:
如果在github中不能下载 mysql_v1alpha1_mysqlcluster.yaml 文件,可以复制以下配置:
metadata 下的 name 需修改为自己的
storageClass 存储卷需要配置成自己的存储卷
不清楚怎么创建存储卷的可以参考第四章传送门
apiVersion: mysql.radondb.com/v1alpha1
kind: MysqlCluster
metadata:
  name: sample
spec:
  replicas: 3
  mysqlVersion: "5.7"

  # the backupSecretName specify the secret file name which store S3 information,
  # if you want S3 backup or restore, please create backup_secret.yaml, uncomment below and fill secret name:
  # backupSecretName:

  # if you want create mysqlcluster from S3, uncomment and fill the directory in S3 bucket below:
  # such as restoreFrom: "backup_202241423817"
  # restoreFrom:

  # Restore from NFS, uncomment below and set the ip of NFS server
  # such as nfsServerAddress: "10.233.55.172"
  # nfsServerAddress:
  mysqlOpts:
    rootPassword: "RadonDB@123"
    rootHost: localhost
    user: radondb_usr
    password: RadonDB@123
    database: radondb
    initTokuDB: false

    # A simple map between string and string.
    # Such as:
    #    mysqlConf:
    #      expire_logs_days: "7"
    mysqlConf: {}

    resources:
      requests:
        cpu: 100m
        memory: 256Mi
      limits:
        cpu: 500m
        memory: 1Gi

  xenonOpts:
    image: radondb/xenon:1.1.5-alpha
    admitDefeatHearbeatCount: 5
    electionTimeout: 10000

    resources:
      requests:
        cpu: 50m
        memory: 128Mi
      limits:
        cpu: 100m
        memory: 256Mi

  metricsOpts:
    enabled: false
    image: prom/mysqld-exporter:v0.12.1

    resources:
      requests:
        cpu: 10m
        memory: 32Mi
      limits:
        cpu: 100m
        memory: 128Mi

  podPolicy:
    imagePullPolicy: IfNotPresent
    sidecarImage: radondb/mysql57-sidecar:v2.2.0
    busyboxImage: busybox:1.32

    slowLogTail: false
    auditLogTail: false

    labels: {}
    annotations: {}
    affinity: {}
    priorityClassName: ""
    tolerations: []
    schedulerName: ""
    # extraResources defines quotas for containers other than mysql or xenon.
    extraResources:
      requests:
        cpu: 10m
        memory: 32Mi

  persistence:
    enabled: true
    accessModes:
    - ReadWriteOnce
    #storageClass: ""
    size: 20Gi
- mysql8+:
如果在github中不能下载 mysql_v1alpha1_mysqlcluster_mysql8.yaml文件,可以复制以下配置:
metadata 下的 name 需修改为自己的,项目创建后会在名称后自动补充 -mysql
storageClass 存储卷需要配置成自己的存储卷
replicas: 3 默认创建3副本
rootPassword: “RadonDB@123” (root用户密码)
rootHost: localhost (此设置为root只能在本机访问,可以修改为 %,远程客户端也可以访问操作)
user: radondb_usr (远程访问用户,此账号不可以创建数据库)
password: RadonDB@123 (远程访问用户密码)
database: radondb (远程访问用户能访问的数据库)
apiVersion: mysql.radondb.com/v1alpha1
kind: MysqlCluster
metadata:
  name: jzb
spec:
  replicas: 3
  mysqlVersion: "8.0"

  # the backupSecretName specify the secret file name which store S3 information,
  # if you want S3 backup or restore, please create backup_secret.yaml, uncomment below and fill secret name:
  # backupSecretName:

  # if you want create mysqlcluster from S3, uncomment and fill the directory in S3 bucket below:
  # restoreFrom:

  mysqlOpts:
    rootPassword: "RadonDB@123"
    rootHost: localhost
    user: radondb_usr
    password: RadonDB@123
    database: radondb
    ## tokudb is not supported in mysql8.
    # initTokuDB: false

    # A simple map between string and string.
    # Such as:
    #    mysqlConf:
    #      expire_logs_days: "7"
    mysqlConf: {}

    resources:
      requests:
        cpu: 100m
        memory: 256Mi
      limits:
        cpu: 500m
        memory: 1Gi

  xenonOpts:
    image: radondb/xenon:1.1.5-alpha
    admitDefeatHearbeatCount: 5
    electionTimeout: 10000

    resources:
      requests:
        cpu: 50m
        memory: 128Mi
      limits:
        cpu: 100m
        memory: 256Mi

  metricsOpts:
    enabled: false
    image: prom/mysqld-exporter:v0.12.1

    resources:
      requests:
        cpu: 10m
        memory: 32Mi
      limits:
        cpu: 100m
        memory: 128Mi

  podPolicy:
    imagePullPolicy: IfNotPresent
    sidecarImage: radondb/mysql80-sidecar:v2.2.0
    busyboxImage: busybox:1.32

    slowLogTail: false
    auditLogTail: false

    labels: {}
    annotations: {}
    affinity: {}
    priorityClassName: ""
    tolerations: []
    schedulerName: ""
    # extraResources defines quotas for containers other than mysql or xenon.
    extraResources:
      requests:
        cpu: 10m
        memory: 32Mi

  persistence:
    enabled: true
    accessModes:
    - ReadWriteOnce
    storageClass: "nfs-storage"
    size: 20Gi
3.2、安装部署
- 安装 RadonDB MySQL 集群
执行以下命令,安装 RadonDB MySQL 集群
注意:未指定项目时,集群将被默认安装在 kubesphere-controls-system 项目中。若需指定项目,安装命令需添加 --namespace=
执行创建命令: kubectl apply -f mysql_v1alpha1_mysqlcluster_mysql8.yaml --namespace=jianzhubao
删除命令:kubectl delete -f mysql_v1alpha1_mysqlcluster_mysql8.yaml --namespace=jianzhubao
[root@k8s-master01 ~]# kubectl apply -f mysql_v1alpha1_mysqlcluster_mysql8.yaml --namespace=jianzhubao
mysqlcluster.mysql.radondb.com/jzb created
集群创建成果后,执行如下命令,可查看 RadonDB MySQL 集群节点服务。
[root@k8s-master01 ~]# kubectl get statefulset -n jianzhubao
NAME                  READY   AGE
jzb-mysql             3/3     66m
[root@k8s-master01 ~]# kubectl get svc -n jianzhubao
NAME                           TYPE        CLUSTER-IP      EXTERNAL-IP   PORT(S)                          AGE
jzb-follower                   ClusterIP   10.233.20.71    <none>        3306/TCP,8082/TCP                68m
jzb-leader                     NodePort    10.233.61.12    <none>        3306:32266/TCP,8082:31713/TCP    68m
jzb-mysql                      ClusterIP   None            <none>        3306/TCP,8082/TCP                68m
-
在工作负载查看mysql是否在创建中,下图为正在创建3副本

-
在服务中已经能查询到三个mysql的服务:

3.3、设置外网访问
- 开放 jzb-leader的外网访问端口


- 在jzb-leader的服务中检查端口是否开放成功:
外网访问 3306映射的端口即可

- 客户端连接测试
主机名为集群的任意节点都可以
user: radondb_usr (远程访问用户,此账号不可以创建数据库)
password: RadonDB@123 (远程访问用户密码)
-
测试连接成功:

-
sql查询正常,能查询出mysql安装的是8.0.25版本:

提示:用命令给mysql创建一个高权限的账号
1. 从jzb-leader的服务中进入mysql终端
2. root账号登录授权
mysql -u root -p
Enter password:RadonDB@123
3. 创建账号:
create user ‘jianzhubao’@‘%’ identified by ‘jianzhubao’;
4. 授最高权限,此处根据自己的需求设置不同的权限
grant all privileges on . to ‘jianzhubao’@‘%’;


四、总结
至此,关于使用KubeSphere3.3.0管理平台搭建一个高可用的MySQL集群到这里就结束了。作者制作不易,别忘了点赞、关注、加收藏哦,我们下期见。。。
五、其他文章传送门
第一章 KubeSphere 3.3.0 + Seata 1.5.2 + Nacos 2.1.0 (nacos集群模式)
第二章 KubeSphere3.3.0 + Nacos 2.1.0 (集群部署)
第三章 KubeSphere3.3.0 + Sentinel 1.8.4 + Nacos 2.1.0 集群部署
第四章 KubeSphere3.3.0 + Redis7.0.4 + Redis-Cluster 集群部署
第五章 KubeSphere3.3.0 + MySQL8.0.25 集群部署
第六章 KubeSphere3.3.0 安装部署 + KubeKey2.2.1(kk)创建集群
第七章 KubeSphere3.3.0 + MySQL8.0 单节点部署
第八章 KubeSphere3.3.0 + Redis7.0.4 单节点部署
第九章 KubeSphere3.3.0 + Nacos2.1.0 单节点部署
第十章 KubeSphere3.3.0 + FastDFS6.0.8 部署