Transformers基本组件(一)快速入门Pipeline、Tokenizer、Model
Transformers基本组件(一)快速入门Pipeline、Tokenizer、Model
Hugging Face出品的Transformers工具包可以说是自然语言处理领域中当下最常用的包之一,实现了大量的主流预训练模型架构,并提供了对应的与训练好的模型文件。
借助Transformers工具包,可以非常方便的调用主流预训练模型解决实际的下游任务,如文本分类、文本匹配、命名实体识别、阅读理解、文本生成、文本摘要等。
Transformers环境可以参考:
AutoDL平台transformers环境搭建
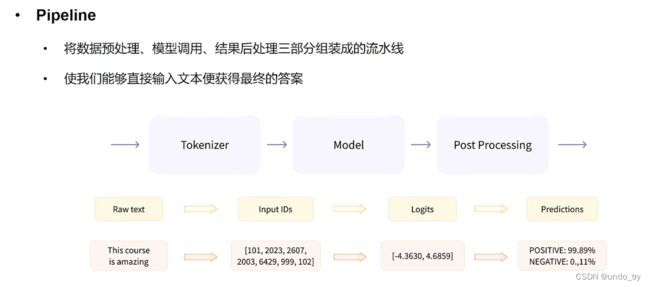
1、基础组件Pipeline
1.1 Pipeline简介
为了更加方便的使用预训练模型,Transformers提供了pipeline函数,该函数封装了模型及对应的数据前处理与后处理工工作,无需我们关注内部细节,只需要指定pipeline的任务类型并输入对应的文本,即可得到我们想要的答案,做到了真正的开箱即用。
目前,pipeline中支持的任务类型包括:
- 情感分析(sentiment-analysis):对给定的文本分析其情感极性
- 文本生成(text-generation):根据给定的文本进行生成
- 命名实体识别(ner):标记句子中的实体
- 阅读理解(question-answering):给定上下文与问题,从上下文中抽取答案
- 掩码填充(fill-mask):填充给定文本中的掩码词
- 文本摘要(summarization):生成一段长文本的摘要
- 机器翻译(translation):将文本翻译成另一种语言
- 特征提取(feature-extraction):生成给定文本的张量表示
1.2 Pipeline常见API
1.2.1 查看Pipeline支持的任务类型
from transformers.pipelines import SUPPORTED_TASKS

import warnings
warnings.filterwarnings("ignore")
for index,(k, v) in enumerate(SUPPORTED_TASKS.items()):
    print(index + 1,'\t', k, '\t', v)
# audio-classification是任务名
# 'impl':
# 'tf': ()  指没有用tf进行实现
# ''pt': (  指的是模型以pytorch的实现类
# default表示默认的模型
# 'type': 'audio' 指的是任务类型

1 	 audio-classification 	 {'impl': <class 'transformers.pipelines.audio_classification.AudioClassificationPipeline'>, 'tf': (), 'pt': (<class 'transformers.models.auto.modeling_auto.AutoModelForAudioClassification'>,), 'default': {'model': {'pt': ('superb/wav2vec2-base-superb-ks', '372e048')}}, 'type': 'audio'}
2 	 automatic-speech-recognition 	 {'impl': <class 'transformers.pipelines.automatic_speech_recognition.AutomaticSpeechRecognitionPipeline'>, 'tf': (), 'pt': (<class 'transformers.models.auto.modeling_auto.AutoModelForCTC'>, <class 'transformers.models.auto.modeling_auto.AutoModelForSpeechSeq2Seq'>), 'default': {'model': {'pt': ('facebook/wav2vec2-base-960h', '55bb623')}}, 'type': 'multimodal'}
3 	 text-to-audio 	 {'impl': <class 'transformers.pipelines.text_to_audio.TextToAudioPipeline'>, 'tf': (), 'pt': (<class 'transformers.models.auto.modeling_auto.AutoModelForTextToWaveform'>, <class 'transformers.models.auto.modeling_auto.AutoModelForTextToSpectrogram'>), 'default': {'model': {'pt': ('suno/bark-small', '645cfba')}}, 'type': 'text'}
4 	 feature-extraction 	 {'impl': <class 'transformers.pipelines.feature_extraction.FeatureExtractionPipeline'>, 'tf': (), 'pt': (<class 'transformers.models.auto.modeling_auto.AutoModel'>,), 'default': {'model': {'pt': ('distilbert-base-cased', '935ac13'), 'tf': ('distilbert-base-cased', '935ac13')}}, 'type': 'multimodal'}
5 	 text-classification 	 {'impl': <class 'transformers.pipelines.text_classification.TextClassificationPipeline'>, 'tf': (), 'pt': (<class 'transformers.models.auto.modeling_auto.AutoModelForSequenceClassification'>,), 'default': {'model': {'pt': ('distilbert-base-uncased-finetuned-sst-2-english', 'af0f99b'), 'tf': ('distilbert-base-uncased-finetuned-sst-2-english', 'af0f99b')}}, 'type': 'text'}
6 	 token-classification 	 {'impl': <class 'transformers.pipelines.token_classification.TokenClassificationPipeline'>, 'tf': (), 'pt': (<class 'transformers.models.auto.modeling_auto.AutoModelForTokenClassification'>,), 'default': {'model': {'pt': ('dbmdz/bert-large-cased-finetuned-conll03-english', 'f2482bf'), 'tf': ('dbmdz/bert-large-cased-finetuned-conll03-english', 'f2482bf')}}, 'type': 'text'}
7 	 question-answering 	 {'impl': <class 'transformers.pipelines.question_answering.QuestionAnsweringPipeline'>, 'tf': (), 'pt': (<class 'transformers.models.auto.modeling_auto.AutoModelForQuestionAnswering'>,), 'default': {'model': {'pt': ('distilbert-base-cased-distilled-squad', '626af31'), 'tf': ('distilbert-base-cased-distilled-squad', '626af31')}}, 'type': 'text'}
8 	 table-question-answering 	 {'impl': <class 'transformers.pipelines.table_question_answering.TableQuestionAnsweringPipeline'>, 'pt': (<class 'transformers.models.auto.modeling_auto.AutoModelForTableQuestionAnswering'>,), 'tf': (), 'default': {'model': {'pt': ('google/tapas-base-finetuned-wtq', '69ceee2'), 'tf': ('google/tapas-base-finetuned-wtq', '69ceee2')}}, 'type': 'text'}
9 	 visual-question-answering 	 {'impl': <class 'transformers.pipelines.visual_question_answering.VisualQuestionAnsweringPipeline'>, 'pt': (<class 'transformers.models.auto.modeling_auto.AutoModelForVisualQuestionAnswering'>,), 'tf': (), 'default': {'model': {'pt': ('dandelin/vilt-b32-finetuned-vqa', '4355f59')}}, 'type': 'multimodal'}
10 	 document-question-answering 	 {'impl': <class 'transformers.pipelines.document_question_answering.DocumentQuestionAnsweringPipeline'>, 'pt': (<class 'transformers.models.auto.modeling_auto.AutoModelForDocumentQuestionAnswering'>,), 'tf': (), 'default': {'model': {'pt': ('impira/layoutlm-document-qa', '52e01b3')}}, 'type': 'multimodal'}
......
1.2.2 Pipeline的创建与使用方式
1、根据任务类型直接创建Pipeline,默认都是英文的模型
from transformers import pipeline

# 注意:需要魔法流量才能下载相关模型
pipe = pipeline("text-classification")
pipe("very good!")
[{'label': 'POSITIVE', 'score': 0.9998525381088257}]
2、指定任务类型,再指定模型,创建基于指定模型的Pipeline
# pipe = pipeline("text-classification", model="uer/roberta-base-finetuned-dianping-chinese")

# 模型地址 https://huggingface.co/models
# 此模型下载地址:https://huggingface.co/uer/roberta-base-finetuned-dianping-chinese/tree/main
# 这里因为网络问题,先离线下载【pytorch_model.bin、vocab.txt等文件】,然后加载

model_path = '/root/autodl-fs/models/roberta-base-finetuned-dianping-chinese'
pipe = pipeline("text-classification", model=model_path)

pipe("我觉得不太行!")

# [{'label': 'negative (stars 1, 2 and 3)', 'score': 0.9735506772994995}]
3、预先加载模型,再创建Pipeline
# 这种方式,必须同时指定model和tokenizer
from transformers import AutoModelForSequenceClassification
from transformers import AutoTokenizer

model = AutoModelForSequenceClassification.from_pretrained(model_path)
tokenizer = AutoTokenizer.from_pretrained(model_path)
pipe = pipeline("text-classification", model=model, tokenizer=tokenizer)

pipe("我觉得不太行!")
# [{'label': 'negative (stars 1, 2 and 3)', 'score': 0.9735506772994995}]
1.2.3 使用GPU进行推理
# 默认是在cpu进行推理
print(pipe.model.device) # device(type='cpu')

import torch
import time
times = []
for i in range(100):
    torch.cuda.synchronize()
    start = time.time()
    pipe("我觉得不太行!")
    torch.cuda.synchronize()
    end = time.time()
    times.append(end - start)
print(sum(times) / 100)
# 使用GPU进行推理
pipe = pipeline("text-classification", model=model_path, device=0)

print(pipe.model.device) # device(type='cuda', index=0)
import torch
import time
times = []
for i in range(100):
    torch.cuda.synchronize()
    start = time.time()
    pipe("我觉得不太行!")
    torch.cuda.synchronize()
    end = time.time()
    times.append(end - start)
print(sum(times) / 100)
1.2.4 确定Pipeline的参数
qa_pipe = pipeline("question-answering", model="uer/roberta-base-chinese-extractive-qa")

qa_pipe
#
# 进入这个类可以查看相关参数
QuestionAnsweringPipeline

qa_pipe(question="中国的首都是哪里?", context="中国的首都是北京", max_answer_len=1)

# {'score': 0.00228740437887609, 'start': 6, 'end': 7, 'answer': '北'}
1.2.5 Pipeline背后的实现
from transformers import AutoTokenizer,AutoModelForSequenceClassification
import torch

# 1、词元化
tokenizer = AutoTokenizer.from_pretrained(model_path)
model = AutoModelForSequenceClassification.from_pretrained(model_path)

input_text = "我觉得不太行!"
inputs = tokenizer(input_text, return_tensors="pt")

inputs
{'input_ids': tensor([[ 101, 2769, 6230, 2533, 679, 1922, 6121, 8013, 102]]), 'token_type_ids': tensor([[0, 0, 0, 0, 0, 0, 0, 0, 0]]), 'attention_mask': tensor([[1, 1, 1, 1, 1, 1, 1, 1, 1]])}
# 2、加载模型,进行预测
res = model(**inputs)
res
SequenceClassifierOutput(loss=None, logits=tensor([[ 1.7376, -1.8681]], grad_fn=<AddmmBackward0>), hidden_states=None, attentions=None)
logits = res.logits
logits = torch.softmax(logits, dim=-1)
logits
tensor([[0.9736, 0.0264]], grad_fn=<SoftmaxBackward0>)
# 3、标签映射
pred = torch.argmax(logits).item()
result = model.config.id2label.get(pred)
result
'negative (stars 1, 2 and 3)'
2、基础组件Tokenizer
2.1 Tokenizer简介
在使用神经网络处理自然语言处理任务时,我们首先需要对数据进行预处理,将数据从字符串转换为神经网络可以接受的格式,一般会分为如下几步:
(1)分词:使用分词器对文本数据进行分词(字、字词);
(2)构建词典:根据数据集分词的结果,构建词典映射(如果采用预训练词向量,词典映射要根据词向量文件进行处理);
(3)数据转换:根据构建好的词典,将分词处理后的数据做映射,将文本序列转换为数字序列;
(4)数据填充与截断:在以batch输入到模型的方式中,需要对过短的数据进行填充,过长的数据进行截断,保证数据长度符合模型能接受的范围,同时batch内的数据维度大小一致。
在以往的工作中,我们可能会使用不同的分词器,并自行实现构建词典与转换的工作。但是在transformers工具包中,无需再这般复杂,只需要借助Tokenizer模块便可以快速的实现上述全部工作,它的功能就是将文本转换为神经网络可以处理的数据。Tokenizer工具包无需额外安装,会随着transformers一起安装。
2.2 Tokenizer 基本使用
from transformers import AutoTokenizer

import warnings
warnings.filterwarnings("ignore")


sen = "弱小的我也有大梦想!"
2.2.1 模型的加载与保存
# 从HuggingFace加载,输入模型名称,即可加载对于的分词器
#tokenizer = AutoTokenizer.from_pretrained("uer/roberta-base-finetuned-dianping-chinese")

# 这里同样选择离线加载
model_path = '/root/autodl-fs/models/roberta-base-finetuned-dianping-chinese'
tokenizer = AutoTokenizer.from_pretrained(model_path)
tokenizer
BertTokenizerFast(name_or_path='/root/autodl-fs/models/roberta-base-finetuned-dianping-chinese', vocab_size=21128, model_max_length=1000000000000000019884624838656, is_fast=True, padding_side='right', truncation_side='right',
special_tokens={'unk_token': '[UNK]', 'sep_token': '[SEP]', 'pad_token': '[PAD]', 'cls_token': '[CLS]', 'mask_token': '[MASK]'}, clean_up_tokenization_spaces=True),  added_tokens_decoder={
	0: AddedToken("[PAD]", rstrip=False, lstrip=False, single_word=False, normalized=False, special=True),
	100: AddedToken("[UNK]", rstrip=False, lstrip=False, single_word=False, normalized=False, special=True),
	101: AddedToken("[CLS]", rstrip=False, lstrip=False, single_word=False, normalized=False, special=True),
	102: AddedToken("[SEP]", rstrip=False, lstrip=False, single_word=False, normalized=False, special=True),
	103: AddedToken("[MASK]", rstrip=False, lstrip=False, single_word=False, normalized=False, special=True),
}
# tokenizer 保存到本地
tokenizer.save_pretrained("./roberta_tokenizer")
('./roberta_tokenizer\\tokenizer_config.json',
 './roberta_tokenizer\\special_tokens_map.json',
 './roberta_tokenizer\\vocab.txt',
 './roberta_tokenizer\\added_tokens.json',
 './roberta_tokenizer\\tokenizer.json')
# 从本地加载tokenizer
tokenizer = AutoTokenizer.from_pretrained("./roberta_tokenizer/")
tokenizer
2.2.2 句子分词
tokens = tokenizer.tokenize(sen)
tokens
['弱', '小', '的', '我', '也', '有', '大', '梦', '想', '!']
2.2.3 查看词典
len(tokenizer.vocab) # 21128
tokenizer.vocab_size # 21128
2.2.4 索引转换
# 将词序列转换为id序列
ids = tokenizer.convert_tokens_to_ids(tokens)
ids
[2483, 2207, 4638, 2769, 738, 3300, 1920, 3457, 2682, 106]
# 将id序列转换为token序列
tokens = tokenizer.convert_ids_to_tokens(ids)
tokens
['弱', '小', '的', '我', '也', '有', '大', '梦', '想', '!']
# 将token序列转换为string
str_sen = tokenizer.convert_tokens_to_string(tokens)
str_sen
'弱 小 的 我 也 有 大 梦 想!'
便捷实现方式
# 将字符串转换为id序列,又称之为编码
ids = tokenizer.encode(sen, add_special_tokens=True)
ids
# [101, 2483, 2207, 4638, 2769, 738, 3300, 1920, 3457, 2682, 106, 102]
# 将id序列转换为字符串,又称之为解码
str_sen = tokenizer.decode(ids, skip_special_tokens=False)
str_sen
# '[CLS] 弱 小 的 我 也 有 大 梦 想! [SEP]'
2.2.5 填充与截断
# 填充
ids = tokenizer.encode(sen, padding="max_length", max_length=15)
ids
# [101, 2483, 2207, 4638, 2769, 738, 3300, 1920, 3457, 2682, 106, 102, 0, 0, 0]
# 截断
ids = tokenizer.encode(sen, max_length=5, truncation=True)
ids
# [101, 2483, 2207, 4638, 102]
2.2.6 其他输入部分
ids = tokenizer.encode(sen, padding="max_length", max_length=15)
ids
# [101, 2483, 2207, 4638, 2769, 738, 3300, 1920, 3457, 2682, 106, 102, 0, 0, 0]
attention_mask = [1 if idx != 0 else 0 for idx in ids]
token_type_ids = [0] * len(ids)
ids, attention_mask, token_type_ids
([101, 2483, 2207, 4638, 2769, 738, 3300, 1920, 3457, 2682, 106, 102, 0, 0, 0],
 [1, 1, 1, 1, 1, 1, 1, 1, 1, 1, 1, 1, 0, 0, 0],
 [0, 0, 0, 0, 0, 0, 0, 0, 0, 0, 0, 0, 0, 0, 0])
2.2.7 快速调用方式
inputs = tokenizer.encode_plus(sen, padding="max_length", max_length=15)
inputs
{
'input_ids': [101, 2483, 2207, 4638, 2769, 738, 3300, 1920, 3457, 2682, 106, 102, 0, 0, 0],
'token_type_ids': [0, 0, 0, 0, 0, 0, 0, 0, 0, 0, 0, 0, 0, 0, 0],
'attention_mask': [1, 1, 1, 1, 1, 1, 1, 1, 1, 1, 1, 1, 0, 0, 0]
}
inputs = tokenizer(sen, padding="max_length", max_length=15)
inputs
{
'input_ids': [101, 2483, 2207, 4638, 2769, 738, 3300, 1920, 3457, 2682, 106, 102, 0, 0, 0],
'token_type_ids': [0, 0, 0, 0, 0, 0, 0, 0, 0, 0, 0, 0, 0, 0, 0],
'attention_mask': [1, 1, 1, 1, 1, 1, 1, 1, 1, 1, 1, 1, 0, 0, 0]
}
2.2.8 处理batch数据
sens = ["弱小的我也有大梦想",
        "有梦想谁都了不起",
        "追逐梦想的心,比梦想本身,更可贵"]
res = tokenizer(sens)
res
{'input_ids': [[101, 2483, 2207, 4638, 2769, 738, 3300, 1920, 3457, 2682, 102], [101, 3300, 3457, 2682, 6443, 6963, 749, 679, 6629, 102], [101, 6841, 6852, 3457, 2682, 4638, 2552, 8024, 3683, 3457, 2682, 3315, 6716, 8024, 3291, 1377, 6586, 102]], 'token_type_ids': [[0, 0, 0, 0, 0, 0, 0, 0, 0, 0, 0], [0, 0, 0, 0, 0, 0, 0, 0, 0, 0], [0, 0, 0, 0, 0, 0, 0, 0, 0, 0, 0, 0, 0, 0, 0, 0, 0, 0]], 'attention_mask': [[1, 1, 1, 1, 1, 1, 1, 1, 1, 1, 1], [1, 1, 1, 1, 1, 1, 1, 1, 1, 1], [1, 1, 1, 1, 1, 1, 1, 1, 1, 1, 1, 1, 1, 1, 1, 1, 1, 1]]}
时间对比
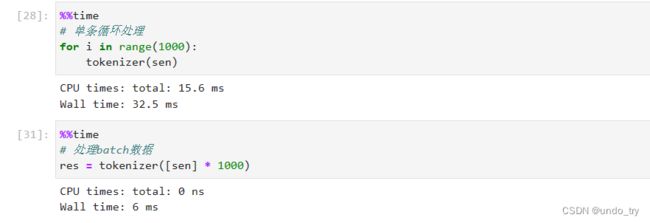
2.2.9 Fast / Slow Tokenizer
sen = "弱小的我也有大Dreaming!"

fast_tokenizer = AutoTokenizer.from_pretrained(model_path)
fast_tokenizer
slow_tokenizer = AutoTokenizer.from_pretrained(model_path, use_fast=False)
slow_tokenizer
处理时间的差别

Fast Tokenizer特有的方法
inputs = fast_tokenizer(sen, return_offsets_mapping=True)
inputs
{
'input_ids': [101, 2483, 2207, 4638, 2769, 738, 3300, 1920, 10252, 8221, 106, 102], 'token_type_ids': [0, 0, 0, 0, 0, 0, 0, 0, 0, 0, 0, 0],
'attention_mask': [1, 1, 1, 1, 1, 1, 1, 1, 1, 1, 1, 1],

# "弱小的我也有大Dreaming!"
# Dreaming被分为两个词(7, 12), (12, 15)
# 该字段中保存着每个token对应到原文中的起始与结束位置
'offset_mapping': [(0, 0), (0, 1), (1, 2), (2, 3), (3, 4), (4, 5), (5, 6), (6, 7), (7, 12), (12, 15), (15, 16), (0, 0)]
}
# word_ids方法,该方法会返回分词后token序列对应原始实际词的索引,特殊标记的值为None。
# Dreaming被分为两个词【7, 7】
inputs.word_ids()
[None, 0, 1, 2, 3, 4, 5, 6, 7, 7, 8, None]
2.2.10 特殊Tokenizer的加载
from transformers import AutoTokenizer

# 需要设置trust_remote_code=True
# 表示信任远程代码
tokenizer = AutoTokenizer.from_pretrained("THUDM/chatglm-6b", trust_remote_code=True)
tokenizer
tokenizer.save_pretrained("chatglm_tokenizer")

# 需要设置trust_remote_code=True
tokenizer = AutoTokenizer.from_pretrained("chatglm_tokenizer", trust_remote_code=True)
3、基础组件Model
3.1 Model简介
常用的模型一般分为三种:自回归模型、自编码模型和序列到序列模型。
- 自回归模型采用经典的语言模型任务进行预训练,即给出上文,预测下文,对应原始Transformer模型的解码器部分,其中最经典的模型是GPT。由于自编码器只能看到上文而无法看到下文的特点,模型一般会用于文本生成的任务。
- 自编码模型则采用句子重建的任务进行预训练,即预先通过某种方式破坏句子,可能是掩码,可能是打乱顺序,希望模型将被破坏的部分还原,对应原始Transformer模型的编码器部分,其中最经典的模型是BERT。与自回归模型不同,模型既可以看到上文信息,也可以看到下文信息,由于这样的特点,自编码模型往往用于自然语言理解的任务,如文本分类、阅读理解等。(此外,这里需要注意,自编码模型和自回归模型的唯一区分其实是在于预训练时的任务,而不是模型结构。)
- 序列到序列模型则是同时使用了原始的编码器与解码器,最经典的模型便是T5。与经典的序列到序列模型类似,这种模型最自然的应用便是文本摘要、机器翻译等任务,事实上基本所有的NLP任务都可以通过序列到序列解决。
| 模型类型 | 常用预训练模型 | 适用任务 |
|---|---|---|
| 自回归模型 | CTRL, GPT, GPT-2, Transformer XL | 文本生成 |
| 自编码模型 | ALBERT, BERT, DistilBERT, RoBERTa | 文本分类、命名实体识别、阅读理解 |
| 序列到序列模型 | BART, T5, Marian, mBART | 文本摘要、机器翻译 |
3.2 Model基本使用
3.2.1 模型的加载
在线加载
from transformers import AutoConfig, AutoModel, AutoTokenizer

# 预训练模型的加载与Tokenizer类似,我们只需要指定想要加载的模型名称即可。
# 面对各种类型的模型,transformers也为我们提供了更加便捷的加载方式,我们无需指定具体的模型的类型,可以统一使用AutoModel进行加载。
# 首次加载的时候会进行模型文件的下载,下载后的文件会保存在~/.cache/huggingface/transformers文件夹中
# 注意:可能会因为网络问题,下载失败
# transformers的模型仓库中提供了丰富的模型,我们可以到模型仓库的网站中查看,直接搜索想要的模型。
model = AutoModel.from_pretrained("hfl/rbt3")
离线下载
# 可以使用下面命令进行下载 (只下载pytorch的权重文件)
!git lfs clone "https://huggingface.co/hfl/rbt3" --include="*.bin"

# 也可以去huggingface的官网手动点击下载
# https://huggingface.co/models
离线加载
# 如果在离线场景下,则需要将模型文件提前准备好,from_pretrained方法中指定本地模型存储的文件夹即可。
model_path = '/root/autodl-fs/models/rbt3'

model = AutoModel.from_pretrained(model_path)
查看模型参数
# 通过AutoConfig可以查看模型参数
config = AutoConfig.from_pretrained(model_path)
config
BertConfig {
  "_name_or_path": "/root/autodl-fs/models/rbt3",
  "architectures": [
    "BertForMaskedLM"
  ],
  "attention_probs_dropout_prob": 0.1,
  "classifier_dropout": null,
  "directionality": "bidi",
  "hidden_act": "gelu",
  "hidden_dropout_prob": 0.1,
  "hidden_size": 768,
  "initializer_range": 0.02,
  "intermediate_size": 3072,
  "layer_norm_eps": 1e-12,
  "max_position_embeddings": 512,
  "model_type": "bert",
  "num_attention_heads": 12,
  "num_hidden_layers": 3,
  "output_past": true,
  "pad_token_id": 0,
  "pooler_fc_size": 768,
  "pooler_num_attention_heads": 12,
  "pooler_num_fc_layers": 3,
  "pooler_size_per_head": 128,
  "pooler_type": "first_token_transform",
  "position_embedding_type": "absolute",
  "transformers_version": "4.28.1",
  "type_vocab_size": 2,
  "use_cache": true,
  "vocab_size": 21128
}
3.2.2 模型的调用
sen = "弱小的我也有大梦想!"
tokenizer = AutoTokenizer.from_pretrained(model_path)

# 这里用到了Tokenizer的一个额外参数return_tensors,指定该参数的值,Tokenizer进行数据处理后将返回对应框架格式的数据,如pt对应pytorch,tf对应TensorFlow。
inputs = tokenizer(sen, return_tensors="pt")
inputs
{
'input_ids': tensor([[ 101, 2483, 2207, 4638, 2769,  738, 3300, 1920, 3457, 2682, 8013,  102]]),
'token_type_ids': tensor([[0, 0, 0, 0, 0, 0, 0, 0, 0, 0, 0, 0]]),
'attention_mask': tensor([[1, 1, 1, 1, 1, 1, 1, 1, 1, 1, 1, 1]])
}
-
Model Head 是连接在模型后的层,通常为1个或多个全连接层
-
Model Head 将模型的编码的表示结果进行映射,以解决不同类型的任务
不带Model Head的模型调用
# 数据经过Tokenizer处理后可以便可以直接输入到模型中,得到模型编码
model = AutoModel.from_pretrained(model_path, output_attentions=True)

output = model(**inputs)
output
BaseModelOutputWithPoolingAndCrossAttentions(
last_hidden_state=tensor(
       [[[ 0.6804,  0.6664,  0.7170,  ..., -0.4102,  0.7839, -0.0262],
         [-0.7378, -0.2748,  0.5034,  ..., -0.1359, -0.4331, -0.5874],
         [-0.0212,  0.5642,  0.1032,  ..., -0.3617,  0.4646, -0.4747],
         ...,
         [ 0.0853,  0.6679, -0.1757,  ..., -0.0942,  0.4664,  0.2925],
         [ 0.3336,  0.3224, -0.3355,  ..., -0.3262,  0.2532, -0.2507],
         [ 0.6761,  0.6688,  0.7154,  ..., -0.4083,  0.7824, -0.0224]]],
       grad_fn=<NativeLayerNormBackward0>),
pooler_output=tensor(
         [[-1.2646e-01, -9.8619e-01, -1.0000e+00, -9.8325e-01,  8.0238e-01,
         ...,
          6.7307e-03,  9.9942e-01, -1.8233e-01]], grad_fn=<TanhBackward0>), hidden_states=None,
past_key_values=None,
attentions=(tensor(
       [[[[4.7840e-01, 3.7087e-04, 1.6194e-04,  ..., 1.4241e-04,
           4.1823e-04, 5.1813e-01],
         ...
          [7.1003e-02, 1.5132e-03, 7.3035e-04,  ..., 2.2069e-02,
           3.9020e-01, 5.0058e-01]]]], grad_fn=<SoftmaxBackward0>), tensor([[[[4.3653e-01, 1.2017e-02, 5.9486e-03,  ..., 6.0889e-03,
           6.2510e-02, 4.1911e-01],
          ...,
          [1.7047e-01, 3.6989e-02, 2.3646e-02,  ..., 4.6833e-02,
           2.5233e-01, 1.6721e-01]]]], grad_fn=<SoftmaxBackward0>)), cross_attentions=None)
带Model Head的模型调用
-
仅仅使用预训练模型本身,是无法对下游任务进行训练的。
-
想要实现对下游任务的训练,我们需要加载transformers包中的扩展模型(预训练模型+任务头模块)。
-
transformers包中提供了多种的任务头。
| NLP任务 | 任务头 |
|---|---|
| 文本分类 | SequenceClassification |
| 文本匹配 | SequenceClassification |
| 阅读理解(抽取式问答) | QuestionAnswering |
| 掩码语言模型 | MaskedLM |
| 文本生成 | CausalLM |
| 命名实体识别 | TokenClassification |
| 文本摘要 | Seq2SeqLM |
| 机器翻译 | Seq2SeqLM |
| 生成式问答 | Seq2SeqLM |
在代码上,就是我们不再导入AutoModel,而是导入AutoModelFor+任务头名称。
假设我们要做文本分类任务,那么则应该导入AutoModelForSequenceClassification。
这里需要注意,并不是每个模型都具备上述的全部任务头。预训练模型具体支持哪些任务头,需要到官网或者源码中进行查看。
from transformers import AutoModelForSequenceClassification


clz_model = AutoModelForSequenceClassification.from_pretrained(model_path, num_labels=10)
clz_model(**inputs)
SequenceClassifierOutput(
loss=None,
logits=tensor([[-0.1776,  0.2208, -0.5060, -0.3938, -0.5837,  1.0171, -0.2616,  0.0495,
          0.1728,  0.3047]],
grad_fn=<AddmmBackward0>),
hidden_states=None,
attentions=None
)
3.3 利用Model进行情感分类
任务类型:文本分类
使用模型:hfl/rbt3
数据集地址:https://github.com/SophonPlus/ChineseNlpCorpus
3.1 加载数据
from transformers import AutoTokenizer, AutoModelForSequenceClassification
from torch.utils.data import Dataset
import pandas as pd

import warnings
warnings.filterwarnings("ignore")

class MyDataset(Dataset):

    def __init__(self) -> None:
        super().__init__()
        self.data = pd.read_csv("./ChnSentiCorp_htl_all.csv")
        self.data = self.data.dropna()

    def __getitem__(self, index):
        return self.data.iloc[index]["review"], self.data.iloc[index]["label"]

    def __len__(self):
        return len(self.data)
dataset = MyDataset()
for i in range(5):
    print(dataset[i])
('距离川沙公路较近,但是公交指示不对,如果是"蔡陆线"的话,会非常麻烦.建议用别的路线.房间较为简单.', 1)
('商务大床房,房间很大,床有2M宽,整体感觉经济实惠不错!', 1)
('早餐太差,无论去多少人,那边也不加食品的。酒店应该重视一下这个问题了。房间本身很好。', 1)
('宾馆在小街道上,不大好找,但还好北京热心同胞很多~宾馆设施跟介绍的差不多,房间很小,确实挺小,但加上低价位因素,还是无超所值的;环境不错,就在小胡同内,安静整洁,暖气好足-_-||。。。呵还有一大优势就是从宾馆出发,步行不到十分钟就可以到梅兰芳故居等等,京味小胡同,北海距离好近呢。总之,不错。推荐给节约消费的自助游朋友~比较划算,附近特色小吃很多~', 1)
('CBD中心,周围没什么店铺,说5星有点勉强.不知道为什么卫生间没有电吹风', 1)
3.2 创建Dataloader
from torch.utils.data import random_split
import torch
from torch.utils.data import DataLoader

# 划分训练集及验证集
trainset, validset = random_split(dataset, lengths=[0.9, 0.1])

# 离线加载模型
model_path = '/root/autodl-fs/models/rbt3'
tokenizer = AutoTokenizer.from_pretrained(model_path)


# 对一批数据进行词元化,并且填充到相同的长度
def collate_func(batch):
    texts, labels = [], []
    for item in batch:
        texts.append(item[0])
        labels.append(item[1])
    inputs = tokenizer(texts, max_length=128, padding="max_length", truncation=True, return_tensors="pt")
    inputs["labels"] = torch.tensor(labels)
    return inputs

trainloader = DataLoader(trainset, batch_size=32, shuffle=True, collate_fn=collate_func)
validloader = DataLoader(validset, batch_size=64, shuffle=False, collate_fn=collate_func)
next(enumerate(validloader))[1]
{'input_ids': tensor([[ 101, 2769,  812,  ...,    0,    0,    0],
        [ 101, 6983, 2421,  ...,    0,    0,    0],
        [ 101, 6392, 3177,  ...,    0,    0,    0],
        ...,
        [ 101, 3302, 1218,  ...,    0,    0,    0],
        [ 101, 2600,  860,  ...,  752, 2141,  102],
        [ 101, 1765, 4415,  ...,    0,    0,    0]]),
 'token_type_ids': tensor([[0, 0, 0,  ..., 0, 0, 0],
        [0, 0, 0,  ..., 0, 0, 0],
        [0, 0, 0,  ..., 0, 0, 0],
        ...,
        [0, 0, 0,  ..., 0, 0, 0],
        [0, 0, 0,  ..., 0, 0, 0],
...,
        [0, 0, 0,  ..., 0, 0, 0],
        [0, 0, 0,  ..., 0, 0, 0],
        [0, 0, 0,  ..., 0, 0, 0]]),
 'attention_mask': tensor([[1, 1, 1,  ..., 0, 0, 0],
        [1, 1, 1,  ..., 0, 0, 0],
        [1, 1, 1,  ..., 0, 0, 0],
        ...,
        [1, 1, 1,  ..., 0, 0, 0],
        [1, 1, 1,  ..., 1, 1, 1],
        [1, 1, 1,  ..., 0, 0, 0]]),
 'labels': tensor([1, 1, 0, 1, 1, 0, 1, 0, 0, 1, 1, 1, 1, 1, 1, 1, 1, 0, 1, 0, 1, 0, 1, 1,
        1, 1, 1, 1, 0, 0, 0, 1, 1, 1, 1, 1, 0, 1, 1, 1, 1, 0, 1, 1, 1, 1, 1, 1,
        1, 1, 1, 1, 0, 1, 1, 1, 1, 0, 1, 1, 1, 1, 1, 1])}
3.3 创建模型及优化器
from torch.optim import Adam

# 创建到Model Head的模型
model = AutoModelForSequenceClassification.from_pretrained(model_path)

if torch.cuda.is_available():
    model = model.cuda()

# 创建优化器
optimizer = Adam(model.parameters(), lr=2e-5)
3.4 训练及评估
# 自定义评估 评估指标accuracy
def evaluate():
    model.eval()
    acc_num = 0
    with torch.inference_mode():
        for batch in validloader:
            if torch.cuda.is_available():
                batch = {k: v.cuda() for k, v in batch.items()}
            output = model(**batch)
            pred = torch.argmax(output.logits, dim=-1)
            acc_num += (pred.long() == batch["labels"].long()).float().sum()
    return acc_num / len(validset)


# 自定义训练
def train(epoch=3, log_step=100):
    global_step = 0
    for ep in range(epoch):
        model.train()
        for batch in trainloader:
            if torch.cuda.is_available():
                batch = {k: v.cuda() for k, v in batch.items()}
            optimizer.zero_grad()
            output = model(**batch)
            output.loss.backward()
            optimizer.step()
            if global_step % log_step == 0:
                print(f"ep: {ep}, global_step: {global_step}, loss: {output.loss.item()}")
            global_step += 1
        acc = evaluate()
        print(f"ep: {ep}, acc: {acc}")
3.5 模型训练
train()
ep: 0, global_step: 0, loss: 0.7741488814353943
ep: 0, global_step: 100, loss: 0.38942962884902954
ep: 0, global_step: 200, loss: 0.1997242420911789
ep: 0, acc: 0.8801546096801758

ep: 1, global_step: 300, loss: 0.16735711693763733
ep: 1, global_step: 400, loss: 0.39419108629226685
ep: 1, acc: 0.8969072103500366


ep: 2, global_step: 500, loss: 0.20464470982551575
ep: 2, global_step: 600, loss: 0.4124392569065094
ep: 2, acc: 0.8917525410652161
3.6 模型预测
sen = "我觉得这家酒店不错,饭很好吃!"
id2_label = {0: "差评!", 1: "好评!"}
model.eval()
with torch.inference_mode():
    inputs = tokenizer(sen, return_tensors="pt")
    inputs = {k: v.cuda() for k, v in inputs.items()}
    logits = model(**inputs).logits
    pred = torch.argmax(logits, dim=-1)
    print(f"输入:{sen}\n模型预测结果:{id2_label.get(pred.item())}")
输入:我觉得这家酒店不错,饭很好吃!
模型预测结果:好评!
from transformers import pipeline

# 使用pipeline进行预测
model.config.id2label = id2_label
pipe = pipeline("text-classification", model=model, tokenizer=tokenizer, device=0)

pipe('我这家饭店饭很贵,菜很贵,不喜欢吃')
[{'label': '差评!', 'score': 0.5992199182510376}]
这里我们自定义了dataset、评估函数及训练函数,接下来会通过组件(Datasets、Evaluate、Trainer)去训练模型。