springcloud
SpringCloud 笔记
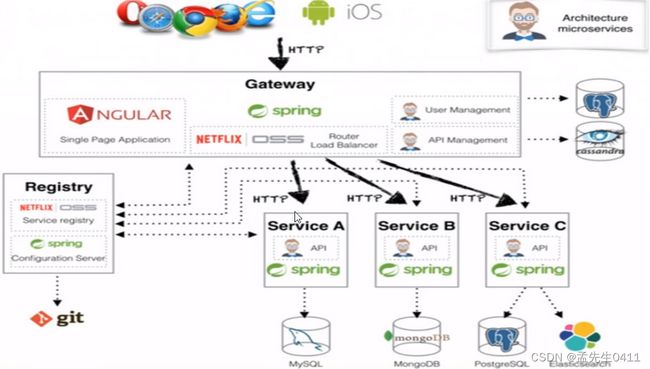
什么是微服务?
1.微服务是一种架构风格
2.一个应用拆分为一组小型服务
3.每个服务运行在自己的进程内,也就是可独立部署和升级
4.服务之间使用轻量级HTTP交互
5.服务围绕业务功能拆分
6.可以由全自动部署机制独立部署
7.去中心化,服务自治。服务可以使用不同的语言、不同的存储技术

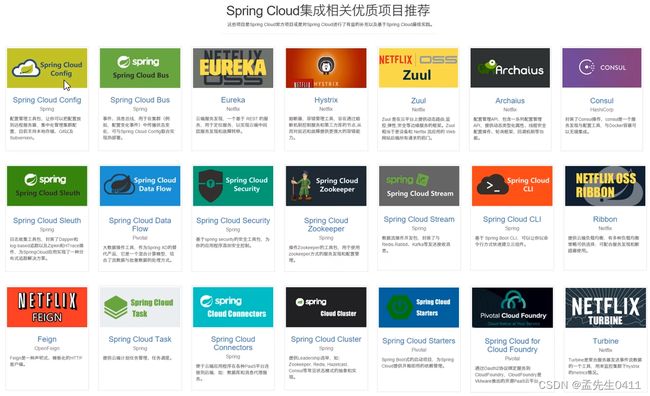
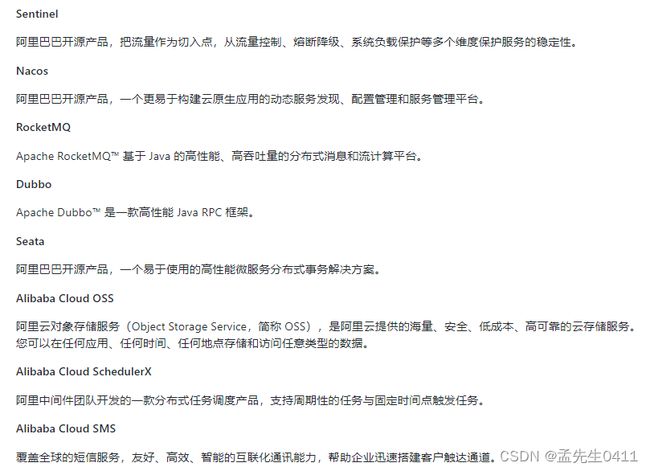
阿里的:

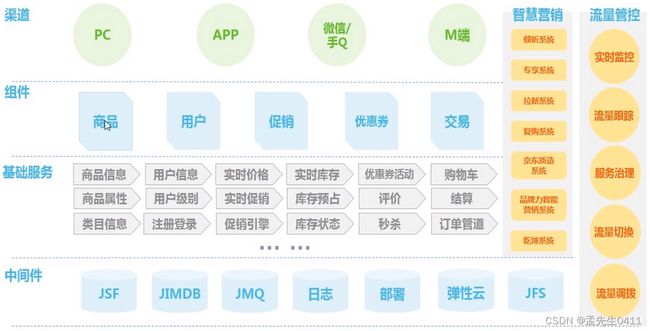
京东物流的:


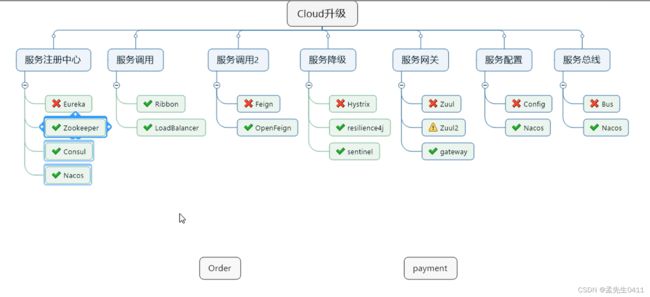
Spring Cloud技术栈
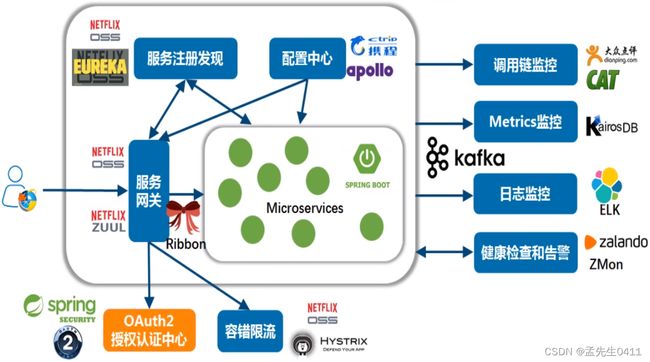
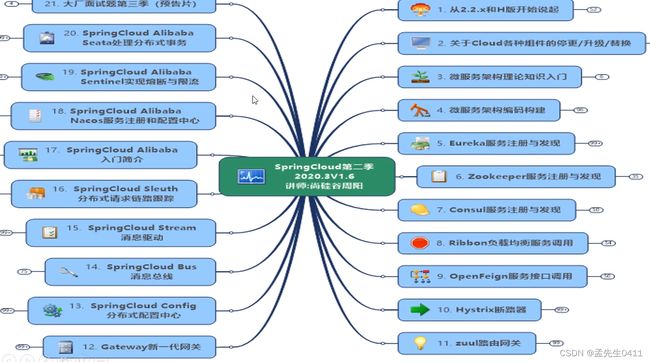
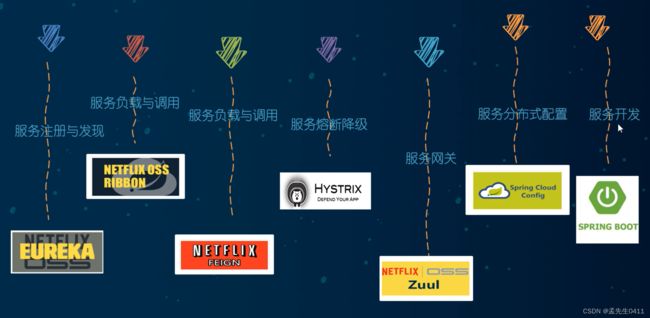
各模块常用的技术支撑:
● 服务注册与发现:eureka
● 服务负载与调用:ribbon、feign
● 服务熔断降级:hystrix
● 服务网关:zuul
● 服务分布式配置:Spring Cloud Config
● 服务开发:SpringBoot
建立父工程
约定 > 配置 > 编码
创建微服务cloud整体聚合父工程Project,有8个关键步骤:
New Project - maven工程 - create from archetype: maven-archetype-site
聚合总父工程名字
Maven选版本
工程名字
字符编码 - Settings - File encoding
注解生效激活 - Settings - Annotation Processors
Java编译版本选8
File Type过滤 - Settings - File Type
父工程pom文件
    4.0.0
    pom

        cloud-provider-payment8001
        cloud-consumer-order80

    org.example
    springcloud
    1.0-SNAPSHOT


        UTF-8
        1.8
        1.8
        4.12
        1.2.17
        1.16.18
        5.1.47
        1.1.16
        1.3.0


                org.springframework.boot
                spring-boot-dependencies
                2.2.2.RELEASE
                pom
                import


                org.springframework.cloud
                spring-cloud-dependencies
                Hoxton.SR1
                pom
                import


                com.alibaba.cloud
                spring-cloud-alibaba-dependencies
                2.1.0.RELEASE
                pom
                import


                mysql
                mysql-connector-java
                ${mysql.version}


                com.alibaba
                druid
                ${druid.version}


                org.mybatis.spring.boot
                mybatis-spring-boot-starter
                ${mybatis.spring.boot.version}


                junit
                junit
                ${junit.version}


                log4j
                log4j
                ${log4j.version}


                org.projectlombok
                lombok
                ${lombok.version}
                true


                org.springframework.boot
                spring-boot-maven-plugin

                    true
                    true
复习DependencyManagement和Dependencies
Maven使用dependencyManagement元素来提供了一种管理依赖版本号的方式。
通常会在一个组织或者项目的最顶层的父POM中看到dependencyManagement元素。
使用pom.xml中的dependencyManagement元素能让所有在子项目中引用个依赖而不用显式的列出版本量。
Maven会沿着父子层次向上走,直到找到一个拥有dependencyManagement元素的项目,然后它就会使用这个
dependencyManagement元素中指定的版本号。
        mysql
        mysql-connector-java
        5.1.2
然后在子项目里就可以添加mysql-connector时可以不指定版本号,例如:
    mysq1
    mysql-connector-java
这样做的好处就是:如果有多个子项目都引用同一样依赖,则可以避免在每个使用的子项目里都声明一个版本号,这样当想升级或切换到另一个版本时,只需要在顶层父容器里更新,而不需要一个一个子项目的修改;另外如果某个子项目需要另外的一个版本,只需要声明version就可。
dependencyManagement里只是声明依赖,并不实现引入,因此子项目需要显示的声明需要用的依赖。
如果不在子项目中声明依赖,是不会从父项目中继承下来的;只有在子项目中写了该依赖项,并且没有指定具体版本,才会从父项目中继承该项,并且version和scope都读取自父pom。
如果子项目中指定了版本号,那么会使用子项目中指定的jar版本。
IDEA右侧旁的Maven插件有Toggle ’ Skip Tests’ Mode按钮,这样maven可以跳过单元测试
父工程创建完成执行mvn : install将父工程发布到仓库方便子工程继承。
支付模块构建(上)
创建微服务模块套路:
建Module
改POM
写YML
主启动
业务类

建名为cloud-provider-payment8001的Maven工程
改POM
        springcloud
        org.example
        1.0-SNAPSHOT

    4.0.0

    cloud-provider-payment8001


            org.springframework.boot
            spring-boot-devtools
            true


            org.springframework.boot
            spring-boot-starter-web


            org.springframework.boot
            spring-boot-starter-actuator


            org.mybatis.spring.boot
            mybatis-spring-boot-starter


            com.alibaba
            druid-spring-boot-starter
            1.2.8


            mysql
            mysql-connector-java


            org.springframework.boot
            spring-boot-starter-jdbc


            org.projectlombok
            lombok
            true


            org.springframework.boot
            spring-boot-starter-test
            test
写YML
server:
  port: 8001

spring:
  application:
    name: cloud-payment-service
  datasource:
    type: com.alibaba.druid.pool.DruidDataSource            # 当前数据源操作类型
    driver-class-name: org.gjt.mm.mysql.Driver              # mysql驱动包
    url: jdbc:mysql://localhost:3306/mxx?useUnicode=true&characterEncoding=utf-8&useSSL=false
    username: root
    password: 1234

mybatis:
  mapperLocations: classpath:mapper/*.xml
  type-aliases-package: com.lun.springcloud.entities    # 所有Entity别名类所在包
主启动
import org.springframework.boot.SpringApplication;
import org.springframework.boot.autoconfigure.SpringBootApplication;

@SpringBootApplication
public class PaymentMain001 {

    public static void main(String[] args) {
        SpringApplication.run(PaymentMain001.class, args);
    }
}
CREATE TABLE `payment`(
	`id` bigint(20) NOT NULL AUTO_INCREMENT COMMENT 'ID',
    `serial` varchar(200) DEFAULT '',
	PRIMARY KEY (id)
)ENGINE=InnoDB AUTO_INCREMENT=1 DEFAULT CHARSET=utf8mb4
entity
import lombok.AllArgsConstructor;
import lombok.Data;
import lombok.NoArgsConstructor;

import java.io.Serializable;

@Data
@AllArgsConstructor
@NoArgsConstructor
public class Payment implements Serializable {
    private Long id;
    private String serial;
}
JSON封装体CommonResult:
import lombok.AllArgsConstructor;
import lombok.Data;
import lombok.NoArgsConstructor;

@Data
@AllArgsConstructor
@NoArgsConstructor
public class CommonResult{
    private Integer code;
    private String message;
    private T data;

    public CommonResult(Integer code, String message){
        this(code, message, null);
    }
}
DAO:
接口PaymentDao:
package com.aliyun.dao;

import com.aliyun.entity.Payment;
import org.apache.ibatis.annotations.Mapper;
import org.apache.ibatis.annotations.Param;

/**
 * @Author:meng_xiangxin
 * @Date: 2022/12/4 18:55
 * @Description:paymentDao
 */
@Mapper
public interface PaymentDao {
    public int create(Payment payment);

    public Payment getPaymentById(@Param("id") Long id);
}
MyBatis映射文件PaymentMapper.xml,路径:resources/mapper/PaymentMapper.xml
insert into payment(serial)
values (#{serial});
Service:
接口PaymentService
package com.aliyun.service;

import com.aliyun.entity.Payment;
import org.apache.ibatis.annotations.Param;

public interface PaymentService {
    public int create(Payment payment);

    public Payment getPaymentById(@Param("id") Long id);
}
serviceimpl 实现
package com.aliyun.service.serviceImpl;

import com.aliyun.dao.PaymentDao;
import com.aliyun.entity.Payment;
import com.aliyun.service.PaymentService;
import org.springframework.stereotype.Service;

import javax.annotation.Resource;

@Service
public class PaymentServiceImpl implements PaymentService {

    @Resource
    private PaymentDao paymentDao;

    @Override
    public int create(Payment payment) {
        return paymentDao.create(payment);
    }

    @Override
    public Payment getPaymentById(Long id) {
        return paymentDao.getPaymentById(id);
    }
}
controller
package com.aliyun.controller;

import com.aliyun.entity.CommonResult;
import com.aliyun.entity.Payment;
import com.aliyun.service.PaymentService;
import lombok.extern.slf4j.Slf4j;
import org.springframework.beans.factory.annotation.Value;
import org.springframework.web.bind.annotation.*;

import javax.annotation.Resource;

@RestController
@Slf4j
public class PaymentController {
    @Resource
    private PaymentService paymentService;
    @Value("${server.port}")
    private int serverPort;

    @PostMapping(value = "/payment/create")
    public CommonResult create(@RequestBody Payment payment) {
        int result = paymentService.create(payment);
        log.info("*****插入结果:" + result);

        if (result > 0) {
            return new CommonResult(200, "插入数据库成功,serverPort: " + serverPort, result);
        } else {
            return new CommonResult(444, "插入数据库失败", null);
        }
    }

    @GetMapping(value = "/payment/get/{id}")
    public CommonResult getPaymentById(@PathVariable("id") Long id) {
        Payment paymentById = paymentService.getPaymentById(id);

        if (paymentById != null) {
            return new CommonResult(200, "查询成功,serverPort:  " + serverPort, paymentById);
        } else {
            return new CommonResult(444, "没有对应记录,查询ID: " + id, null);
        }
    }

}
浏览器 - http://localhost:8001/payment/get/1
Postman - http://localhost:8001/payment/create?serial=lun2
支付模块构建(下)
建Module
改POM
写YML
主启动
业务类
热部署Devtools
添加依赖
    org.springframework.boot
    spring-boot-devtools
    runtime
    true
下段配置复制到聚合父类总工程的pom.xml
            org.springframework.boot
            spring-boot-maven-plugin

                true
                true
File -> Settings(New Project Settings->Settings for New Projects) ->Complier
下面项勾选
Automatically show first error in editor
Display notification on build completion
Build project automatically
Compile independent modules in parallel
Update the value of
键入Ctrl + Shift + Alt + / ,打开Registry,勾选:
compiler.automake.allow.when.app.running
actionSystem.assertFocusAccessFromEdt
重启IDEA
消费者订单模块(上)
建Module
创建名为cloud-consumer-order80的maven工程。
改pom
        springcloud
        org.example
        1.0-SNAPSHOT

    4.0.0

    cloud-consumer-order80


        8
        8


            org.springframework.boot
            spring-boot-starter-web


            org.springframework.boot
            spring-boot-starter-actuator


            org.springframework.boot
            spring-boot-devtools
            runtime
            true


            org.projectlombok
            lombok
            true


            org.springframework.boot
            spring-boot-starter-test
            test
写yml
server:
  port: 80
主启动
package com.aliyun;

import org.springframework.boot.SpringApplication;
import org.springframework.boot.autoconfigure.SpringBootApplication;

@SpringBootApplication
public class OrderMain80 {
    public static void main(String[] args) {
        SpringApplication.run(OrderMain80.class, args);
    }
}
实体类
import lombok.AllArgsConstructor;
import lombok.Data;
import lombok.NoArgsConstructor;

import java.io.Serializable;

@Data
@AllArgsConstructor
@NoArgsConstructor
public class Payment implements Serializable {
    private Long id;
    private String serial;
}
import lombok.AllArgsConstructor;
import lombok.Data;
import lombok.NoArgsConstructor;

@Data
@AllArgsConstructor
@NoArgsConstructor
public class CommonResult{
    private Integer code;
    private String message;
    private T data;

    public CommonResult(Integer code, String message){
        this(code, message, null);
    }
}
控制层:
package com.aliyun.controller;

import com.aliyun.entity.CommonResult;
import com.aliyun.entity.Payment;
import lombok.extern.slf4j.Slf4j;
import org.springframework.web.bind.annotation.GetMapping;
import org.springframework.web.bind.annotation.PathVariable;
import org.springframework.web.bind.annotation.RestController;
import org.springframework.web.client.RestTemplate;

import javax.annotation.Resource;

@RestController
@Slf4j
public class OrderController {
    public static final String PAYMENT_URL = "http://localhost:8001";

    @Resource
    private RestTemplate restTemplate;

    //因为浏览器只支持get请求,为了方便这里就用get
    @GetMapping("/consumer/payment/create")
    public CommonResult create(Payment payment){
        log.info("********插入的数据:" + payment);
        //postForObject分别有三个参数:请求地址,请求参数,返回的对象类型
        return restTemplate.postForObject(PAYMENT_URL + "/payment/create", payment, CommonResult.class);
    }

    @GetMapping("/consumer/payment/get/{id}")
    public CommonResult getPayment(@PathVariable("id") Long id){
        log.info("********查询的id:" + id);
        //getForObject两个参数:请求地址,返回的对象类型
        return restTemplate.getForObject(PAYMENT_URL + "/payment/get/" + id, CommonResult.class);
    }
}
配置
package com.aliyun.config;

import org.springframework.context.annotation.Bean;
import org.springframework.context.annotation.Configuration;
import org.springframework.web.client.RestTemplate;

@Configuration
public class ApplicationContextConfig {
    //往容器中添加一个RestTemplate
    //RestTemplate提供了多种便捷访问远程http访问的方法
    @Bean
    public RestTemplate restTemplate() {
        return new RestTemplate();
    }
}
运行cloud-consumer-order80与cloud-provider-payment8001两工程
浏览器 - http://localhost/consumer/payment/get/1
RestTemplate
RestTemplate
RestTemplate提供了多种便捷访问远程Http服务的方法,是一种简单便捷的访问restful服务模板类,是Spring提供的用于访问Rest服务的客户端模板工具集
官方网址:RestTemplate
使用restTemplate访问restful接口非常的简单粗暴无脑。
(url, requestMap, ResponseBean.class)这三个参数分别代表。
REST请求地址、请求参数、HTTP响应转换被转换成的对象类型。
通过修改idea的workspace.xml的方式来快速打开Run Dashboard窗口(这个用来显示哪些Spring Boot工程运行,停止等信息。我idea 2020.1版本在名为Services窗口就可以显示哪些Spring Boot工程运行,停止等信息出来,所以这仅作记录参考)。
Run DashBoard项目管理
开启Run DashBoard
打开工程路径下的.idea文件夹的workspace.xml
在中修改或添加以下代码:
由于idea版本差异,可能需要关闭重启。
工程重构
观察cloud-consumer-order80与cloud-provider-payment8001两工程有重复代码
新建 cloud-api-commons
改pom
        springcloud
        org.example
        1.0-SNAPSHOT

    4.0.0

    cloud-consumer-order80


        8
        8


            org.springframework.boot
            spring-boot-starter-web


            org.springframework.boot
            spring-boot-starter-actuator


            org.springframework.boot
            spring-boot-devtools
            runtime
            true


            org.projectlombok
            lombok
            true


            org.springframework.boot
            spring-boot-starter-test
            test


            org.example
            cloud-api-commons
            1.0-SNAPSHOT
            compile
将cloud-consumer-order80与cloud-provider-payment8001两工程的公有的包移至cloud-api-commons工程下。
maven clean、install cloud-api-commons工程,以供给cloud-consumer-order80与cloud-provider-payment8001两工程调用。
把另外两个项目的entity删除
引入 cloud-api-commons 依赖
    com.lun.springcloud
    cloud-api-commons
    ${project.version}
Eureka 服务注册和发现
什么是服务治理
Spring Cloud封装了Netflix 公司开发的Eureka模块来实现服务治理
在传统的RPC远程调用框架中,管理每个服务与服务之间依赖关系比较复杂,管理比较复杂,所以需要使用服务治理,管理服务于服务之间依赖关系,可以实现服务调用、负载均衡、容错等,实现服务发现与注册。
什么是服务注册与发现
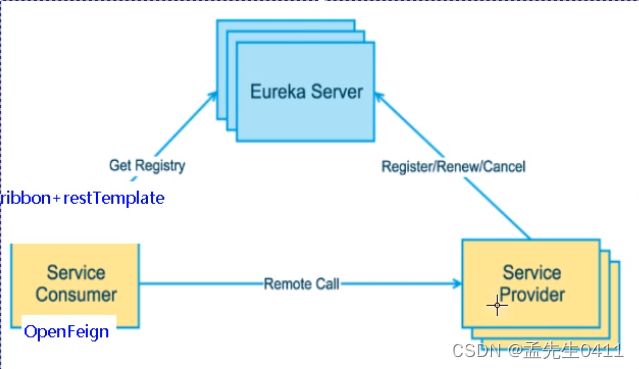
Eureka采用了CS的设计架构,Eureka Sever作为服务注册功能的服务器,它是服务注册中心。而系统中的其他微服务,使用Eureka的客户端连接到 Eureka Server并维持心跳连接。这样系统的维护人员就可以通过Eureka Server来监控系统中各个微服务是否正常运行。
在服务注册与发现中,有一个注册中心。当服务器启动的时候,会把当前自己服务器的信息比如服务地址通讯地址等以别名方式注册到注册中心上。另一方(消费者服务提供者),以该别名的方式去注册中心上获取到实际的服务通讯地址,然后再实现本地RPC调用RPC远程调用框架核心设计思想:在于注册中心,因为使用注册中心管理每个服务与服务之间的一个依赖关系(服务治理概念)。在任何RPC远程框架中,都会有一个注册中心存放服务地址相关信息(接口地址)
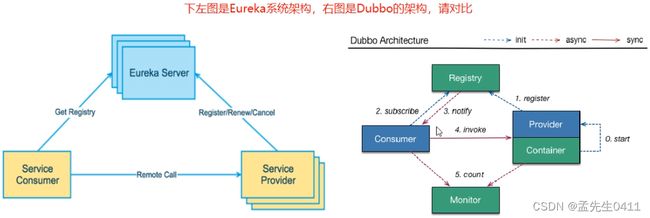
Eureka包含两个组件:Eureka Server和Eureka Client
Eureka Server提供服务注册服务
各个微服务节点通过配置启动后,会在EurekaServer中进行注册,这样EurekaServer中的服务注册表中将会存储所有可用服务节点的信息,服务节点的信息可以在界面中直观看到。
EurekaClient通过注册中心进行访问
它是一个Java客户端,用于简化Eureka Server的交互,客户端同时也具备一个内置的、使用轮询(round-robin)负载算法的负载均衡器。在应用启动后,将会向Eureka Server发送心跳(默认周期为30秒)。如果Eureka Server在多个心跳周期内没有接收到某个节点的心跳,EurekaServer将会从服务注册表中把这个服务节点移除(默认90秒)
EurekaServer服务端安装
创建名为cloud-eureka-server7001的Maven工程
修改pom.xml
    org.springframework.cloud
    spring-cloud-starter-eureka


    org.springframework.cloud
    spring-cloud-starter-netflix-eureka-server
POM文件
        springcloud
        org.example
        1.0-SNAPSHOT

    4.0.0

    cloud-eureka-server7001


        8
        8


            org.springframework.cloud
            spring-cloud-starter-netflix-eureka-server


            org.example
            cloud-api-commons
            1.0-SNAPSHOT
            compile


            org.springframework.boot
            spring-boot-starter-web


            org.springframework.boot
            spring-boot-starter-actuator


            org.springframework.boot
            spring-boot-devtools
            runtime
            true


            org.projectlombok
            lombok


            org.springframework.boot
            spring-boot-starter-test
            test


            junit
            junit
添加application.yml
server:
  port: 7001

eureka:
  instance:
    hostname: localhost #eureka服务端的实例名称
  client:
    #false表示不向注册中心注册自己。
    register-with-eureka: false
    #false表示自己端就是注册中心,我的职责就是维护服务实例,并不需要去检索服务
    fetch-registry: false
    service-url:
      #设置与Eureka server交互的地址查询服务和注册服务都需要依赖这个地址。
      defaultZone: http://${eureka.instance.hostname}:${server.port}/eureka/
主启动
添加@EnableEurekaServer指定该模块作为Eureka注册中心的服务器。
package com.aliyun;

import org.springframework.boot.SpringApplication;
import org.springframework.boot.autoconfigure.SpringBootApplication;
import org.springframework.cloud.netflix.eureka.server.EnableEurekaServer;

/**
 * @Author:meng_xiangxin
 * @Date: 2022/12/5 10:33
 * @Description: Eureka 主启动
 */
@SpringBootApplication
@EnableEurekaServer
public class EurekaMain7001 {
    public static void main(String[] args) {
        SpringApplication.run(EurekaMain7001.class, args);
    }
}
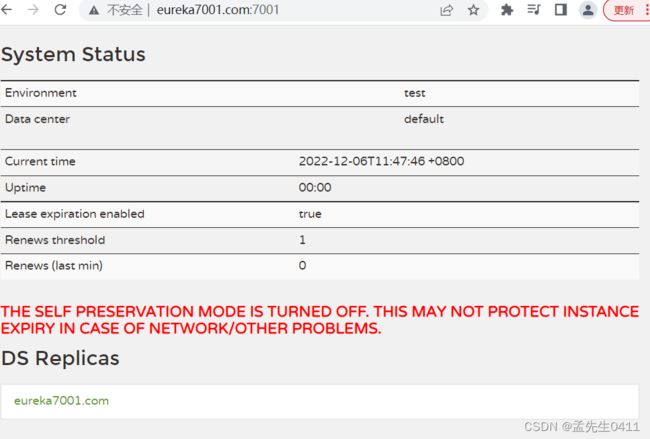
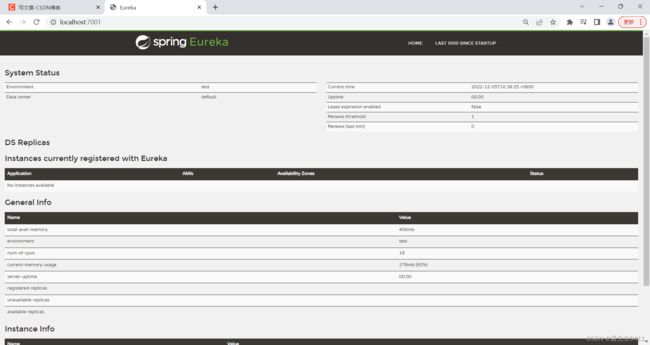
测试运行EurekaMain7001,浏览器输入http://localhost:7001 回车,会查看到Spring Eureka服务主页。
支付微服务8001入驻进EurekaServer
EurekaClient端cloud-provider-payment8001将注册进EurekaServer成为服务提供者provider,类似学校对外提供授课服务。
1.修改cloud-provider-payment8001
2.改POM
添加spring-cloud-starter-netflix-eureka-client依赖
    org.springframework.cloud
    spring-cloud-starter-netflix-eureka-client
写YML
eureka:
  client:
    #表示是否将自己注册进Eurekaserver默认为true。
    register-with-eureka: true
    #是否从EurekaServer抓取已有的注册信息,默认为true。单节点无所谓,集群必须设置为true才能配合ribbon使用负载均衡
    fetchRegistry: true
    service-url:
      defaultZone: http://localhost:7001/eureka
主启动
添加注解:@EnableEurekaClient。 指明这是一个Eureka客户端,要注册进EurekaServer中。
import org.springframework.boot.SpringApplication;
import org.springframework.boot.autoconfigure.SpringBootApplication;
import org.springframework.cloud.netflix.eureka.EnableEurekaClient;

@SpringBootApplication
@EnableEurekaClient//<-----添加该注解
public class PaymentMain001 {

    public static void main(String[] args) {
        SpringApplication.run(PaymentMain001.class, args);
    }
}
测试
启动cloud-provider-payment8001和cloud-eureka-server7001工程。
浏览器输入 - http://localhost:7001/ 主页内的Instances currently registered with Eureka会显示cloud-provider-payment8001的配置文件application.yml设置的应用名cloud-payment-service
spring:
  application:
    name: cloud-payment-service
订单微服务80入驻进EurekaServer
EurekaClient端cloud-consumer-order80将注册进EurekaServer成为服务消费者consumer
cloud-consumer-order80
POM
    org.springframework.cloud
    spring-cloud-starter-netflix-eureka-client
YML
server:
  port: 80

spring:
  application:
    name: cloud-order-service

eureka:
  client:
    #表示是否将自己注册进Eurekaserver默认为true。
    register-with-eureka: true
    #是否从EurekaServer抓取已有的注册信息,默认为true。单节点无所谓,集群必须设置为true才能配合ribbon使用负载均衡
    fetchRegistry: true
    service-url:
      defaultZone: http://localhost:7001/eureka
主启动
同8001加上@EnableEurekaClient 注解
import org.springframework.boot.SpringApplication;
import org.springframework.boot.autoconfigure.SpringBootApplication;
import org.springframework.cloud.netflix.eureka.EnableEurekaClient;

@SpringBootApplication
@EnableEurekaClient//<--- 添加该标签
public class OrderMain80
{
    public static void main( String[] args ){
        SpringApplication.run(OrderMain80.class, args);
    }
}
启动cloud-provider-payment8001、cloud-eureka-server7001和cloud-consumer-order80这三工程。
浏览器输入 http://localhost:7001 , 在主页的Instances currently registered with Eureka将会看到cloud-provider-payment8001、cloud-consumer-order80两个工程名。
application.yml配置中层次缩进和空格,两者不能少,否则,会抛出异常Failed to bind properties under ‘eureka.client.service-url’ to java.util.Map
如果不想将服务注册进eureka
在yml文件中,设置 register-with-eureka: false
Eureka集群原理说明
单机版Eureka构建到这就结束了,但是企业中不可能有谁敢说它的服务注册中心是单机版。 因为没有集群的高可用,就会带来一个严重的问题,单点故障。
- Eureka集群原理说明
- EurekaServer集群环境构建步骤
- 将支付服务8001微服务发布到上面2台Eureka集群配置中
- 将订单服务80微服务发布到上面2台Eureka集群配置中
- 测试01
- 支付服务提供者8001集群环境构建。
- 负载均衡
- 测试02

服务注册:将服务信息注册进注册中心
服务发现:从注册中心上获取服务信息
实质:存key服务命取value闭用地址
1先启动eureka注主册中心
2启动服务提供者payment支付服务
3支付服务启动后会把自身信息(比服务地址L以别名方式注朋进eureka
4消费者order服务在需要调用接口时,使用服务别名去注册中心获取实际的RPC远程调用地址
5消去者导调用地址后,底屋实际是利用HttpClient技术实现远程调用
6消费者实癸导服务地址后会缓存在本地jvm内存中,默认每间隔30秒更新—次服务调用地址
问题:微服务RPC远程服务调用最核心的是什么
高可用,试想你的注册中心只有一个only one,万一它出故障了,会导致整个为服务环境不可用。
解决办法:搭建Eureka注册中心集群,实现负载均衡+故障容错。
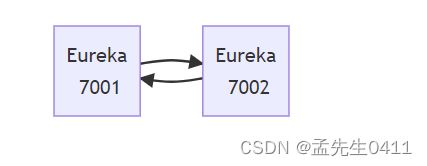
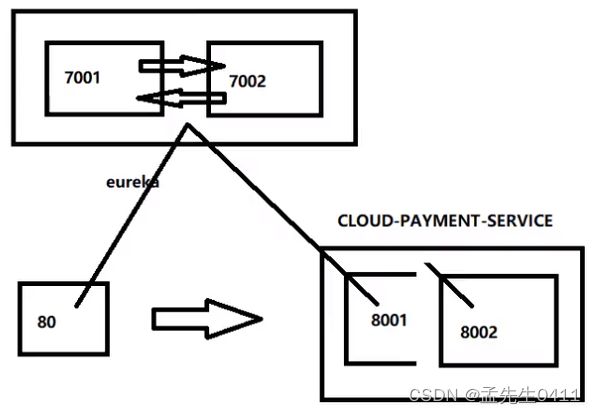
互相注册,相互守望。
Eureka集群环境构建
创建cloud-eureka-server7002工程
找到C:\Windows\System32\drivers\etc路径下的hosts文件,修改映射配置添加进hosts文件
127.0.0.1 eureka7001.com
127.0.0.1 eureka7002.com

修改cloud-eureka-server7001配置文件
server:
  port: 7001

eureka:
  instance:
    hostname: eureka7001.com #eureka服务端的实例名称
  client:
    register-with-eureka: false     #false表示不向注册中心注册自己。
    fetch-registry: false     #false表示自己端就是注册中心,我的职责就是维护服务实例,并不需要去检索服务
    service-url:
    #集群指向其它eureka
      defaultZone: http://eureka7002.com:7002/eureka/
    #单机就是7001自己
      #defaultZone: http://eureka7001.com:7001/eureka/
修改cloud-eureka-server7002配置文件
server:
  port: 7002

eureka:
  instance:
    hostname: eureka7002.com #eureka服务端的实例名称
  client:
    register-with-eureka: false     #false表示不向注册中心注册自己。
    fetch-registry: false     #false表示自己端就是注册中心,我的职责就是维护服务实例,并不需要去检索服务
    service-url:
    #集群指向其它eureka
      defaultZone: http://eureka7001.com:7001/eureka/
    #单机就是7002自己
      #defaultZone: http://eureka7002.com:7002/eureka/
实践的时候,遇到异常情况
在开启cloud-eureka-server7002时,开启失败,说7002端口被占用,然后在cmd中输入netstat -ano | find “7002”,查不到任何东西。
纳闷一阵,重启电脑,问题解决。
订单支付两微服务注册进Eureka集群
将支付服务8001微服务,订单服务80微服务发布到上面2台Eureka集群配置中
将它们的配置文件的eureka.client.service-url.defaultZone进行修改
eureka:
  client:
    #表示是否将自己注册进Eurekaserver默认为true。
    register-with-eureka: true
    #是否从EurekaServer抓取已有的注册信息,默认为true。单节点无所谓,集群必须设置为true才能配合ribbon使用负载均衡
    fetchRegistry: true
    service-url:
      defaultZone: http://eureka7001.com:7001/eureka, http://eureka7002.com:7002/eureka
测试01
先要启动EurekaServer,7001/7002服务
再要启动服务提供者provider,8001
再要启动消费者,80
浏览器输入 - http://localhost/consumer/payment/get/1
支付微服务集群配置
支付服务提供者8001集群环境构建
参考cloud-provicer-payment8001
1.新建cloud-provider-payment8002
2.改POM
3.写YML - 端口8002
4.主启动
5.业务类
6.修改8001/8002的Controller,添加serverPort
@RestController
@Slf4j
public class PaymentController{

    @Value("${server.port}")
    private String serverPort;//添加serverPort

    @PostMapping(value = "/payment/create")
    public CommonResult create(@RequestBody Payment payment)
    {
        int result = paymentService.create(payment);
        log.info("*****插入结果:" + result);

        if(result > 0) {
            return new CommonResult(200,"插入数据库成功,serverPort: "+serverPort/*添加到此处*/, result);
        }else{
            return new CommonResult(444,"插入数据库失败",null);
        }
    }
}
负载均衡
cloud-consumer-order80订单服务访问地址不能写死
@Slf4j
@RestController
public class OrderController {

    //public static final String PAYMENT_URL = "http://localhost:8001";
    public static final String PAYMENT_URL = "http://CLOUD-PAYMENT-SERVICE";
    ...
}
使用@LoadBlanced注解赋予RestTemplate负载均衡的能力
以前我们把生产者微服务写死,没关系,因为只有一个生产者微服务,只认一个。
但是现在不能写死了,因为这个微服务名下对应有多个微服务,那么调用时,必须得说明 哪一个被调用了。 需要规定一种默认的负载均衡机制:@LoadBlanced;在Order80端的配置类上加入@LoadBlanced注解开启负载均衡
import org.springframework.cloud.client.loadbalancer.LoadBalanced;
import org.springframework.context.annotation.Bean;
import org.springframework.context.annotation.Configuration;
import org.springframework.web.client.RestTemplate;

@Configuration
public class ApplicationContextConfig {

    @Bean
    @LoadBalanced//使用@LoadBalanced注解赋予RestTemplate负载均衡的能力
    public RestTemplate getRestTemplate(){
        return new RestTemplate();
    }

}
ApplicationContextBean - 提前说一下Ribbon的负载均衡功能
测试
先要启动EurekaServer,7001/7002服务
再要启动服务提供者provider,8001/8002服务
浏览器输入 - http://localhost/consumer/payment/get/31
结果:负载均衡效果达到,8001/8002端口交替出现
Ribbon和Eureka整合后Consumer可以直接调用服务而不用再关心地址和端口号,且该服务还有负载功能。
相互注册,相互守望
actuator微服务信息完善
主机名称:服务名称修改(也就是将IP地址,换成可读性高的名字)
修改cloud-provider-payment8001,cloud-provider-payment8002
eureka:
  ...
  instance:
    instance-id: payment8001 #添加此处
eureka:
  ...
  instance:
    instance-id: payment8002 #添加此处
修改之后
eureka主页将显示payment8001,payment8002代替原来显示的IP地址。
修改部分 - YML - eureka.instance.instance-id
访问信息有IP信息提示,(就是将鼠标指针移至payment8001,payment8002名下,会有IP地址提示)
修改部分 - YML - eureka.instance.prefer-ip-address
eureka:
  ...
  instance:
    instance-id: payment8001
    prefer-ip-address: true #添加此处
eureka:
  ...
  instance:
    instance-id: payment8002
    prefer-ip-address: true #添加此处
服务发现Discovery
服务发现:对于注册进eureka里面的微服务,可以通过服务发现来获得该服务的信息
修改cloud-provider-payment8001的Controller
package com.aliyun.controller;

import com.aliyun.entity.CommonResult;
import com.aliyun.entity.Payment;
import com.aliyun.service.PaymentService;
import lombok.extern.slf4j.Slf4j;
import org.springframework.beans.factory.annotation.Value;
import org.springframework.cloud.client.ServiceInstance;
import org.springframework.cloud.client.discovery.DiscoveryClient;
import org.springframework.web.bind.annotation.*;

import javax.annotation.Resource;
import java.util.List;

@RestController
@Slf4j
public class PaymentController {
    @Resource
    private PaymentService paymentService;
    @Value("${server.port}")
    private int serverPort;
    @Resource
    private DiscoveryClient discoveryClient;

    @PostMapping(value = "/payment/create")
    public CommonResult create(@RequestBody Payment payment) {
        int result = paymentService.create(payment);
        log.info("*****插入结果:" + result);

        if (result > 0) {
            return new CommonResult(200, "插入数据库成功,serverPort: " + serverPort, result);
        } else {
            return new CommonResult(444, "插入数据库失败", null);
        }
    }

    @GetMapping(value = "/payment/get/{id}")
    public CommonResult getPaymentById(@PathVariable("id") Long id) {
        Payment paymentById = paymentService.getPaymentById(id);

        if (paymentById != null) {
            return new CommonResult(200, "查询成功,serverPort:  " + serverPort, paymentById);
        } else {
            return new CommonResult(444, "没有对应记录,查询ID: " + id, null);
        }
    }

    @GetMapping("/payment/discovery")
    public Object discovery() {
        List<String> services = discoveryClient.getServices();
        for (String service : services) {
            log.info("测试" + service);
        }
        List<ServiceInstance> instances = discoveryClient.getInstances("CLOUD-PAYMENT-SERVICE");
        for (ServiceInstance instance : instances) {
            log.info(instance.getServiceId()+"\t"+instance.getHost()+"\t"+instance.getPort()+"\t"+instance.getUri());
        }

        return this.discoveryClient;
    }
}
8001主启动类
package com.aliyun;

import org.mybatis.spring.annotation.MapperScan;
import org.springframework.boot.SpringApplication;
import org.springframework.boot.autoconfigure.SpringBootApplication;
import org.springframework.cloud.client.discovery.EnableDiscoveryClient;
import org.springframework.cloud.netflix.eureka.EnableEurekaClient;

@SpringBootApplication
@MapperScan("com.aliyun.dao")
@EnableEurekaClient
@EnableDiscoveryClient//<-----添加该注解
public class CloudProvidePayment8001 {
    public static void main(String[] args) {
        SpringApplication.run(CloudProvidePayment8001.class, args);
    }

}
自测
localhost:8001/payment/discovery
{
    "services": [
        "cloud-payment-service",
        "cloud-consumer-order"
    ],
    "order": 0
}
后台显示
CLOUD-PAYMENT-SERVICE 192.168.228.1 8002 http://192.168.228.1:8002
Eureka自我保护理论知识
概述
保护模式主要用于一组客户端和Eureka Server之间存在网络分区场景下的保护。一旦进入保护模式,Eureka Server将会尝试保护其服务注册表中的信息,不再删除服务注册表中的数据,也就是不会注销任何微服务。
如果在Eureka Server的首页看到以下这段提示,则说明Eureka进入了保护模式:
EMERGENCY! EUREKA MAY BE INCORRECTLY CLAIMING INSTANCES ARE UP WHEN THEY’RE NOT. RENEWALS ARE LESSER THANTHRESHOLD AND HENCE THE INSTANCES ARE NOT BEING EXPIRED JUSTTO BE SAFE
导致原因
一句话:某时刻某一个微服务不可用了,Eureka不会立刻清理,依旧会对该微服务的信息进行保存。
属于CAP里面的AP分支。
为什么会产生Eureka自我保护机制?
为了EurekaClient可以正常运行,防止与EurekaServer网络不通情况下,EurekaServer不会立刻将EurekaClient服务剔除
什么是自我保护模式?
默认情况下,如果EurekaServer在一定时间内没有接收到某个微服务实例的心跳,EurekaServer将会注销该实例(默认90秒)。但是当网络分区故障发生(延时、卡顿、拥挤)时,微服务与EurekaServer之间无法正常通信,以上行为可能变得非常危险了——因为微服务本身其实是健康的,此时本不应该注销这个微服务。Eureka通过“自我保护模式”来解决这个问题——当EurekaServer节点在短时间内丢失过多客户端时(可能发生了网络分区故障),那么这个节点就会进入自我保护模式。

自我保护机制∶默认情况下EurekaClient定时向EurekaServer端发送心跳包
如果Eureka在server端在一定时间内(默认90秒)没有收到EurekaClient发送心跳包,便会直接从服务注册列表中剔除该服务,但是在短时间( 90秒中)内丢失了大量的服务实例心跳,这时候Eurekaserver会开启自我保护机制,不会剔除该服务(该现象可能出现在如果网络不通但是EurekaClient为出现宕机,此时如果换做别的注册中心如果一定时间内没有收到心跳会将剔除该服务,这样就出现了严重失误,因为客户端还能正常发送心跳,只是网络延迟问题,而保护机制是为了解决此问题而产生的)。
在自我保护模式中,Eureka Server会保护服务注册表中的信息,不再注销任何服务实例。
它的设计哲学就是宁可保留错误的服务注册信息,也不盲目注销任何可能健康的服务实例。一句话讲解:好死不如赖活着。
综上,自我保护模式是一种应对网络异常的安全保护措施。它的架构哲学是宁可同时保留所有微服务(健康的微服务和不健康的微服务都会保留)也不盲目注销任何健康的微服务。使用自我保护模式,可以让Eureka集群更加的健壮、稳定。
怎么禁止自我保护
在7001配置中
添加
#关闭自我保护
enable-self-preservation: false
eviction-interval-timer-in-ms: 2000
eureka:
  instance:
    hostname: .eureka7001com #eureka服务端的实例名称
  client:
    register-with-eureka: false     #false表示不向注册中心注册自己。
    fetch-registry: false     #false表示自己端就是注册中心,我的职责就是维护服务实例,并不需要去检索服务
    service-url:
      #集群指向其它eureka
      #      defaultZone: http://eureka7002.com:7002/eureka/
      #单机就是7001自己
      defaultZone: http://eureka7001.com:7001/eureka/
  server:
    #关闭自我保护
    enable-self-preservation: false

    eviction-interval-timer-in-ms: 2000
eureka.instance.lease-renewal-interval-in-seconds=30
eureka.instance.lease-expiration-duration-in-seconds=90
eureka:
  ...
  instance:
    instance-id: payment8001
    prefer-ip-address: true
    #心跳检测与续约时间
    #开发时没置小些,保证服务关闭后注册中心能即使剔除服务
    #Eureka客户端向服务端发送心跳的时间间隔,单位为秒(默认是30秒)
    lease-renewal-interval-in-seconds: 1
    #Eureka服务端在收到最后一次心跳后等待时间上限,单位为秒(默认是90秒),超时将剔除服务
    lease-expiration-duration-in-seconds: 2
测试
7001和8001都配置完成
先启动7001再启动8001
结果:先关闭8001,马上被删除了
Eureka停更说明
ZooKeeper代替Eureka功能。
zookeeper
● 服务注册中心:zookeeper代替eureka
● Consul服务注册与发现
概述
Zookeeper从设计模式角度来理解:是一个基于观察者模式设计的分布式服务管理框架,它负责存储和管理大家都关心的数据,然 后接受观察者的注册,一旦这些数据的状态发生变化,Zookeeper就将负责通知已经在Zookeeper上注册的那些观察者做出相应的反应。用于服务注册与发现。
 特点
特点

1)Zookeeper:一个领导者(Leader),多个跟随者(Follower)组成的集群。
2)服务器集群中只要有半数以上节点存活,Zookeeper集群就能正常服务。所以Zookeeper适合安装奇数台服务器。
3)全局数据一致:每个Server保存一份相同的数据副本,Client无论连接到哪个Server,数据都是一致的。
4)更新请求顺序执行,来自同一个Client的更新请求按其发送顺序依次执行。
5)数据更新原子性,一次数据更新要么成功,要么失败。
6)实时性,在一定时间范围内,Client能读到最新数据。
统一集群管理
1)分布式环境中,实时掌握每个节点的状态是必要的。
● 可根据节点实时状态做出一些调整。
2)ZooKeeper可以实现实时监控节点状态变化
● 可将节点信息写入ZooKeeper上的一个ZNode。(状态信息等等)
● 监听这个ZNode可获取它的实时状态变化。
软负载均衡
在Zookeeper中记录每台服务器的访问数,让访问数最少的服务器去处理最新的客户端请求
支付服务注册进zookeeper
注册中心Zookeeper
Zookeeper 官方下载网址 Zookeeper下载
cd /opt
mkdir zookeeper
解压 tar -xvzf apache-zookeeper-3.7.0-bin.tar.gz
进入zookeeper 中的 conf目录:cd apache-zookeeper-3.7.0-bin/conf/
修改zoo_sample.cfg 为zoo.cfg: mv zoo_sample.cfg zoo.cfg
编辑zoo.cfg配置文件:
①新建zookeeper数据存放目录:
mkdir /opt/zookeeper/apache-zookeeper-3.7.0-bin/MyZkData
②、vi zoo.cfg,修改zookeeper的数据存放目录
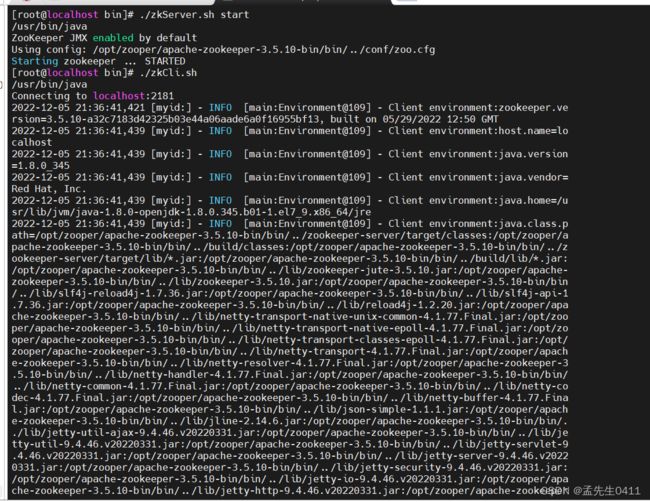
启动zookeeper服务端:
cd /opt/zookeeper/apache-zookeeper-3.7.0-bin/bin
执行 ./zkServer.sh start
启动zookeeper客户端,测试是否安装成功:
./zkCli.sh
zookeeper是什么?
zookeeper是一个分布式协调工具,可以实现注册中心功能
关闭Linux服务器防火墙后,启动zookeeper服务器
用到的Linux命令行:
systemctl stop firewalld关闭防火墙
systemctl status firewalld查看防火墙状态
ipconfig查看IP地址
ping查验结果
zookeeper服务器取代Eureka服务器,zk作为服务注册中心
新建名为cloud-provider-payment8004的Maven工程。
POM
<?xml version="1.0" encoding="UTF-8"?>
<project xmlns="http://maven.apache.org/POM/4.0.0"
         xmlns:xsi="http://www.w3.org/2001/XMLSchema-instance"
         xsi:schemaLocation="http://maven.apache.org/POM/4.0.0 http://maven.apache.org/xsd/maven-4.0.0.xsd">
    <parent>
        <artifactId>springcloud</artifactId>
        <groupId>org.example</groupId>
        <version>1.0-SNAPSHOT</version>
    </parent>
    <modelVersion>4.0.0</modelVersion>

    <artifactId>cloud-provider-payment8004</artifactId>

    <properties>
        <maven.compiler.source>8</maven.compiler.source>
        <maven.compiler.target>8</maven.compiler.target>
    </properties>
    <dependencies>
        <!-- SpringBoot整合Web组件 -->
        <dependency>
            <groupId>org.springframework.boot</groupId>
            <artifactId>spring-boot-starter-web</artifactId>
        </dependency>
        <dependency>
            <groupId>org.example</groupId>
            <artifactId>cloud-api-commons</artifactId>
            <version>1.0-SNAPSHOT</version>
            <scope>compile</scope>
        </dependency>
        <!-- SpringBoot整合zookeeper客户端 -->
        <dependency>
            <groupId>org.springframework.cloud</groupId>
            <artifactId>spring-cloud-starter-zookeeper-discovery</artifactId>
            <!--先排除自带的zookeeper3.5.3 防止与3.4.9起冲突-->
            <exclusions>
                <exclusion>
                    <groupId>org.apache.zookeeper</groupId>
                    <artifactId>zookeeper</artifactId>
                </exclusion>
            </exclusions>
        </dependency>
        <!--添加zookeeper3.4.9版本-->
        <dependency>
            <groupId>org.apache.zookeeper</groupId>
            <artifactId>zookeeper</artifactId>
            <version>3.4.9</version>
        </dependency>
        <dependency>
            <groupId>org.springframework.boot</groupId>
            <artifactId>spring-boot-devtools</artifactId>
            <scope>runtime</scope>
            <optional>true</optional>
        </dependency>
        <dependency>
            <groupId>org.projectlombok</groupId>
            <artifactId>lombok</artifactId>
            <optional>true</optional>
        </dependency>
        <dependency>
            <groupId>org.springframework.boot</groupId>
            <artifactId>spring-boot-starter-test</artifactId>
            <scope>test</scope>
        </dependency>
    </dependencies>

</project>
yml
#8004表示注册到zookeeper服务器的支付服务提供者端口号
server:
  port: 8004

#服务别名----注册zookeeper到注册中心名称
spring:
  application:
    name: cloud-provider-payment
  cloud:
    zookeeper:
      connect-string: 127.0.0.1:2181 # 192.168.111.144:2181 #
主启动类
import org.springframework.boot.SpringApplication;
import org.springframework.boot.autoconfigure.SpringBootApplication;
import org.springframework.cloud.client.discovery.EnableDiscoveryClient;

@SpringBootApplication
@EnableDiscoveryClient//该注解用于向使用consul或者zookeeper作为注册中心时注册服务
public class PaymentMain8004 {
    public static void main(String[] args) {
        SpringApplication.run(PaymentMain8004.class, args);
    }
}
Controller
import lombok.extern.slf4j.Slf4j;
import org.springframework.beans.factory.annotation.Value;
import org.springframework.web.bind.annotation.RequestMapping;
import org.springframework.web.bind.annotation.RestController;

import java.util.UUID;

@RestController
@Slf4j
public class PaymentController
{
    @Value("${server.port}")
    private String serverPort;

    @RequestMapping(value = "/payment/zk")
    public String paymentzk()
    {
        return "springcloud with zookeeper: "+serverPort+"\t"+ UUID.randomUUID().toString();
    }
}
启动8004注册进zookeeper(要先启动zookeeper的server)
验证测试:浏览器 - http://localhost:8004/payment/zk
验证测试2 :接着用zookeeper客户端操作
[zk: localhost:2181(CONNECTED) 0] ls /
[services, zookeeper]
[zk: localhost:2181(CONNECTED) 1] ls /services/cloud-provider-payment
[a4567f50-6ad9-47a3-9fbb-7391f41a9f3d]
[zk: localhost:2181(CONNECTED) 2] get /services/cloud-provider-payment/a4567f50-6ad9-47a3-9fbb-7391f41a9f3d
{"name":"cloud-provider-payment","id":"a4567f50-6ad9-47a3-9fbb-7391f41a9f3d","address":"192.168.199.218","port":8004,"ss
lPort":null,"payload":{"@class":"org.springframework.cloud.zookeeper.discovery.ZookeeperInstance","id":"application-1","
name":"cloud-provider-payment","metadata":{}},"registrationTimeUTC":1612811116918,"serviceType":"DYNAMIC","uriSpec":{"pa
rts":[{"value":"scheme","variable":true},{"value":"://","variable":false},{"value":"address","variable":true},{"value":"
:","variable":false},{"value":"port","variable":true}]}}
[zk: localhost:2181(CONNECTED) 3]
json格式化get /services/cloud-provider-payment/a4567f50-6ad9-47a3-9fbb-7391f41a9f3d的结果:
{
    "name": "cloud-provider-payment",
    "id": "a4567f50-6ad9-47a3-9fbb-7391f41a9f3d",
    "address": "192.168.199.218",
    "port": 8004,
    "sslPort": null,
    "payload": {
        "@class": "org.springframework.cloud.zookeeper.discovery.ZookeeperInstance",
        "id": "application-1",
        "name": "cloud-provider-payment",
        "metadata": { }
    },
    "registrationTimeUTC": 1612811116918,
    "serviceType": "DYNAMIC",
    "uriSpec": {
        "parts": [
            {
                "value": "scheme",
                "variable": true
            },
            {
                "value": "://",
                "variable": false
            },
            {
                "value": "address",
                "variable": true
            },
            {
                "value": ":",
                "variable": false
            },
            {
                "value": "port",
                "variable": true
            }
        ]
    }
}
临时还是持久节点
ZooKeeper的服务节点是临时节点,没有Eureka那含情脉脉。
订单服务注册进zookeeper
新建cloud-consumerzk-order80
POM
<?xml version="1.0" encoding="UTF-8"?>
<project xmlns="http://maven.apache.org/POM/4.0.0"
         xmlns:xsi="http://www.w3.org/2001/XMLSchema-instance"
         xsi:schemaLocation="http://maven.apache.org/POM/4.0.0 http://maven.apache.org/xsd/maven-4.0.0.xsd">
    <parent>
        <artifactId>springcloud</artifactId>
        <groupId>org.example</groupId>
        <version>1.0-SNAPSHOT</version>
    </parent>
    <modelVersion>4.0.0</modelVersion>

    <artifactId>cloud-consumerzk-order80</artifactId>

    <properties>
        <maven.compiler.source>8</maven.compiler.source>
        <maven.compiler.target>8</maven.compiler.target>
    </properties>
    <dependencies>
        <!-- SpringBoot整合Web组件 -->
        <dependency>
            <groupId>org.springframework.boot</groupId>
            <artifactId>spring-boot-starter-web</artifactId>
        </dependency>
        <!-- SpringBoot整合zookeeper客户端 -->
        <dependency>
            <groupId>org.springframework.cloud</groupId>
            <artifactId>spring-cloud-starter-zookeeper-discovery</artifactId>
            <!--先排除自带的zookeeper-->
            <exclusions>
                <exclusion>
                    <groupId>org.apache.zookeeper</groupId>
                    <artifactId>zookeeper</artifactId>
                </exclusion>
            </exclusions>
        </dependency>
        <!--添加zookeeper3.4.9版本-->
        <dependency>
            <groupId>org.apache.zookeeper</groupId>
            <artifactId>zookeeper</artifactId>
            <version>3.4.9</version>
        </dependency>
        <dependency>
            <groupId>org.springframework.boot</groupId>
            <artifactId>spring-boot-devtools</artifactId>
            <scope>runtime</scope>
            <optional>true</optional>
        </dependency>
        <dependency>
            <groupId>org.projectlombok</groupId>
            <artifactId>lombok</artifactId>
            <optional>true</optional>
        </dependency>
        <dependency>
            <groupId>org.springframework.boot</groupId>
            <artifactId>spring-boot-starter-test</artifactId>
            <scope>test</scope>
        </dependency>
    </dependencies>

</project>
YML
server:
  port: 80

#服务别名----注册zookeeper到注册中心名称
spring:
  application:
    name: cloud-consumer-order
  cloud:
    zookeeper:
      connect-string: 192.168.145.151:2181
主启动
import org.springframework.boot.SpringApplication;
import org.springframework.boot.autoconfigure.SpringBootApplication;
import org.springframework.cloud.client.discovery.EnableDiscoveryClient;

@SpringBootApplication
@EnableDiscoveryClient
public class OrderZKMain80 {
    public static void main(String[] args) {
        SpringApplication.run(OrderZKMain80.class, args);
    }
}
业务类
import org.springframework.cloud.client.loadbalancer.LoadBalanced;
import org.springframework.context.annotation.Bean;
import org.springframework.context.annotation.Configuration;
import org.springframework.web.client.RestTemplate;

@Configuration
public class ApplicationContextConfig
{
    @Bean
    @LoadBalanced
    public RestTemplate getRestTemplate()
    {
        return new RestTemplate();
    }
}
import javax.annotation.Resource;

@RestController
@Slf4j
public class OrderZKController
{
    public static final String INVOKE_URL = "http://cloud-provider-payment";

    @Resource
    private RestTemplate restTemplate;

    @GetMapping(value = "/consumer/payment/zk")
    public String paymentInfo()
    {
        String result = restTemplate.getForObject(INVOKE_URL+"/payment/zk",String.class);
        return result;
    }
}
测试
运行ZooKeeper服务端,cloud-consumerzk-order80,cloud-provider-payment8004。

打开ZooKeeper客户端:
[zk: localhost:2181(CONNECTED) 9] ls /services
[cloud-consumer-order, cloud-provider-payment]
访问测试地址 - http://localhost/consumer/payment/zk
Consul
Consul官网:官网
下载地址:下载
Consul是一个服务网格解决方案,它提供了一个功能齐全的控制平面,具有服务发现、配置和分段功能。这些特性中的每一个都可以根据需要单独使用,也可以一起用于构建全服务网格。Consul需要一个数据平面,并支持代理和本机集成模型。Consul与一个简单的内置代理,使一切工作的开箱即用,但也支持第三方代理集成,如Envoy。
Consul是一套开源的分布式服务发现和配置管理系统,由HashiCorp 公司用Go语言开发。
提供了微服务系统中的服务治理、配置中心、控制总线等功能。这些功能中的每一个都可以根据需要单独使用,也可以一起使用以构建全方位的服务网格,总之Consul提供了一种完整的服务网格解决方案。
它具有很多优点。包括:基于raft协议,比较简洁;支持健康检查,同时支持HTTP和DNS协议支持跨数据中心的WAN集群提供图形界面跨平台,支持Linux、Mac、Windows。
能干嘛?
服务发现 - 提供HTTP和DNS两种发现方式。
健康监测 - 支持多种方式,HTTP、TCP、Docker、Shell脚本定制化
KV存储 - Key、Value的存储方式
多数据中心 - Consul支持多数据中心
可视化Web界面
安装并运行Consul
下载页面
windows版解压缩后,得consul.exe,打开cmd
查看版本consul -v:

开发模式启动== consul agent -dev== :
浏览器输入 - http://localhost:8500/ - 打开Consul控制页。
服务提供者注册进Consul
新建Module支付服务 cloud-providerconsul-payment8006
POM
<?xml version="1.0" encoding="UTF-8"?>
<project xmlns="http://maven.apache.org/POM/4.0.0"
         xmlns:xsi="http://www.w3.org/2001/XMLSchema-instance"
         xsi:schemaLocation="http://maven.apache.org/POM/4.0.0 http://maven.apache.org/xsd/maven-4.0.0.xsd">
    <parent>
        <artifactId>springcloud</artifactId>
        <groupId>org.example</groupId>
        <version>1.0-SNAPSHOT</version>
    </parent>
    <modelVersion>4.0.0</modelVersion>

    <artifactId>cloud-providerconsul-payment8006</artifactId>

    <properties>
        <maven.compiler.source>8</maven.compiler.source>
        <maven.compiler.target>8</maven.compiler.target>
    </properties>

    <dependencies>
        <!-- 引入自己定义的api通用包,可以使用Payment支付Entity -->
        <dependency>
            <groupId>org.example</groupId>
            <artifactId>cloud-api-commons</artifactId>
            <version>1.0-SNAPSHOT</version>
            <scope>compile</scope>
        </dependency>
        <!--SpringCloud consul-server -->
        <dependency>
            <groupId>org.springframework.cloud</groupId>
            <artifactId>spring-cloud-starter-consul-discovery</artifactId>
        </dependency>
        <!-- SpringBoot整合Web组件 -->
        <dependency>
            <groupId>org.springframework.boot</groupId>
            <artifactId>spring-boot-starter-web</artifactId>
        </dependency>
        <dependency>
            <groupId>org.springframework.boot</groupId>
            <artifactId>spring-boot-starter-actuator</artifactId>
        </dependency>
        <!--日常通用jar包配置-->
        <dependency>
            <groupId>org.springframework.boot</groupId>
            <artifactId>spring-boot-devtools</artifactId>
            <scope>runtime</scope>
            <optional>true</optional>
        </dependency>
        <dependency>
            <groupId>org.projectlombok</groupId>
            <artifactId>lombok</artifactId>
            <optional>true</optional>
        </dependency>
        <dependency>
            <groupId>org.springframework.boot</groupId>
            <artifactId>spring-boot-starter-test</artifactId>
            <scope>test</scope>
        </dependency>
        <dependency>
            <groupId>cn.hutool</groupId>
            <artifactId>hutool-all</artifactId>
            <version>RELEASE</version>
            <scope>test</scope>
        </dependency>

    </dependencies>

</project>
YML
###consul服务端口号
server:
  port: 8006

spring:
  application:
    name: consul-provider-payment
####consul注册中心地址
  cloud:
    consul:
      host: localhost
      port: 8500
      discovery:
        #hostname: 127.0.0.1
        service-name: ${spring.application.name}
主启动类
import org.springframework.boot.SpringApplication;
import org.springframework.boot.autoconfigure.SpringBootApplication;
import org.springframework.cloud.client.discovery.EnableDiscoveryClient;

@SpringBootApplication
@EnableDiscoveryClient
public class PaymentMain8006
{
    public static void main(String[] args) {
            SpringApplication.run(PaymentMain8006.class, args);
    }
}
业务类Controller
import lombok.extern.slf4j.Slf4j;
import org.springframework.beans.factory.annotation.Value;
import org.springframework.web.bind.annotation.RequestMapping;
import org.springframework.web.bind.annotation.RestController;

import java.util.UUID;

@RestController
@Slf4j
public class PaymentController
{
    @Value("${server.port}")
    private String serverPort;

    @RequestMapping(value = "/payment/consul")
    public String paymentConsul()
    {
        return "springcloud with consul: "+serverPort+"\t   "+ UUID.randomUUID().toString();
    }
}
验证测试
http://localhost:8006/payment/consul
http://localhost:8500 - 会显示provider8006
服务消费者注册进Consul
新建Module消费服务 order80-cloud-consumerconsul-order80
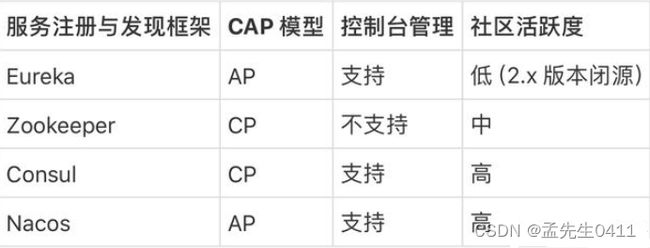
三个注册中心异同点
组件名	语言CAP	 服务健康检查	 对外暴露接口	 Spring Cloud集成
Eureka	 Java		AP	     可配支持		HTTP
Consul	  Go		CP	     支持			HTTP/DNS
Zookeeper Java	    CP	    支持客户端		已集成
CAP:
C:Consistency (强一致性)
A:Availability (可用性)
P:Partition tolerance (分区容错性)

最多只能同时较好的满足两个。
CAP理论的核心是:一个分布式系统不可能同时很好的满足一致性,可用性和分区容错性这三个需求。
因此,根据CAP原理将NoSQL数据库分成了满足CA原则、满足CP原则和满足AP原则三大类:
CA - 单点集群,满足—致性,可用性的系统,通常在可扩展性上不太强大。
CP - 满足一致性,分区容忍必的系统,通常性能不是特别高。
AP - 满足可用性,分区容忍性的系统,通常可能对一致性要求低一些。
AP架构(Eureka)
当网络分区出现后,为了保证可用性,系统B可以返回旧值,保证系统的可用性。
结论:违背了一致性C的要求,只满足可用性和分区容错,即AP
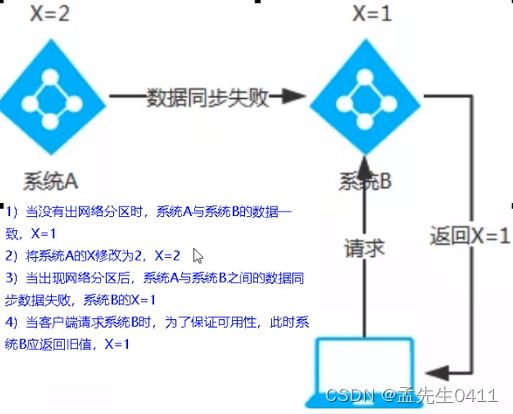
CP架构(ZooKeeper/Consul)
当网络分区出现后,为了保证一致性,就必须拒接请求,否则无法保证一致性。
结论:违背了可用性A的要求,只满足一致性和分区容错,即CP。
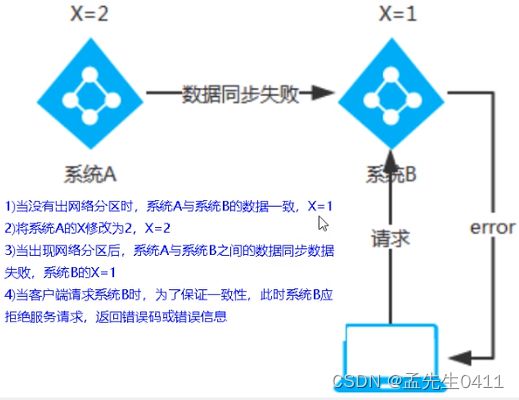
CP 与 AP 对立同一的矛盾关系。
Ribbon
Spring Cloud Ribbon是基于Netflix Ribbon实现的一套客户端负载均衡的工具。
提供客户端的软件负载均衡算法和服务调用
在配置文件中列出Load Balancer(简称LB)后面所有的机器,Ribbon会自动的帮助你基于某种规则(如简单轮询,随机连接等)去连接这些机器。我们很容易使用Ribbon实现自定义的负载均衡算法。
LB负载均衡(Load Balance)是什么
将用户的请求平摊的分配到多个服务上,从而达到系统的HA (高可用)。
常见的负载均衡有软件Nginx,LVS,硬件F5等。
Ribbon本地负载均衡客户端VS Nginx服务端负载均衡区别
Nginx是服务器负载均衡,客户端所有请求都会交给nginx,然后由nginx实现转发请求。即负载均衡是由服务端实现的。
Ribbon本地负载均衡,在调用微服务接口时候,会在注册中心上获取注册信息服务列表之后缓存到JVM本地,从而在本地实现RPC远程服务调用技术。
集中式LB
即在服务的消费方和提供方之间使用独立的LB设施(可以是硬件,如F5, 也可以是软件,如nginx),由该设施负责把访问请求通过某种策略转发至服务的提供方;
进程内LB
将LB逻辑集成到消费方,消费方从服务注册中心获知有哪些地址可用,然后自己再从这些地址中选择出一个合适的服务器。
Ribbon就属于进程内LB,它只是一个类库,集成于消费方进程,消费方通过它来获取到服务提供方的地址。
负载均衡 + RestTemplate调用
Ribbon的负载均衡和Rest调用
架构说明
总结:Ribbon其实就是一个软负载均衡的客户端组件,它可以和其他所需请求的客户端结合使用,和Eureka结合只是其中的一个实例。
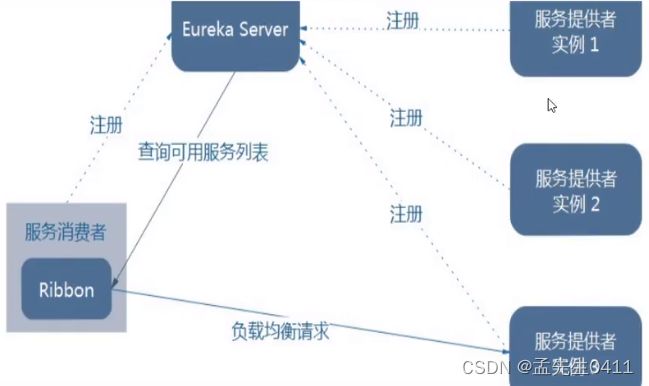
Ribbon在工作时分成两步:
第一步先选择EurekaServer ,它优先选择在同一个区域内负载较少的server。
第二步再根据用户指定的策略,在从server取到的服务注册列表中选择一个地址。
其中Ribbon提供了多种策略:比如轮询、随机和根据响应时间加权。
POM
先前工程项目没有引入spring-cloud-starter-ribbon也可以使用ribbon。
<dependency>
    <groupld>org.springframework.cloud</groupld>
    <artifactld>spring-cloud-starter-netflix-ribbon</artifactid>
</dependency>
Ribbon默认自带的负载规则
lRule:根据特定算法中从服务列表中选取一个要访问的服务
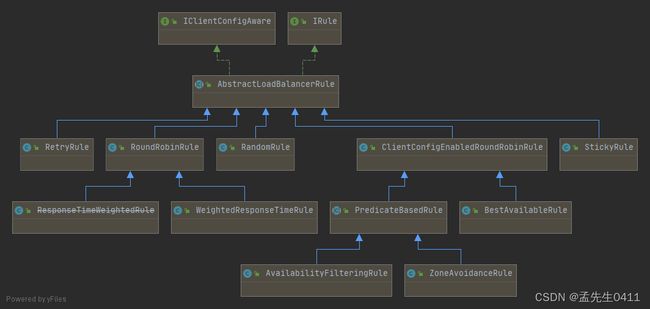
RoundRobinRule 轮询
RandomRule 随机
RetryRule 先按照RoundRobinRule的策略获取服务,如果获取服务失败则在指定时间内会进行重
WeightedResponseTimeRule 对RoundRobinRule的扩展,响应速度越快的实例选择权重越大,越容易被选择
BestAvailableRule 会先过滤掉由于多次访问故障而处于断路器跳闸状态的服务,然后选择一个并发量最小的服务
AvailabilityFilteringRule 先过滤掉故障实例,再选择并发较小的实例
ZoneAvoidanceRule 默认规则,复合判断server所在区域的性能和server的可用性选择服务器
Ribbon负载规则替换
1.修改cloud-consumer-order80
2.注意配置细节
官方文档明确给出了警告:
这个自定义配置类不能放在@ComponentScan所扫描的当前包下以及子包下,
否则我们自定义的这个配置类就会被所有的Ribbon客户端所共享,达不到特殊化定制的目的了。
(也就是说不要将Ribbon配置类与主启动类同包)
import com.netflix.loadbalancer.IRule;
import com.netflix.loadbalancer.RandomRule;
import org.springframework.context.annotation.Bean;
import org.springframework.context.annotation.Configuration;

@Configuration
public class MySelfRule {

    @Bean
    public IRule myRule(){
        return new RandomRule();
    }
}
主启动类添加@RibbonClient
import org.springframework.boot.SpringApplication;
import org.springframework.boot.autoconfigure.SpringBootApplication;
import org.springframework.cloud.netflix.eureka.EnableEurekaClient;
import org.springframework.cloud.netflix.ribbon.RibbonClient;

@SpringBootApplication
@EnableEurekaClient
//添加到此处
@RibbonClient(name = "CLOUD-PAYMENT-SERVICE", configuration = MySelfRule.class)
public class OrderMain80
{
    public static void main( String[] args ){
        SpringApplication.run(OrderMain80.class, args);
    }
}
测试
开启cloud-eureka-server7001,cloud-consumer-order80,cloud-provider-payment8001,cloud-provider-payment8002
浏览器-输入http://localhost/consumer/payment/get/1
返回结果中的serverPort在8001与8002两种间反复横跳。
Ribbon默认负载轮询算法原理
默认负载轮训算法: rest接口第几次请求数 % 服务器集群总数量 = 实际调用服务器位置下标,每次服务重启动后rest接口计数从1开始。
List instances = discoveryClient.getInstances(“CLOUD-PAYMENT-SERVICE”);
如:
List [0] instances = 127.0.0.1:8002
List [1] instances = 127.0.0.1:8001
8001+ 8002组合成为集群,它们共计2台机器,集群总数为2,按照轮询算法原理:
当总请求数为1时:1%2=1对应下标位置为1,则获得服务地址为127.0.0.1:8001
当总请求数位2时:2%2=О对应下标位置为0,则获得服务地址为127.0.0.1:8002
当总请求数位3时:3%2=1对应下标位置为1,则获得服务地址为127.0.0.1:8001
当总请求数位4时:4%2=О对应下标位置为0,则获得服务地址为127.0.0.1:8002
如此类推…
RoundRobinRule源码分析
public interface IRule{
    /*
     * choose one alive server from lb.allServers or
     * lb.upServers according to key
     *
     * @return choosen Server object. NULL is returned if none
     *  server is available
     */

    //重点关注这方法
    public Server choose(Object key);

    public void setLoadBalancer(ILoadBalancer lb);

    public ILoadBalancer getLoadBalancer();
}
package com.netflix.loadbalancer;

import com.netflix.client.config.IClientConfig;
import org.slf4j.Logger;
import org.slf4j.LoggerFactory;

import java.util.List;
import java.util.concurrent.atomic.AtomicInteger;

/**
 * The most well known and basic load balancing strategy, i.e. Round Robin Rule.
 *
 * @author stonse
 * @author Nikos Michalakis
 *
 */
public class RoundRobinRule extends AbstractLoadBalancerRule {

    private AtomicInteger nextServerCyclicCounter;
    private static final boolean AVAILABLE_ONLY_SERVERS = true;
    private static final boolean ALL_SERVERS = false;

    private static Logger log=LoggerFactory.getLogger(RoundRobinRule.class);

    public RoundRobinRule() {
        nextServerCyclicCounter = new AtomicInteger(0);
    }

    public RoundRobinRule(ILoadBalancer lb) {
        this();
        setLoadBalancer(lb);
    }

    //重点关注这方法。
    public Server choose(ILoadBalancer lb, Object key) {
        if (lb == null) {
            log.warn("no load balancer");
            return null;
        }

        Server server = null;
        int count = 0;
        while (server == null && count++ < 10) {
            List<Server> reachableServers = lb.getReachableServers();
            List<Server> allServers = lb.getAllServers();
            int upCount = reachableServers.size();
            int serverCount = allServers.size();

            if ((upCount == 0) || (serverCount == 0)) {
                log.warn("No up servers available from load balancer: " + lb);
                return null;
            }

            int nextServerIndex = incrementAndGetModulo(serverCount);
            server = allServers.get(nextServerIndex);

            if (server == null) {
                /* Transient. */
                Thread.yield();
                continue;
            }

            if (server.isAlive() && (server.isReadyToServe())) {
                return (server);
            }

            // Next.
            server = null;
        }

        if (count >= 10) {
            log.warn("No available alive servers after 10 tries from load balancer: "
                    + lb);
        }
        return server;
    }

    /**
     * Inspired by the implementation of {@link AtomicInteger#incrementAndGet()}.
     *
     * @param modulo The modulo to bound the value of the counter.
     * @return The next value.
     */
    private int incrementAndGetModulo(int modulo) {
        for (;;) {
            int current = nextServerCyclicCounter.get();
            int next = (current + 1) % modulo;//求余法
            if (nextServerCyclicCounter.compareAndSet(current, next))
                return next;
        }
    }

    @Override
    public Server choose(Object key) {
        return choose(getLoadBalancer(), key);
    }

    @Override
    public void initWithNiwsConfig(IClientConfig clientConfig) {
    }
}
Ribbon之手写轮询算法
自己试着写一个类似RoundRobinRule的本地负载均衡器。
7001/7002集群启动
8001/8002微服务改造- controller
@RestController
@Slf4j
public class PaymentController{
    ...
	@GetMapping(value = "/payment/lb")
    public String getPaymentLB() {
        return serverPort;//返回服务接口
    }
    ...
}
80订单微服务改造
1.ApplicationContextConfig去掉注解@LoadBalanced,OrderMain80去掉注解@RibbonClient
import org.springframework.cloud.client.loadbalancer.LoadBalanced;
import org.springframework.context.annotation.Bean;
import org.springframework.context.annotation.Configuration;
import org.springframework.web.client.RestTemplate;

@Configuration
public class ApplicationContextConfig {

    @Bean
    //@LoadBalanced
    public RestTemplate getRestTemplate(){
        return new RestTemplate();
    }

}
创建LoadBalancer接口
import org.springframework.cloud.client.ServiceInstance;

import java.util.List;

/**
 */
public interface LoadBalancer
{
    ServiceInstance instances(List<ServiceInstance> serviceInstances);
}
MyLB
实现LoadBalancer接口
import org.springframework.cloud.client.ServiceInstance;
import org.springframework.stereotype.Component;

import java.util.List;
import java.util.concurrent.atomic.AtomicInteger;

/**
 */
@Component//需要跟主启动类同包,或者在其子孙包下。
public class MyLB implements LoadBalancer
{

    private AtomicInteger atomicInteger = new AtomicInteger(0);

    public final int getAndIncrement()
    {
        int current;
        int next;

        do {
            current = this.atomicInteger.get();
            next = current >= 2147483647 ? 0 : current + 1;
        }while(!this.atomicInteger.compareAndSet(current,next));
        System.out.println("*****第几次访问,次数next: "+next);
        return next;
    }
    //负载均衡算法:rest接口第几次请求数 % 服务器集群总数量 = 实际调用服务器位置下标  ,每次服务重启动后rest接口计数从1开始。
    @Override
    public ServiceInstance instances(List<ServiceInstance> serviceInstances)
    {
        int index = getAndIncrement() % serviceInstances.size();

        return serviceInstances.get(index);
    }
}
OrderController
import org.springframework.cloud.client.ServiceInstance;
import org.springframework.cloud.client.discovery.DiscoveryClient;
import com.lun.springcloud.lb.LoadBalancer;

@Slf4j
@RestController
public class OrderController {

    //public static final String PAYMENT_URL = "http://localhost:8001";
    public static final String PAYMENT_URL = "http://CLOUD-PAYMENT-SERVICE";

	...

    @Resource
    private LoadBalancer loadBalancer;

    @Resource
    private DiscoveryClient discoveryClient;

	...

    @GetMapping(value = "/consumer/payment/lb")
    public String getPaymentLB()
    {
        List<ServiceInstance> instances = discoveryClient.getInstances("CLOUD-PAYMENT-SERVICE");

        if(instances == null || instances.size() <= 0){
            return null;
        }

        ServiceInstance serviceInstance = loadBalancer.instances(instances);
        URI uri = serviceInstance.getUri();

        return restTemplate.getForObject(uri+"/payment/lb",String.class);

    }
}
测试 不停地刷新http://localhost/consumer/payment/lb,可以看到8001/8002交替出现。
OpenFeign
OpenFeign官方网站:网站
Feign是一个声明式WebService客户端。使用Feign能让编写Web Service客户端更加简单。它的使用方法是定义一个服务接口然后在上面添加注解。Feign也支持可拔插式的编码器和解码器。Spring Cloud对Feign进行了封装,使其支持了Spring MVC标准注解和HttpMessageConverters。Feign可以与Eureka和Ribbon组合使用以支持负载均衡。
Feign能干什么
编写Java Http客户端变得更容易。
Feign集成了Ribbon
通过feign只需要定义服务绑定接口且以声明式的方法,优雅而简单的实现了服务调用。
Feign和OpenFeign两者区别
Feign是Spring Cloud组件中的一个轻量级RESTful的HTTP服务客户端Feign内置了Ribbon,用来做客户端负载均衡,去调用服务注册中心的服务。Feign的使用方式是:使用Feign的注解定义接口,调用这个接口,就可以调用服务注册中心的服务。
OpenFeign是Spring Cloud在Feign的基础上支持了SpringMVC的注解,如@RequesMapping等等。OpenFeign的@Feignclient可以解析SpringMVc的@RequestMapping注解下的接口,并通过动态代理的方式产生实现类,实现类中做负载均衡并调用其他服务。
<dependency>
    <groupId>org.springframework.cloud</groupId>
    <artifactId>spring-cloud-starter-feign</artifactId>
</dependency>
<dependency>
    <groupId>org.springframework.cloud</groupId>
    <artifactId>spring-cloud-starter-openfeign</artifactId>
</dependency>
OpenFeign服务调用
接口+注解:微服务调用接口 + @FeignClient
新建cloud-consumer-feign-order80
POM
<?xml version="1.0" encoding="UTF-8"?>
<project xmlns="http://maven.apache.org/POM/4.0.0"
         xmlns:xsi="http://www.w3.org/2001/XMLSchema-instance"
         xsi:schemaLocation="http://maven.apache.org/POM/4.0.0 http://maven.apache.org/xsd/maven-4.0.0.xsd">
    <parent>
        <artifactId>springcloud</artifactId>
        <groupId>org.example</groupId>
        <version>1.0-SNAPSHOT</version>
    </parent>
    <modelVersion>4.0.0</modelVersion>

    <artifactId>cloud-consumer-feign-order80</artifactId>

    <properties>
        <maven.compiler.source>8</maven.compiler.source>
        <maven.compiler.target>8</maven.compiler.target>
    </properties>
    <dependencies>
        <!--openfeign-->
        <dependency>
            <groupId>org.springframework.cloud</groupId>
            <artifactId>spring-cloud-starter-openfeign</artifactId>
        </dependency>
        <!--eureka client-->
        <dependency>
            <groupId>org.springframework.cloud</groupId>
            <artifactId>spring-cloud-starter-netflix-eureka-client</artifactId>
        </dependency>
        <!-- 引入自己定义的api通用包,可以使用Payment支付Entity -->
        <dependency>
            <groupId>org.example</groupId>
            <artifactId>cloud-api-commons</artifactId>
            <version>1.0-SNAPSHOT</version>
            <scope>compile</scope>
        </dependency>
        <!--web-->
        <dependency>
            <groupId>org.springframework.boot</groupId>
            <artifactId>spring-boot-starter-web</artifactId>
        </dependency>
        <dependency>
            <groupId>org.springframework.boot</groupId>
            <artifactId>spring-boot-starter-actuator</artifactId>
        </dependency>
        <!--一般基础通用配置-->
        <dependency>
            <groupId>org.springframework.boot</groupId>
            <artifactId>spring-boot-devtools</artifactId>
            <scope>runtime</scope>
            <optional>true</optional>
        </dependency>
        <dependency>
            <groupId>org.projectlombok</groupId>
            <artifactId>lombok</artifactId>
            <optional>true</optional>
        </dependency>
        <dependency>
            <groupId>org.springframework.boot</groupId>
            <artifactId>spring-boot-starter-test</artifactId>
            <scope>test</scope>
        </dependency>
    </dependencies>

</project>
YML
server:
  port: 80

eureka:
  client:
    register-with-eureka: false
    service-url:
      defaultZone: http://eureka7001.com:7001/eureka/,http://eureka7002.com:7002/eureka/
主启动
import org.springframework.boot.SpringApplication;
import org.springframework.boot.autoconfigure.SpringBootApplication;
import org.springframework.cloud.openfeign.EnableFeignClients;

@SpringBootApplication
@EnableFeignClients
public class OrderFeignMain80 {
    public static void main(String[] args) {
        SpringApplication.run(OrderFeignMain80.class, args);
    }
}
业务类
业务逻辑接口+@FeignClient配置调用provider服务
新建PaymentFeignService接口并新增注解@FeignClient
package com.aliyun.service;

import com.aliyun.entity.CommonResult;
import com.aliyun.entity.Payment;
import org.springframework.cloud.openfeign.FeignClient;
import org.springframework.stereotype.Component;
import org.springframework.web.bind.annotation.GetMapping;
import org.springframework.web.bind.annotation.PathVariable;

/**
 * @Author:meng_xiangxin
 * @Date: 2022/12/7 21:30
 * @Description: feign 接口
 */

@Component
@FeignClient(value = "CLOUD-PAYMENT-SERVICE")
public interface PaymentFeignService {
    @GetMapping(value = "/payment/get/{id}")
    public CommonResult<Payment> getPaymentById(@PathVariable("id") Long id);


    @GetMapping(value = "/payment/feign/timeout")
    public String paymentFeignTimeout();
}
controller
package com.aliyun.controller;

import com.aliyun.entity.CommonResult;
import com.aliyun.entity.Payment;
import com.aliyun.service.PaymentFeignService;
import lombok.extern.slf4j.Slf4j;
import org.springframework.beans.factory.annotation.Value;
import org.springframework.web.bind.annotation.GetMapping;
import org.springframework.web.bind.annotation.PathVariable;
import org.springframework.web.bind.annotation.RestController;

import javax.annotation.Resource;
import java.util.concurrent.TimeUnit;

/**
 * @Author:meng_xiangxin
 * @Date: 2022/12/7 21:32
 * @Description: FeignController
 */

@RestController
@Slf4j
public class OrderFeignController {
    @Resource
    private PaymentFeignService paymentFeignService;

    @Value("${server.port}")
    private String serverPort;

    @GetMapping(value = "/consumer/payment/get/{id}")
    public CommonResult<Payment> getPaymentById(@PathVariable("id") Long id) {
        return paymentFeignService.getPaymentById(id);
    }

    @GetMapping(value = "/consumer/payment/feign/timeout")
    public String paymentFeignTimeout() {
        // OpenFeign客户端一般默认等待1秒钟
        return paymentFeignService.paymentFeignTimeout();
    }
}
这样就可以找到CLOUD-PAYMENT-SERVICE微服务下面的/payment/get/{id}这个地址。
这也就说明:
● PaymentFeignService接口+@FeignClient注解,完成Feign的包装调用
● 指明找哪个微服务上面的地址
主启动类开启Feign(增加@EnableFeignClients注解),接口上使用@FeignClient,组合使用

测试
先启动2个eureka集群7001/7002
再启动2个微服务8001/8002
启动OpenFeign启动
http://localhost/consumer/payment/get/1
Feign自带负载均衡配置项
OpenFeign超时控制
服务提供方8001/8002故意写暂停程序
@RestController
@Slf4j
public class PaymentController {

    ...

    @Value("${server.port}")
    private String serverPort;

    ...

    @GetMapping(value = "/payment/feign/timeout")
    public String paymentFeignTimeout()
    {
        // 业务逻辑处理正确,但是需要耗费3秒钟
        try {
            TimeUnit.SECONDS.sleep(3);
        } catch (InterruptedException e) {
            e.printStackTrace();
        }
        return serverPort;
    }

    ...
}
服务消费方80添加超时方法PaymentFeignService
@Component
@FeignClient(value = "CLOUD-PAYMENT-SERVICE") //作为一个Feign功能绑定的的接口
public interface PaymentFeignService {
    @GetMapping(value = "/payment/get/{id}")
    public CommonResult<Payment> getPaymentById(@PathVariable("id") Long id);

    @GetMapping("/payment/feign/timeout")
    public String paymentFeignTimeout();
}
服务消费方80添加超时方法OrderFeignController
@RestController
@Slf4j
public class OrderFeignController
{
    @Resource
    private PaymentFeignService paymentFeignService;

    ...

    @GetMapping(value = "/consumer/payment/feign/timeout")
    public String paymentFeignTimeout()
    {
        // OpenFeign客户端一般默认等待1秒钟
        return paymentFeignService.paymentFeignTimeout();
    }
}
测试:
多次刷新http://localhost/consumer/payment/feign/timeout
将会跳出错误Spring Boot默认错误页面,主要异常:feign.RetryableException:Read timed out executing GET http://CLOUD-PAYMENT-SERVCE/payment/feign/timeout。
OpenFeign默认等待1秒钟,超过后报错
YML文件里需要开启OpenFeign客户端超时控制

#设置feign客户端超时时间(OpenFeign默认支持ribbon)(单位:毫秒)
ribbon:
  #指的是建立连接所用的时间,适用于网络状况正常的情况下,两端连接所用的时间
  ReadTimeout: 5000
  #指的是建立连接后从服务器读取到可用资源所用的时间
  ConnectTimeout: 5000
3.0.3版本
feign.client.config.default.connect-timeout=5000 feign.client.config.default.read-timeout=5000
OpenFeign日志增强
日志打印功能
Feign提供了日志打印功能,我们可以通过配置来调整日志级别,从而了解Feign 中 Http请求的细节。
说白了就是对Feign接口的调用情况进行监控和输出
日志级别
NONE:默认的,不显示任何日志;
BASIC:仅记录请求方法、URL、响应状态码及执行时间;
HEADERS:除了BASIC中定义的信息之外,还有请求和响应的头信息;
FULL:除了HEADERS中定义的信息之外,还有请求和响应的正文及元数据。
配置日志bean
import feign.Logger;
import org.springframework.context.annotation.Bean;
import org.springframework.context.annotation.Configuration;

@Configuration
public class FeignConfig
{
    @Bean
    Logger.Level feignLoggerLevel()
    {
        return Logger.Level.FULL;
    }
}
YML文件里需要开启日志的Feign客户端
logging:
  level:
    # feign日志以什么级别监控哪个接口
    com.lun.springcloud.service.PaymentFeignService: debug
Hystrix
用于处理分布式系统的延迟和容错的开源库
许多依赖不可避免的会调用失败,比如超时、异常等,Hystrix能够保证在一个依赖出问题的情况下,不会导致整体服务失败,避免级联故障,以提高分布式系统的弹性。
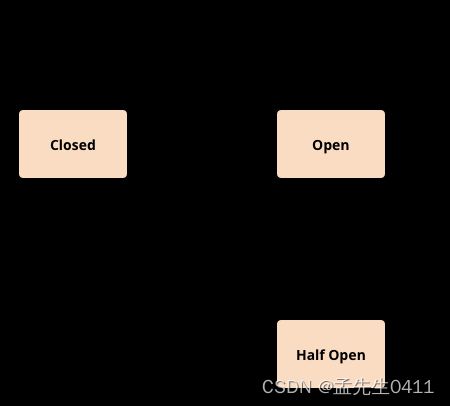
"断路器”本身是一种开关装置,当某个服务单元发生故障之后,通过断路器的故障监控(类似熔断保险丝),向调用方返回一个符合预期的、可处理的备选响应(FallBack),而不是长时间的等待或者抛出调用方无法处理的异常,这样就保证了服务调用方的线程不会被长时间、不必要地占用,从而避免了故障在分布式系统中的蔓延,乃至雪崩。
Hystrix的服务降级熔断限流概念
服务降级
服务器忙,请稍后再试,不让客户端等待并立刻返回一个友好提示,fallback
哪些情况会出发降级
程序运行导常
超时
服务熔断触发服务降级
线程池/信号量打满也会导致服务降级
服务熔断
类比保险丝达到最大服务访问后,直接拒绝访问,拉闸限电,然后调用服务降级的方法并返回友好提示。
服务的降级 -> 进而熔断 -> 恢复调用链路
服务限流
秒杀高并发等操作,严禁一窝蜂的过来拥挤,大家排队,一秒钟N个,有序进行。
Hystrix支付微服务构建
cloud-provider-hygtrix-payment8001
POM
<?xml version="1.0" encoding="UTF-8"?>
<project xmlns="http://maven.apache.org/POM/4.0.0"
         xmlns:xsi="http://www.w3.org/2001/XMLSchema-instance"
         xsi:schemaLocation="http://maven.apache.org/POM/4.0.0 http://maven.apache.org/xsd/maven-4.0.0.xsd">
    <parent>
        <artifactId>springcloud</artifactId>
        <groupId>org.example</groupId>
        <version>1.0-SNAPSHOT</version>
    </parent>
    <modelVersion>4.0.0</modelVersion>
    <artifactId>cloud-provider-hygtrix-payment8001</artifactId>
    <properties>
        <maven.compiler.source>8</maven.compiler.source>
        <maven.compiler.target>8</maven.compiler.target>
    </properties>

    <dependencies>
        <!--hystrix-->
        <dependency>
            <groupId>org.springframework.cloud</groupId>
            <artifactId>spring-cloud-starter-netflix-hystrix</artifactId>
        </dependency>
        <!--eureka client-->
        <dependency>
            <groupId>org.springframework.cloud</groupId>
            <artifactId>spring-cloud-starter-netflix-eureka-client</artifactId>
        </dependency>
        <!--web-->
        <dependency>
            <groupId>org.springframework.boot</groupId>
            <artifactId>spring-boot-starter-web</artifactId>
        </dependency>
        <dependency>
            <groupId>org.springframework.boot</groupId>
            <artifactId>spring-boot-starter-actuator</artifactId>
        </dependency>
        <dependency>
            <groupId>org.example</groupId>
            <artifactId>cloud-api-commons</artifactId>
            <version>1.0-SNAPSHOT</version>
            <scope>compile</scope>
        </dependency>
        <dependency>
            <groupId>org.springframework.boot</groupId>
            <artifactId>spring-boot-devtools</artifactId>
            <scope>runtime</scope>
            <optional>true</optional>
        </dependency>
        <dependency>
            <groupId>org.projectlombok</groupId>
            <artifactId>lombok</artifactId>
            <optional>true</optional>
        </dependency>
        <dependency>
            <groupId>org.springframework.boot</groupId>
            <artifactId>spring-boot-starter-test</artifactId>
            <scope>test</scope>
        </dependency>
    </dependencies>

</project>
YML
server:
  port: 8001

spring:
  application:
    name: cloud-provider-hystrix-payment

eureka:
  client:
    register-with-eureka: true
    fetch-registry: true
    service-url:
      #defaultZone: http://eureka7001.com:7001/eureka,http://eureka7002.com:7002/eureka
      defaultZone: http://eureka7001.com:7001/eureka
主启动
package com;

import org.springframework.boot.SpringApplication;
import org.springframework.boot.autoconfigure.SpringBootApplication;
import org.springframework.cloud.netflix.eureka.EnableEurekaClient;

/**
 * @Author:meng_xiangxin
 * @Date: 2022/12/8 15:08
 * @Description:
 */
@SpringBootApplication
@EnableEurekaClient
public class PaymentHystrixMain8001 {
    public static void main(String[] args) {
        SpringApplication.run(PaymentHystrixMain8001.class, args);
    }

}
业务类
service
package com.aliyun.service;

import org.springframework.stereotype.Service;

import java.util.concurrent.TimeUnit;

/**
 * @Author:meng_xiangxin
 * @Date: 2022/12/8 15:09
 * @Description:
 */
@Service
public class PaymentService {
    public String paymentInfo_OK(Integer id) {
        return "线程池:" + Thread.currentThread().getName() + "  paymentInfo_OK,id:  " + id + "\t" + "O(∩_∩)O哈哈~";


    }


    public String paymentInfo_TimeOut(Integer id) {
        try {
            TimeUnit.MILLISECONDS.sleep(3000);
        } catch (InterruptedException e) {
            e.printStackTrace();
        }
        return "线程池:  " + Thread.currentThread().getName() + " id:  " + id + "\t" + "O(∩_∩)O哈哈~" + "  耗时(秒): 3";
    }
}
controller
package com.aliyun.controller;

import com.aliyun.service.PaymentService;
import lombok.extern.slf4j.Slf4j;
import org.springframework.beans.factory.annotation.Value;
import org.springframework.web.bind.annotation.GetMapping;
import org.springframework.web.bind.annotation.PathVariable;
import org.springframework.web.bind.annotation.RestController;

import javax.annotation.Resource;

/**
 * @Author:meng_xiangxin
 * @Date: 2022/12/8 15:21
 * @Description:
 */
@RestController
@Slf4j
public class PaymentController {
    @Resource
    private PaymentService paymentService;

    @Value("${server.port}")
    private String serverPort;

    @GetMapping("/payment/hystrix/ok/{id}")
    public String paymentInfo_OK(@PathVariable("id") Integer id) {
        String result = paymentService.paymentInfo_OK(id);
        log.info("*****result: " + result);
        return result;

    }

    @GetMapping("/payment/hystrix/timeout/{id}")
    public String paymentInfo_TimeOut(@PathVariable("id") Integer id) {
        String result = paymentService.paymentInfo_TimeOut(id);
        log.info("*****result: " + result);
        return result;
    }
}
正常测试
启动eureka7001
启动cloud-provider-hystrix-payment8001
访问
success的方法 - http://localhost:8001/payment/hystrix/ok/1
每次调用耗费5秒钟 - http://localhost:8001/payment/hystrix/timeout/1
上述module均OK
以上述为根基平台,从正确 -> 错误 -> 降级熔断 -> 恢复。
JMeter高并发压测后卡顿
上述在非高并发情形下,还能勉强满足
Jmeter压测测试
Jmeter官网 Jmeter
开启Jmeter,来20000个并发压死8001,20000个请求都去访问paymentInfo_TimeOut服务
1.测试计划中右键添加-》线程-》线程组(线程组202102,线程数:200,线程数:100,其他参数默认)
2.刚刚新建线程组202102,右键它-》添加-》取样器-》Http请求-》基本 输入http://localhost:8001/payment/hystrix/ok/1
3.点击绿色三角形图标启动。
看演示结果:拖慢,原因:tomcat的默认的工作线程数被打满了,没有多余的线程来分解压力和处理。
Jmeter压测结论
上面还是服务提供者8001自己测试,假如此时外部的消费者80也来访问,那消费者只能干等,最终导致消费端80不满意,服务端8001直接被拖慢。
订单微服务调用支付服务出现卡顿
看热闹不嫌弃事大,80新建加入
新建 - cloud-consumer-feign-hystrix-order80
pom
<?xml version="1.0" encoding="UTF-8"?>
<project xmlns="http://maven.apache.org/POM/4.0.0"
         xmlns:xsi="http://www.w3.org/2001/XMLSchema-instance"
         xsi:schemaLocation="http://maven.apache.org/POM/4.0.0 http://maven.apache.org/xsd/maven-4.0.0.xsd">
    <parent>
        <artifactId>springcloud</artifactId>
        <groupId>org.example</groupId>
        <version>1.0-SNAPSHOT</version>
    </parent>
    <modelVersion>4.0.0</modelVersion>

    <artifactId>cloud-consumer-feign-hystrix-order80</artifactId>

    <properties>
        <maven.compiler.source>8</maven.compiler.source>
        <maven.compiler.target>8</maven.compiler.target>
    </properties>
    <dependencies>
        <!--openfeign-->
        <dependency>
            <groupId>org.springframework.cloud</groupId>
            <artifactId>spring-cloud-starter-openfeign</artifactId>
        </dependency>
        <!--hystrix-->
        <dependency>
            <groupId>org.springframework.cloud</groupId>
            <artifactId>spring-cloud-starter-netflix-hystrix</artifactId>
        </dependency>
        <!--eureka client-->
        <dependency>
            <groupId>org.springframework.cloud</groupId>
            <artifactId>spring-cloud-starter-netflix-eureka-client</artifactId>
        </dependency>
        <!-- 引入自己定义的api通用包,可以使用Payment支付Entity -->
        <dependency>
            <groupId>org.example</groupId>
            <artifactId>cloud-api-commons</artifactId>
            <version>1.0-SNAPSHOT</version>
            <scope>compile</scope>
        </dependency>
        <!--web-->
        <dependency>
            <groupId>org.springframework.boot</groupId>
            <artifactId>spring-boot-starter-web</artifactId>
        </dependency>
        <dependency>
            <groupId>org.springframework.boot</groupId>
            <artifactId>spring-boot-starter-actuator</artifactId>
        </dependency>
        <!--一般基础通用配置-->
        <dependency>
            <groupId>org.springframework.boot</groupId>
            <artifactId>spring-boot-devtools</artifactId>
            <scope>runtime</scope>
            <optional>true</optional>
        </dependency>
        <dependency>
            <groupId>org.projectlombok</groupId>
            <artifactId>lombok</artifactId>
            <optional>true</optional>
        </dependency>
        <dependency>
            <groupId>org.springframework.boot</groupId>
            <artifactId>spring-boot-starter-test</artifactId>
            <scope>test</scope>
        </dependency>
    </dependencies>

</project>
yml
server:
  port: 80

eureka:
  client:
    register-with-eureka: false
    service-url:
      defaultZone: http://eureka7001.com:7001/eureka/
主启动
import org.springframework.boot.SpringApplication;
import org.springframework.boot.autoconfigure.SpringBootApplication;
import org.springframework.cloud.netflix.hystrix.EnableHystrix;
import org.springframework.cloud.openfeign.EnableFeignClients;

/**
 */
@SpringBootApplication
@EnableFeignClients
//@EnableHystrix
public class OrderHystrixMain80
{
    public static void main(String[] args)
    {
        SpringApplication.run(OrderHystrixMain80.class,args);
    }
}
业务类
import org.springframework.cloud.openfeign.FeignClient;
import org.springframework.stereotype.Component;
import org.springframework.web.bind.annotation.GetMapping;
import org.springframework.web.bind.annotation.PathVariable;

/**
 */
@Component
@FeignClient(value = "CLOUD-PROVIDER-HYSTRIX-PAYMENT" /*,fallback = PaymentFallbackService.class*/)
public interface PaymentHystrixService
{
    @GetMapping("/payment/hystrix/ok/{id}")
    public String paymentInfo_OK(@PathVariable("id") Integer id);

    @GetMapping("/payment/hystrix/timeout/{id}")
    public String paymentInfo_TimeOut(@PathVariable("id") Integer id);
}
controller
package com.aliyun.controller;

import com.aliyun.service.PaymentHystrixService;
import lombok.extern.slf4j.Slf4j;
import org.springframework.web.bind.annotation.GetMapping;
import org.springframework.web.bind.annotation.PathVariable;
import org.springframework.web.bind.annotation.RestController;

import javax.annotation.Resource;

/**
 * @Author:meng_xiangxin
 * @Date: 2022/12/8 16:24
 * @Description:
 */
@RestController
@Slf4j
public class OrderHystirxController {
    @Resource
    private PaymentHystrixService paymentHystrixService;

    @GetMapping("/consumer/payment/hystrix/ok/{id}")
    public String paymentInfo_OK(@PathVariable("id") Integer id) {
        String result = paymentHystrixService.paymentInfo_OK(id);
        return result;
    }

    @GetMapping("/consumer/payment/hystrix/timeout/{id}")
    public String paymentInfo_TimeOut(@PathVariable("id") Integer id) {
        String result = paymentHystrixService.paymentInfo_TimeOut(id);
        return result;
    }
}
http://localhost/consumer/payment/hystrix/ok/1
降级容错解决的维度要求
超时导致服务器变慢(转圈) - 超时不再等待
出错(宕机或程序运行出错) - 出错要有兜底
解决:
对方服务(8001)超时了,调用者(80)不能一直卡死等待,必须有服务降级。
对方服务(8001)down机了,调用者(80)不能一直卡死等待,必须有服务降级。
对方服务(8001)OK,调用者(80)自己出故障或有自我要求(自己的等待时间小于服务提供者),自己处理降级。
Hystrix之服务降级支付侧fallback
降级配置 - @HystrixCommand
8001先从自身找问题
设置自身调用超时时间的峰值,峰值内可以正常运行,超过了需要有兜底的方法处埋,作服务降级fallback。
8001fallback
业务类启用 - @HystrixCommand报异常后如何处理
—旦调用服务方法失败并抛出了错误信息后,会自动调用@HystrixCommand标注好的fallbackMethod调用类中的指定方法
@Service
public class PaymentService{

    @HystrixCommand(fallbackMethod = "paymentInfo_TimeOutHandler"/*指定善后方法名*/,commandProperties = {
            @HystrixProperty(name="execution.isolation.thread.timeoutInMilliseconds",value="3000")
    })
    public String paymentInfo_TimeOut(Integer id)
    {
        //int age = 10/0;
        try { TimeUnit.MILLISECONDS.sleep(5000); } catch (InterruptedException e) { e.printStackTrace(); }
        return "线程池:  "+Thread.currentThread().getName()+" id:  "+id+"\t"+"O(∩_∩)O哈哈~"+"  耗时(秒): ";
    }

    //用来善后的方法
    public String paymentInfo_TimeOutHandler(Integer id)
    {
        return "线程池:  "+Thread.currentThread().getName()+"  8001系统繁忙或者运行报错,请稍后再试,id:  "+id+"\t"+"o(╥﹏╥)o";
    }

}
上面故意制造两种异常:
int age = 10/0,计算异常
我们能接受3秒钟,它运行5秒钟,超时异常。
当前服务不可用了,做服务降级,兜底的方案都是paymentInfo_TimeOutHandler
主启动类激活
添加新注解@EnableCircuitBreaker
import org.springframework.boot.SpringApplication;
import org.springframework.boot.autoconfigure.SpringBootApplication;
import org.springframework.cloud.client.circuitbreaker.EnableCircuitBreaker;
import org.springframework.cloud.netflix.eureka.EnableEurekaClient;

@SpringBootApplication
@EnableEurekaClient
@EnableCircuitBreaker//添加到此处
public class PaymentHystrixMain8001{
    public static void main(String[] args) {
            SpringApplication.run(PaymentHystrixMain8001.class, args);
    }
}
Hystrix之服务降级订单侧fallback
80订单微服务,也可以更好的保护自己,自己也依样画葫芦进行客户端降级保护
题外话,切记 - 我们自己配置过的热部署方式对java代码的改动明显
但对@HystrixCommand内属性的修改建议重启微服务
YML
server:
  port: 80

eureka:
  client:
    register-with-eureka: false
    service-url:
      defaultZone: http://eureka7001.com:7001/eureka/

#开启
feign:
  hystrix:
    enabled: true
主启动
package com;

import org.springframework.boot.SpringApplication;
import org.springframework.boot.autoconfigure.SpringBootApplication;
import org.springframework.cloud.client.circuitbreaker.EnableCircuitBreaker;
import org.springframework.cloud.netflix.hystrix.EnableHystrix;
import org.springframework.cloud.openfeign.EnableFeignClients;

/**
 * @Author:meng_xiangxin
 * @Date: 2022/12/8 16:22
 * @Description:
 */
@SpringBootApplication
@EnableFeignClients
//@EnableCircuitBreaker //添加此注解
@EnableHystrix
public class OrderHystrixMain80 {
    public static void main(String[] args) {
        SpringApplication.run(OrderHystrixMain80.class, args);
    }
}
业务类
 @Resource
    private PaymentHystrixService paymentHystrixService;


    @GetMapping("/consumer/payment/hystrix/timeout/{id}")
    @HystrixCommand(fallbackMethod = "paymentTimeOutFallbackMethod",commandProperties = {
            @HystrixProperty(name="execution.isolation.thread.timeoutInMilliseconds",value="1500")
    })
    public String paymentInfo_TimeOut(@PathVariable("id") Integer id) {
        //int age = 10/0;
        String result = paymentHystrixService.paymentInfo_TimeOut(id);
        return result;
    }
    //善后方法
    public String paymentTimeOutFallbackMethod(@PathVariable("id") Integer id){
        return "我是消费者80,对方支付系统繁忙请10秒钟后再试或者自己运行出错请检查自己,o(╥﹏╥)o";
    }
}
Hystrix之全局服务降级DefaultProperties
解决方法
1:1每个方法配置一个服务降级方法,技术上可以,但是不聪明
1:N除了个别重要核心业务有专属,其它普通的可以通过@DefaultProperties(defaultFallback = “”)统一跳转到统一处理结果页面
通用的和独享的各自分开,避免了代码膨胀,合理减少了代码量
package com.aliyun.controller;

import com.aliyun.service.PaymentHystrixService;
import com.netflix.hystrix.contrib.javanica.annotation.DefaultProperties;
import com.netflix.hystrix.contrib.javanica.annotation.HystrixCommand;
import lombok.extern.slf4j.Slf4j;
import org.springframework.web.bind.annotation.GetMapping;
import org.springframework.web.bind.annotation.PathVariable;
import org.springframework.web.bind.annotation.RestController;

import javax.annotation.Resource;

/**
 * @Author:meng_xiangxin
 * @Date: 2022/12/8 16:24
 * @Description:
 */
@RestController
@Slf4j
@DefaultProperties(defaultFallback = "payment_Global_FallbackMethod")
public class OrderHystirxController {
    @Resource
    private PaymentHystrixService paymentHystrixService;

    @GetMapping("/consumer/payment/hystrix/ok/{id}")
    public String paymentInfo_OK(@PathVariable("id") Integer id)
    {
        String result = paymentHystrixService.paymentInfo_OK(id);
        return result;
    }

    @GetMapping("/consumer/payment/hystrix/timeout/{id}")
//    @HystrixCommand(fallbackMethod = "paymentTimeOutFallbackMethod",commandProperties = {
//            @HystrixProperty(name="execution.isolation.thread.timeoutInMilliseconds",value="1500")
//    })
    @HystrixCommand//用全局的fallback方法
    public String paymentInfo_TimeOut(@PathVariable("id") Integer id) {
        //int age = 10/0;
        String result = paymentHystrixService.paymentInfo_TimeOut(id);
        return result;
    }
    public String paymentTimeOutFallbackMethod(@PathVariable("id") Integer id)
    {
        return "我是消费者80,对方支付系统繁忙请10秒钟后再试或者自己运行出错请检查自己,o(╥﹏╥)o";
    }

    // 下面是全局fallback方法
    public String payment_Global_FallbackMethod()
    {
        return "Global异常处理信息,请稍后再试,/(ㄒoㄒ)/~~";
    }
}
Hystrix之通配服务降级FeignFallback
目前问题2 统一和自定义的分开,代码混乱
服务降级,客户端去调用服务端,碰上服务端宕机或关闭
本次案例服务降级处理是在客户端80实现完成的,与服务端8001没有关系,只需要为Feign客户端定义的接口添加一个服务降级处理的实现类即可实现解耦
未来我们要面对的异常
运行
超时
宕机
修改cloud-consumer-feign-hystrix-order80
根据cloud-consumer-feign-hystrix-order80已经有的PaymentHystrixService接口,
重新新建一个类(AaymentFallbackService)实现该接口,统一为接口里面的方法进行异常处理
PaymentFallbackService类实现PaymentHystrixService接口
package com.aliyun.service;

import org.springframework.stereotype.Component;

/**
 * @Author:meng_xiangxin
 * @Date: 2022/12/12 10:36
 * @Description:
 */
@Component
public class PaymentFallbackService implements PaymentHystrixService {
    @Override
    public String paymentInfo_OK(Integer id) {
        return "-----PaymentFallbackService fall back-paymentInfo_OK ,o(╥﹏╥)o";
    }

    @Override
    public String paymentInfo_TimeOut(Integer id) {
        return "-----PaymentFallbackService fall back-paymentInfo_TimeOut ,o(╥﹏╥)o";
    }
}
yml
server:
  port: 80

eureka:
  client:
    register-with-eureka: false
    service-url:
      defaultZone: http://eureka7001.com:7001/eureka/

#开启
feign:
  hystrix:
    enabled: true
PaymentHystrixService接口
package com.aliyun.service;

/**
 * @Author:meng_xiangxin
 * @Date: 2022/12/8 16:23
 * @Description:
 */

import org.springframework.cloud.openfeign.FeignClient;
import org.springframework.stereotype.Component;
import org.springframework.web.bind.annotation.GetMapping;
import org.springframework.web.bind.annotation.PathVariable;

@Component
@FeignClient(value = "CLOUD-PROVIDER-HYSTRIX-PAYMENT",//
        fallback = PaymentFallbackService.class)//指定PaymentFallbackService类
public interface PaymentHystrixService {

    @GetMapping("/payment/hystrix/ok/{id}")
    public String paymentInfo_OK(@PathVariable("id") Integer id);

    @GetMapping("/payment/hystrix/timeout/{id}")
    public String paymentInfo_TimeOut(@PathVariable("id") Integer id);
}
测试
单个eureka先启动7001
PaymentHystrixMain8001启动
正常访问测试 - http://localhost/consumer/payment/hystrix/ok/1
故意关闭微服务8001
客户端自己调用提示 - 此时服务端provider已经down了,但是我们做了服务降级处理,让客户端在服务端不可用时也会获得提示信息而不会挂起耗死服务器。
Hystrix之服务熔断理论
断路器,相当于保险丝。
熔断机制概述
熔断机制是应对雪崩效应的一种微服务链路保护机制。当扇出链路的某个微服务出错不可用或者响应时间太长时,会进行服务的降级,进而熔断该节点微服务的调用,快速返回错误的响应信息。当检测到该节点微服务调用响应正常后,恢复调用链路。
![]()
Hystrix之服务熔断案例(上)
修改cloud-provider-hystrix-payment8001
PaymentService
package com.aliyun.service;

import cn.hutool.core.util.IdUtil;
import com.netflix.hystrix.contrib.javanica.annotation.HystrixCommand;
import com.netflix.hystrix.contrib.javanica.annotation.HystrixProperty;
import org.springframework.stereotype.Service;
import org.springframework.web.bind.annotation.PathVariable;

import java.util.concurrent.TimeUnit;

/**
 * @Author:meng_xiangxin
 * @Date: 2022/12/8 15:09
 * @Description:
 */
@Service
public class PaymentService {


    @HystrixCommand(fallbackMethod = "paymentInfo_TimeOutHandler"/*指定善后方法名*/, commandProperties = {
            @HystrixProperty(name = "execution.isolation.thread.timeoutInMilliseconds", value = "3000")
    })
    public String paymentInfo_OK(Integer id) {
        return "线程池:" + Thread.currentThread().getName() + "  paymentInfo_OK,id:  " + id + "\t" + "O(∩_∩)O哈哈~";


    }

    //用来善后的方法
    public String paymentInfo_TimeOutHandler(Integer id) {
        return "线程池:  " + Thread.currentThread().getName() + "  8001系统繁忙或者运行报错,请稍后再试,id:  " + id + "\t" + "o(╥﹏╥)o";
    }

    public String paymentInfo_TimeOut(Integer id) {
        try {
            TimeUnit.MILLISECONDS.sleep(3000);
        } catch (InterruptedException e) {
            e.printStackTrace();
        }
        return "线程池:  " + Thread.currentThread().getName() + " id:  " + id + "\t" + "O(∩_∩)O哈哈~" + "  耗时(秒): 3";
    }


    //=====服务熔断
    @HystrixCommand(fallbackMethod = "paymentCircuitBreaker_fallback", commandProperties = {
            @HystrixProperty(name = "circuitBreaker.enabled", value = "true"),// 是否开启断路器
            @HystrixProperty(name = "circuitBreaker.requestVolumeThreshold", value = "10"),// 请求次数
            @HystrixProperty(name = "circuitBreaker.sleepWindowInMilliseconds", value = "10000"), // 时间窗口期
            @HystrixProperty(name = "circuitBreaker.errorThresholdPercentage", value = "60"),// 失败率达到多少后跳闸
    })
    public String paymentCircuitBreaker(@PathVariable("id") Integer id) {
        if (id < 0) {
            throw new RuntimeException("******id 不能负数");
        }
        String serialNumber = IdUtil.simpleUUID();

        return Thread.currentThread().getName() + "\t" + "调用成功,流水号: " + serialNumber;
    }

    public String paymentCircuitBreaker_fallback(@PathVariable("id") Integer id) {
        return "id 不能负数,请稍后再试,/(ㄒoㄒ)/~~   id: " + id;
    }
}
HystrixCommandProperties配置类
package com.aliyun;

import org.slf4j.Logger;
import org.slf4j.LoggerFactory;

/**
 * @Author:meng_xiangxin
 * @Date: 2022/12/12 10:58
 * @Description:
 */
public abstract class HystrixCommandProperties {
    private static final Logger logger = LoggerFactory.getLogger(HystrixCommandProperties.class);

    /* defaults */
    /* package */ static final Integer default_metricsRollingStatisticalWindow = 10000;// default => statisticalWindow: 10000 = 10 seconds (and default of 10 buckets so each bucket is 1 second)
    private static final Integer default_metricsRollingStatisticalWindowBuckets = 10;// default => statisticalWindowBuckets: 10 = 10 buckets in a 10 second window so each bucket is 1 second
    private static final Integer default_circuitBreakerRequestVolumeThreshold = 20;// default => statisticalWindowVolumeThreshold: 20 requests in 10 seconds must occur before statistics matter
    private static final Integer default_circuitBreakerSleepWindowInMilliseconds = 5000;// default => sleepWindow: 5000 = 5 seconds that we will sleep before trying again after tripping the circuit
    private static final Integer default_circuitBreakerErrorThresholdPercentage = 50;// default => errorThresholdPercentage = 50 = if 50%+ of requests in 10 seconds are failures or latent then we will trip the circuit
    private static final Boolean default_circuitBreakerForceOpen = false;// default => forceCircuitOpen = false (we want to allow traffic)
    /* package */ static final Boolean default_circuitBreakerForceClosed = false;// default => ignoreErrors = false
    private static final Integer default_executionTimeoutInMilliseconds = 1000; // default => executionTimeoutInMilliseconds: 1000 = 1 second
    private static final Boolean default_executionTimeoutEnabled = true;
}
Hystrix之服务熔断案例(下)
package com.aliyun.service;

import cn.hutool.core.util.IdUtil;
import com.netflix.hystrix.contrib.javanica.annotation.HystrixCommand;
import com.netflix.hystrix.contrib.javanica.annotation.HystrixProperty;
import org.springframework.stereotype.Service;
import org.springframework.web.bind.annotation.PathVariable;

import java.util.concurrent.TimeUnit;

/**
 * @Author:meng_xiangxin
 * @Date: 2022/12/8 15:09
 * @Description:
 */
@Service
public class PaymentService {


    @HystrixCommand(fallbackMethod = "paymentInfo_TimeOutHandler"/*指定善后方法名*/, commandProperties = {
            @HystrixProperty(name = "execution.isolation.thread.timeoutInMilliseconds", value = "3000")
    })
    public String paymentInfo_OK(Integer id) {
        return "线程池:" + Thread.currentThread().getName() + "  paymentInfo_OK,id:  " + id + "\t" + "O(∩_∩)O哈哈~";


    }

    //用来善后的方法
    public String paymentInfo_TimeOutHandler(Integer id) {
        return "线程池:  " + Thread.currentThread().getName() + "  8001系统繁忙或者运行报错,请稍后再试,id:  " + id + "\t" + "o(╥﹏╥)o";
    }

    public String paymentInfo_TimeOut(Integer id) {
        try {
            TimeUnit.MILLISECONDS.sleep(3000);
        } catch (InterruptedException e) {
            e.printStackTrace();
        }
        return "线程池:  " + Thread.currentThread().getName() + " id:  " + id + "\t" + "O(∩_∩)O哈哈~" + "  耗时(秒): 3";
    }


    //=====服务熔断
    @HystrixCommand(fallbackMethod = "paymentCircuitBreaker_fallback", commandProperties = {
            @HystrixProperty(name = "circuitBreaker.enabled", value = "true"),// 是否开启断路器
            @HystrixProperty(name = "circuitBreaker.requestVolumeThreshold", value = "10"),// 请求次数
            @HystrixProperty(name = "circuitBreaker.sleepWindowInMilliseconds", value = "10000"), // 时间窗口期
            @HystrixProperty(name = "circuitBreaker.errorThresholdPercentage", value = "60"),// 失败率达到多少后跳闸
    })
    public String paymentCircuitBreaker(@PathVariable("id") Integer id) {
        if (id < 0) {
            throw new RuntimeException("******id 不能负数");
        }
        String serialNumber = IdUtil.simpleUUID();

        return Thread.currentThread().getName() + "\t" + "调用成功,流水号: " + serialNumber;
    }

    public String paymentCircuitBreaker_fallback(@PathVariable("id") Integer id) {
        return "id 不能负数,请稍后再试,/(ㄒoㄒ)/~~   id: " + id;
    }
}
测试
自测cloud-provider-hystrix-payment8001
正确 - http://localhost:8001/payment/circuit/1
错误 - http://localhost:8001/payment/circuit/-1
多次错误,再来次正确,但错误得显示
重点测试 - 多次错误,然后慢慢正确,发现刚开始不满足条件,就算是正确的访问地址也不能进行
Hystrix之服务熔断总结
熔断打开:请求不再进行调用当前服务,内部设置时钟一般为MTTR(平均故障处理时间),当打开时长达到所设时钟则进入半熔断状态。
熔断关闭:熔断关闭不会对服务进行熔断。
熔断半开:部分请求根据规则调用当前服务,如果请求成功且符合规则则认为当前服务恢复正常,关闭熔断。
断路器在什么情况下开始起作用
//=====服务熔断
@HystrixCommand(fallbackMethod = "paymentCircuitBreaker_fallback",commandProperties = {
    @HystrixProperty(name = "circuitBreaker.enabled",value = "true"),// 是否开启断路器
    @HystrixProperty(name = "circuitBreaker.requestVolumeThreshold",value = "10"),// 请求次数
    @HystrixProperty(name = "circuitBreaker.sleepWindowInMilliseconds",value = "10000"), // 时间窗口期
    @HystrixProperty(name = "circuitBreaker.errorThresholdPercentage",value = "60"),// 失败率达到多少后跳闸
})
public String paymentCircuitBreaker(@PathVariable("id") Integer id) {
    ...
}
涉及到断路器的三个重要参数:
快照时间窗:断路器确定是否打开需要统计一些请求和错误数据,而统计的时间范围就是快照时间窗,默认为最近的10秒。
请求总数阀值:在快照时间窗内,必须满足请求总数阀值才有资格熔断。默认为20,意味着在10秒内,如果该hystrix命令的调用次数不足20次7,即使所有的请求都超时或其他原因失败,断路器都不会打开。
错误百分比阀值:当请求总数在快照时间窗内超过了阀值,比如发生了30次调用,如果在这30次调用中,有15次发生了超时异常,也就是超过50%的错误百分比,在默认设定50%阀值情况下,这时候就会将断路器打开。
断路器开启或者关闭的条件
到达以下阀值,断路器将会开启:
当满足一定的阀值的时候(默认10秒内超过20个请求次数)
当失败率达到一定的时候(默认10秒内超过50%的请求失败)
当开启的时候,所有请求都不会进行转发
一段时间之后(默认是5秒),这个时候断路器是半开状态,会让其中一个请求进行转发。如果成功,断路器会关闭,若失败,继续开启。
断路器打开之后
1:再有请求调用的时候,将不会调用主逻辑,而是直接调用降级fallback。通过断路器,实现了自动地发现错误并将降级逻辑切换为主逻辑,减少响应延迟的效果。
2:原来的主逻辑要如何恢复呢?
对于这一问题,hystrix也为我们实现了自动恢复功能。
当断路器打开,对主逻辑进行熔断之后,hystrix会启动一个休眠时间窗,在这个时间窗内,降级逻辑是临时的成为主逻辑,当休眠时间窗到期,断路器将进入半开状态,释放一次请求到原来的主逻辑上,如果此次请求正常返回,那么断路器将继续闭合,主逻辑恢复,如果这次请求依然有问题,断路器继续进入打开状态,休眠时间窗重新计时。
All配置
@HystrixCommand(fallbackMethod = "fallbackMethod",
                groupKey = "strGroupCommand",
                commandKey = "strCommand",
                threadPoolKey = "strThreadPool",

                commandProperties = {
                    // 设置隔离策略,THREAD 表示线程池 SEMAPHORE:信号池隔离
                    @HystrixProperty(name = "execution.isolation.strategy", value = "THREAD"),
                    // 当隔离策略选择信号池隔离的时候,用来设置信号池的大小(最大并发数)
                    @HystrixProperty(name = "execution.isolation.semaphore.maxConcurrentRequests", value = "10"),
                    // 配置命令执行的超时时间
                    @HystrixProperty(name = "execution.isolation.thread.timeoutinMilliseconds", value = "10"),
                    // 是否启用超时时间
                    @HystrixProperty(name = "execution.timeout.enabled", value = "true"),
                    // 执行超时的时候是否中断
                    @HystrixProperty(name = "execution.isolation.thread.interruptOnTimeout", value = "true"),

                    // 执行被取消的时候是否中断
                    @HystrixProperty(name = "execution.isolation.thread.interruptOnCancel", value = "true"),
                    // 允许回调方法执行的最大并发数
                    @HystrixProperty(name = "fallback.isolation.semaphore.maxConcurrentRequests", value = "10"),
                    // 服务降级是否启用,是否执行回调函数
                    @HystrixProperty(name = "fallback.enabled", value = "true"),
                    // 是否启用断路器
                    @HystrixProperty(name = "circuitBreaker.enabled", value = "true"),
                    // 该属性用来设置在滚动时间窗中,断路器熔断的最小请求数。例如,默认该值为 20 的时候,如果滚动时间窗(默认10秒)内仅收到了19个请求, 即使这19个请求都失败了,断路器也不会打开。
                    @HystrixProperty(name = "circuitBreaker.requestVolumeThreshold", value = "20"),

                    // 该属性用来设置在滚动时间窗中,表示在滚动时间窗中,在请求数量超过 circuitBreaker.requestVolumeThreshold 的情况下,如果错误请求数的百分比超过50, 就把断路器设置为 "打开" 状态,否则就设置为 "关闭" 状态。
                    @HystrixProperty(name = "circuitBreaker.errorThresholdPercentage", value = "50"),
                    // 该属性用来设置当断路器打开之后的休眠时间窗。 休眠时间窗结束之后,会将断路器置为 "半开" 状态,尝试熔断的请求命令,如果依然失败就将断路器继续设置为 "打开" 状态,如果成功就设置为 "关闭" 状态。
                    @HystrixProperty(name = "circuitBreaker.sleepWindowinMilliseconds", value = "5000"),
                    // 断路器强制打开
                    @HystrixProperty(name = "circuitBreaker.forceOpen", value = "false"),
                    // 断路器强制关闭
                    @HystrixProperty(name = "circuitBreaker.forceClosed", value = "false"),
                    // 滚动时间窗设置,该时间用于断路器判断健康度时需要收集信息的持续时间
                    @HystrixProperty(name = "metrics.rollingStats.timeinMilliseconds", value = "10000"),

                    // 该属性用来设置滚动时间窗统计指标信息时划分"桶"的数量,断路器在收集指标信息的时候会根据设置的时间窗长度拆分成多个 "桶" 来累计各度量值,每个"桶"记录了一段时间内的采集指标。
                    // 比如 10 秒内拆分成 10 个"桶"收集这样,所以 timeinMilliseconds 必须能被 numBuckets 整除。否则会抛异常
                    @HystrixProperty(name = "metrics.rollingStats.numBuckets", value = "10"),
                    // 该属性用来设置对命令执行的延迟是否使用百分位数来跟踪和计算。如果设置为 false, 那么所有的概要统计都将返回 -1。
                    @HystrixProperty(name = "metrics.rollingPercentile.enabled", value = "false"),
                    // 该属性用来设置百分位统计的滚动窗口的持续时间,单位为毫秒。
                    @HystrixProperty(name = "metrics.rollingPercentile.timeInMilliseconds", value = "60000"),
                    // 该属性用来设置百分位统计滚动窗口中使用 “ 桶 ”的数量。
                    @HystrixProperty(name = "metrics.rollingPercentile.numBuckets", value = "60000"),
                    // 该属性用来设置在执行过程中每个 “桶” 中保留的最大执行次数。如果在滚动时间窗内发生超过该设定值的执行次数,
                    // 就从最初的位置开始重写。例如,将该值设置为100, 滚动窗口为10秒,若在10秒内一个 “桶 ”中发生了500次执行,
                    // 那么该 “桶” 中只保留 最后的100次执行的统计。另外,增加该值的大小将会增加内存量的消耗,并增加排序百分位数所需的计算时间。
                    @HystrixProperty(name = "metrics.rollingPercentile.bucketSize", value = "100"),

                    // 该属性用来设置采集影响断路器状态的健康快照(请求的成功、 错误百分比)的间隔等待时间。
                    @HystrixProperty(name = "metrics.healthSnapshot.intervalinMilliseconds", value = "500"),
                    // 是否开启请求缓存
                    @HystrixProperty(name = "requestCache.enabled", value = "true"),
                    // HystrixCommand的执行和事件是否打印日志到 HystrixRequestLog 中
                    @HystrixProperty(name = "requestLog.enabled", value = "true"),

                },
                threadPoolProperties = {
                    // 该参数用来设置执行命令线程池的核心线程数,该值也就是命令执行的最大并发量
                    @HystrixProperty(name = "coreSize", value = "10"),
                    // 该参数用来设置线程池的最大队列大小。当设置为 -1 时,线程池将使用 SynchronousQueue 实现的队列,否则将使用 LinkedBlockingQueue 实现的队列。
                    @HystrixProperty(name = "maxQueueSize", value = "-1"),
                    // 该参数用来为队列设置拒绝阈值。 通过该参数, 即使队列没有达到最大值也能拒绝请求。
                    // 该参数主要是对 LinkedBlockingQueue 队列的补充,因为 LinkedBlockingQueue 队列不能动态修改它的对象大小,而通过该属性就可以调整拒绝请求的队列大小了。
                    @HystrixProperty(name = "queueSizeRejectionThreshold", value = "5"),
                }
               )
public String doSomething() {
	...
}
Hystrix工作流程最后总结
服务限流 - 后面高级篇讲解alibaba的Sentinel说明
步骤说明

创建HystrixCommand (用在依赖的服务返回单个操作结果的时候)或HystrixObserableCommand(用在依赖的服务返回多个操作结果的时候)对象。
命令执行。
其中 HystrixCommand实现了下面前两种执行方式
execute():同步执行,从依赖的服务返回一个单一的结果对象或是在发生错误的时候抛出异常。
2. queue():异步执行,直接返回一个Future对象,其中包含了服务执行结束时要返回的单一结果对象。
而 HystrixObservableCommand实现了后两种执行方式:
obseve():返回Observable对象,它代表了操作的多个统
果,它是一个Hot Observable (不论“事件源”是否有“订阅者”,都会在创建后对事件进行发布,所以对于Hot Observable的每一个“订阅者”都有可能是从“事件源”的中途开始的,并可能只是看到了整个操作的局部过程)。
2. toObservable():同样会返回Observable对象,也代表了操作的多个结果,但它返回的是一个Cold Observable(没有“订间者”的时候并不会发布事件,而是进行等待,直到有“订阅者"之后才发布事件,所以对于Cold Observable 的订阅者,它可以保证从一开始看到整个操作的全部过程)。
若当前命令的请求缓存功能是被启用的,并且该命令缓存命中,那么缓存的结果会立即以Observable对象的形式返回。
检查断路器是否为打开状态。如果断路器是打开的,那么Hystrix不会执行命令,而是转接到fallback处理逻辑(第8步);如果断路器是关闭的,检查是否有可用资源来执行命令(第5步)。
线程池/请求队列信号量是否占满。如果命令依赖服务的专有线程地和请求队列,或者信号量(不使用线程的时候)已经被占满,那么Hystrix也不会执行命令,而是转接到fallback处理理辑(第8步) 。
Hystrix会根据我们编写的方法来决定采取什么样的方式去请求依赖服务。
HystrixCommand.run():返回一个单一的结果,或者抛出异常。
HystrixObservableCommand.construct():返回一个Observable对象来发射多个结果,或通过onError发送错误通知。
Hystix会将“成功”、“失败”、“拒绝”、“超时” 等信息报告给断路器,而断路器会维护一组计数器来统计这些数据。断路器会使用这些统计数据来决定是否要将断路器打开,来对某个依赖服务的请求进行"熔断/短路"。
当命令执行失败的时候,Hystix会进入fallback尝试回退处理,我们通常也称波操作为“服务降级”。而能够引起服务降级处理的情况有下面几种:
第4步∶当前命令处于“熔断/短路”状态,断洛器是打开的时候。
第5步∶当前命令的钱程池、请求队列或者信号量被占满的时候。
第6步∶HystrixObsevableCommand.construct()或HytrixCommand.run()抛出异常的时候。
当Hystrix命令执行成功之后,它会将处理结果直接返回或是以Observable的形式返回。
tips:如果我们没有为命令实现降级逻辑或者在降级处理逻辑中抛出了异常,Hystrix依然会运回一个Obsevable对象,但是它不会发射任结果数惯,而是通过onError方法通知命令立即中断请求,并通过onError方法将引起命令失败的异常发送给调用者。
Hystrix图形化Dashboard搭建
概述
除了隔离依赖服务的调用以外,Hystrix还提供了准实时的调用监控(Hystrix Dashboard),Hystrix会持续地记录所有通过Hystrix发起的请求的执行信息,并以统计报表和图形的形式展示给用户,包括每秒执行多少请求多少成功,多少失败等。
Netflix通过hystrix-metrics-event-stream项目实现了对以上指标的监控。Spring Cloud也提供了Hystrix Dashboard的整合,对监控内容转化成可视化界面。
仪表盘
新建cloud-consumer-hystrix-dashboard9001
POM
<?xml version="1.0" encoding="UTF-8"?>
<project xmlns="http://maven.apache.org/POM/4.0.0"
         xmlns:xsi="http://www.w3.org/2001/XMLSchema-instance"
         xsi:schemaLocation="http://maven.apache.org/POM/4.0.0 http://maven.apache.org/xsd/maven-4.0.0.xsd">
    <parent>
        <artifactId>springcloud</artifactId>
        <groupId>org.example</groupId>
        <version>1.0-SNAPSHOT</version>
    </parent>
    <modelVersion>4.0.0</modelVersion>

    <artifactId>cloud-consumer-hystrix-dashboard9001</artifactId>

    <properties>
        <maven.compiler.source>8</maven.compiler.source>
        <maven.compiler.target>8</maven.compiler.target>
    </properties>


    <dependencies>
        <dependency>
            <groupId>org.springframework.cloud</groupId>
            <artifactId>spring-cloud-starter-netflix-hystrix-dashboard</artifactId>
        </dependency>
        <dependency>
            <groupId>org.springframework.boot</groupId>
            <artifactId>spring-boot-starter-actuator</artifactId>
        </dependency>

        <dependency>
            <groupId>org.springframework.boot</groupId>
            <artifactId>spring-boot-devtools</artifactId>
            <scope>runtime</scope>
            <optional>true</optional>
        </dependency>
        <dependency>
            <groupId>org.projectlombok</groupId>
            <artifactId>lombok</artifactId>
            <optional>true</optional>
        </dependency>
        <dependency>
            <groupId>org.springframework.boot</groupId>
            <artifactId>spring-boot-starter-test</artifactId>
            <scope>test</scope>
        </dependency>
    </dependencies>


</project>
YML
server:
  port: 9001
HystrixDashboardMain9001+新注解@EnableHystrixDashboard
import org.springframework.boot.SpringApplication;
import org.springframework.boot.autoconfigure.SpringBootApplication;
import org.springframework.cloud.netflix.hystrix.dashboard.EnableHystrixDashboard;

@SpringBootApplication
@EnableHystrixDashboard
public class HystrixDashboardMain9001
{
    public static void main(String[] args) {
        SpringApplication.run(HystrixDashboardMain9001.class, args);
    }
}
所有Provider微服务提供类(8001/8002/8003)都需要监控依赖配置
<dependency>
    <groupId>org.springframework.boot</groupId>
    <artifactId>spring-boot-starter-actuator</artifactId>
</dependency>
启动cloud-consumer-hystrix-dashboard9001该微服务后续将监控微服务8001
浏览器输入http://localhost:9001/hystrix
Hystrix图形化Dashboard监控实战
cloud-provider-hystrix-payment8001
注意:新版本Hystrix需要在主启动类PaymentHystrixMain8001中指定监控路径
import com.netflix.hystrix.contrib.metrics.eventstream.HystrixMetricsStreamServlet;
import org.springframework.boot.SpringApplication;
import org.springframework.boot.autoconfigure.SpringBootApplication;
import org.springframework.boot.web.servlet.ServletRegistrationBean;
import org.springframework.cloud.client.circuitbreaker.EnableCircuitBreaker;
import org.springframework.cloud.netflix.eureka.EnableEurekaClient;
import org.springframework.context.annotation.Bean;

@SpringBootApplication
@EnableEurekaClient
@EnableCircuitBreaker
public class PaymentHystrixMain8001
{
    public static void main(String[] args) {
            SpringApplication.run(PaymentHystrixMain8001.class, args);
    }


    /**
     *此配置是为了服务监控而配置,与服务容错本身无关,springcloud升级后的坑
     *ServletRegistrationBean因为springboot的默认路径不是"/hystrix.stream",
     *只要在自己的项目里配置上下面的servlet就可以了
     *否则,Unable to connect to Command Metric Stream 404
     */
    @Bean
    public ServletRegistrationBean getServlet() {
        HystrixMetricsStreamServlet streamServlet = new HystrixMetricsStreamServlet();
        ServletRegistrationBean registrationBean = new ServletRegistrationBean(streamServlet);
        registrationBean.setLoadOnStartup(1);
        registrationBean.addUrlMappings("/hystrix.stream");
        registrationBean.setName("HystrixMetricsStreamServlet");
        return registrationBean;
    }
}
监控测试
启动1个eureka
启动8001,9001
观察监控窗口
9001监控8001 - 填写监控地址 - http://localhost:8001/hystrix.stream 到 http://localhost:9001/hystrix页面的输入框。
测试地址
http://localhost:8001/payment/circuit/1
http://localhost:8001/payment/circuit/-1
测试通过
先访问正确地址,再访问错误地址,再正确地址,会发现图示断路器都是慢慢放开的。
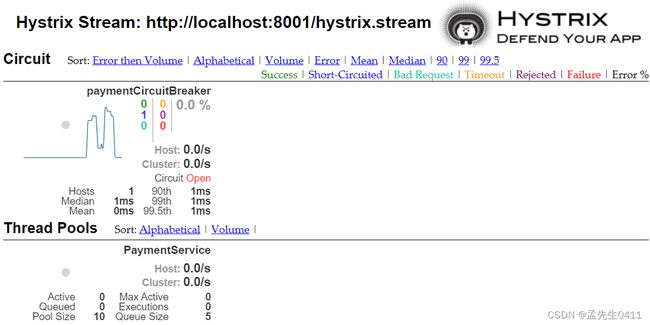

1圈
实心圆:共有两种含义。它通过颜色的变化代表了实例的健康程度,它的健康度从绿色<黄色<橙色<红色递减。
该实心圆除了颜色的变化之外,它的大小也会根据实例的请求流量发生变化,流量越大该实心圆就越大。所以通过该实心圆的展示,就可以在大量的实例中快速的发现故障实例和高压力实例。
1线
曲线:用来记录2分钟内流量的相对变化,可以通过它来观察到流量的上升和下降趋势。
整图说明
GateWay和Zuul课程说明
Zuul开发人员窝里斗,实属明日黄花
重点关注Gate Way
GateWay是什么
GateWay 官网
概述
Cloud全家桶中有个很重要的组件就是网关,在1.x版本中都是采用的Zuul网关;
但在2.x版本中,zuul的升级一直跳票,SpringCloud最后自己研发了一个网关替代Zuul,那就是SpringCloud Gateway—句话:gateway是原zuul1.x版的替代

Gateway是在Spring生态系统之上构建的API网关服务,基于Spring 5,Spring Boot 2和Project Reactor等技术。
Gateway旨在提供一种简单而有效的方式来对API进行路由,以及提供一些强大的过滤器功能,例如:熔断、限流、重试等。
SpringCloud Gateway是Spring Cloud的一个全新项目,基于Spring 5.0+Spring Boot 2.0和Project Reactor等技术开发的网关,它旨在为微服务架构提供—种简单有效的统一的API路由管理方式。
SpringCloud Gateway作为Spring Cloud 生态系统中的网关,目标是替代Zuul,在Spring Cloud 2.0以上版本中,没有对新版本的Zul 2.0以上最新高性能版本进行集成,仍然还是使用的Zuul 1.x非Reactor模式的老版本。而为了提升网关的性能,SpringCloud Gateway是基于WebFlux框架实现的,而WebFlux框架底层则使用了高性能的Reactor模式通信框架Netty。
Spring Cloud Gateway的目标提供统一的路由方式且基于 Filter链的方式提供了网关基本的功能,例如:安全,监控/指标,和限流。
作用:
方向代理
鉴权
流量控制
熔断
日志监控
…
GateWay非阻塞异步模型
有Zuul了怎么又出来Gateway?我们为什么选择Gateway?
netflix不太靠谱,zuul2.0一直跳票,迟迟不发布。
一方面因为Zuul1.0已经进入了维护阶段,而且Gateway是SpringCloud团队研发的,是亲儿子产品,值得信赖。而且很多功能Zuul都没有用起来也非常的简单便捷。
Gateway是基于异步非阻塞模型上进行开发的,性能方面不需要担心。虽然Netflix早就发布了最新的Zuul 2.x,但Spring Cloud貌似没有整合计划。而且Netflix相关组件都宣布进入维护期;不知前景如何?
多方面综合考虑Gateway是很理想的网关选择。
SpringCloud Gateway具有如下特性:
基于Spring Framework 5,Project Reactor和Spring Boot 2.0进行构建;
动态路由:能够匹配任何请求属性;
可以对路由指定Predicate (断言)和Filter(过滤器);
集成Hystrix的断路器功能;
集成Spring Cloud 服务发现功能;
易于编写的Predicate (断言)和Filter (过滤器);
请求限流功能;
支持路径重写。
SpringCloud Gateway与Zuul的区别
在SpringCloud Finchley正式版之前,Spring Cloud推荐的网关是Netflix提供的Zuul。
Zuul 1.x,是一个基于阻塞I/O的API Gateway。
Zuul 1.x基于Servlet 2.5使用阻塞架构它不支持任何长连接(如WebSocket)Zuul的设计模式和Nginx较像,每次I/О操作都是从工作线程中选择一个执行,请求线程被阻塞到工作线程完成,但是差别是Nginx用C++实现,Zuul用Java实现,而JVM本身会有第-次加载较慢的情况,使得Zuul的性能相对较差。
Zuul 2.x理念更先进,想基于Netty非阻塞和支持长连接,但SpringCloud目前还没有整合。Zuul .x的性能较Zuul 1.x有较大提升。在性能方面,根据官方提供的基准测试,Spring Cloud Gateway的RPS(每秒请求数)是Zuul的1.6倍。
Spring Cloud Gateway建立在Spring Framework 5、Project Reactor和Spring Boot2之上,使用非阻塞API。
Spring Cloud Gateway还支持WebSocket,并且与Spring紧密集成拥有更好的开发体验
Zuul1.x模型
Springcloud中所集成的Zuul版本,采用的是Tomcat容器,使用的是传统的Serviet IO处理模型。
Servlet的生命周期?servlet由servlet container进行生命周期管理。
container启动时构造servlet对象并调用servlet init()进行初始化;
container运行时接受请求,并为每个请求分配一个线程(一般从线程池中获取空闲线程)然后调用service);
container关闭时调用servlet destory()销毁servlet。

上述模式的缺点:
Servlet是一个简单的网络IO模型,当请求进入Servlet container时,Servlet container就会为其绑定一个线程,在并发不高的场景下这种模型是适用的。但是一旦高并发(如抽风用Jmeter压),线程数量就会上涨,而线程资源代价是昂贵的(上线文切换,内存消耗大)严重影响请求的处理时间。在一些简单业务场景下,不希望为每个request分配一个线程,只需要1个或几个线程就能应对极大并发的请求,这种业务场景下servlet模型没有优势。
所以Zuul 1.X是基于servlet之上的一个阻塞式处理模型,即Spring实现了处理所有request请求的一个servlet (DispatcherServlet)并由该servlet阻塞式处理处理。所以SpringCloud Zuul无法摆脱servlet模型的弊端。
Gateway模型
WebFlux是什么?
官网
传统的Web框架,比如说: Struts2,SpringMVC等都是基于Servlet APl与Servlet容器基础之上运行的。
但是在Servlet3.1之后有了异步非阻塞的支持。而WebFlux是一个典型非阻塞异步的框架,它的核心是基于Reactor的相关API实现的。相对于传统的web框架来说,它可以运行在诸如Netty,Undertow及支持Servlet3.1的容器上。非阻塞式+函数式编程(Spring 5必须让你使用Java 8)。
Spring WebFlux是Spring 5.0 引入的新的响应式框架,区别于Spring MVC,它不需要依赖Servlet APl,它是完全异步非阻塞的,并且基于Reactor来实现响应式流规范。
Spring Cloud Gateway requires the Netty runtime provided by Spring Boot and Spring Webflux. It does not work in a traditional Servlet Container or when built as a WAR.link
Gateway工作流程
三大核心概念
Route(路由) - 路由是构建网关的基本模块,它由ID,目标URI,一系列的断言和过滤器组成,如断言为true则匹配该路由;
Predicate(断言) - 参考的是Java8的java.util.function.Predicate,开发人员可以匹配HTTP请求中的所有内容(例如请求头或请求参数),如果请求与断言相匹配则进行路由;
Filter(过滤) - 指的是Spring框架中GatewayFilter的实例,使用过滤器,可以在请求被路由前或者之后对请求进行修改。

web请求,通过一些匹配条件,定位到真正的服务节点。并在这个转发过程的前后,进行一些精细化控制。
predicate就是我们的匹配条件;而fliter,就可以理解为一个无所不能的拦截器。有了这两个元素,再加上目标uri,就可以实现一个具体的路由了
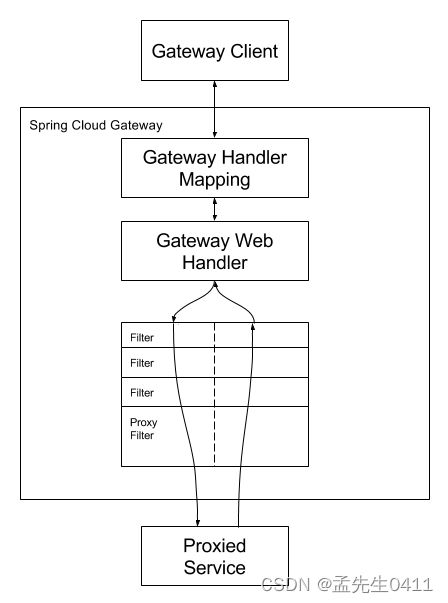
客户端向Spring Cloud Gateway发出请求。然后在Gateway Handler Mapping 中找到与请求相匹配的路由,将其发送到GatewayWeb Handler。
Handler再通过指定的过滤器链来将请求发送到我们实际的服务执行业务逻辑,然后返回。
过滤器之间用虚线分开是因为过滤器可能会在发送代理请求之前(“pre”)或之后(“post")执行业务逻辑。
Filter在“pre”类型的过滤器可以做参数校验、权限校验、流量监控、日志输出、协议转换等,在“post”类型的过滤器中可以做响应内容、响应头的修改,日志的输出,流量监控等有着非常重要的作用。
核心逻辑:路由转发 + 执行过滤器链。
Gateway9527搭建
新建Module - cloud-gateway-gateway9527
POM
<?xml version="1.0" encoding="UTF-8"?>
<project xmlns="http://maven.apache.org/POM/4.0.0"
         xmlns:xsi="http://www.w3.org/2001/XMLSchema-instance"
         xsi:schemaLocation="http://maven.apache.org/POM/4.0.0 http://maven.apache.org/xsd/maven-4.0.0.xsd">
    <parent>
        <artifactId>springcloud</artifactId>
        <groupId>org.example</groupId>
        <version>1.0-SNAPSHOT</version>
    </parent>
    <modelVersion>4.0.0</modelVersion>

    <artifactId>cloud-gateway-gateway9527</artifactId>

    <properties>
        <maven.compiler.source>8</maven.compiler.source>
        <maven.compiler.target>8</maven.compiler.target>
    </properties>


    <dependencies>
        <!--gateway-->
        <dependency>
            <groupId>org.springframework.cloud</groupId>
            <artifactId>spring-cloud-starter-gateway</artifactId>
        </dependency>
        <!--eureka-client-->
        <dependency>
            <groupId>org.springframework.cloud</groupId>
            <artifactId>spring-cloud-starter-netflix-eureka-client</artifactId>
        </dependency>
        <!-- 引入自己定义的api通用包,可以使用Payment支付Entity -->
        <dependency>
            <groupId>org.example</groupId>
            <artifactId>cloud-api-commons</artifactId>
            <version>1.0-SNAPSHOT</version>
            <scope>compile</scope>
        </dependency>
        <!--一般基础配置类-->
        <dependency>
            <groupId>org.springframework.boot</groupId>
            <artifactId>spring-boot-devtools</artifactId>
            <scope>runtime</scope>
            <optional>true</optional>
        </dependency>
        <dependency>
            <groupId>org.projectlombok</groupId>
            <artifactId>lombok</artifactId>
            <optional>true</optional>
        </dependency>
        <dependency>
            <groupId>org.springframework.boot</groupId>
            <artifactId>spring-boot-starter-test</artifactId>
            <scope>test</scope>
        </dependency>
    </dependencies>

</project>
YML
server:
  port: 9527

spring:
  application:
    name: cloud-getway

  #############################新增网关配置###########################
  cloud:
    gateway:
      routes:
        - id: payment_routh #payment_route    #路由的ID,没有固定规则但要求唯一,建议配合服务名
          uri: http://localhost:8001          #匹配后提供服务的路由地址
          #uri: lb://cloud-payment-service #匹配后提供服务的路由地址
          predicates:
            - Path=/payment/get/**         # 断言,路径相匹配的进行路由
#        - id: payment_routh2 #payment_route    #路由的ID,没有固定规则但要求唯一,建议配合服务名
#          uri: http://localhost:8001          #匹配后提供服务的路由地址
#          #uri: lb://cloud-payment-service #匹配后提供服务的路由地址
#          predicates:
#            - Path=/payment/lb/**         # 断言,路径相匹配的进行路由
eureka:
  instance:
    hostname: cloud-gateway-service
  client: #服务提供者provider注册进eureka服务列表内
    register-with-eureka: true
    fetch-registry: true
    service-url:
      defaultZone: http://eureka7001.com:7001/eureka
业务类
无
主启动类
import org.springframework.boot.SpringApplication;
import org.springframework.boot.autoconfigure.SpringBootApplication;
import org.springframework.cloud.netflix.eureka.EnableEurekaClient;


@SpringBootApplication
@EnableEurekaClient
public class GateWayMain9527
{
    public static void main(String[] args) {
        SpringApplication.run(GateWayMain9527.class, args);
    }
}
Gateaway9527网关如何做路由映射呢?
我们以前访问cloud-provider-payment8001中的controller方法,通过:
localhost:8001/payment/get/id 和 localhost:8001/payment/lb 就能访问到相应的方法。
现在我们不想暴露8001端口号,希望在8001外面套一层9527
YML新增网关配置
server:
  port: 9527

spring:
  application:
    name: cloud-gateway
#############################新增网关配置###########################
  cloud:
    gateway:
      routes:
        - id: payment_routh #payment_route    #路由的ID,没有固定规则但要求唯一,建议配合服务名
          uri: http://localhost:8001          #匹配后提供服务的路由地址
          #uri: lb://cloud-payment-service #匹配后提供服务的路由地址
          predicates:
            - Path=/payment/get/**         # 断言,路径相匹配的进行路由

        - id: payment_routh2 #payment_route    #路由的ID,没有固定规则但要求唯一,建议配合服务名
          uri: http://localhost:8001          #匹配后提供服务的路由地址
          #uri: lb://cloud-payment-service #匹配后提供服务的路由地址
          predicates:
            - Path=/payment/lb/**         # 断言,路径相匹配的进行路由
####################################################################

eureka:
  instance:
    hostname: cloud-gateway-service
  client: #服务提供者provider注册进eureka服务列表内
    service-url:
      register-with-eureka: true
      fetch-registry: true
      defaultZone: http://eureka7001.com:7001/eureka
● routes:可以为controller中所有的rest接口做路由
● uri + predicate拼接:http://localhost:8001/payment/get/** 就是具体的接口请求路径。其中uri是需要通过localhost:9527 映射的地址,即访问localhost:9527会转发到 localhost:8001
● predicate:断言http://localhost:8001下面有一个/payment/get/这样的地址。如果找到了这个地址就返回true,可以用9527端口访问,进行端口的适配;找不到就返回false,不能用9527这个端口适配。慢慢的就不再暴露微服务本来的接口8001,转而使用统一网关9527。
/get/ 中**表示通配符,因为这里是一个不确定的参数:/get/{id}
这样就为这两个方法做了路由匹配

测试
启动7001、7002、cloud-provider-payment8001、9527
踩坑提示:gateway不需要spring-boot-starter-web依赖,否在会报错;原因是gateway底层使用的是webflux会与web冲突。
eureka集群中注册了9527和payment8001
访问说明
添加网关前 - http://localhost:8001/payment/get/1
添加网关后 - http://localhost:9527/payment/get/1
两者访问成功,返回相同结果
Gateway配置路由的两种方式
在yml中配置——之前的方式
代码中注入RouteLocator的Bean
官网案例:
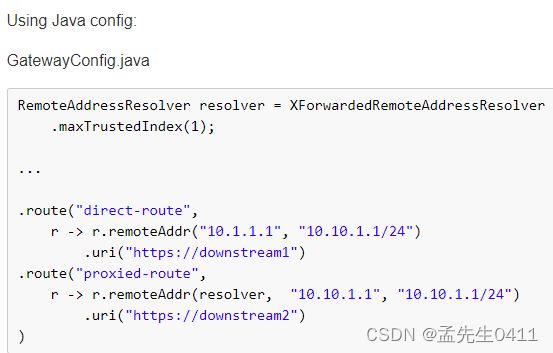
业务需求:
通过9527网关访问到百度新闻的网址;http://news.baidu.com/guonei
在config包下创建一个配置类 路由规则是:我现在访问/guonei,将会转发到http://news.baidu.com/guonei
package com.aliyun;

import org.springframework.cloud.gateway.route.RouteLocator;
import org.springframework.cloud.gateway.route.builder.RouteLocatorBuilder;
import org.springframework.context.annotation.Bean;
import org.springframework.context.annotation.Configuration;

/**
 * @Author:meng_xiangxin
 * @Date: 2022/12/12 14:52
 * @Description: 创建网关、路由
 */
@Configuration
public class GatewayConfig {
    /**
     * 配置了一个id为path_route_atguigu的路由规则,
     * 当访问地址 http://localhost:9527/guonei时会自动转发到地址:http://news.baidu.com/guonei
     */
    @Bean
    public RouteLocator customRouteLocator(RouteLocatorBuilder routeLocatorBuilder) {
        //构建一个路由器,这个routes相当于yml配置文件中的routes
        RouteLocatorBuilder.Builder routes = routeLocatorBuilder.routes();
        //路由器的id是:path_route_aliyun,规则是我现在访问/guonei,将会转发到http://news.baidu.com/guonei
        // 这里的id、path、uri都可以跟yml中的配置对上
        // 通过localhost:9527 映射 http://news.baidu.com
        routes.route("path_route_aliyun", r -> r.path("/guonei").uri("http://news.baidu.com")).build();
        return routes.build();
    }
}
与之对应的yml:
  cloud:
    gateway:
      routes:
        - id: payment_routh #payment_route    #路由的ID,没有固定规则但要求唯一,建议配合服务名
          uri: http://localhost:8001          #匹配后提供服务的路由地址
          #uri: lb://cloud-payment-service #匹配后提供服务的路由地址
          predicates:
            - Path=/payment/get/**         # 断言,路径相匹配的进行路由
        - id: payment_routh2 #payment_route    #路由的ID,没有固定规则但要求唯一,建议配合服务名
          uri: http://localhost:8001          #匹配后提供服务的路由地址
          #uri: lb://cloud-payment-service #匹配后提供服务的路由地址
          predicates:
            - Path=/payment/lb/**         # 断言,路径相匹配的进行路由
        - id: Path_route_aliyun  # 新的路由规则localhost:9527/guonei->http://news.baidu.com/guonei
          uri: http://news.baidu.com
          predicates:
            - Path=/guonei
测试
访问localhost:9527/guonei
成功!

进阶
目前面临的问题
一个路由规则仅仅只对应一个接口方法,即我们将请求地址写死了。 试想一下:在分布式集群的情况下,会有多少个主机,多少个端口,多少个接口? 难道我们要为每一个接口都定义一个路由规则吗?
解决思路:我们前面用80调用8001和8002中的接口时,只认微服务名。访问接口时没有指定哪个端口。 那么我们在定义路由规则时也可以通过微服务名实现动态路由和负载均衡。
修改9527实现动态路由
默认情况下Gateway会根据注册中心注册的服务列表,以注册中心上微服务名为路径创建动态路由进行转发,从而实现动态路由的功能。
pom:
//之前已经添加过了
<dependency>
    <groupId>org.springframework.cloud</groupId>
    <artifactId>spring-cloud-starter-netflix-eureka-client</artifactId>
</dependency>
yml:spring.cloud.gateway.discovery.locator.enabled:true;
在添加uri的时候,开始是lb://微服务名
spring:
  application:
    name: cloud-gateway
  cloud:
    gateway:
      discovery:
        locator:
          enabled: true #开启从注册中心动态创建路由的功能,利用微服务名进行路由
      routes:
        - id: payment_routh #payment_route    #路由的ID,没有固定规则但要求唯一,建议配合服务名
#          uri: http://localhost:8001          #匹配后提供服务的路由地址
          uri: lb://cloud-payment-service   #匹配后提供服务的路由地址
          predicates:
            - Path=/payment/get/**         # 断言,路径相匹配的进行路由

        - id: payment_routh2 #payment_route    #路由的ID,没有固定规则但要求唯一,建议配合服务名
#          uri: http://localhost:8001          #匹配后提供服务的路由地址
          uri: lb://cloud-payment-service  #匹配后提供服务的路由地址
          predicates:
            - Path=/payment/lb/**         # 断言,路径相匹配的进行路由
注意:
uri: lb://cloud-payment-service
lb://开头代表从注册中心中获取服务,后面接的就是你需要转发到的服务名称,而且找到的服务实现负载均衡。
配置好后的路由规则:
发送localhost:9527/xx/xxx请求,会去找cloud-payment-service服务名中对应微服务实例。 再根据具体的路径,找的具体的方法接口,并且开启了负载均衡。
测试
http://localhost:9527/payment/lb
8001、8002交替,负载均衡的轮循算法
Predicate 断言的使用
我们注意:Predicates 这是一个复数,其实有多种Predicate。 我们这里用的Predicate的是[Path],它是路由规则的其中一个。作用是,如果cloud-payment-service 的微服务实例中有/payment/get**的接口,就会返回true,路由规则生效。
但实际上存在多种Predicate:
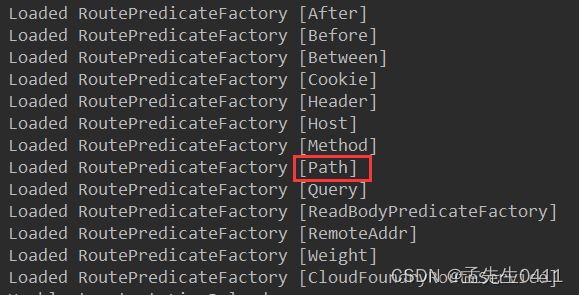
每一个断言Predicate都有它独特的规则,多个Predicate断言是一个与&组合。
● Spring Cloud Gateway 将路由匹配作为Spring WebFlux Handler Mapping基础架构的一部分。
● Spring Cloud Gateway 包括许多内置的Route Predicate 工厂,所有的这些Predicate都和Http请求的不同属性匹配,多个Route Predicate可以进行组合。
● Spring Cloud Gateway 创建route对象时,使用RoutePredicateFactory创建Predicate对象,Predicate对象可以赋值给Route,SpringCloud Gateway包含许多内置的Route Predicate Factories.
● 所有的 这些谓词都匹配Http的请求的各种属性,多种谓词工厂可以组合,并通过逻辑and
官网对gateway的断言每个都写了栗子:https://cloud.spring.io/spring-cloud-static/spring-cloud-gateway/2.2.1.RELEASE/reference/html/#the-after-route-predicate-factory
常用的Predicate 断言
After Route Predicate:
● 匹配改断言时间之后的uri请求
● - After=2021-09-28T19:14:51.514+08:00[Asia/Shanghai]
如何获得上述格式的时间呢?
public class TimeTest {
    public static void main(String[] args) {
        ZonedDateTime zbj = ZonedDateTime.now(); // 默认时区
        System.out.println(zbj); //2021-09-28T19:14:51.514+08:00[Asia/Shanghai]
//        ZonedDateTime zny = ZonedDateTime.now(ZoneId.of("America/New_York")); // 用指定时区获取当前时间
//        System.out.println(zny);
    }
}
配置yml
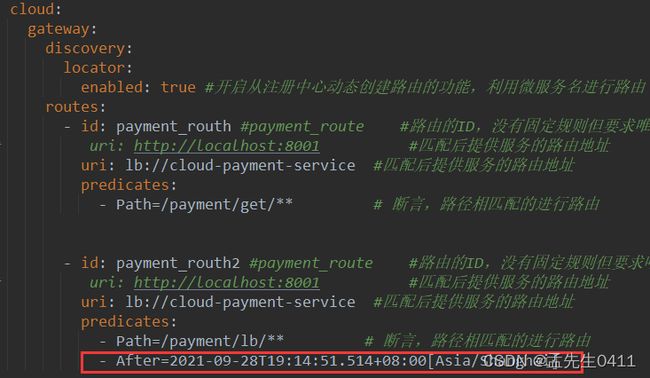
测试:
成功

Before Route Predicate:
● 匹配改断言时间之前的uri请求
Between Route Predicate:
● 匹配改断言时间之间的uri请求
● Between=2020-02-02T17:45:06.206+08:00[Asia/Shanghai],2020-03-25T18:59:06.206+08:00[Asia/Shanghai]
Cookie Route Predicate:
- Cookie=chocolate, ch.p Cookie Route Predicate需要两个参数,一个是Cookie name,一个是正则表达式。 路由规则会通过获取对应的Cookie name 值和正则表达式去匹配,如果匹配上就会执行路由, 如果没有匹配上则不执行。

表示只有发送的请求有cookie,而且里面有username=zzyy这个数据才能访问
利用curl命令发送POST/GET请求
● 不带cookie发送请求
cmd直接输入:
curl http://localhost:9527/payment/lb : 只发了一个GET请求,没有带Cookie
报错:
 ● 带cookie发送请求
curl http://localhost:9527/payment/lb --cookie “username=zzyy”
成功:
- Header=X-Request-Id, \d+:带着这样的请求头才执行:请求头要有X-Request-Id属性,并且值为整数的正则表达式
测试:
curl http://localhost:9527/payment/lb -H “X-Request-Id:123”
Host Route Predicate:
● curl http://localhost:9527/payment/lb -H "Host: www.atguigu.com"
  ○ 正确
● curl http://localhost:9527/payment/lb -H "Host: java.atguigu.com"
  ○ 正确
● curl http://localhost:9527/payment/lb -H "Host: java.atguigu.net"
  ○ 错误
Path Route Predicate:
匹配路径,最开始就是用的这个
9.Query Route Predicate:
Filter的使用
Filter是什么?
指的是Spring框架中GatewayFilter的实例,使用过滤器,可以在请求被路由前或者之后对请求进行修改。 Filter链:同时满足一系列的过滤链。
路由过滤器可用于修改进入的HTTP请求和返回的HTTP响应,路由过滤器只能指定路由进行使用。Spring Cloud Gateway 内置了多种路由过滤器,他们都由GatewayFilter的工厂类来产生。
官网
生命周期 :
pre 在业务逻辑之前
post 在业务逻辑之后
种类:
单一的:GatewayFilter
全局的:GlobalFilter
自定义全局过滤器(GlobalFilter)
两个主要接口介绍:implements GlobalFilter, Ordered
package com.aliyun.config;

import lombok.extern.slf4j.Slf4j;
import org.springframework.cloud.gateway.filter.GatewayFilterChain;
import org.springframework.cloud.gateway.filter.GlobalFilter;
import org.springframework.core.Ordered;
import org.springframework.http.HttpStatus;
import org.springframework.stereotype.Component;
import org.springframework.web.server.ServerWebExchange;
import reactor.core.publisher.Mono;

import java.util.Date;

/**
 * @Author:meng_xiangxin
 * @Date: 2022/12/12 16:04
 * @Description:
 */
@Component
@Slf4j
public class MyLogGateWayFilter implements GlobalFilter, Ordered {

    @Override
    public Mono<Void> filter(ServerWebExchange exchange, GatewayFilterChain chain) {
        log.info("*********************come in MyLogGateWayFilter:  "+ new Date());
        //取出请求参数的uname对应的值
        String uname = exchange.getRequest().getQueryParams().getFirst("uname");
        //如果uanme为空,就直接过滤掉,不走路由
        if(uname == null){
            log.info("************* 用户名为Null 非法用户 o(╥﹏╥)o");

            //判断该请求不通过时:给一个回应,返回
            exchange.getResponse().setStatusCode(HttpStatus.NOT_ACCEPTABLE);
            return exchange.getResponse().setComplete();
        }

        //反之,调用下一个过滤器,也就是放行:在该环节判断通过的exchange放行,交给下一个filter判断
        return chain.filter(exchange);
    }

    /**
     * 这个过滤器的加载顺序,数字越小,优先级越高
     * 设置这个过滤器在Filter链中的加载顺序。
     */
    @Override
    public int getOrder() {
        return 0;
    }
}
测试:
http://localhost:9527/payment/lb?uname=z3
发现报错了:
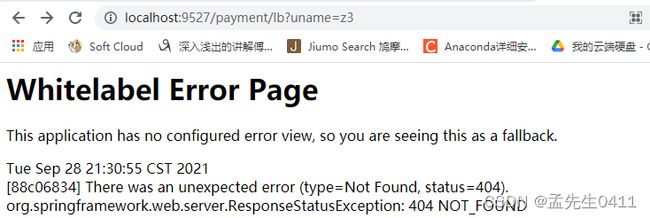
检查yml配置文件,发现predicates 断言设置了Query

加上Query需要的参数 username,或者将Query注释掉
http://localhost:9527/payment/lb?uname=z3&username=33
成功:
![]()
测试:http://localhost:9527/payment/lb 没有加uname,被过滤掉了
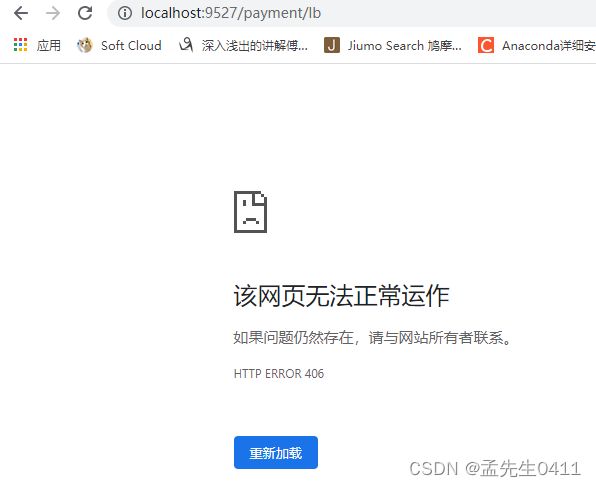

服务配置&服务总线
服务配置——SpringCloud Config分布式配置中心
概述
● 1. 我们的模块越来越多,每个模块都要写一个application.yml。 我们想象这样一种情况: 10个微服务都要连接同一个数据库,我们在这10个微服务都配置了连接数据库yml。 当这个数据库发生了变化,怎么办? 修改10个yml。 如果是100个微服务都连接这个数据库呢? 东西多了,就要有统一个管理。
● 2. 上线后,发布版本了。有生产环境,有测试环境,预发布版本环境。 那么就是3套的配置的管理系统和业务要求,一个配置文件不能同时满足三种环境。
● 3. 集中式的管理这些配置。微服务意味着要将单体应用中的业务拆分成一个个子服务,每个服务的粒度相对较小,因此系统中会出现大量的服务。 由于每个服务都需要必要的配置信息才能运行,所以一套集中式,动态的配置管理设施是必不可少的。 我们每个微服务自己带着一个application.yml,上百个配置文件的管理… SpringCloud提供了ConfigServer来解决这个问题。
Config是什么
SpringCloud Config为微服务架构中的微服务提供集中化的外部配置支持(Git/GitHub)(意思就是可以配置远程的配置文件?),配置服务器为各个不同微服务应用的所有环境提供了一个中心化的外部配置(Config Server)。
统一共用的放在配置中心,各自特有的再单独配置。
由于SpringCloud Config默认使用Git来存储配置文件,最推荐与github整合。
怎么用
SpringCloud Config 分为服务端和客户端两部分。
服务端也称为分布式配置中心,他是一个独立的微服务应用,用来连接配置服务器并为客户端提供获取配置信息,加密/解密等信息访问接口。
客户端则是通过指定的配置中心来管理应用资源,以及与业务相关的配置内容,并在启动的时候从配置中心获取和加载配置信息,配置服务器默认采用git来存储配置信息,这样既有助于对环境配置进行版本管理,并且可以通过git客户端来方便的管理和访问配置内容。
能干嘛
● 集中管理配置文件
● 不同环境不同配置,动态化的配置更新,分环境部署比如 dev/test/prod/beta/release
● 运行期间动态调整配置,不再需要在每个服务部署的机器上编写配置文件,服务回想配置中心统一拉取配置自己的信息。
● 当配置发生变动时,服务不需要重启即可感知到配置的变化并应用新的配置。
● 将配置信息以Rest接口的形式暴露。
● 与GitHub整合配置,由于SpringCloud Config默认使用Git来存储配置文件,虽然也支持SVN。但是最推荐的还是 Git,而且使用的是http/https访问的形式。
Config服务端配置与测试
用你自己的账号在GitHub上新建一个名为springcloud-config的新Repository
Repository中创建以下文件:

github仓库克隆一份:https://github.com/zzyybs/springcloud-config
添加令牌
新建Module模块 cloud-config-center-3344,它就是Cloud的配置中心模块 cloudConfig Center

pom
<?xml version="1.0" encoding="UTF-8"?>
<project xmlns="http://maven.apache.org/POM/4.0.0"
         xmlns:xsi="http://www.w3.org/2001/XMLSchema-instance"
         xsi:schemaLocation="http://maven.apache.org/POM/4.0.0 http://maven.apache.org/xsd/maven-4.0.0.xsd">
    <parent>
        <artifactId>springcloud</artifactId>
        <groupId>org.example</groupId>
        <version>1.0-SNAPSHOT</version>
    </parent>
    <modelVersion>4.0.0</modelVersion>

    <artifactId>cloud-config-center-3344</artifactId>

    <properties>
        <maven.compiler.source>8</maven.compiler.source>
        <maven.compiler.target>8</maven.compiler.target>
    </properties>

    <dependencies>
        <!--添加消息总线RabbitMQ支持-->
        <dependency>
            <groupId>org.springframework.cloud</groupId>
            <artifactId>spring-cloud-starter-bus-amqp</artifactId>
        </dependency>
        <!--springCloud Config Server-->
        <dependency>
            <groupId>org.springframework.cloud</groupId>
            <artifactId>spring-cloud-config-server</artifactId>
        </dependency>
        <dependency>
            <groupId>org.springframework.cloud</groupId>
            <artifactId>spring-cloud-starter-netflix-eureka-client</artifactId>
        </dependency>
        <dependency>
            <groupId>org.springframework.boot</groupId>
            <artifactId>spring-boot-starter-web</artifactId>
        </dependency>

        <dependency>
            <groupId>org.springframework.boot</groupId>
            <artifactId>spring-boot-starter-actuator</artifactId>
        </dependency>
        <dependency>
            <groupId>org.springframework.boot</groupId>
            <artifactId>spring-boot-devtools</artifactId>
            <scope>runtime</scope>
            <optional>true</optional>
        </dependency>
        <dependency>
            <groupId>org.projectlombok</groupId>
            <artifactId>lombok</artifactId>
            <optional>true</optional>
        </dependency>
        <dependency>
            <groupId>org.springframework.boot</groupId>
            <artifactId>spring-boot-starter-test</artifactId>
            <scope>test</scope>
        </dependency>
    </dependencies>

</project>
yml
server:
  port: 3344

spring:
  application:
    name: cloud-config-center #注册进Eureka服务器的微服务名
  cloud:
    config:
      server:
        git:
          uri: https://gitee.com/mengxiangxin/test.git #GitHub上面的git仓库名字
          search-paths: #搜索目录
            - test
          username: mengxiangxin
          password:
      label: master #读取分支
      #启动成功后访问的路径 http://ip:3344/{label}/{application}-{profile}.yml 能访问的配置文件 就表示成功了

eureka:
  client:
    service-url:
      defaultZone: http://localhost:7001/eureka


##rabbitmq相关配置,暴露bus刷新配置的端点 SpringCloud Bus动态刷新全局广播
management:
  endpoints: #暴露bus刷新配置的端点
    web:
      exposure:
        include: 'bus-refresh'


#rabbitmq相关配置
rabbitmq:
  host: localhost
  port: 15672
  username: guest
  password: guest
uri地址如果用https的别忘了配置username和password
注意这里cloud.config.server.git下面uri和search-paths以及label的含义
uri就是我们远程仓库的地址,search-paths表示远程仓库下有一个叫做springcloud-config的,label则表示读取master分支里面的内容(2020-10月开始master分支变为main分支)
新建的github分支已经默认为main,所以此处需指定 spring.cloud.config.server.git.default-label=main
主启动类
package com.aliyun;

import org.springframework.boot.SpringApplication;
import org.springframework.boot.autoconfigure.SpringBootApplication;
import org.springframework.cloud.config.server.EnableConfigServer;

/**
 * @Author:meng_xiangxin
 * @Date: 2022/12/13 9:25
 * @Description:
 */
@SpringBootApplication
@EnableConfigServer
public class ConfigCenterMain3344 {
    public static void main(String[] args) {
        SpringApplication.run(ConfigCenterMain3344.class, args);
    }
}
这里注意一下:我没有加@EnableEurekaClient注解,这个服务依然注册进eureka注册中心了。
<dependency>
  <groupId>org.springframework.cloud</groupId>
  <artifactId>spring-cloud-starter-netflix-eureka-client</artifactId>
</dependency>
依赖,可以省略@EnableEurekaClient,而根据yml配置文件想eureka里面注册。
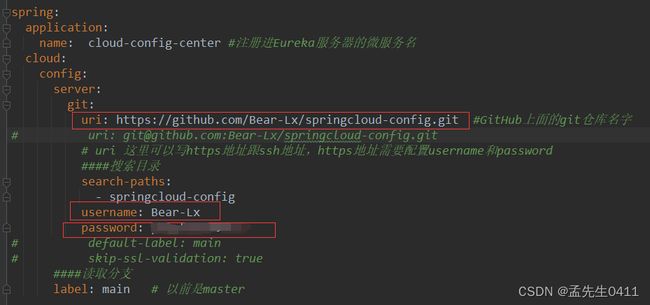
SSH
这里应该使用 ssh-keygen -m PEM -t rsa -b 4096 -C “填自己的描述” 生成
ssh key
而不是使用 ssh-keygen -t rsa -C “填自己的描述” 生成ssh key
第一种方式生成的私钥是以BEGIN RSA PRIVATE KEY开头,END RSA PRIVATE KEY结尾;第二种方式生成的私钥是以BEGIN OPENSSH PRIVATE KEY开头,END OPENSSH PRIVATE KEY结尾,SpringCloud访问git的组件不支持openssh这种格式的密钥。
我没有测试SSH验证是否能够通过。
要么你仓库公开 就像老师这样,私有仓库的话uri可以换https然后配置帐号密码,或者依旧用ssh,然后多配个私钥都可以
配置的读取规则
/{label}/{application}-{profile}.yml
![]()
读取main(master)分支
● http://localhost:3344/master/config-dev.yaml
● http://localhost:3344/master/config-test.yaml
● http://localhost:3344/master/config-prod.yaml
读取dev分支
● http://localhost:3344/dev/config-dev.yaml
● http://localhost:3344/dev/config-dev.yaml
● http://localhost:3344/dev/config-dev.yam

/{application}-{profile}.yml
默认去master分支找,所以这里不写分支

这里需要在yml文件中设置spring.cloud.config.server.git.default-label=main(github更新后master分支都成了main分支)
server:
  port: 3344

spring:
  application:
    name: cloud-config-center #注册进Eureka服务器的微服务名
  cloud:
    config:
      server:
        git:
          uri: https://gitee.com/mengxiangxin/test.git  #GitHub上面的git仓库名字 这里可以写https地址跟ssh地址,https地址需要配置username和password
          default-label: main
          ####搜索目录
          search-paths:
            - test
            ####读取分支
          username: mengxiangxin
          password:
        label: main   # 以前是master
#服务注册到eureka地址
eureka:
  client:
    service-url:
      #      defaultZone: http://localhost:7001/eureka #单机版
      defaultZone: http://localhost:7001/eureka,http://localhost:7002/eureka #集群版
● http://localhost:3344/config-dev.yaml
● http://localhost:3344/config-test.yaml
● http://localhost:3344/config-prod.yaml

/{application}/{profile}[/{label}]
逆写法

● http://localhost:3344/config/dev/master
● http://localhost:3344/config/test/master
● http://localhost:3344/config/prod/master\
总结
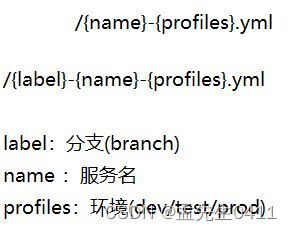
成功实现了SpringCloud通过GitHub获取配置信息
Config客户端配置与测试
上面我们的ConfigServer连接上了GitHub,成功的从GitHub上获取到了config信息
现在我们配置客户端,客户端从配置中心(Config Server)获取配置信息

新建cloud-config-client-3355
pom
<?xml version="1.0" encoding="UTF-8"?>
<project xmlns="http://maven.apache.org/POM/4.0.0"
         xmlns:xsi="http://www.w3.org/2001/XMLSchema-instance"
         xsi:schemaLocation="http://maven.apache.org/POM/4.0.0 http://maven.apache.org/xsd/maven-4.0.0.xsd">
    <parent>
        <artifactId>springcloud</artifactId>
        <groupId>org.example</groupId>
        <version>1.0-SNAPSHOT</version>
    </parent>
    <modelVersion>4.0.0</modelVersion>

    <artifactId>cloud-config-client-3355</artifactId>

    <properties>
        <maven.compiler.source>8</maven.compiler.source>
        <maven.compiler.target>8</maven.compiler.target>
    </properties>
    <dependencies>
        <!--这里就是客户端的SpringCloud config 因为是客户端所以没有server-->
        <dependency>
            <groupId>org.springframework.cloud</groupId>
            <artifactId>spring-cloud-starter-config</artifactId>
        </dependency>

        <dependency>
            <groupId>org.springframework.cloud</groupId>
            <artifactId>spring-cloud-starter-netflix-eureka-client</artifactId>
        </dependency>

        <!--web/actuator这两个一般一起使用,写在一起-->
        <dependency>
            <groupId>org.springframework.boot</groupId>
            <artifactId>spring-boot-starter-web</artifactId>
        </dependency>
        <dependency>
            <groupId>org.springframework.boot</groupId>
            <artifactId>spring-boot-starter-actuator</artifactId>
        </dependency>

        <!--通用配置-->
        <dependency>
            <groupId>org.springframework.boot</groupId>
            <artifactId>spring-boot-devtools</artifactId>
            <scope>runtime</scope>
            <optional>true</optional>
        </dependency>
        <dependency>
            <groupId>org.projectlombok</groupId>
            <artifactId>lombok</artifactId>
            <optional>true</optional>
        </dependency>
        <dependency>
            <groupId>org.springframework.boot</groupId>
            <artifactId>spring-boot-starter-test</artifactId>
            <scope>test</scope>
        </dependency>


        <!--web/actuator这两个一般一起使用,写在一起-->
        <dependency>
            <groupId>org.springframework.boot</groupId>
            <artifactId>spring-boot-starter-web</artifactId>
        </dependency>
        <dependency>
            <groupId>org.springframework.boot</groupId>
            <artifactId>spring-boot-starter-actuator</artifactId>
        </dependency>

        <!--添加消息总线RabbitMQ支持-->
        <dependency>
            <groupId>org.springframework.cloud</groupId>
            <artifactId>spring-cloud-starter-bus-amqp</artifactId>
        </dependency>

    </dependencies>
</project>
bootstrap.yml
为了配置文件的加载顺序和分级管理,我们这里使用boostrap.yml
● application.yml是用户级的资源配置项
● boostrap.yml是系统级的,优先级更高
Spring Cloud会创建一个“Bootstrap Context”,作为Spring应用的Application Context的父上下文。初始化的时候,Bootstrap Context负责从外部源加载配置属性并解析配置。这两个上下文共享一个从外部获取的Environment。
要将Client模块下的application.yml文件改为bootstrap.yml,这是很关键的,因为bootstrap.yml是比application.yml先加载的。bootstrap.yml优先级高于application.yml
server:
  port: 3355

spring:
  application:
    name: config-client
  cloud:
    config:
      label: master  #分支名称
      name: config  #配置文件名称
      profile: dev  #读取后缀名称   上述三个综合http://localhost:3344/master/config-dev.yml
      uri: http://localhost:3344  #配置中心的地址
#服务注册到eureka地址
eureka:
  client:
    service-url:
      #设置与eureka server交互的地址查询服务和注册服务都需要依赖这个地址
      defaultZone: http://localhost:7001/eureka #单机版

# 暴露监控端点 否则 curl -X POST "http://localhost:3355/actuator/refresh" 不可使用
management:
  endpoints:
    web:
      exposure:
        include: "*"
#SpringCloud Bus动态刷新定点通知 公式:http://localhost:配置中心的端口号/actuator/bus-refresh/{destination}
#例如 只通知3355,curl -X POST "http://localhost:3344/actuator/bus-refresh/config-client:3355"
##rabbitmq相关配置,暴露bus刷新配置的端点
rabbitmq:
  host: localhost
  port: 15672
  username: guest
  password: guest
package com.aliyun;

import org.springframework.boot.SpringApplication;
import org.springframework.boot.autoconfigure.SpringBootApplication;
import org.springframework.cloud.config.server.EnableConfigServer;

/**
 * @Author:meng_xiangxin
 * @Date: 2022/12/13 9:25
 * @Description:
 */
@SpringBootApplication
@EnableConfigServer
public class ConfigCenterMain3344 {
    public static void main(String[] args) {
        SpringApplication.run(ConfigCenterMain3344.class, args);
    }
}
业务类
package com.aliyun.controller;

import org.springframework.beans.factory.annotation.Value;
import org.springframework.cloud.context.config.annotation.RefreshScope;
import org.springframework.web.bind.annotation.GetMapping;
import org.springframework.web.bind.annotation.RestController;

/**
 * @Author:meng_xiangxin
 * @Date: 2022/12/13 10:24
 * @Description: 实现热加载 自动获取刷新内容
 */
@RestController
@RefreshScope
public class ConfigClientController {
    @Value("${config.info}")
    private String configInfo;

    @GetMapping("/configInfo")
    public String getConfigInfo() {
        return configInfo;
    }
}
测试
配置中心和客户端都注册进了eureka

成功实现了客户端3355访问SpringCloud Config3344通过GitHub获取配置信息
这里其他博主有出现问题SpringCloud-Config配置,参看博客上的解决办法,我并没有遇到相同的问题,直接成功。
问题随之而来——分布式配置的动态刷新问题
我们实现了客户端3355通过Config3344获取GithHub上的配置信息,那么现在面临另外一个问题:
Linux运维修改GitHub上的配置文件内容做调整

刷新3344,发现ConfigServer配置中心立刻响应

有变化除非自己重启或者重新加载,难到每次运维修改配置文件,客户端都需要重启??噩梦
Config客户端之动态刷新
避免每次更新配置都要重启客户端微服务3355,需要修改3355模块
pom引入actuator监控
<!--web/actuator这两个一般一起使用,写在一起-->
<dependency>
  <groupId>org.springframework.boot</groupId>
  <artifactId>spring-boot-starter-web</artifactId>
</dependency>
<dependency>
  <groupId>org.springframework.boot</groupId>
  <artifactId>spring-boot-starter-actuator</artifactId>
</dependency>
修改yml,暴露监控端口
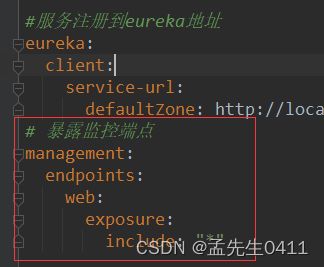
2.0.0版本的SpringBoot的actuator启动端点监控web端默认加载默认只有两个info, health可见的页面节点。 如果需要显示更多需要在application.properties配置文件中添加 management.endpoints.web.exposure.include=* management.endpoints.web.exposure.exclude=env,beans
include=* 表示包含所有节点页面 ,exclude=env,beans 表示排除env、beans
在业务类上加一个@RefreshScope注解
package com.aliyun.controller;

import org.springframework.beans.factory.annotation.Value;
import org.springframework.cloud.context.config.annotation.RefreshScope;
import org.springframework.web.bind.annotation.GetMapping;
import org.springframework.web.bind.annotation.RestController;

/**
 * @Author:meng_xiangxin
 * @Date: 2022/12/13 10:24
 * @Description: 实现热加载 自动获取刷新内容
 */
@RestController
@RefreshScope
public class ConfigClientController {
    @Value("${config.info}")
    private String configInfo;

    @GetMapping("/configInfo")
    public String getConfigInfo() {
        return configInfo;
    }
}
测试:3355还是没有动态刷新
需要运维人员发送Post请求刷新3355
我们还需要让运维人员发送一下POST请求,刷新一下3355 必须是Post请求
curl -X POST “http://localhost:3355/actuator/refresh”

多个微服务客户端,难道每个微服务都要手动刷新?
● 在微服务多的情况下,每个微服务都需要执行一个post请求,手动刷新?
● 可否广播,一次通知,处处生效? 大范围的实现自动刷新
● 可能有这种情况:100台机器,有得不要求实时刷新。我们想实现该刷新的刷新,不想刷新的不刷新,怎么实现?
解决方法——Bus总线。
服务消息总线——SpringCloud Bus
● GitHub上的配置文件修改后,可否广播一下,不用每个微服务都通过发送POST请求动态刷新。
● 可不可以该刷新的刷新,不想刷新的不刷新。
带着这些问题,我们来到本章Bus的学习,他是对Config的增强。
主要内容:
- 概述
- RabbitMQ环境配置
- SpringCloud Bus动态刷新全局广播
- SpringCloud Bus动态刷新顶点通知。
概述
我们想实现分布式的自动刷新配置功能,不是通过手动发送POST请求实现刷新。 SpringCloudBus配合SpringCloudConfig使用可以实现配置的动态刷新。
配置更新后,将A刷新一下(推给A),然后通过总线“传染”给了其他的微服务。
Bus支持两种消息代理:RabbitMQ和Kafka
Spring Cloud Bus能管理和传播分布式系统间的消息,就像一个分布式执行器,可用于广播状态更改、事件推送等,也可以当作微服务间的通信通道。
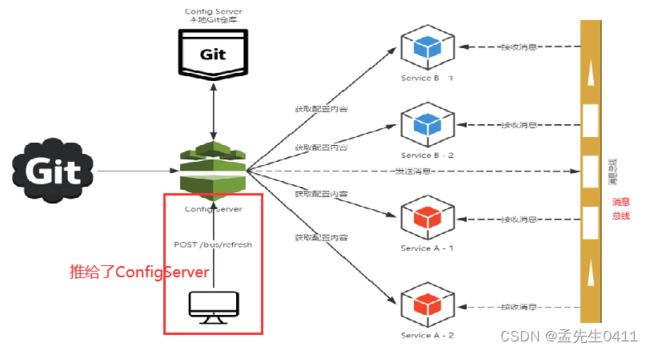
这里是推送给ConfigServer,跟上面推送给客户端是不一样的。
为什么被称为总线
什么是总线:在微服务架构的系统中,通常会使用轻量级的消息代理来构建一个共用的消息主题,并让系统中所有微服务实例都连接上来。由于该主题中产生的消息会被所有实例监听和消费,所以称它为消息总线。在总线上的各个实例,都可以方便地广播一些需要让其他连接在该主题上的实例都知道的消息。
基本原理:ConfigClient实例都监听MQ中同一个topic(默认是springCloudBus)。当一个服务刷新数据的时候,它会把这个信息放入到Topic中,这样其它监听同一Topic的服务就能得到通知,然后去更新自身的配置。
RabbitMQ环境配置
安装
安装教程
进入RabbitMQ安装目录下的sbin目录:E:\install\rabbimq\rabbitmq_server-3.7.4\sbin ,
打开cmd输入如下命令:
rabbitmq-plugins enable rabbitmq_management
启动:rabbitmq-server start
然后测试是否安装成功:http://localhost:15672/ 账号密码都是guest。安装成功!
SpringCloud Bus动态刷新全局广播
必须先具备良好的RabbitMQ环境
Bus动态刷新全局广播的设计思想和选型
利用消息总线出发一个客户端/bus/refresh,从而刷新所有客户端的配置
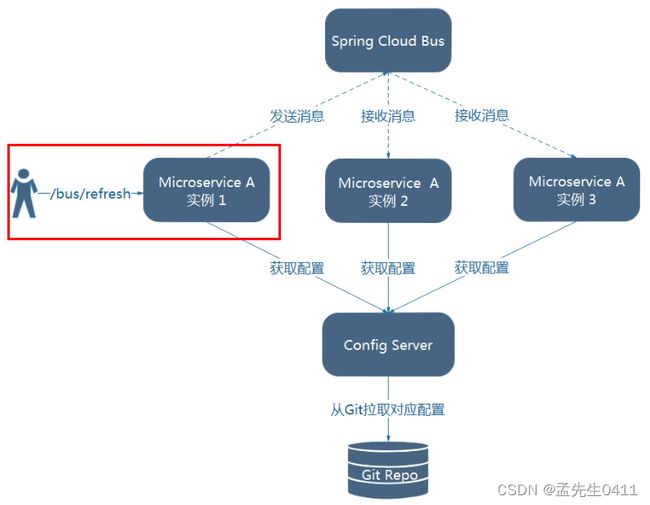
利用消息总线接触一个服务端ConfigServer的/bus/refresh断点,从而刷新所有客户端的配置
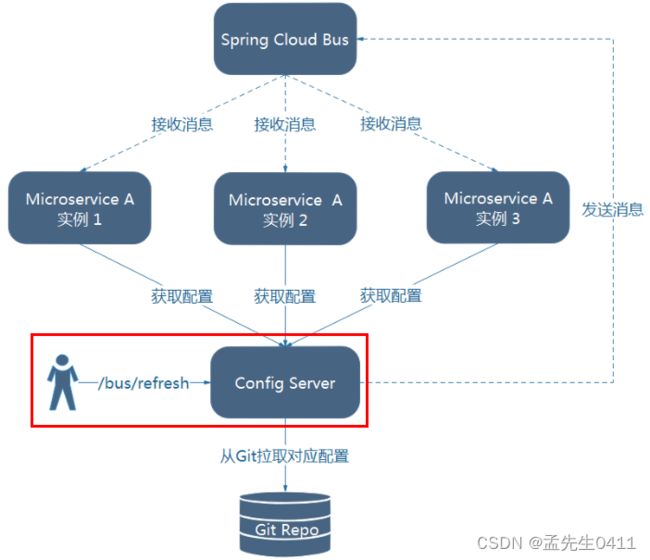
图二的框架显然更合理一些,图一不适合的原因如下:
- 破坏了微服务的职责单一性,因为微服务本身是业务模块,它不应该承担配置刷新的功能
- 破坏了微服务各结点的对等性
- 有一定的局限性: 微服务迁移时,它的网络地址常常会发生变化,此时如果想要做到自动刷新,那就回增加更多的修改。
所以我们使用第二种:通知总线,总线再通知所有客户端。
添加一个新的cloud-config-client-3366
演示广播效果,增加复杂度,再以3355为模板再制作一个3366
pom
与3355相同
<?xml version="1.0" encoding="UTF-8"?>
<project xmlns="http://maven.apache.org/POM/4.0.0"
         xmlns:xsi="http://www.w3.org/2001/XMLSchema-instance"
         xsi:schemaLocation="http://maven.apache.org/POM/4.0.0 http://maven.apache.org/xsd/maven-4.0.0.xsd">
    <parent>
        <artifactId>springcloud</artifactId>
        <groupId>org.example</groupId>
        <version>1.0-SNAPSHOT</version>
    </parent>
    <modelVersion>4.0.0</modelVersion>

    <artifactId>cloud-config-client-3366</artifactId>

    <properties>
        <maven.compiler.source>8</maven.compiler.source>
        <maven.compiler.target>8</maven.compiler.target>
    </properties>


    <dependencies>
        <!--添加消息总线RabbitMQ支持-->
        <dependency>
            <groupId>org.springframework.cloud</groupId>
            <artifactId>spring-cloud-starter-bus-amqp</artifactId>
        </dependency>
        <!--这里就是客户端的SpringCloud config 因为是客户端所以没有server-->
        <dependency>
            <groupId>org.springframework.cloud</groupId>
            <artifactId>spring-cloud-starter-config</artifactId>
        </dependency>
        <dependency>
            <groupId>org.springframework.cloud</groupId>
            <artifactId>spring-cloud-starter-netflix-eureka-client</artifactId>
        </dependency>

        <!--web/actuator这两个一般一起使用,写在一起-->
        <dependency>
            <groupId>org.springframework.boot</groupId>
            <artifactId>spring-boot-starter-web</artifactId>
        </dependency>
        <dependency>
            <groupId>org.springframework.boot</groupId>
            <artifactId>spring-boot-starter-actuator</artifactId>
        </dependency>

        <!--通用配置-->
        <dependency>
            <groupId>org.springframework.boot</groupId>
            <artifactId>spring-boot-devtools</artifactId>
            <scope>runtime</scope>
            <optional>true</optional>
        </dependency>
        <dependency>
            <groupId>org.projectlombok</groupId>
            <artifactId>lombok</artifactId>
            <optional>true</optional>
        </dependency>
        <dependency>
            <groupId>org.springframework.boot</groupId>
            <artifactId>spring-boot-starter-test</artifactId>
            <scope>test</scope>
        </dependency>
    </dependencies>

</project>
yml
server:
  port: 3366

spring:
  application:
    name: config-client
  cloud:
    #Config客户端配置
    config:
      label: master #分支名称
      name: config #配置文件名称
      profile: dev #读取后缀名称   上述3个综合:master分支上config-dev.yml的配置文件被读取http://config-3344.com:3344/master/config-dev.yml
      uri: http://localhost:3344 #配置中心地址

#服务注册到eureka地址
eureka:
  client:
    service-url:
      defaultZone: http://localhost:7001/eureka

# 暴露监控端点
management:
  endpoints:
    web:
      exposure:
        include: "*"

#rabbitmq相关配置 15672是Web管理界面的端口;5672是MQ访问的端口
rabbitmq:
  host: localhost
  port: 5672
  username: guest
  password: guest
主启动
package com;

import org.springframework.boot.SpringApplication;
import org.springframework.boot.autoconfigure.SpringBootApplication;
import org.springframework.cloud.netflix.eureka.EnableEurekaClient;

/**
 * @Author:meng_xiangxin
 * @Date: 2022/12/14 9:02
 * @Description:
 */
@SpringBootApplication
@EnableEurekaClient
public class ConfigClientMain3366 {
    public static void main(String[] args) {
        SpringApplication.run(ConfigClientMain3366.class, args);
    }
}
业务类controller
package com.aliyun.controller;

import org.springframework.beans.factory.annotation.Value;
import org.springframework.cloud.context.config.annotation.RefreshScope;
import org.springframework.web.bind.annotation.GetMapping;
import org.springframework.web.bind.annotation.RestController;

@RestController
@RefreshScope
public class ConfigClientController {
    @Value("${server.port}")
    private String serverPort;

    @Value("${config.info}")
    private String configInfo;


    @GetMapping("/configInfo")
    public String getConfigInfo() {
        return "serverPort:" + serverPort + "\t\n\n configInfo: " + configInfo;
    }

}
分析
@Value(“ s e r v e r . p o r t " ) 从配置文件中取前缀为 s e r v e r . p o r t 的值:注意这个模块关联了两个 y m l 一个是我们本地配置的 b o o t s t r a p . y m l ,另一个是通过 b o o t s t r a p . y m l 关联到 3344 ,再关联到 G i t H u b 上的 c o n f i g − t e x t . y m l 。所以 @ V a l u e ( " {server.port}")从配置文件中取前缀为server.port的值:注意这个模块关联了两个yml 一个是我们本地配置的bootstrap.yml,另一个是通过bootstrap.yml关联到3344,再关联到GitHub上的config-text.yml。所以@Value(" server.port")从配置文件中取前缀为server.port的值:注意这个模块关联了两个yml一个是我们本地配置的bootstrap.yml,另一个是通过bootstrap.yml关联到3344,再关联到GitHub上的config−text.yml。所以@Value("{server.port}”)从bootstrap.yml取到了server.port的值;@Value(“${config.info}”)从关联的config-{profile}.yml取到了info的值
配置案例
给cloud-config-center-3344配置中心服务端添加消息总线支持
给cloud-config-client-3355配置中心服务端添加消息总线支持
<!--添加消息总线RabbitMQ支持-->
<dependency>
    <groupId>org.springframework.cloud</groupId>
    <artifactId>spring-cloud-starter-bus-amqp</artifactId>
</dependency>
见 3344、3355 yml配置 rabbitmq相关配置
测试
启动7001、7002(我配了eureka集群)、3344、3355、3366

自测通过


修改GitHub上的配置文件,因为3355和3366都和config-dev.yml绑定,所以我们修改该配置文件,版本号修改成6

给3344Config-Server发送Post请求,刷新3344
curl -X POST “http://localhost:3344/actuator/bus-refresh”
一处刷新,处处生效!

当一个服务刷新数据时,它会把这个信息放到Topic中,这样其他监听同一Topic的服务就能得到通知, 然后去更新自身的配置。
SpringCloud Bus动态刷新定点通知
只通知指定的微服务。比如:只通知3355,不通知3366,指定具体某一个实例生效,而不是全部。
公式:http://localhost:配置中心的端口号/actuator/bus-refresh/{destination},
/bus/refresh请求不再发送到具体的服务实例上,而是发给config server并通过destination参数类指定需要更新配置的服务或实例。
案例
我们这里以刷新运行在3355端口上的config-client为例,只通知3355,不通知3366
curl -X POST “http://localhost:3344/actuator/bus-refresh/config-client:3355”
流程总结
Stream消息驱动/Sleuth分布式请求链路跟踪
SpringCloud Stream消息驱动
为什么引入cloud stream?解决的痛点是什么?
-
市面上存在着多种消息中间件技术
ActiveMQ,RabbitMQ,RocketMQ,Kafka
那么每多出来一种新的技术,就要付出响应的学习成本
消息中间件技术的多样导致开发者的学习成本很大 -
不同的系统中会用到不同的消息中间件,那么当需要系统进行整合时,或者系统进行切换时
由于用的是不同的中间件技术,该怎么整合切换。
存在多种MQ的情况时,如何进行切换、维护和开发?
具体的实现,需要的成本很大。 -
那么有没有一种新的技术,让我们不再关注具体的MQ的细节,我们只需要用一种适配绑定的方式,自动的给我们在各种MQ内切换。
-
引出了SpringCloud Stream
屏蔽底层的细节差异,让我只需要操作一个Cloud Stream,就可以操作底层下面各种各样不同的MQ。达到我们以更小的代价实现切换,维护,开发。
什么是SpringCloudStream?
官方定义 Spring Cloud Stream 是一个构建消息驱动微服务的框架。
应用程序通过 inputs 或者 outputs 来与 Spring Cloud Stream中binder对象交互。
所以,我们只需要搞清楚如何与 Spring Cloud Stream 交互就可以方便使用消息驱动的方式。
通过使用Spring Integration来连接消息代理中间件以实现消息事件驱动。
Spring Cloud Stream 为一些供应商的消息中间件产品提供了个性化的自动化配置实现,引用了发布-订阅、消费组、分区的三个核心概念。
目前仅支持RabbitMQ、Kafka。
一句话:SpringCloud Stream 屏蔽底层消息中间件的差异,降低切换成本,统一消息的编程模型。
官网

绑定器对象:Binder Implementations
就是靠它屏蔽了我们底层的MQ的差异。
设计思想
为什么用Cloud Stream
比方说我们同时用到了RabbitMQ和Kafka,由于这两个消息中间件的架构上的不同,整合和切换就会有很大的成本。像RabbitMQ有exchange,kafka有Topic和Partitions分区。
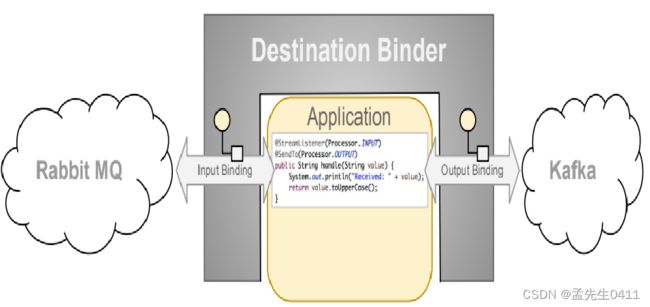
这些中间件的差异性导致我们实际项目开发给我们造成了一定的困扰,我们如果用了两个消息队列的其中一种,后面的业务需求,我想往另外一种消息队列进行迁移,这时候无疑就是一个灾难性的,一大堆东西都要重新推倒重新做,因为它跟我们的系统耦合了,这时候springcloud Stream给我们提供了一种解耦合的方式。
stream是怎么统一底层差异的?

Binder
在没有绑定器这个概念的情况下,我们的SpringBoot应用要直接与消息中间件进行信息交互的时候,由于各消息中间件构建的初衷不同,它们的实现细节上会有较大的差异性,通过定义绑定器作为中间层,完美地实现了应用程序与消息中间件细节之间的隔离。Stream对消息中间件的进一步封装,可以做到代码层面对中间件的无感知,甚至于动态的切换中间件(rabbitmq切换为kafka),使得微服务开发的高度解耦,服务可以关注更多自己的业务流程。
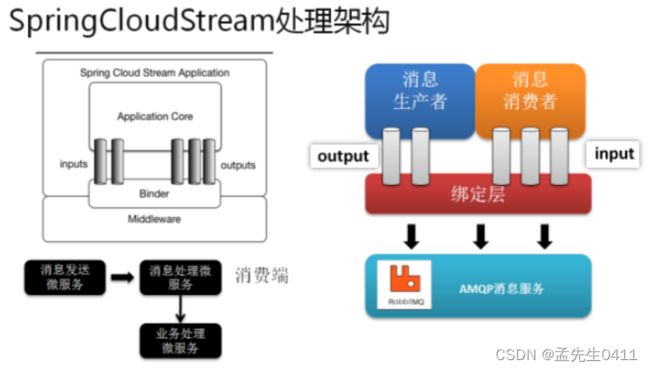
通过定义绑定器Binder作为中间层,实现了应用程序与消息中间件细节之间的隔离。
Binder可以生成Binding,Binding用来绑定消息容器的生产者和消费者,它有两种类型,INPUT和OUTPUT,input对应于消费者(消费者从Stream接收消息),output对应于生产者(生产者从Stream发布消息)。
Stream中的消息通信方式遵循了发布-订阅模式。Topic主题进行广播:在RabbitMQ就是Exchange;在Kakfa中就是Topic
Spring Cloud Stream标准流程套路
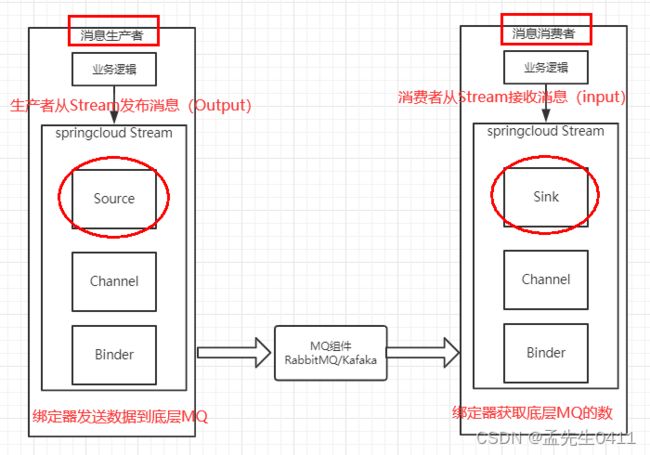
● Binder:很方便的连接中间件,屏蔽差异(用于连接中间件与生产/消费者)
● Channel:通道,是队列Queue的一种抽象,在消息通讯系统中就是实现存储和转发的媒介,通过Channel对队列进行配置
● Source和Sink:简单的可理解为参照对象是Spring Cloud Stream自身,从Stream发布消息就是输出(output),接受消息就是输入(input)。(简单的理解为输出/输如)
编码API和常用注解
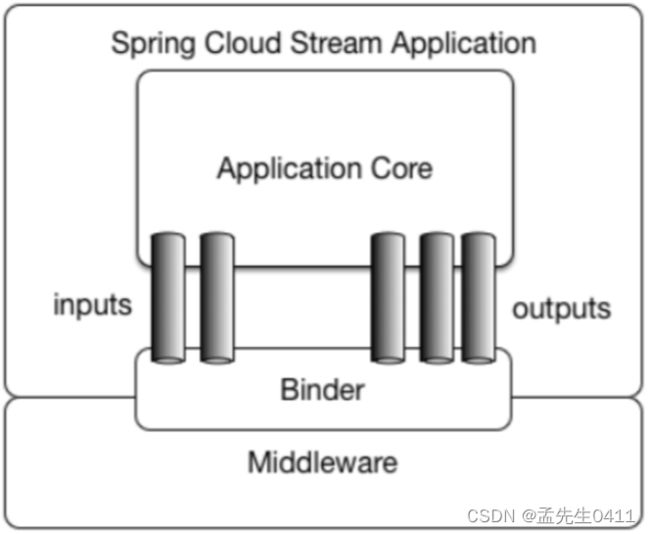
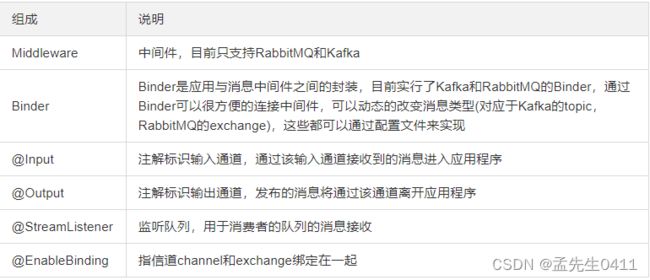
案例说明
RabbitMQ环境已经OK;
工程中新建三个子模块:
● cloud-stream-rabbitmq-provider8801, 作为生产者进行发消息模块
● cloud-stream-rabbitmq-consumer8802,作为消息接收模块
● cloud-stream-rabbitmq-consumer8803 作为消息接收模块
消息驱动之生产者8801
新建module
cloud-stream-rabbitmq-provider8801:作为生产者发送消息模块
POM
<?xml version="1.0" encoding="UTF-8"?>
<project xmlns="http://maven.apache.org/POM/4.0.0"
         xmlns:xsi="http://www.w3.org/2001/XMLSchema-instance"
         xsi:schemaLocation="http://maven.apache.org/POM/4.0.0 http://maven.apache.org/xsd/maven-4.0.0.xsd">
    <parent>
        <artifactId>springcloud</artifactId>
        <groupId>org.example</groupId>
        <version>1.0-SNAPSHOT</version>
    </parent>
    <modelVersion>4.0.0</modelVersion>

    <artifactId>cloud-stream-rabbitmq-provider8801</artifactId>

    <properties>
        <maven.compiler.source>8</maven.compiler.source>
        <maven.compiler.target>8</maven.compiler.target>
    </properties>
    <dependencies>
        <!--rabbitMQ-->
        <dependency>
            <groupId>org.springframework.cloud</groupId>
            <artifactId>spring-cloud-starter-stream-rabbit</artifactId>
        </dependency>
        <!--eureka client-->
        <dependency>
            <groupId>org.springframework.cloud</groupId>
            <artifactId>spring-cloud-starter-netflix-eureka-client</artifactId>
        </dependency>
        <!--web/actuator这两个一般一起使用,写在一起-->
        <dependency>
            <groupId>org.springframework.boot</groupId>
            <artifactId>spring-boot-starter-web</artifactId>
        </dependency>
        <dependency>
            <groupId>org.springframework.boot</groupId>
            <artifactId>spring-boot-starter-actuator</artifactId>
        </dependency>
        <!--基础配置-->
        <dependency>
            <groupId>org.springframework.boot</groupId>
            <artifactId>spring-boot-devtools</artifactId>
            <scope>runtime</scope>
            <optional>true</optional>
        </dependency>
        <dependency>
            <groupId>org.projectlombok</groupId>
            <artifactId>lombok</artifactId>
            <optional>true</optional>
        </dependency>
        <dependency>
            <groupId>org.springframework.boot</groupId>
            <artifactId>spring-boot-starter-test</artifactId>
            <scope>test</scope>
        </dependency>
    </dependencies>

</project>
application.yml
这里有个报错,但是正常使用
server:
  port: 8802

spring:
  application:
    name: cloud-stream-consumer
  cloud:
    stream:
      binders: # 在此处配置要绑定的rabbitmq的服务信息;
        defaultRabbit: # 表示定义的名称,用于于binding整合
          type: rabbit # 消息组件类型
          environment: # 设置rabbitmq的相关的环境配置
            spring:
              rabbitmq:
                host: localhost
                port: 5672
                username: guest
                password: guest
      bindings: # 服务的整合处理
        input: # 这个名字是一个通道的名称
          destination: studyExchange # 表示要使用的Exchange名称定义
          content-type: application/json # 设置消息类型,本次为对象json,如果是文本则设置“text/plain”
          binder: { defaultRabbit } # 设置要绑定的消息服务的具体设置

eureka:
  client: # 客户端进行Eureka注册的配置
    service-url:
      defaultZone: http://localhost:7001/eureka,http://localhost:7002/eureka
  instance:
    lease-renewal-interval-in-seconds: 2 # 设置心跳的时间间隔(默认是30秒)
    lease-expiration-duration-in-seconds: 5 # 如果现在超过了5秒的间隔(默认是90秒)
    instance-id: receive-8803.com  # 在信息列表时显示主机名称
    prefer-ip-address: true     # 访问的路径变为IP地址
报红解决方法:
● output前面加"- ":
● defaultRabbit用大括号{}括起来:
主启动
package com.aliyun;

import org.springframework.boot.SpringApplication;
import org.springframework.boot.autoconfigure.SpringBootApplication;
import org.springframework.cloud.netflix.eureka.EnableEurekaClient;

/**
 * @Author:meng_xiangxin
 * @Date: 2022/12/22 9:06
 * @Description: 主启动类
 */
@SpringBootApplication
@EnableEurekaClient
public class StreamMQMain8801 {
    public static void main(String[] args) {
        SpringApplication.run(StreamMQMain8801.class, args);
    }
}
业务类
我们此时要写的代码,要注意是和MQ交互,而不是传统的controller调用service。
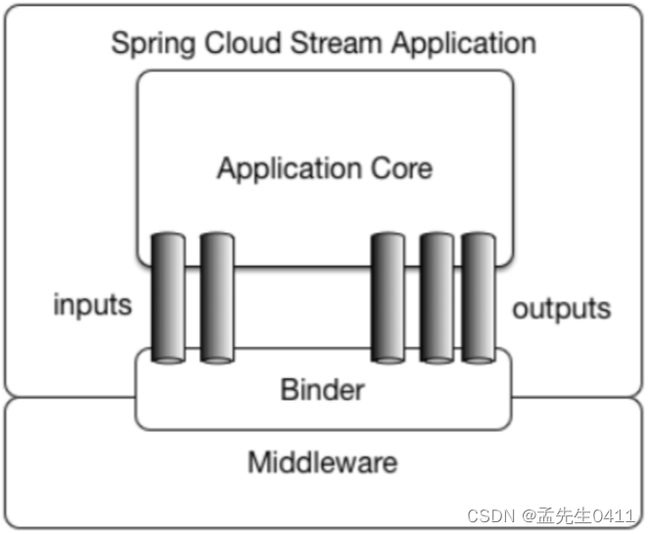
我们现在写的代码是基于SpringCloudStream,然后做output指定通道,开启交互绑定器,再和中间件进行交互。
发送消息接口:
package com.aliyun.service;

/**
 * @Author:meng_xiangxin
 * @Date: 2022/12/22 9:07
 * @Description:
 */
public interface IMessageProvider {
    public String send();
}
发送消息接口实现类:
Source 定义消息的发送管道:
这个Source哪来的呢? 简单的可理解为参照对象是SpringCloudStream自身, 从Stream发出消息就是输出,接收消息就是输入。 这里我们可以理解为我们定义一个消息生产者的发送管道:消息源。

2. 创建并发送消息
这里MessageChannel的实例名必须是output,要不然无法启动
package com.aliyun.service.impl;


import com.aliyun.service.IMessageProvider;
import org.springframework.cloud.stream.annotation.EnableBinding;
import org.springframework.cloud.stream.messaging.Source;
import org.springframework.integration.support.MessageBuilder;
import org.springframework.messaging.MessageChannel;

import javax.annotation.Resource;
import java.util.UUID;

//可以理解为定义消息的发送管道Source对应output(生产者),Sink对应input(消费者)
@EnableBinding(Source.class)
//@Service:这里不需要了,这里不是传统的controller调用service。这个service是和rabbitMQ打交道的
public class MessageProviderImpl implements IMessageProvider {

    @Resource
    private MessageChannel output; // 消息的发送管道,MessageChannel对象的实例名必须是output

    @Override
    public String send() {
        String serial = UUID.randomUUID().toString();

        //创建消息,通过output这个管道向消息中间件发消息
//        Message message = MessageBuilder.withPayload(serial).build();
//        output.send(message);
        this.output.send(MessageBuilder.withPayload(serial).build()); // 创建并发送消息
        System.out.println("***serial: " + serial);

        return serial;
    }
}
Controller:
package com.aliyun.controller;

import com.aliyun.service.IMessageProvider;
import org.springframework.web.bind.annotation.GetMapping;
import org.springframework.web.bind.annotation.RestController;

import javax.annotation.Resource;

/**
 * @Author:meng_xiangxin
 * @Date: 2022/12/22 9:25
 * @Description:
 */
@RestController
public class SendMessageController {
    @Resource
    private IMessageProvider messageProvider;

    @GetMapping(value = "/sendMessage")
    public String sendMessage() {
        return messageProvider.send();
    }
}
测试
启动7001、7002、8801

多次访问http://localhost:8801/sendMessage
消息驱动之消费者8802
新建cloud-stream-rabbitmq-consumer8802
pom
<?xml version="1.0" encoding="UTF-8"?>
<project xmlns="http://maven.apache.org/POM/4.0.0"
         xmlns:xsi="http://www.w3.org/2001/XMLSchema-instance"
         xsi:schemaLocation="http://maven.apache.org/POM/4.0.0 http://maven.apache.org/xsd/maven-4.0.0.xsd">
    <parent>
        <artifactId>springcloud</artifactId>
        <groupId>org.example</groupId>
        <version>1.0-SNAPSHOT</version>
    </parent>
    <modelVersion>4.0.0</modelVersion>

    <artifactId>cloud-stream-rabbitmq-consumer8802</artifactId>

    <properties>
        <maven.compiler.source>8</maven.compiler.source>
        <maven.compiler.target>8</maven.compiler.target>
    </properties>
    <dependencies>
        <!--rabbitMQ-->
        <dependency>
            <groupId>org.springframework.cloud</groupId>
            <artifactId>spring-cloud-starter-stream-rabbit</artifactId>
        </dependency>
        <!--eureka client-->
        <dependency>
            <groupId>org.springframework.cloud</groupId>
            <artifactId>spring-cloud-starter-netflix-eureka-client</artifactId>
        </dependency>
        <!--web/actuator这两个一般一起使用,写在一起-->
        <dependency>
            <groupId>org.springframework.boot</groupId>
            <artifactId>spring-boot-starter-web</artifactId>
        </dependency>
        <dependency>
            <groupId>org.springframework.boot</groupId>
            <artifactId>spring-boot-starter-actuator</artifactId>
        </dependency>
        <!--基础配置-->
        <dependency>
            <groupId>org.springframework.boot</groupId>
            <artifactId>spring-boot-devtools</artifactId>
            <scope>runtime</scope>
            <optional>true</optional>
        </dependency>
        <dependency>
            <groupId>org.projectlombok</groupId>
            <artifactId>lombok</artifactId>
            <optional>true</optional>
        </dependency>
        <dependency>
            <groupId>org.springframework.boot</groupId>
            <artifactId>spring-boot-starter-test</artifactId>
            <scope>test</scope>
        </dependency>
    </dependencies>
</project>
application.yml
8801是生产者是output,8802是消费者是input
server:
  port: 8802

spring:
  application:
    name: cloud-stream-consumer
  cloud:
    stream:
      binders: # 在此处配置要绑定的rabbitmq的服务信息;
        defaultRabbit: # 表示定义的名称,用于于binding整合
          type: rabbit # 消息组件类型
          environment: # 设置rabbitmq的相关的环境配置
            spring:
              rabbitmq:
                host: localhost
                port: 5672
                username: guest
                password: guest
      bindings: # 服务的整合处理
        input: # 这个名字是一个通道的名称
          destination: studyExchange # 表示要使用的Exchange名称定义
          content-type: application/json # 设置消息类型,本次为对象json,如果是文本则设置“text/plain”
          binder: { defaultRabbit } # 设置要绑定的消息服务的具体设置
          group: aliyunA

eureka:
  client: # 客户端进行Eureka注册的配置
    service-url:
      defaultZone: http://localhost:7001/eureka,http://localhost:7002/eureka
  instance:
    lease-renewal-interval-in-seconds: 2 # 设置心跳的时间间隔(默认是30秒)
    lease-expiration-duration-in-seconds: 5 # 如果现在超过了5秒的间隔(默认是90秒)
    instance-id: receive-8802.com  # 在信息列表时显示主机名称
    prefer-ip-address: true     # 访问的路径变为IP地址
主启动
package com;

import org.springframework.boot.SpringApplication;
import org.springframework.boot.autoconfigure.SpringBootApplication;
import org.springframework.cloud.netflix.eureka.EnableEurekaClient;

@SpringBootApplication
@EnableEurekaClient
public class StreamMQMain8802 {
    public static void main(String[] args) {
        SpringApplication.run(StreamMQMain8802.class, args);
    }
}
业务
package com.aliyun;

import org.springframework.beans.factory.annotation.Value;
import org.springframework.cloud.stream.annotation.EnableBinding;
import org.springframework.cloud.stream.annotation.StreamListener;
import org.springframework.cloud.stream.messaging.Sink;
import org.springframework.messaging.Message;
import org.springframework.stereotype.Component;

/**
 * @Author:meng_xiangxin
 * @Date: 2022/12/22 9:44
 * @Description:
 */
@Component
@EnableBinding(Sink.class) //可以理解为我们定义一个消息消费者的接收管道
public class ReceiveMessageListener {
    @Value("${server.port}")
    private String serverPort;

    @StreamListener(Sink.INPUT) //输入源:作为一个消息监听者
    public void input(Message<String> message) {
        //获取到消息
        String messageStr = message.getPayload();
        System.out.println("消费者1号,------->接收到的消息:" + messageStr + "\t port: "+serverPort);
    }
}
高级特性:分组消费与持久化
依照8802,clone出一份cloud-stream-rabbitmq-consumer8803
Pom
<?xml version="1.0" encoding="UTF-8"?>
<project xmlns="http://maven.apache.org/POM/4.0.0"
         xmlns:xsi="http://www.w3.org/2001/XMLSchema-instance"
         xsi:schemaLocation="http://maven.apache.org/POM/4.0.0 http://maven.apache.org/xsd/maven-4.0.0.xsd">
    <parent>
        <artifactId>springcloud</artifactId>
        <groupId>org.example</groupId>
        <version>1.0-SNAPSHOT</version>
    </parent>
    <modelVersion>4.0.0</modelVersion>

    <artifactId>cloud-stream-rabbitmq-consumer8803</artifactId>

    <properties>
        <maven.compiler.source>8</maven.compiler.source>
        <maven.compiler.target>8</maven.compiler.target>
    </properties>
    <dependencies>
        <!--rabbitMQ-->
        <dependency>
            <groupId>org.springframework.cloud</groupId>
            <artifactId>spring-cloud-starter-stream-rabbit</artifactId>
        </dependency>
        <!--eureka client-->
        <dependency>
            <groupId>org.springframework.cloud</groupId>
            <artifactId>spring-cloud-starter-netflix-eureka-client</artifactId>
        </dependency>
        <!--web/actuator这两个一般一起使用,写在一起-->
        <dependency>
            <groupId>org.springframework.boot</groupId>
            <artifactId>spring-boot-starter-web</artifactId>
        </dependency>
        <dependency>
            <groupId>org.springframework.boot</groupId>
            <artifactId>spring-boot-starter-actuator</artifactId>
        </dependency>
        <!--基础配置-->
        <dependency>
            <groupId>org.springframework.boot</groupId>
            <artifactId>spring-boot-devtools</artifactId>
            <scope>runtime</scope>
            <optional>true</optional>
        </dependency>
        <dependency>
            <groupId>org.projectlombok</groupId>
            <artifactId>lombok</artifactId>
            <optional>true</optional>
        </dependency>
        <dependency>
            <groupId>org.springframework.boot</groupId>
            <artifactId>spring-boot-starter-test</artifactId>
            <scope>test</scope>
        </dependency>
    </dependencies>
</project>
application.yml
server:
  port: 8803

spring:
  application:
    name: cloud-stream-consumer
  cloud:
    stream:
      binders: # 在此处配置要绑定的rabbitmq的服务信息;
        defaultRabbit: # 表示定义的名称,用于于binding整合
          type: rabbit # 消息组件类型
          environment: # 设置rabbitmq的相关的环境配置
            spring:
              rabbitmq:
                host: localhost
                port: 5672
                username: guest
                password: guest
      bindings: # 服务的整合处理
        input: # 这个名字是一个通道的名称
          destination: studyExchange # 表示要使用的Exchange名称定义
          content-type: application/json # 设置消息类型,本次为对象json,如果是文本则设置“text/plain”
          binder: { defaultRabbit } # 设置要绑定的消息服务的具体设置
          group: aliyunB
eureka:
  client: # 客户端进行Eureka注册的配置
    service-url:
      defaultZone: http://localhost:7001/eureka,http://localhost:7002/eureka
  instance:
    lease-renewal-interval-in-seconds: 2 # 设置心跳的时间间隔(默认是30秒)
    lease-expiration-duration-in-seconds: 5 # 如果现在超过了5秒的间隔(默认是90秒)
    instance-id: receive-8803.com  # 在信息列表时显示主机名称
    prefer-ip-address: true     # 访问的路径变为IP地址
主启动类
package com.aliyun;

import org.springframework.boot.SpringApplication;
import org.springframework.boot.autoconfigure.SpringBootApplication;
import org.springframework.cloud.netflix.eureka.EnableEurekaClient;

/**
 * @Author:meng_xiangxin
 * @Date: 2022/12/22 10:20
 * @Description:
 */
@SpringBootApplication
@EnableEurekaClient
public class StreamMQMain8803 {
    public static void main(String[] args) {
        SpringApplication.run(StreamMQMain8803.class, args);
    }

}
业务类
package com.aliyun;

import org.springframework.beans.factory.annotation.Value;
import org.springframework.cloud.stream.annotation.EnableBinding;
import org.springframework.cloud.stream.annotation.StreamListener;
import org.springframework.cloud.stream.messaging.Sink;
import org.springframework.messaging.Message;
import org.springframework.stereotype.Component;

/**
 * @Author:meng_xiangxin
 * @Date: 2022/12/22 10:24
 * @Description:
 */
@Component
@EnableBinding(Sink.class) //可以理解为我们定义一个消息消费者的接收管道
public class ReceiveMessageListener {
    @Value("${server.port}")
    private String serverPort;

    @StreamListener(Sink.INPUT)
    public void input(Message<String> message) {
        System.out.println("消费者2号,------->接收到的消息:" + message.getPayload() + "\t port: " + serverPort);
    }
}
启动测试
启动7001、7002、8801(消息生产)、8802(消息消费)、8803(消息消费)

此时studyexchange有两个订阅者:8802、8803


测试成功
运行后的问题1:重复消费问题
目前8801发送一条消息后,8802和8803会同时收到8801的消息,存在重复消费问题。
为什么要解决重复消费问题
比如8801下一个订单,但是被两个服务获取消费,会多扣一次款。
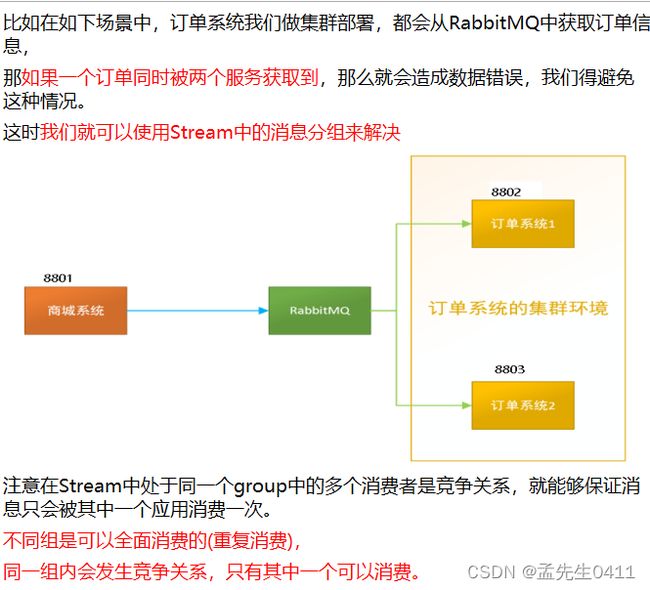
默认分组:流水号
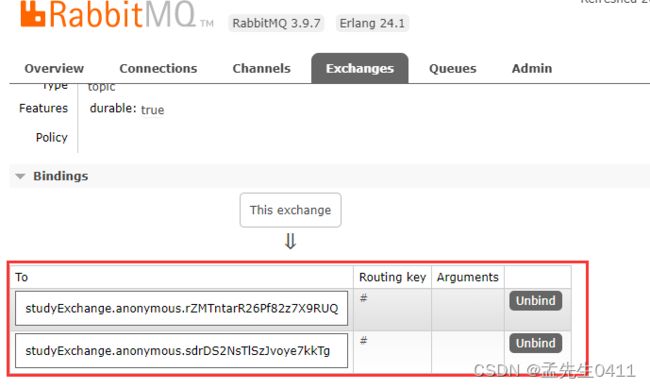
8802和8803默认是两个不同的分组。不同的微服务,默认分组是不同的,不同的组可以消费同一个消息
解决:消息分组
微服务应用放置于同一个group中,就能够保证消息只会被其中一个应用消费一次。不同的组是可以全面消费的(重复消费),同一个组内的多个消费者会发生竞争关系,只有其中一个可以消费。
先自定义分组,然后自定义配置分为同一个组,解决重复消费问题。
自定义分组
将8802和8803分为两个不同的组,atguiguA和atguiguB
修改8802和8803的yml
  bindings: # 服务的整合处理
        input: # 这个名字是一个通道的名称
          destination: studyExchange # 表示要使用的Exchange名称定义
          content-type: application/json # 设置消息类型,本次为对象json,如果是文本则设置“text/plain”
          binder: { defaultRabbit } # 设置要绑定的消息服务的具体设置
          group: aliyunA

  bindings: # 服务的整合处理
        input: # 这个名字是一个通道的名称
          destination: studyExchange # 表示要使用的Exchange名称定义
          content-type: application/json # 设置消息类型,本次为对象json,如果是文本则设置“text/plain”
          binder: { defaultRabbit } # 设置要绑定的消息服务的具体设置
          group: aliyunB
rabbitMQ 中 queue会有所显示
虽然实现了自定义分组,但是重复消费的问题依然存在。
分布式微服务应用为了实现高可用和负载均衡,实际上都会部署多个实例,本例阳哥启动了两个消费微服务(8802/8803)
多数情况,生产者发送消息给某个具体微服务时只希望被消费一次,按照上面我们启动两个应用的例子,虽然它们同属一个应用,但是这个消息出现了被重复消费两次的情况。为了解决这个问题,在Spring Cloud Stream中提供了消费组的概念。
8802/8803实现了轮询分组,每次只有一个消费者接收消息,8801模块的发的消息只能被8802或8803其中一个接收到,这样避免了重复消费。
运行后的问题:消息持久化问题
先启动8802,无分组属性配置,后台没有打出来消息
发现8802没有收到消息,消息丢失。。。。
再启动8803,有分组属性配置,后台打印出来了MQ上的消息
SpringCloud Sleuth 分布式请求链路跟踪
概述
分布式请求链路跟踪:
为什么会出现这个技术,要解决哪些问题。
在微服务框架中,一个客户端发起的请求在后端系统中会经过多次不同的服务节点调用来协同产生最后的请求结果,每一个前段请求都会形成一条复杂的分布式服务调用链路,链路中的任何一环出现高延时或错误都会引起整个请求最后的失败。
SpringCloudSleuth提供了一套完整的服务跟踪的解决方案,在分布式系统中提供乐追踪解决方案并且兼容支持了zipkin。
搭建链路监控步骤
zipkin
Sleuth:负责跟踪整理,zipkin:负责展现
下载
SpringCloud从F版起已不需要自己构建Zipkin Server了,只需调用jar包即可
下载地址
zipkin-server-2.12.9-exec.jar
运行jar&运行控制台
cd到zipkin-server-2.12.9-exec.jar的下载目录
直接在cmd中运行java -jar zipkin-server-2.12.9-exec.jar

访问http://localhost:9411/zipkin/ web交互界面
完整的调用链路
表示一请求链路,一条链路通过Trace Id唯一标识,Span标识发起的请求信息,各span通过parent id 关联起来
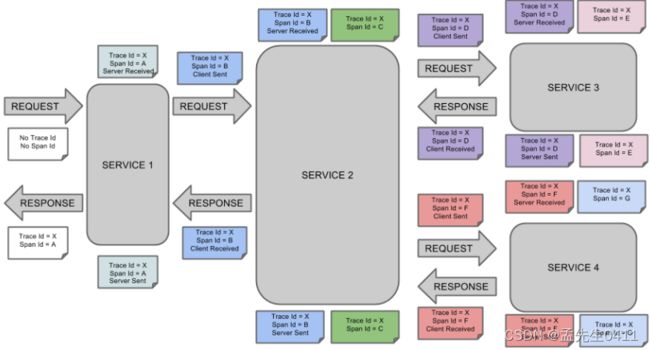
Trace:类似于树结构的Span集合,表示一条调用链路,存在唯一标识。
Span:表示调用链路来源,通俗的理解Span就是一次请求信息。各个Span通过parentID关联起来。
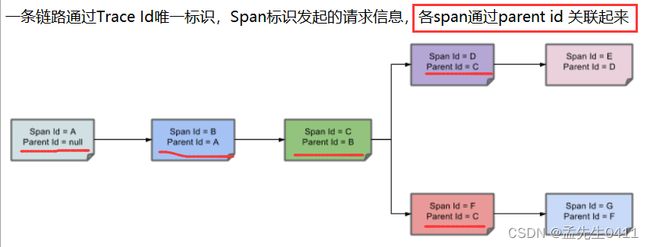

服务提供者cloud-provider-payment8001
引入spring-cloud-starter-zipkin依赖,其包含了sleuth+zipkin
  <!--包含了sleuth+zipkin-->
        <dependency>
            <groupId>org.springframework.cloud</groupId>
            <artifactId>spring-cloud-starter-zipkin</artifactId>
        </dependency>
yml
zipkin:
    base-url: http://localhost:9411
  sleuth:
    sampler:
      #采样率值介于 0 到 1 之间,1 则表示全部采集
      probability: 1
业务类PaymentController
@GetMapping("/payment/zipkin")
public String paymentZipkin() {
    return "hi ,i'am paymentzipkin server fall back,welcome to atguigu,O(∩_∩)O哈哈~";
}
服务消费者cloud-consumer-order80
pom
引入spring-cloud-starter-zipkin依赖,其包含了sleuth+zipkin
       <!--包含了sleuth+zipkin-->
        <dependency>
            <groupId>org.springframework.cloud</groupId>
            <artifactId>spring-cloud-starter-zipkin</artifactId>
        </dependency>
// ====================> zipkin+sleuth
@GetMapping("/comsumer/payment/zipkin")
public String paymentZipKin() {
    String result = restTemplate.getForObject("http://localhost:8001" + "/payment/zipkin/", String.class);
    return result;
}
测试
启动7001、7002、8001、80

8001自测

80调用8001

打开浏览器访问:http://localhost:9411
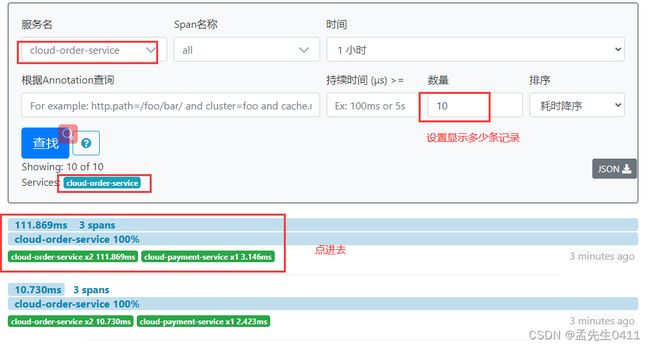
order服务调用了支付服务
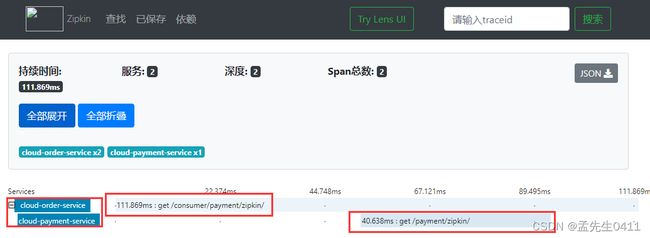 说明:order调用的payment服务,发送的是什么请求,请求链接,都有详细的记录
查看依赖关系
SpringCloud Alibaba Nacos服务注册和配置中心
SpringCloud Alibaba简介
为什么出现 SpringCloud AlibabaSpring Cloud Netflix项目进入维护模式
https://spring.io/blog/2018/12/12/spring-cloud-greenwich-rc1-available-now
进入维护模式意味着Spring Cloud Netflix 将不再开发新的组件
我们都知道Spring Cloud 版本迭代算是比较快的,因而出现了很多重大ISSUE都还来不及Fix就又推另一个Release了。进入维护模式意思就是目前一直以后一段时间Spring Cloud Netflix提供的服务和功能就这么多了,不在开发新的组件和功能了。以后将以维护和Merge分支Full Request为主
新组件功能将以其他替代平代替的方式实现。
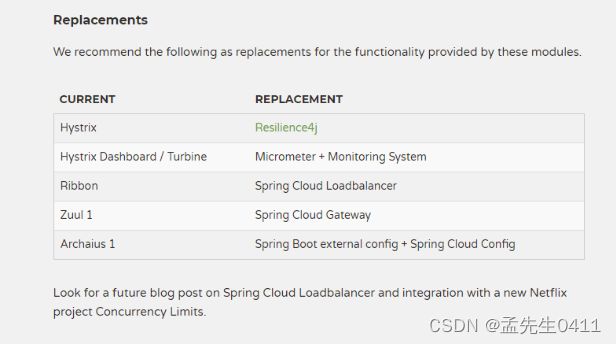
SpringCloud Alibaba带来了什么
官网
能干什么
服务限流降级:默认支持 Servlet、Feign、RestTemplate、Dubbo 和 RocketMQ 限流降级功能的接入,可以在运行时通过控制台实时修改限流降级规则,还支持查看限流降级 Metrics 监控。
服务注册与发现:适配 Spring Cloud 服务注册与发现标准,默认集成了 Ribbon 的支持。
分布式配置管理:支持分布式系统中的外部化配置,配置更改时自动刷新。
消息驱动能力:基于 Spring Cloud Stream 为微服务应用构建消息驱动能力。
阿里云对象存储:阿里云提供的海量、安全、低成本、高可靠的云存储服务。支持在任何应用、任何时间、任何地点存储和访问任意类型的数据。
分布式任务调度:提供秒级、精准、高可靠、高可用的定时(基于 Cron 表达式)任务调度服务。同时提供分布式的任务执行模型,如网格任务。网格任务支持海量子任务均匀分配到所有 Worker(schedulerx-client)上执行。
去哪里下载
https://github.com/alibaba/spring-cloud-alibaba/blob/master/README-zh.md
之前在父工程的pom文件中已经引入了alibaba的依赖
<dependencyManagement>
    <dependencies>
        <dependency>
            <groupId>com.alibaba.cloud</groupId>
            <artifactId>spring-cloud-alibaba-dependencies</artifactId>
            <version>2.1.0.RELEASE</version>
            <type>pom</type>
            <scope>import</scope>
        </dependency>
    </dependencies>
</dependencyManagement>
学习资料的获取
官网:https://spring.io/projects/spring-cloud-alibaba#overview
英文:
https://github.com/alibaba/spring-cloud-alibaba
https://spring-cloud-alibaba-group.github.io/github-pages/greenwich/spring-cloud-alibaba.html
中文:https://github.com/alibaba/spring-cloud-alibaba/blob/master/README-zh.md
SpringCloud Alibaba Nacos服务注册和配置中心
对应着我们前面学的:Eureka/Consul/Zookeeper(服务注册) Config+Bus(配置中心)
Nacos简介
Nacos——Naming Configuration Service
是什么
● 一个更易于构建云原生应用的动态服务发现、配置管理和服务的管理平台。
● Nacos:Dynamic Naming and Configuration Service
● Nacos就是注册中心 + 配置中心的组合, Nacos = Eureka + Config + Bus
能干什么
替代Eureka做服务注册中心;替代Config做服务配置中心
下载地址
https://github.com/alibaba/Nacos
官网文档:https://nacos.io/zh-cn/index.html
https://spring-cloud-alibaba-group.github.io/github-pages/greenwich/spring-cloud-alibaba.html#_spring_cloud_alibaba_nacos_discovery
各注册中心比较
安装并运行Nacos
本地需要准备java8+maven环境。
官网下载:https://github.com/alibaba/nacos/releases
老师安装的1.1.4,我这里使用的最新版2.0.3
解压安装包,运行bin目录下的startup.cmd
默认的是集群模式,我们需要单机启动cmd中输入:
startup.cmd -m standalone 即可通过单机模式启动
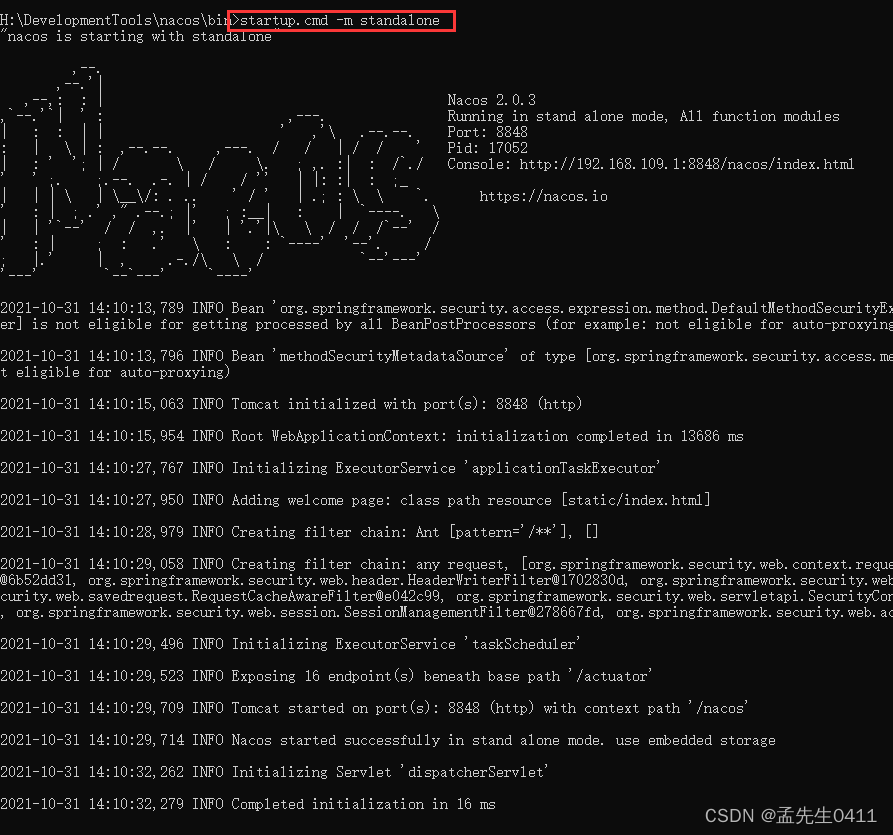
命令运行成功后直接访问http://localhost:8848/nacos 默认账号密码都是nacos

启动成功。
Nacos作为服务注册中心演示
基于Nacos的服务提供者
建moudle
cloud-alibaba-provider-payment9001
pom
父工程中需要引入alibaba的依赖,之前已经引入过了
<?xml version="1.0" encoding="UTF-8"?>
<project xmlns="http://maven.apache.org/POM/4.0.0"
         xmlns:xsi="http://www.w3.org/2001/XMLSchema-instance"
         xsi:schemaLocation="http://maven.apache.org/POM/4.0.0 http://maven.apache.org/xsd/maven-4.0.0.xsd">
    <parent>
        <artifactId>springcloud</artifactId>
        <groupId>org.example</groupId>
        <version>1.0-SNAPSHOT</version>
    </parent>
    <modelVersion>4.0.0</modelVersion>

    <artifactId>cloud-alibaba-provider-payment9001</artifactId>

    <properties>
        <maven.compiler.source>8</maven.compiler.source>
        <maven.compiler.target>8</maven.compiler.target>
    </properties>


    <dependencies>
        <!--SpringCloud ailibaba nacos -->
        <!-- nacos config-->
<!--                <dependency>-->
<!--                    <groupId>com.alibaba.cloud</groupId>-->
<!--                    <artifactId>spring-cloud-starter-alibaba-nacos-config</artifactId>-->
<!--                    <version>2.2.2.RELEASE</version>-->
<!--                </dependency>-->
        <!--SpringCloud Alibaba nacos-->
                <dependency>
                    <groupId>com.alibaba.cloud</groupId>
                    <artifactId>spring-cloud-starter-alibaba-nacos-discovery</artifactId>
                    <version>2.2.2.RELEASE</version>
                </dependency>
        <!-- SpringBoot整合Web组件 -->
        <dependency>
            <groupId>org.springframework.boot</groupId>
            <artifactId>spring-boot-starter-web</artifactId>
        </dependency>
        <dependency>
            <groupId>org.springframework.boot</groupId>
            <artifactId>spring-boot-starter-actuator</artifactId>
        </dependency>
        <!--日常通用jar包配置-->
        <dependency>
            <groupId>org.springframework.boot</groupId>
            <artifactId>spring-boot-devtools</artifactId>
            <scope>runtime</scope>
            <optional>true</optional>
        </dependency>
        <dependency>
            <groupId>org.projectlombok</groupId>
            <artifactId>lombok</artifactId>
            <optional>true</optional>
        </dependency>
        <dependency>
            <groupId>org.springframework.boot</groupId>
            <artifactId>spring-boot-starter-test</artifactId>
            <scope>test</scope>
        </dependency>
    </dependencies>

</project>
yml
server:
  port: 9001

spring:
  application:
    name: nacos-payment-provider
  cloud:
    nacos:
      discovery:
        server-addr: localhost:8848 #配置Nacos地址,注册到Nacos
# 做监控需要把这个全部暴露出来
management:
  endpoints:
    web:
      exposure:
        include: '*'
主启动类
package com;

import org.springframework.boot.SpringApplication;
import org.springframework.boot.autoconfigure.SpringBootApplication;
import org.springframework.cloud.client.discovery.EnableDiscoveryClient;

@SpringBootApplication
@EnableDiscoveryClient //这里跟以前不同了,不再是EnableEurekaClient
public class PaymentMain9001 {
    public static void main(String[] args) {
        SpringApplication.run(PaymentMain9001.class, args);
    }
}
业务类
package com.aliyun;

import com.netflix.client.config.DefaultClientConfigImpl;
import com.netflix.client.config.IClientConfig;
import org.springframework.beans.factory.annotation.Value;
import org.springframework.context.annotation.Bean;
import org.springframework.web.bind.annotation.GetMapping;
import org.springframework.web.bind.annotation.PathVariable;
import org.springframework.web.bind.annotation.RestController;

@RestController
public class PaymentController {
    @Bean
    public IClientConfig iClientConfig() {
        return new DefaultClientConfigImpl();
    }


    @Value("${server.port}")
    private String serverPort;

    @GetMapping(value = "/payment/nacos/{id}")
    public String getPayment(@PathVariable("id") Integer id) {
        return "nacos registry,serverPort" + serverPort + "\t id" + id;
    }
}
测试
这里不像eureka还要写注册中心微服务,直接安装打开nacos即可。
启动9001,查看nacos控制台,注册成功.
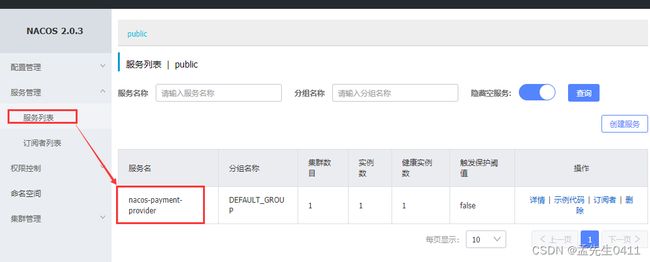
访问http://localhost:9001/payment/nacos/1

相同配置再新建一个module 9002
步骤与9001一致,就是端口号改成9002
这里有一个简单的方法,虚拟映射一个和9001配置相同的9011微服务模块,端口号是9011

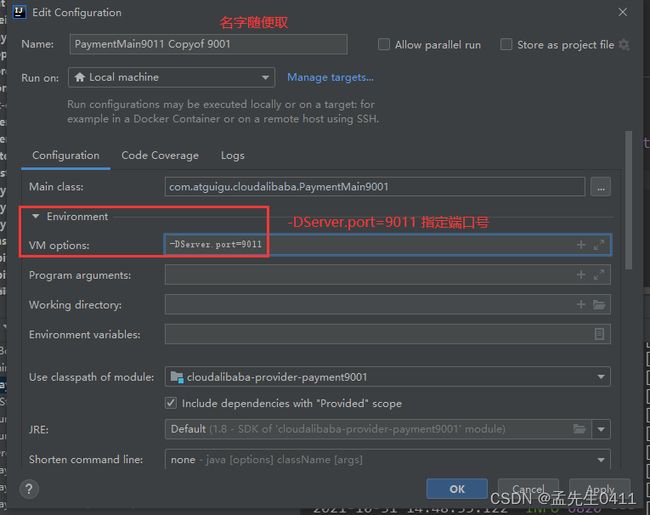
现在有两个支付模块,9001和虚拟映射的9011。

基于Nacos的服务消费者
Nacos自带负载均衡
新建module cloud-alibaba-consumer-nacos-order83
pom
nacos自带负载均衡
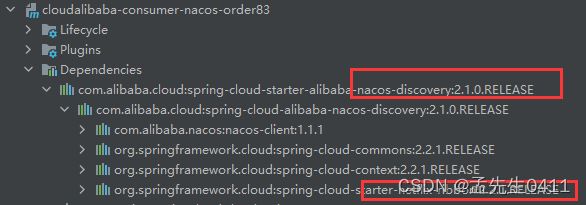
Ribbon:支持负载均衡,自带RestTemplate
<?xml version="1.0" encoding="UTF-8"?>
<project xmlns="http://maven.apache.org/POM/4.0.0"
         xmlns:xsi="http://www.w3.org/2001/XMLSchema-instance"
         xsi:schemaLocation="http://maven.apache.org/POM/4.0.0 http://maven.apache.org/xsd/maven-4.0.0.xsd">
    <parent>
        <artifactId>springcloud</artifactId>
        <groupId>org.example</groupId>
        <version>1.0-SNAPSHOT</version>
    </parent>
    <modelVersion>4.0.0</modelVersion>

    <artifactId>cloud-alibaba-consumer-nacos-order83</artifactId>

    <properties>
        <maven.compiler.source>8</maven.compiler.source>
        <maven.compiler.target>8</maven.compiler.target>
    </properties>

    <dependencies>
        <!--SpringCloud ailibaba nacos -->
        <dependency>
            <groupId>com.alibaba.cloud</groupId>
            <artifactId>spring-cloud-starter-alibaba-nacos-discovery</artifactId>
        </dependency>
        <!-- 引入自己定义的api通用包,可以使用Payment支付Entity -->
        <dependency>
            <groupId>org.example</groupId>
            <artifactId>cloud-api-commons</artifactId>
            <version>1.0-SNAPSHOT</version>
            <scope>compile</scope>
        </dependency>
        <!-- SpringBoot整合Web组件 -->
        <dependency>
            <groupId>org.springframework.boot</groupId>
            <artifactId>spring-boot-starter-web</artifactId>
        </dependency>
        <dependency>
            <groupId>org.springframework.boot</groupId>
            <artifactId>spring-boot-starter-actuator</artifactId>
        </dependency>
        <!--日常通用jar包配置-->
        <dependency>
            <groupId>org.springframework.boot</groupId>
            <artifactId>spring-boot-devtools</artifactId>
            <scope>runtime</scope>
            <optional>true</optional>
        </dependency>
        <dependency>
            <groupId>org.projectlombok</groupId>
            <artifactId>lombok</artifactId>
            <optional>true</optional>
        </dependency>
        <dependency>
            <groupId>org.springframework.boot</groupId>
            <artifactId>spring-boot-starter-test</artifactId>
            <scope>test</scope>
        </dependency>
    </dependencies>
</project>
yml
server:
  port: 83


spring:
  application:
    name: nacos-order-consumer
  cloud:
    nacos:
      discovery:
        server-addr: localhost:8848

#消费者将要去访问的微服务名称(注册成功进nacos的微服务提供者)
service-url:
  nacos-user-service: http://nacos-payment-provider
主启动类
package com;

import org.springframework.boot.SpringApplication;
import org.springframework.boot.autoconfigure.SpringBootApplication;
import org.springframework.cloud.client.discovery.EnableDiscoveryClient;

@SpringBootApplication
@EnableDiscoveryClient
public class OrderNacosMain83 {
    public static void main(String[] args) {
        SpringApplication.run(OrderNacosMain83.class, args);
    }
}
业务类
package com.aliyun.config;

import com.netflix.client.config.DefaultClientConfigImpl;
import com.netflix.client.config.IClientConfig;
import org.springframework.cloud.client.loadbalancer.LoadBalanced;
import org.springframework.context.annotation.Bean;
import org.springframework.context.annotation.Configuration;
import org.springframework.web.client.RestTemplate;

/**
 * @Author:meng_xiangxin
 * @Date: 2022/12/23 8:50
 * @Description:
 */
@Configuration
public class ApplicationContextBean {
    @Bean
    @LoadBalanced
    public RestTemplate getRestTemplate() {
        return new RestTemplate();
    }

    @Bean
    public IClientConfig iClientConfig() {
        return new DefaultClientConfigImpl();
    }
}
package com.aliyun.controller;

import lombok.extern.slf4j.Slf4j;
import org.springframework.beans.factory.annotation.Value;
import org.springframework.web.bind.annotation.GetMapping;
import org.springframework.web.bind.annotation.PathVariable;
import org.springframework.web.bind.annotation.RestController;
import org.springframework.web.client.RestTemplate;

import javax.annotation.Resource;

/**
 * @Author:meng_xiangxin
 * @Date: 2022/12/23 8:52
 * @Description:
 */
@RestController
@Slf4j
public class OrderNacosController {
    @Resource
    private RestTemplate restTemplate;
    @Value("${service-url.nacos-user-service}")
    private String serverURL;

    @GetMapping("/consumer/payment/nacos/{id}")
    public String paymentInfo(@PathVariable("id") Long id) {
        String forObject = restTemplate.getForObject(serverURL + "/payment/nacos" + id, String.class);
        return forObject;
    }
}

测试
启动9001、9002、83
nacos控制台

测试链接:http://localhost:83/consumer/payment/nacos/1
发现9001与9002交替出现,即轮询负载均衡。
可能出现的问题:
当消费者通过http://nacos-payment-provider去调用微服务时抛出UnknowHostException:未知主机名异常。
这是因为nacos-payment-provider对应两个微服务实例,他不知道用哪个微服务,所以报错。
解决:加上负载均衡注解 @LoadBalanced
package com.aliyun.config;

import com.netflix.client.config.DefaultClientConfigImpl;
import com.netflix.client.config.IClientConfig;
import org.springframework.cloud.client.loadbalancer.LoadBalanced;
import org.springframework.context.annotation.Bean;
import org.springframework.context.annotation.Configuration;
import org.springframework.web.client.RestTemplate;

/**
 * @Author:meng_xiangxin
 * @Date: 2022/12/23 8:50
 * @Description:
 */
@Configuration
public class ApplicationContextBean {
    @Bean
    @LoadBalanced
    public RestTemplate getRestTemplate() {
        return new RestTemplate();
    }

    @Bean
    public IClientConfig iClientConfig() {
        return new DefaultClientConfigImpl();
    }
}
服务注册中心对比
![]()
Nacos与CAP
Nacos可以在CP与AP之间切换
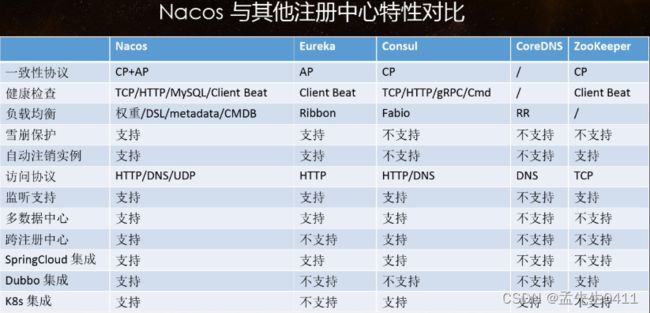

CP与AP的切换
C(consistency):所有节点在同一时间看到的数据是一致的,强一致性;
A(availability):的定义是所有的请求都会收到响应,最起码有一个兜底回复,高可用性。
何时选择使用何种模式?
AP:
一般来说,如果不需要存储服务级别的信息且服务实例是通过nacos-client注册,并能够保持心跳上报,那么就可以选择AP模式。当前主流的服务如 Spring cloud 和 Dubbo 服务,都适用于AP模式,AP模式为了服务的可能性而减弱了一致性,因此AP模式下只支持注册临时实例。
CP:
如果需要在服务级别编辑或者存储配置信息,那么 CP 是必须,K8S服务和DNS服务则适用于CP模式。
CP模式下则支持注册持久化实例,此时则是以 Raft 协议为集群运行模式,该模式下注册实例之前必须先注册服务,如果服务不存在,则会返回错误。
怎么切换:
curl -X PUT ‘$NACOS_SERVER:8848/nacos/v1/ns/operator/switches?entry=serverMode&value=CP’
Nacos作为服务配置中心演示
以前我们将所有的配置信息写到了GitHub上,用Config+Bus来进行自动刷新和动态的更新。
现在我们可以直接把配置文件写进Nacos,然后再用Nacos做类似于config这样的功能,直接从Nacos上抓取我们的配置信息。
Nacos作为配置中心——基础配置
主要是添加一个:nacos-config依赖
<!--nacos-config-->
<dependency>
<groupId>com.alibaba.cloud</groupId>
<artifactId>spring-cloud-starter-alibaba-nacos-config</artifactId>
</dependency>
建module cloud-alibaba-config-nacos-client3377
<?xml version="1.0" encoding="UTF-8"?>
<project xmlns="http://maven.apache.org/POM/4.0.0"
         xmlns:xsi="http://www.w3.org/2001/XMLSchema-instance"
         xsi:schemaLocation="http://maven.apache.org/POM/4.0.0 http://maven.apache.org/xsd/maven-4.0.0.xsd">
    <parent>
        <artifactId>springcloud</artifactId>
        <groupId>org.example</groupId>
        <version>1.0-SNAPSHOT</version>
    </parent>
    <modelVersion>4.0.0</modelVersion>

    <artifactId>cloud-alibaba-config-nacos-client3377</artifactId>

    <properties>
        <maven.compiler.source>8</maven.compiler.source>
        <maven.compiler.target>8</maven.compiler.target>
    </properties>
    <dependencies>
        <!--nacos-config-->
        <dependency>
            <groupId>com.alibaba.cloud</groupId>
            <artifactId>spring-cloud-starter-alibaba-nacos-config</artifactId>
        </dependency>
        <!--nacos-discovery-->
        <dependency>
            <groupId>com.alibaba.cloud</groupId>
            <artifactId>spring-cloud-starter-alibaba-nacos-discovery</artifactId>
        </dependency>
        <!--web + actuator-->
        <dependency>
            <groupId>org.springframework.boot</groupId>
            <artifactId>spring-boot-starter-web</artifactId>
        </dependency>
        <dependency>
            <groupId>org.springframework.boot</groupId>
            <artifactId>spring-boot-starter-actuator</artifactId>
        </dependency>
        <!--一般基础配置-->
        <dependency>
            <groupId>org.springframework.boot</groupId>
            <artifactId>spring-boot-devtools</artifactId>
            <scope>runtime</scope>
            <optional>true</optional>
        </dependency>
        <dependency>
            <groupId>org.projectlombok</groupId>
            <artifactId>lombok</artifactId>
            <optional>true</optional>
        </dependency>
        <dependency>
            <groupId>org.springframework.boot</groupId>
            <artifactId>spring-boot-starter-test</artifactId>
            <scope>test</scope>
        </dependency>
    </dependencies>

</project>
yml
这里需要配置两个,一个bootstrap和一个application。
原因:Nacos同springcloud-config一样,在项目初始化时,要保证先从配置中心进行配置拉取,拉取配置之后,才能保证项目的正常启动。
springboot中配置文件的加载是存在优先级顺序的,bootstrap优先级高于application。
全局的放在:bootstrap.yml 自己的放在:application.yml
bootstrap:
微服务端口:3377,服务名nacos-config-client,注册进nacos:localhost:8848 作为配置客户端
# nacos配置
server:
  port: 3377

spring:
  application:
    name: nacos-config-client
  cloud:
    nacos:
      discovery:
        server-addr: localhost:8848 #Nacos服务注册中心地址
      config:
        server-addr: localhost:8848 #Nacos作为配置中心地址
        file-extension: yaml #指定yaml格式的配置

# ${spring.application.name}-${spring.profile.active}.${spring.cloud.nacos.config.file-extension}
application:
spring:
  profiles:
    active: dev # 表示开发环境
主启动类
package com;

import org.springframework.boot.SpringApplication;
import org.springframework.boot.autoconfigure.SpringBootApplication;
import org.springframework.cloud.client.discovery.EnableDiscoveryClient;

/**
 * @Author:meng_xiangxin
 * @Date: 2022/12/23 9:08
 * @Description:
 */
@SpringBootApplication
@EnableDiscoveryClient
public class NacosConfigClientMain3377 {
    public static void main(String[] args) {
        SpringApplication.run(NacosConfigClientMain3377.class, args);
    }
}
业务类
通过Spring Cloud原生注解@RefreshScope 实现配置自动更新
package com.aliyun.controller;

import com.netflix.client.config.DefaultClientConfigImpl;
import com.netflix.client.config.IClientConfig;
import org.springframework.beans.factory.annotation.Value;
import org.springframework.cloud.context.config.annotation.RefreshScope;
import org.springframework.context.annotation.Bean;
import org.springframework.web.bind.annotation.GetMapping;
import org.springframework.web.bind.annotation.RestController;

/**
 * @Author:meng_xiangxin
 * @Date: 2022/12/23 9:09
 * @Description:
 */
@RestController
@RefreshScope
//在控制器类加入@RefreshScope注解使当前类下的配置支持Nacos的动态刷新功能。
public class ConfigClientController {
    @Bean
    public IClientConfig iClientConfig() {
        return new DefaultClientConfigImpl();
    }

    @Value("${config.info}")
    private String configInfo;

    @GetMapping("/config/info")
    public String getConfigInfo() {
        return configInfo;
    }
}
在Nacos中添加配置信息
Nacos中的匹配规则
理论:
● Nacos中的dataid的组成格式与SpringBoot配置文件中的匹配规则
官网:https://nacos.io/zh-cn/docs/quick-start-spring-cloud.html

注意nacos只识别yaml,不支持yml。
最终公式: s p r i n g . a p p l i c a t i o n . n a m e − {spring.application.name}- spring.application.name−{spring.profiles.active}.${spring.cloud.nacos.config.file-extension}
结果: nacos-config-client-dev.yaml
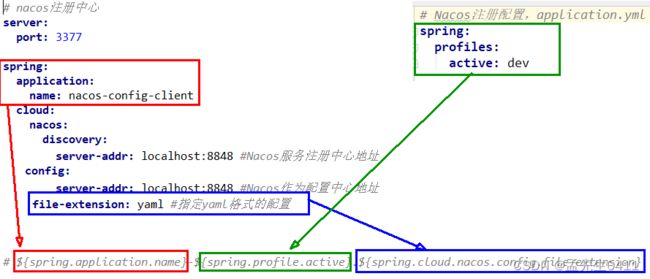
实操
配置新增:

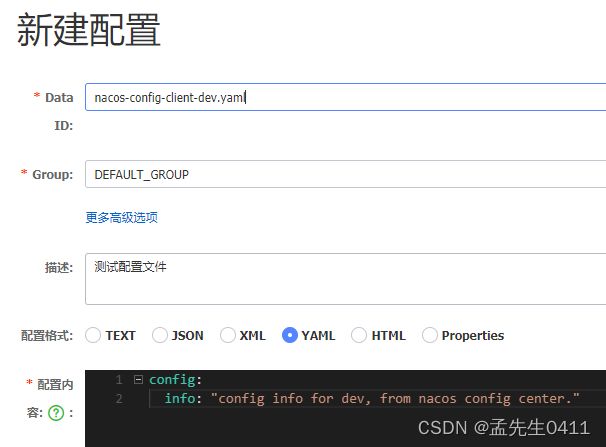
测试
启动3377
发送请求:http://localhost:3377/config/info

自带动态刷新:修改nacos中的yaml配置文件,再次调用查看配置,发现配置刷新了。
Nacos作为配置中心——分类配置
分布式开发中的多环境多项目管理问题
● 问题1:
实际开发中,通常一个系统会准备
dev开发环境
test测试环境
prod生产环境。
如何保证指定环境启动时服务能正确读取到Nacos上相应环境的配置文件呢?
● 问题2:
一个大型分布式微服务系统会有很多微服务子项目,
每个微服务项目又都会有相应的开发环境、测试环境、预发环境、正式环境…
那怎么对这些微服务配置进行管理呢?
Namespace+Group+Data ID三者关系?为什么这么设计?
类似Java里面的package名和类名,最外层的namespace是可以用于区分部署环境的,Group和DataID逻辑上区分两个目标对象。
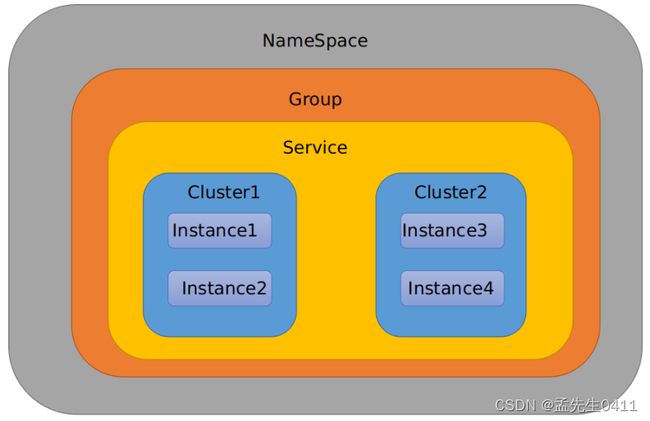
默认情况:
Namespace=public,Group=DEFAULT_GROUP, 默认Cluster是DEFAULT
Nacos默认的命名空间是public,Namespace主要用来实现隔离。
比方说我们现在有三个环境:开发、测试、生产环境,我们就可以创建三个Namespace,不同的Namespace之间是隔离的。
Group默认是DEFAULT_GROUP,Group可以把不同的微服务划分到同一个分组里面去
Service就是微服务;一个Service可以包含多个Cluster(集群),Nacos默认Cluster是DEFAULT,Cluster是对指定微服务的一个虚拟划分。
比方说为了容灾,将Service微服务分别部署在了杭州机房和广州机房,这时就可以给杭州机房的Service微服务起一个集群名称(HZ),给广州机房的Service微服务起一个集群名称(GZ),还可以尽量让同一个机房的微服务互相调用,以提升性能。
最后是Instance,就是微服务的实例。
三种方案加载配置
DataID方案
指定spring.profile.active和配置文件的DataID来使不同环境下读取不同的配置
默认空间+默认分组+新建dev和test两个DataID
● dev配置DataID,上一讲配置过
● 新建test配置DataID
通过spring.profile.active属性就能进行多环境下配置文件的读取
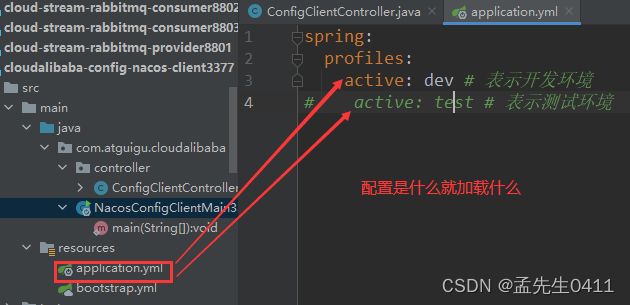
重启3377 测试http://localhost:3377/config/info,成功读取到test配置下的config.info

Group方案
默认Group是DEFAULT_GROUP,现在通过Group实现环境分区
新建一个配置文件,添加到DEV_GROUP分组
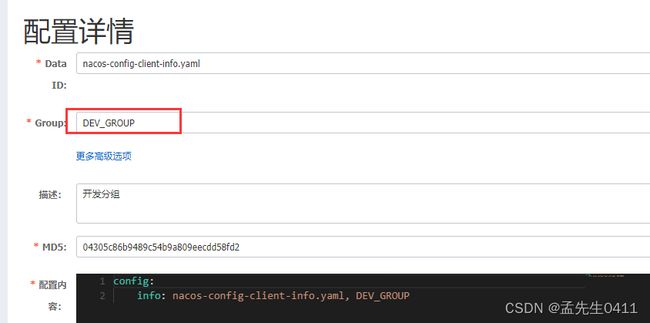
新建一个配置文件,添加到TEST_GROUP分组
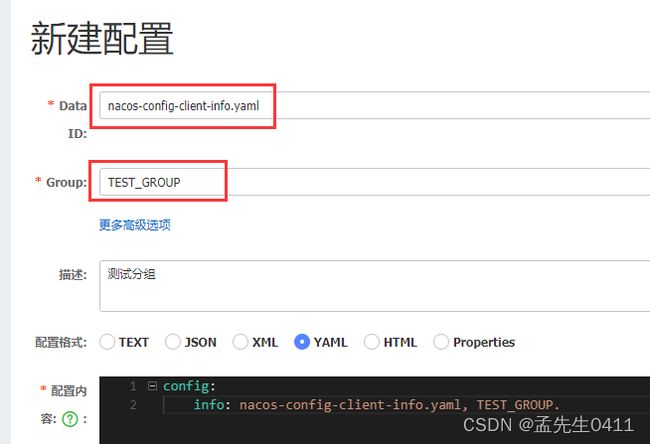

在config下增加一条group的配置即可。可配置为DEV_GROUP或TEST_GROUP
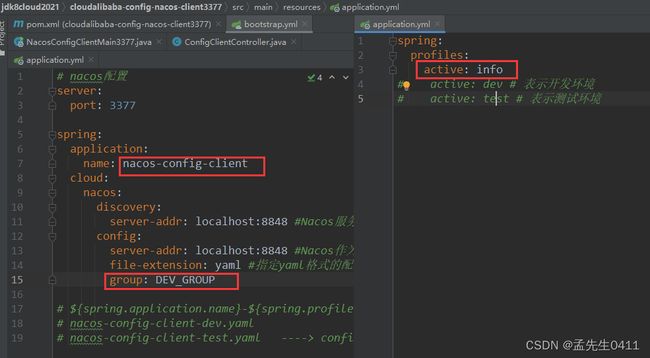
测试:

namesapce方案
新建dev/test的Namesapce
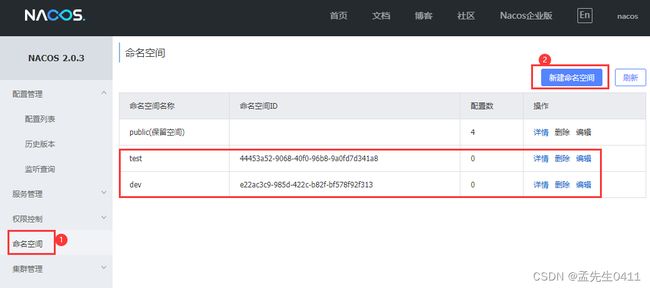
回到服务管理-服务列表查看
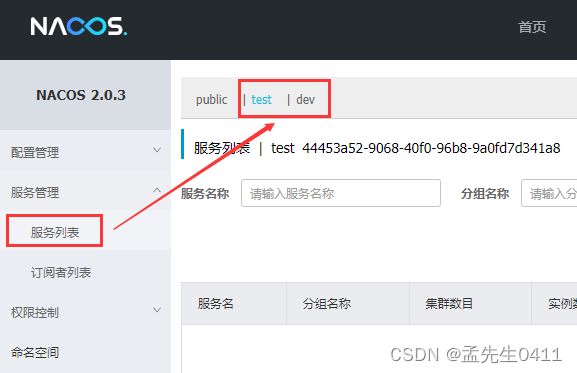
在这两个新建的namespace中分别新建三个不同分组的配置文件

4. 修改3377的yml文件
bootstrap:
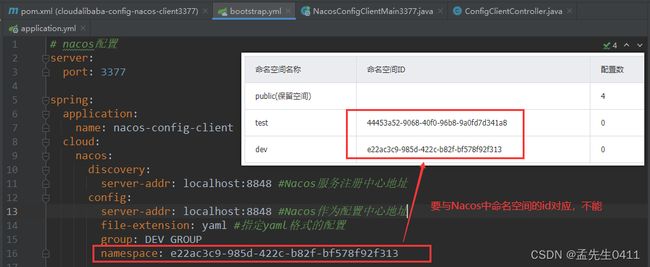
application:

测试
dev namesapce:

 总结
DataID方案是在默认namesapce和默认Group下,创建两个不同的DataID。
Group方案是在默认namespace下,新建两个DataID相同的配置文件,通过指定不同的分组来读取不同的配置。
Namespace方案,是相同的Group,相同的DataID,创建并指定不同的namespace来读取不同配置。
Nacos集群和持久化配置(重点)
我们之前在学eureka的时候,配置了两个eureka注册中心微服务。学Nacos时,不用我们单独新建注册中心微服务模块了,直接安装使用即可,很方便。
但是:如果这个注册中心挂了怎么办?我们目前就开了一个Nacos程序,也没有配置集群。显然,实际情况中不可能只有一个Nacos注册中心,因此需要用到nacos集群。
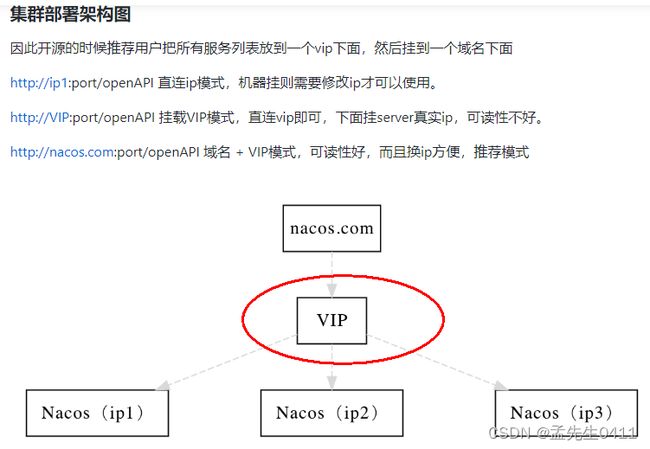
要将配置持久化到数据库中:MySQL
不用nacos内嵌的数据库
通俗易懂的Nacos集群架构图

重点说明:
默认Nacos使用嵌入式数据库实现数据的存储,我们重启Nacos后,以前的配置文件不会小时。
但是,如果启动多个默认配置下的Nacos节点,数据存储是存在一致性问题的。每个nacos都有自己独立的嵌入式数据库,存放的数据不一致。
为了解决这个问题,Nacos采用了集中式存储的方式来支持集群化部署,目前只支持MySQL的存储。
nacos支持的三种部署模式:
● 单机模式:用于测试和单机使用
● 集群模式:用于生产环境,确保高可用
● 多集群模式:用于多数据中心场景
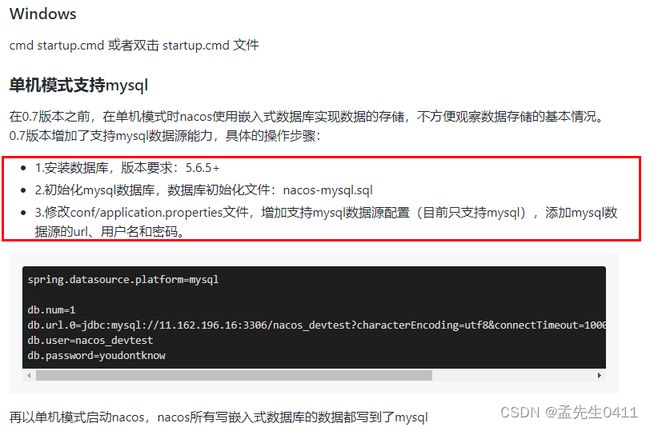 Nacos嵌入式数据库derby切换到mysql
Nacos默认自带的是嵌入式数据库derby,那么如果做集群时每个nacos都自带一个derby,那么就有三个存储配置稳健的数据库,显然数据的统一性存在问题。
windows单机版derby到mysql切换步骤
- 首先在nacos安装目录的conf目录下找到一个名为nacos-mysql.sql的sql脚本
然后执行nacos-mysql.sql脚本
注意:数据库nacos_config需要自己创建
在conf目录下找到application.properties
db.num=1
db.url.0=jdbc:mysql://127.0.0.1:3306/nacos_config?characterEncoding=utf8&connectTimeout=40000&socketTimeout=60000&autoReconnect=true&useUnicode=true&useSSL=false&serverTimezone=UTC&allowPublicKeyRetrieval=true
db.user=root
db.password=1234
/* 创建nacos_config数据库  */
CREATE DATABASE nacos_config;
USE nacos_config;
重新启动nacos,可以看到是个全新的空记录界面,以前是记录进derby
在bin目录下的cmd 输入 startup.cmd -m standalone 执行,这里还是单机模式,只不过数据库从derby迁移到了mysql

可以看到,重启之后之前的配置都没了,说明迁移成功。
在naocs新建配置时,会自动保存到mysql数据库中
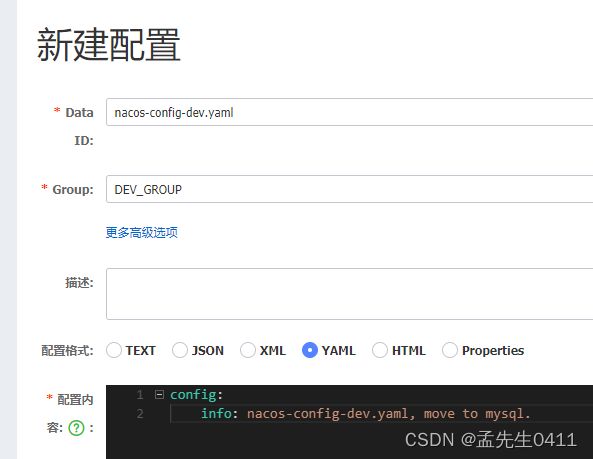

Linux版Nacos+MySQL生产环境配置
一定要先把环境准备好! centos7/Ubuntu/ + maven(3.2+)+mysql(5.6.5+)+JDK1.8
预计需要1个Nginx+3个nacos注册中心+1个mysql
集群配置步骤(重点)
跟windows一样,linxu的nacos 在 /nacos/conf 目录下有一个nacos-mysql.sql的sql脚本
我是通过SQLyog客户端远程连接,然后执行。
application.properties 配置
/usr/local/nacos/conf 下,修改内容:
db.num=1
db.url.0=jdbc:mysql://127.0.0.1:3306/nacos_config?characterEncoding=utf8&connectTimeout=40000&socketTimeout=60000&autoReconnect=true&useUnicode=true&useSSL=false&serverTimezone=UTC&allowPublicKeyRetrieval=true
db.user=root
db.password=1234
Linux服务器上nacos的集群配置cluster.conf
梳理出3台nacos集器的不同服务端口号 3333 4444 5555

cp cluster.conf.example cluster.conf
vim cluster.conf


编辑Nacos的启动脚本startup.sh,使它能够接受不同的启动端口
/usr/local/nacos/bin 目录下有startup.sh,平时单机版的启动,都是./startup.sh即可。
集群启动,我们希望可以类似其它软件的shell命令,传递不同的端口号启动不同的nacos实例。
命令:./startup.sh -p 3333 表示启动端口号为3333的nacos服务器实例,和上一步的cluster.conf配置的一致。
注意:2.0版本的-p被占用了,可以用大写P或者其他字母,刚改完浏览器会有延迟,过一会才会好。
● 1.1.4 版本修改前后对比方式:

![]()
2.0.3版本修改前后对比

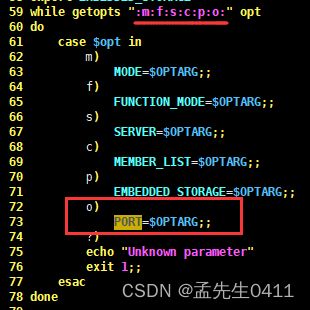


firewall-cmd --add-port=3333/tcp --permanent
firewall-cmd --add-port=4444/tcp --permanent
firewall-cmd --add-port=5555/tcp --permanent
firewall-cmd --reload
最终只能启动一个nacos,尝试各种办法未解决,更换nacos1.1.4后没有问题。
然后分别执行开启3333、4444、5555三个nacos,成功开启nacos集群

Nginx的配置,由它作为负载均衡器
/usr/local/nginx/conf 下nginx.conf文件为默认配置文件 启动nginx通过-c可以指定配置文件启动。我这里将原来的配置文件拷贝为nginx_nacos.conf
 启动nginx,cd到/usr/local/nginx/sbin下 ,执行:
./nginx -c /usr/local/nginx/conf/nginx_nacos.conf
别忘了防火墙开启1111端口的访问:
firewall-cmd --add-port=1111/tcp --permanent
firewall-cmd --reload
测试
测试通过nginx访问nacos,成功登陆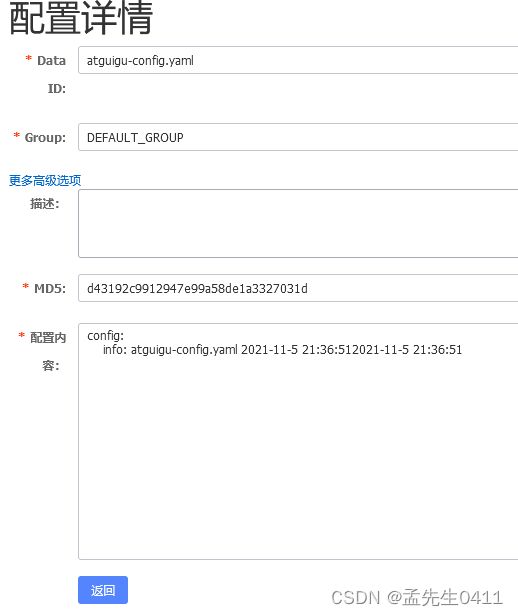
成功存到Linux的数据库中!

微服务cloudalibaba-provider-payment9002启动注册进nacos集群
server:
  port: 9002

spring:
  application:
    name: nacos-payment-provider
  cloud:
    nacos:
      discovery:
#        server-addr: localhost:8848 #配置Nacos地址,注册到Nacos
        server-addr: 192.168.190.134:1111 # 注册到nacos集群,通过nginx代理
# 做监控需要把这个全部暴露出来
management:
  endpoints:
    web:
      exposure:
        include: '*'
SpringCloud Alibaba Sentinel实现熔断与限流
Sentinel
https://github.com/alibaba/Sentinel 中文
Sentinel 是轻量级的流量控制、熔断降级Java库;功能类似于Hystrix
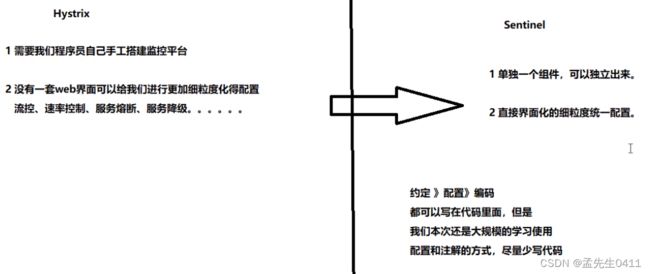
下载地址
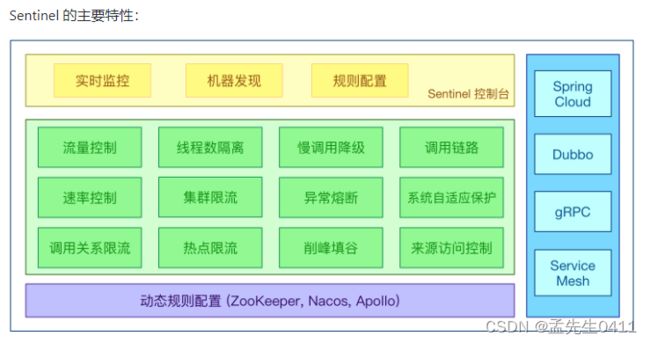
怎么玩:
入门文档
服务使用中的各种问题:服务雪崩、服务降级、服务熔断、服务限流
Sentinel分为两个部分:
● 核心库(Java客户端)不依赖任何框架/库,能够云星宇所有Java运行时环境,同时对Dubbo/Spring Cloud等框架也有较好的支持——后台;
● 控制台(Dashboard)基于Spring Boot开发,打包后可以直接运行,不需要额外的Tomcat等应用容器——前台 8080
安装步骤
下载到本地sentinel-dashboard-1.8.2.jar
运行命令:
前提需要Java8,且8080端口不能被占用;java -jar sentinel-dashboard-1.8.2.jar
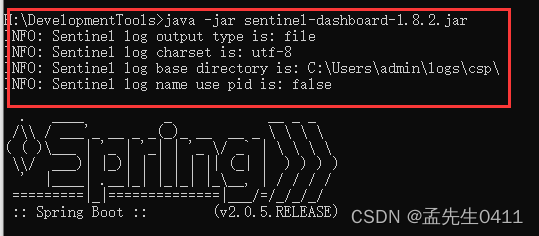
访问 localhost:8080,账号密码均为sentinel

初始化演示工程
启动Nacos8848
新建Module cloud-alibaba-sentinel-service8401
pom
以后基本上nacos 跟sentinel一起配置
        springcloud
        org.example
        1.0-SNAPSHOT

    4.0.0

    cloud-alibaba-sentinel-service8401


        8
        8


            com.alibaba.cloud
            spring-cloud-starter-alibaba-nacos-discovery


            com.alibaba.csp
            sentinel-datasource-nacos


            com.alibaba.cloud
            spring-cloud-starter-alibaba-sentinel


            org.springframework.cloud
            spring-cloud-starter-openfeign


            org.springframework.boot
            spring-boot-starter-web


            org.springframework.boot
            spring-boot-starter-actuator


            org.springframework.boot
            spring-boot-devtools
            runtime
            true


            cn.hutool
            hutool-all
            4.6.3


            org.projectlombok
            lombok
            true


            org.springframework.boot
            spring-boot-starter-test
            test
yaml
spring.cloud.sentinel.transport.port 端口配置会在应用对应的机器上启动一个 Http Server,该 Server 会与 Sentinel 控制台做交互。
比如 Sentinel 控制台添加了1个限流规则,会把规则数据push给这个Http Server接收,Http Server再将规则注册到Sentinel中。
spring.cloud.sentinel.transport.port:指定与Sentinel控制台交互的端口,应用本地会启动一个占用该端口的Http Server
server:
  port: 8401
spring:
  application:
    name: cloud-alibaba-sentinel-service
  cloud:
    nacos:
      discovery:
        server-addr: localhost:8848 #Nacos服务注册中心地址
    sentinel:
      transport:
        #配置Sentinel dashboard地址
        dashboard: localhost:8080
        #默认8719端口,假如被占用会自动从8719开始依次+1扫描,直至找到未被占用的端口
        port: 8719
        #spring cloud Alibaba 需要2.1.1.RELEASE以上版本
        web-context-unify: false
management:
  endpoints:
    web:
      exposure:
        include: '*'
主启动类
package com;

import org.springframework.boot.SpringApplication;
import org.springframework.boot.autoconfigure.SpringBootApplication;
import org.springframework.cloud.client.discovery.EnableDiscoveryClient;

@SpringBootApplication
@EnableDiscoveryClient
public class SentinelMainApp8401 {
    public static void main(String[] args) {
        SpringApplication.run(SentinelMainApp8401.class, args);
    }
}
业务类
流量控制controller:FlowLimitController
package com.aliyun.controller;

import com.aliyun.service.FlowLimitService;
import org.springframework.beans.factory.annotation.Autowired;
import org.springframework.web.bind.annotation.GetMapping;
import org.springframework.web.bind.annotation.RestController;

import java.util.concurrent.TimeUnit;

/**
 * @Author:meng_xiangxin
 * @Date: 2022/12/26 14:54
 * @Description:
 */
@RestController
public class FlowLimitController {
    @Autowired
    FlowLimitService flowLimitService;

    @GetMapping("/testA")
    public String testA() {
        //暂停0.8秒
//        try {
//            TimeUnit.MILLISECONDS.sleep(800);
//        } catch (InterruptedException e) {
//            e.printStackTrace();
//        }
        return "------testA";
    }

    @GetMapping("/testB")
    public String testB() {
        return "------testB";
    }

    //   链路测试
    @GetMapping("/linktestA")
    public String linktestA() {
        return flowLimitService.message();
    }

    @GetMapping("/linktestB")
    public String linktestB() {
        return flowLimitService.message();
    }
}
测试
启动Sentinel8080 java -jar sentinel-dashboard-1.8.2.jar、启动微服务8401
查看Sentinel控制台,发现什么也没有。
 原因:Sentinel采用懒加载机制
执行一下:http://localhost:8401/testA

sentinel8080正在监控微服务8401
流控规则
流控模式
直接(默认)+快速失败(默认)
(1) QPS直接快速失败
QPS:query per second,每秒钟的请求数量,当调用该api的QPS达到阈值时,进行限流。
下面设置表示1秒钟内查询一次就是OK,若QPS>1,就直接-快速失败,报默认错误

测试一下,当/testA的访问超过1次/s是,页面报错。被Sentinel限流,还能继续请求只要QPS<=1。

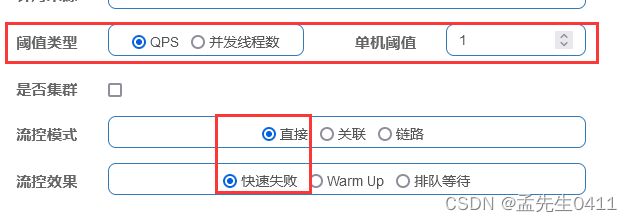
直接调用默认的报错信息在技术上是OK的,但是是否应该有自定义的后续处理?应该有类似Hystrix的fallback的兜底方法。
(2) 线程数直接快速失败
当调用该api的线程数达到阈值的时候,进行限流。
与QPS直接快速失败不同的是,QPS情况下限制的是流量,比如银行的人流量只能是1人/s,也就是说每次只能一个人进入银行办理业务;而线程数就好比银行只有一个窗口开放,一群人都可以进入银行,但是每次只能处理一个人的业务。

演示效果:
先修改一下8401的业务类

然后重启8401,测试/testA,最好用两个浏览器访问,效果更明显

关联
当关联的资源达到阈值时,就限流自己。比如当与A关联的资源B达到阈值后,就限流A自己。
支付接口达到阈值,限流下订单的接口。
- 配置
设置效果:当关联资源/testB的qps阀值超过1时,就限流/testA的Rest访问地址,当关联资源到阈值后限制配置好的资源名
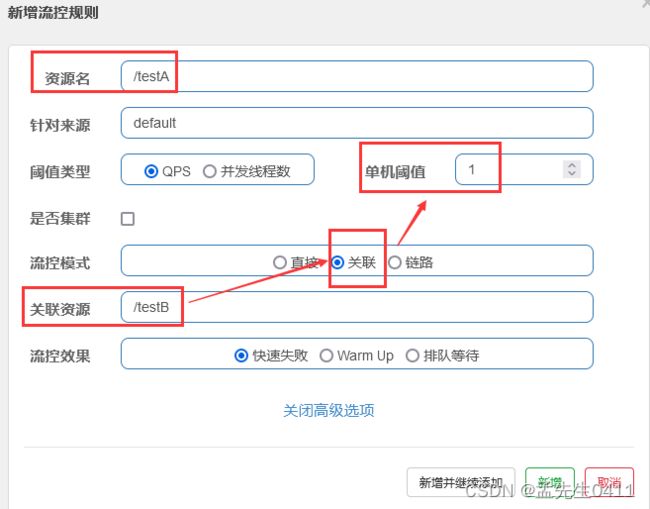
测试
单独访问testB成功。
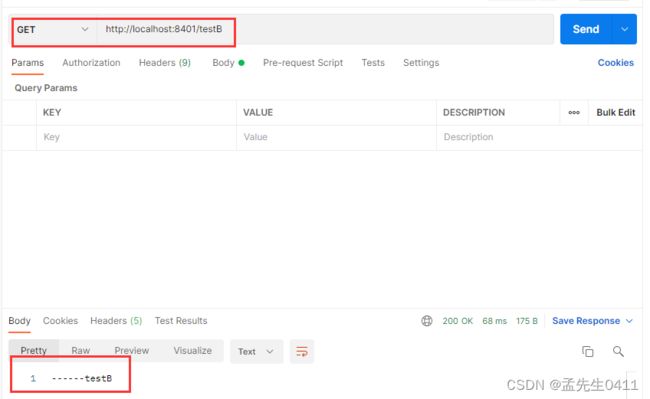 postman模拟并发密集访问testB
先创建一个集合,名字自己随便取。
然后将创建的访问/testB的请求保存在创建的集合中
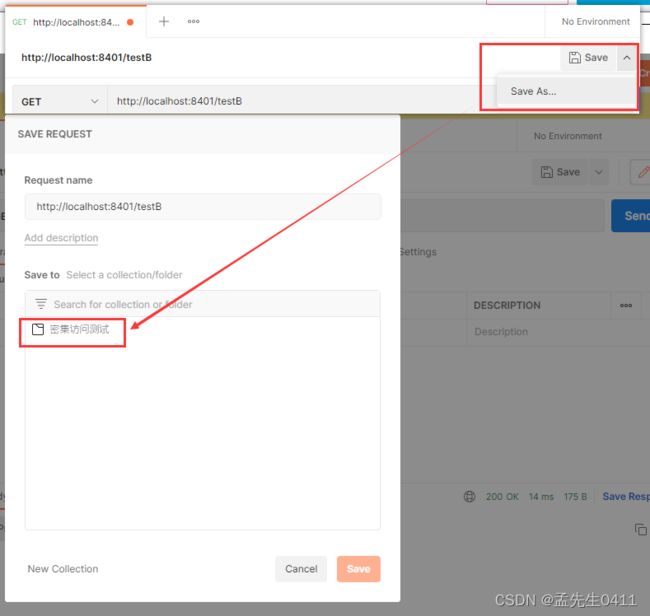
设定集合运行参数,20个线程,每次间隔0.3s访问一次(QPS>1),执行:
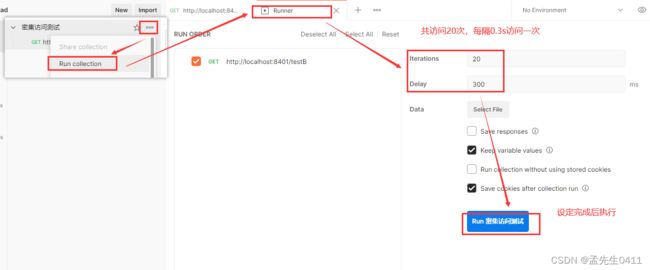
然后再访问/testA,发现被限流,等postman执行完毕,testA又可以访问了

链路
需要测试链路的话,springcloud 阿里巴巴版本需要2.1.1.RELEASE以上,在父工程的pom中修改,不要直接在子module的pom中修改,版本有对应关系,不然报错。


● Sentinel从1.6.3版本开始,Sentinel Web Filter 默认收敛所有的URL入口的Context,因此链路限流不生效
● 1.7.0版本开始,官方在CommomFilter中引入了WEB_CONTEXT_UNIFY这个init parameter,用于控制是否收敛context,将其配置为false即可根据不同的URL进行链路限流
● Spring Cloud Alibaba 在2.1.1.RELEASE版本后,可以通过配置spring.cloud.sentinel.web-context-unify=false关闭
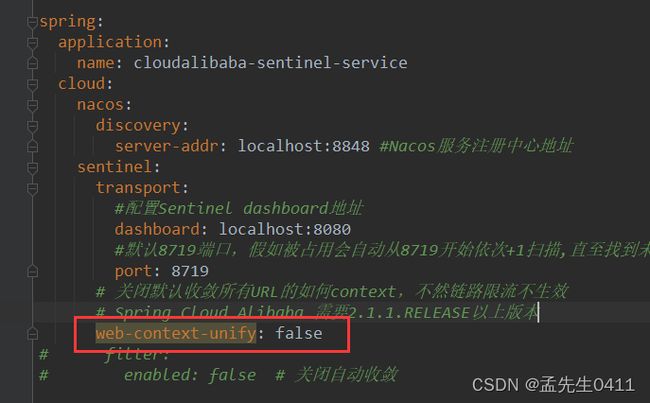
https://github.com/alibaba/Sentinel/issues/1313
测试
启动8401,给/testA设置链路+快速失败流控规则:
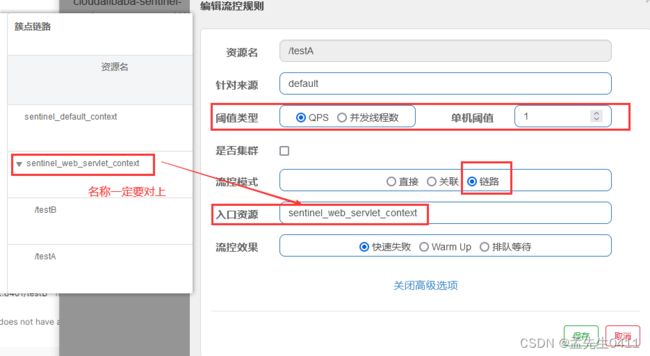
这里入口资源就是簇点链路中,资源名称的上一级。
访问http://localhost:8401/linktestA ,多次刷新出现限流
![]()
,但是这种情况我个人觉得跟直接快速失败区别不大,只直接是监控/testA资源,而链路是监控/testA的资源入口sentinel_web_servlet_context。
然后我又参看了其他博客,流控模式——链路。增加了FlowLimitService 修改了controller
package com.aliyun.service;

import com.alibaba.csp.sentinel.annotation.SentinelResource;
import org.springframework.stereotype.Service;

/**
 * @Author:meng_xiangxin
 * @Date: 2022/12/26 15:33
 * @Description:
 */
@Service
public class FlowLimitService {
    @SentinelResource("message")
    public String message() {
        return "success";
    }
}
package com.aliyun.controller;

import com.aliyun.service.FlowLimitService;
import org.springframework.beans.factory.annotation.Autowired;
import org.springframework.web.bind.annotation.GetMapping;
import org.springframework.web.bind.annotation.RestController;

import java.util.concurrent.TimeUnit;

/**
 * @Author:meng_xiangxin
 * @Date: 2022/12/26 14:54
 * @Description:
 */
@RestController
public class FlowLimitController {
    @Autowired
    FlowLimitService flowLimitService;

    @GetMapping("/testA")
    public String testA() {
        //暂停0.8秒
//        try {
//            TimeUnit.MILLISECONDS.sleep(800);
//        } catch (InterruptedException e) {
//            e.printStackTrace();
//        }
        return "------testA";
    }

    @GetMapping("/testB")
    public String testB() {
        return "------testB";
    }

    //   链路测试
    @GetMapping("/linktestA")
    public String linktestA() {
        return flowLimitService.message();
    }

    @GetMapping("/linktestB")
    public String linktestB() {
        return flowLimitService.message();
    }
}
分别通过/linktetA 和 /linktestB都是message的入口,然后设置/linktestA入口的流量限制,发现不起作用。。
流控效果
快速失败在上面的流控模式演示过了,他是默认的流控效果,直接失败,抛出异常。源码:com.alibaba.csp.sentinel.slots.block.flow.controller.DefaultController
warm up 预热
源码:com.alibaba.csp.sentinel.slots.block.flow.controller.WarmUpController
公式:阈值除以coldFactor(默认值为3),经过预热时长后才会达到阈值
狂点请求,可以看通过的QPS逐渐增加,最开始会报错限流,之后就可以抗住10/s的QPS了
应用场景:秒杀系统在开启的瞬间,会有很多流量上来,很有可能把系统打死,预热方式就是把为了保护系统,可慢慢的把流量放进来,慢慢的把阀值增长到设置的阀值。
排队等待
官网
源码:com.alibaba.csp.sentinel.slots.block.flow.controller.RateLimiterController
/testA的QPS最大为1,超过的话就排队等待,等待的超时时间为20000ms。
修改一下业务代码,把线程名打印出来以验证是否排队。
测试
postman:
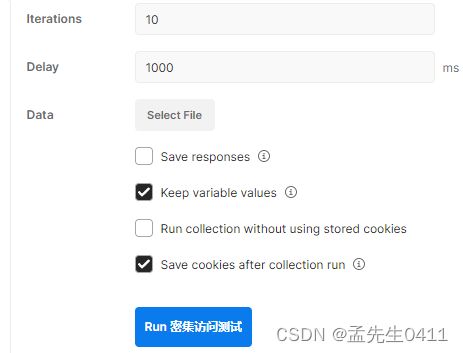

可以看到刚好满足1s一个请求,说明请求的执行进行了排队。
降级规则(熔断规则)
老版本的Sentinel的断路器是没有半开状态的,半开的状态系统自动去检测是否请求有异常,没有异常就关闭断路器恢复使用,有异常则继续打开断路器不可用。具体可以参考Hystrix。(在Hystrix中 快照时间窗口是值 阈值检测时间 ,而休眠时间窗口是指 断路器从开启到半开状态间隔的时间)
新版本的Sentinel加入了半开状态!
降级策略
Sentinel 熔断降级会在调用链路中某个资源出现不稳定状态时(例如调用超时或异常比例升高),对这个资源的调用进行限制,让请求快速失败,避免影响到其它的资源而导致级联错误。
当资源被降级后,在接下来的降级时间窗口之内,对该资源的调用都自动熔断(默认行为是抛出 DegradeException。
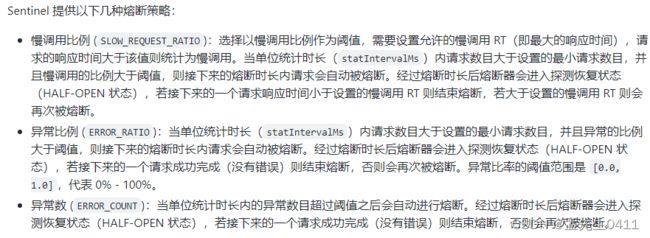
慢调用比例,RT(平均响应时间,秒级)
老版本:

新版本:
● 慢调用比例 (SLOW_REQUEST_RATIO):选择以慢调用比例作为阈值,需要设置允许的慢调用 RT(即最大的响应时间),请求的响应时间大于该值则统计为慢调用。当单位统计时长(statIntervalMs)内请求数目大于设置的最小请求数目,并且慢调用的比例大于阈值,则接下来的熔断时长内请求会自动被熔断。经过熔断时长后熔断器会进入探测恢复状态(HALF-OPEN 状态),若接下来的一个请求响应时间小于设置的慢调用 RT 则结束熔断,若大于设置的慢调用 RT 则会再次被熔断。(跟豪猪科类似)
@GetMapping("/testD")
public String testD() {
    //暂停1秒
    try {
        TimeUnit.MILLISECONDS.sleep(1000);
    } catch (InterruptedException e) {
        e.printStackTrace();
    }
    log.info("testD  测试慢调用比例 RT");
    return "------tedtD";
}
编辑熔断规则:
在1000ms的统计时间内,总请求数(超过5次)中有80%的请求最大RT超过了200ms,那么触发熔断机制,熔断2s。

jmeter压测:
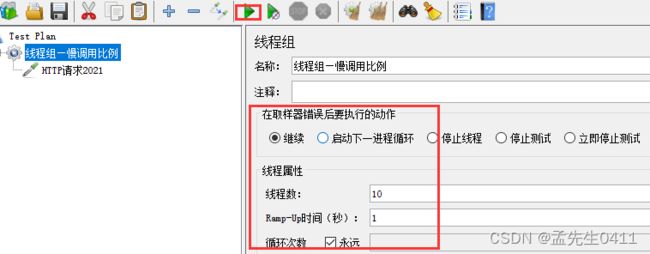
永远一秒钟打进来10个线程(大于5个了)调用testD,我们希望200毫秒处理完本次任务,如果超过200毫秒还没处理完,在未来s秒钟的时间内,断路器打开(保险丝跳闸)微服务不可用,保险丝跳闸断电了。
testD被熔断了

从实时监控也可以看到,在09的时候开始熔断。

后续我停止jmeter,没有这么大的访问量了,断路器半开到关闭(保险丝恢复),微服务恢复OK。
异常比例
老版本:

新版本:
异常比例 (ERROR_RATIO):当单位统计时长(statIntervalMs)内请求数目大于设置的最小请求数目,并且异常的比例大于阈值,则接下来的熔断时长内请求会自动被熔断。经过熔断时长后熔断器会进入探测恢复状态(HALF-OPEN 状态),若接下来的一个请求成功完成(没有错误)则结束熔断,否则会再次被熔断。异常比率的阈值范围是 [0.0, 1.0],代表 0% - 100%。
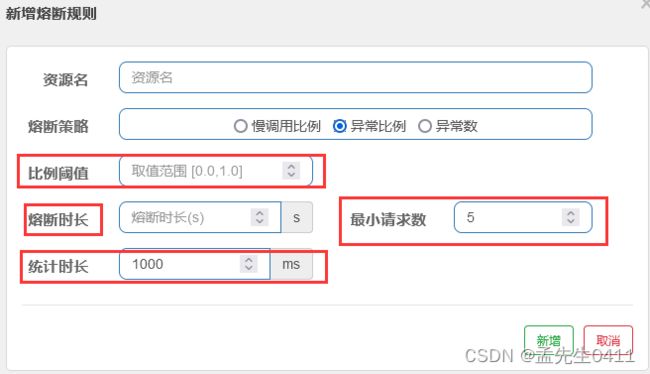
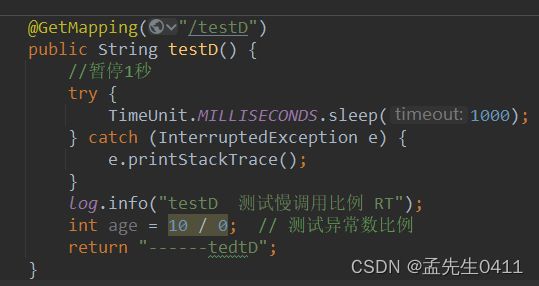
编辑熔断规则:
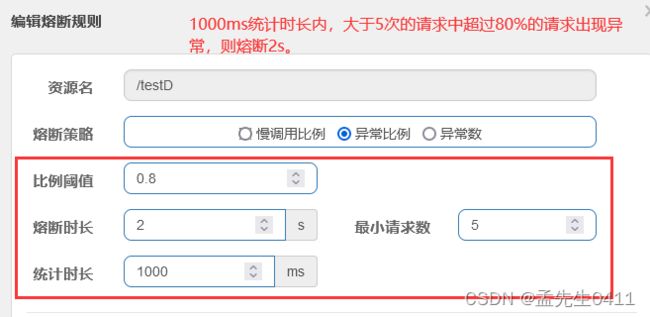
1000ms统计时长内,大于5次的请求中超过80%的请求出现异常,则熔断2s。
jmeter压测:
单独访问一次,必然来一次报错一次(int age = 10/0),调一次错一次;开启jmeter后,直接高并发发送请求,多次调用达到我们的配置条件了。断路器开启(保险丝跳闸),微服务不可用了,不再报错error而是服务降级了。

被熔断。
停掉jemeter后过2s。报/zero错误,因为业务类中有个10/0。
异常数
老版本:

时间窗口一定要大于等于60秒。
新版本
● 异常数 (ERROR_COUNT):当单位统计时长内的异常数目超过阈值之后会自动进行熔断。经过熔断时长后熔断器会进入探测恢复状态(HALF-OPEN 状态),若接下来的一个请求成功完成(没有错误)则结束熔断,否则会再次被熔断。
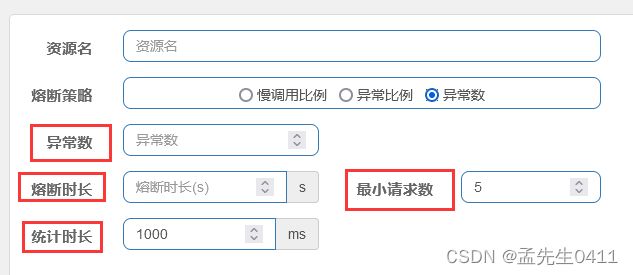
实战测试
修改业务类:

编辑熔断规则:
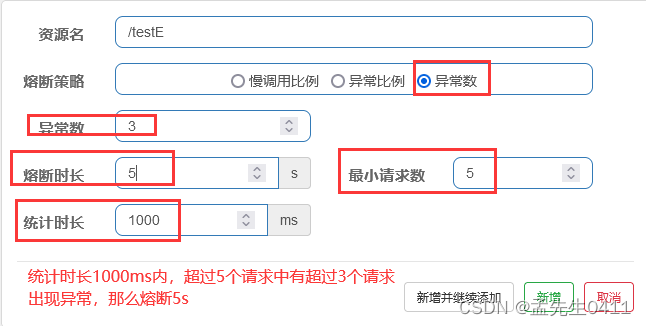
手动测试:

这里我测试有bug,虽然熔断了但是熔断时长不是我配置的5s,大约是一分钟,统计时长也不是1s,好像也是一分钟,同时没达到最小请求数,只达到3次异常就直接熔断了。虽然我用的新版本,但是逻辑好像跟老版本的一样?
热点key限流
基本介绍
何为热点:热点即经常访问的数据,很多时候我们希望统计或者限制某个热点数据中访问频次最高的TopN数据,并对其访问进行限流或者其它操作。比如:
● 商品 ID 为参数,统计一段时间内最常购买的商品 ID 并进行限制
● 用户 ID 为参数,针对一段时间内频繁访问的用户 ID 进行限制
热点参数限制会统计传入参数中的热点参数,并根据配置的限流阈值与模式,对包含热点参数的资源调用进行限制。热点参数限流可以看作是一种特殊的流量控制,仅对包含热点参数的资源调用生效。

Sentinel利用LRU策略统计最近最常访问的热电参数,结合令牌桶算法来进行参数级别的流控。热点参数限流支持集群模式。
基本使用
兜底防范分为系统默认和客户自定义;两种,根据之前的case,都是使用sentinel系统默认的提示:Blocked by Sentinel (flow limiting)。那我们能不能自定义兜底方法呢?类似hystrix,某个方法出问题了,就找对应的兜底降级方法?
类似于@HystrixCommand, 引入@SentinelResource注解。
热点规则共有资源名、限流模式(只支持QPS模式)、参数索引、单机阈值、统计窗口时长、是否集群6种参数,还有一些高级选项,用到时会详细介绍。这里会用到注解中的value作为资源名,兜底方法会在后面详细介绍@SentinelResource注解详解

注意:
资源名:唯一路径,默认为请求路径。此处必须是 @SentinelResource 注解的 value 属性值,配置@GetMapping 的请求路径无效)
测试方法
还是在8401的controller中,加入热点测试方法。
@GetMapping("/testHotKey")
@SentinelResource(value = "testHotKey", blockHandler = "del_testHotKey")   //这里的名称可以随便写,但是一般跟rest地址一样
public String testHotkey(@RequestParam(value = "p1", required = false) String p1,
                         @RequestParam(value = "p1", required = false) String p2) {
    return "------testHotkey";
}

//这里是我们自定义的兜底方法,BlockException不要打成了BlockedException
public String del_testHotKey(String p1, String p2, BlockException e) {
    return "这次不用默认的兜底提示Blocked by Sentinel(flow limiting),自定义提示:del_testHotKeyo(╥﹏╥)o...";
}
注解@SentinelResource(value = “testHotKey”, blockHandler = “del_testHotKey”)
分析:
● 其中 value = “testHotKey” 是一个标识(Sentinel资源名),与rest的/testHotKey对应,这里value的值可以任意写,但是我们约定与rest地址一致,唯一区别是没有/。
● blockHandler = “del_testHotKey” 则表示如果违背了Sentinel中配置的流控规则,就会调用我们自己的兜底方法del_testHotKey
配置热点key限流规则
绑定testHotKey资源,把testHotKey对应的第一个参数作为热点key进行监控。设定热点限流规则:当该资源的访问QPS超过1次/s的时候,产生限流并执行自定义的del_testHotKey兜底方法。
简而言之:方法testHotKey里面第一个参数只要QPS超过每秒1次,马上降级处理。
测试
访问http://localhost:8401/testHotKey?p1=a&p2=b
1次/s正常显示,迅速点击两次,触发热点限流,执行自定义兜底方法:

仅传入参数p2没有任何影响: http://localhost:8401/testHotKey?p2=b

现在开两个访问,一个通过jmeter压测http://localhost:8401/testHotKey?p1=a&p2=b,另外再单独使用浏览器访问http://localhost:8401/testHotKey?p2=b,发现只带参数p2访问没有任何影响。
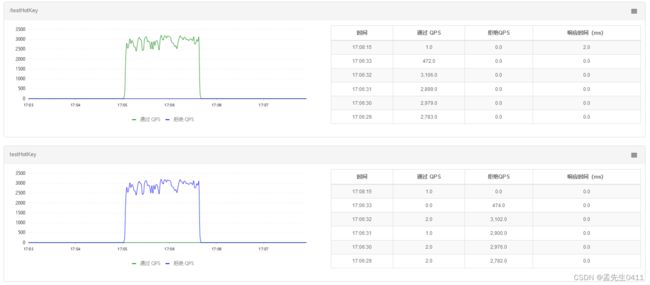
不配置blockeHandler(兜底方法)

触发热点限流降级会出现error page,对用户不友好。

参数例外项
上述案例演示了第一个参数p1,当QPS超过1秒1次点击后马上被限流
特例情况:我们期望p1参数当它是某个特殊值时,它的限流值和平时不一样,比如当p1的值等于5时,它的阈值可以达到200。

测试直接错误页面。测试
狂点http://localhost:8401/testHotKey?p1=5&p2=b 没有限流

其他
手动添加一个异常:

测试直接错误页面。

要注意: Sentinel它只管你有没有触发它的限流规则,也可以说只管这个web交互页面(控制台)里面的东西。 配置类的东西Sentinel可以管,java异常的错误我不管。
@SentinelResource
处理的是Sentinel控制台配置的违规情况,有blockHandler方法配置的兜底处理;
RuntimeException
int age = 10/0,这个是java运行时报出的运行时异常RunTimeException,@SentinelResource不管
总结:
@SentinelResource主管配置出错,运行出错该走异常走异常
系统规则(系统自适应限流)
Sentinel 系统自适应限流从整体维度对应用入口流量进行控制,结合应用的 Load、CPU 使用率、总体平均 RT、入口 QPS 和并发线程数等几个维度的监控指标,通过自适应的流控策略,让系统的入口流量和系统的负载达到一个平衡,让系统尽可能跑在最大吞吐量的同时保证系统整体的稳定性。
系统保护规则是应用整体维度的,而不是资源维度的,并且仅对入口流量生效。入口流量指的是进入应用的流量(EntryType.IN),比如 Web 服务或 Dubbo 服务端接收的请求,都属于入口流量。
系统规则支持以下的模式:
● Load 自适应(仅对 Linux/Unix-like 机器生效):系统的 load1 作为启发指标,进行自适应系统保护。当系统 load1 超过设定的启发值,且系统当前的并发线程数超过估算的系统容量时才会触发系统保护(BBR 阶段)。系统容量由系统的 maxQps * minRt 估算得出。设定参考值一般是 CPU cores * 2.5。
● CPU usage(1.5.0+ 版本):当系统 CPU 使用率超过阈值即触发系统保护(取值范围 0.0-1.0),比较灵敏。
● 平均 RT:当单台机器上所有入口流量的平均 RT 达到阈值即触发系统保护,单位是毫秒。
● 并发线程数:当单台机器上所有入口流量的并发线程数达到阈值即触发系统保护。
● 入口 QPS:当单台机器上所有入口流量的 QPS 达到阈值即触发系统保护。
案例——配置全局QPS

不管是/testA还是/testB 只要QPS > 1 整个系统就不能用。
这个粒度太粗,就相当于一个窗口人很多,整个银行就不接待人了,不太建议使用。
@SentinelResource 注解详解
按资源名称限流+后续处理
启动nacos+sentinel
修改8401
pom
引入我们自定义的公共api jar包
<!-- 引入自己定义的api通用包,可以使用Payment支付Entity -->
<dependency>
<groupId>org.example</groupId>
<artifactId>cloud-api-commons</artifactId>
<version>1.0-SNAPSHOT</version>
<scope>compile</scope>
</dependency>
RateLimitController
package com.aliyun.controller;
import com.alibaba.csp.sentinel.annotation.SentinelResource;
import com.alibaba.csp.sentinel.slots.block.BlockException;
import com.aliyun.entity.CommonResult;
import com.aliyun.entity.Payment;
import org.springframework.web.bind.annotation.GetMapping;
import org.springframework.web.bind.annotation.RestController;
/**
* @Author:meng_xiangxin
* @Date: 2022/12/26 17:09
* @Description:
*/
@RestController
public class RateLimitController {
@GetMapping("/byResource")
@SentinelResource(value = "byResource", blockHandler = "handleException")
public CommonResult byResource() {
return new CommonResult(200, "按资源名称限流测试OK", new Payment(2020L, "serial001"));
}
public CommonResult handleException(BlockException exception) {
return new CommonResult(444, exception.getClass().getCanonicalName() + "\t 服务不可用");
}
}
配置流控规则——按资源名称添加流控规则
触发流控规则:

问题
如果我们重启8401会发现之前配置的一些规则都没有了。难道每次重启服务器都要重新配置一遍规则吗?规则如何进行持久化?
按照Url地址限流+后续处理
通过访问的URL来限流,会返回Sentinel自带默认的限流处理信息
修改controller
@GetMapping("/rateLimit/byUrl")
@SentinelResource(value = "byUrl")
public CommonResult byUrl()
{
return new CommonResult(200,"按url限流测试OK",new Payment(2020L,"serial002"));
}
设置流控规则及测试
先自测,没有问题:

按rest URI设置流控规则

触发流控:

这个没有自定义的兜底的方法,返回Sentinel自带的限流处理结果。
总结以及面临的问题
不管是@GetMapping(rest url)还是 @SentinelResource,只要是唯一的,就可以作为流控规则的资源名称。如果没有自定义自己的兜底方法,那么就使用系统自带的。
问题:
● 依照现有条件,我们自定义的处理方法又和业务代码耦合在一块,不直观。如果都用系统默认的,就没有体现我们自己的业务要求。
● 如果每个业务方法/API接口都添加一个兜底的,那代码膨胀加剧。
● 全局统一的处理方法没有体现。
客户自定义限流处理逻辑
为了解决代码耦合与膨胀的问题
创建CustomerBlockHandler类用于自定义限流处理逻辑
在CustomerBlockHandler类中统一的处理限流提示、服务降级的说明等等。
package com.aliyun.config;
import com.alibaba.csp.sentinel.slots.block.BlockException;
import com.aliyun.entity.CommonResult;
public class CustomerBlockHandler {
public static CommonResult handlerException(BlockException e) {
return new CommonResult(4444, "按客户自定义, global handlerException----1");
}
public static CommonResult handlerException2(BlockException e) {
return new CommonResult(4444, "按客户自定义, global handlerException----2");
}
}
修改RateLimitController,使用自定义处理逻辑类
package com.aliyun.controller;
import com.alibaba.csp.sentinel.annotation.SentinelResource;
import com.alibaba.csp.sentinel.slots.block.BlockException;
import com.aliyun.config.CustomerBlockHandler;
import com.aliyun.entity.CommonResult;
import com.aliyun.entity.Payment;
import org.springframework.web.bind.annotation.GetMapping;
import org.springframework.web.bind.annotation.RestController;
/**
* @Author:meng_xiangxin
* @Date: 2022/12/26 17:09
* @Description:
*/
@RestController
public class RateLimitController {
@GetMapping("/byResource")
@SentinelResource(value = "byResource", blockHandler = "handleException")
public CommonResult byResource() {
return new CommonResult(200, "按资源名称限流测试OK", new Payment(2020L, "serial001"));
}
public CommonResult handleException(BlockException exception) {
return new CommonResult(444, exception.getClass().getCanonicalName() + "\t 服务不可用");
}
@GetMapping("/rateLimit/byUrl")
@SentinelResource(value = "byUrl")
public CommonResult byUrl() {
return new CommonResult(200, "按url限流测试OK", new Payment(2020L, "serial002"));
}
//CustomerBlockHandler自定义类,来处理服务降级、限流提示.....
/**
* 自定义通用的限流处理逻辑,
* blockHandlerClass = CustomerBlockHandler.class
* blockHandler = handleException2
* 上述配置:找CustomerBlockHandler类里的handleException2方法进行兜底处理
*/
//自定义通用的限流处理逻辑
@GetMapping("/rateLimit/customerBlockHandler")
@SentinelResource(value = "customerBlockHandler",
blockHandlerClass = CustomerBlockHandler.class,
blockHandler = "handlerException2")
public CommonResult customerBlockHandler() {
return new CommonResult(200, "按客户自定义", new Payment(2020L, "serial003"));
}
}
测试
启动8401,先测试一次http://localhost:8401/rateLimit/customerBlockHandler

设置流控规则:

触发流控,看是否是我们自定义提示:

自定义提示出来了!
结构说明
更多属性说明
服务熔断
主要内容:
● sentinel分别整合ribbon+openFeign以及设置fallback
● 熔断框架比较
Ribbon系列
nacos中整合了Ribbon,所以直接使用nacos就行。启动nacos和Sentinel。
服务提供者9003/9004
新建cloud-alibaba-provider-payment9003/9004两个一样的做法
pom
springcloud
org.example
1.0-SNAPSHOT
4.0.0
cloud-alibaba-provider-payment9003
8
8
com.alibaba.cloud
spring-cloud-starter-alibaba-nacos-discovery
org.example
cloud-api-commons
1.0-SNAPSHOT
compile
org.springframework.boot
spring-boot-starter-web
org.springframework.boot
spring-boot-starter-actuator
org.springframework.boot
spring-boot-devtools
runtime
true
org.projectlombok
lombok
true
org.springframework.boot
spring-boot-starter-test
test
yml
9004 别忘了改端口号
server:
port: 9003
spring:
application:
name: nacos-payment-provider
cloud:
nacos:
discovery:
server-addr: localhost:8848 #配置Nacos地址
management:
endpoints:
web:
exposure:
include: '*'
主启动类
package com;
import org.springframework.boot.SpringApplication;
import org.springframework.boot.autoconfigure.SpringBootApplication;
import org.springframework.cloud.client.discovery.EnableDiscoveryClient;
/**
* @Author:meng_xiangxin
* @Date: 2022/12/27 9:45
* @Description: 主启动类
*/
@EnableDiscoveryClient
@SpringBootApplication
public class PaymentMain9003 {
public static void main(String[] args) {
SpringApplication.run(PaymentMain9003.class, args);
}
}
业务类
package com.aliyun;
import com.aliyun.entity.CommonResult;
import com.aliyun.entity.Payment;
import org.springframework.beans.factory.annotation.Value;
import org.springframework.web.bind.annotation.GetMapping;
import org.springframework.web.bind.annotation.PathVariable;
import org.springframework.web.bind.annotation.RestController;
import java.util.HashMap;
@RestController
public class PaymentController {
@Value("${server.port}")
private String serverPort;
public static HashMap<Long, Payment> hashMap = new HashMap<>();
static {
hashMap.put(1L, new Payment(1L, "28a8c1e3bc2742d8848569891fb42181"));
hashMap.put(2L, new Payment(2L, "bba8c1e3bc2742d8848569891ac32182"));
hashMap.put(3L, new Payment(3L, "6ua8c1e3bc2742d8848569891xt92183"));
}
@GetMapping(value = "/paymentSQL/{id}")
public CommonResult<Payment> paymentSQL(@PathVariable("id") Long id) {
Payment payment = hashMap.get(id);
CommonResult<Payment> result = new CommonResult(200, "from mysql,serverPort: " + serverPort, payment);
return result;
}
}
测试
http://localhost:9003/paymentSQL/1

http://localhost:9004/paymentSQL/1

服务消费者84
新建cloud-alibaba-consumer-nacos-order84
pom
<?xml version="1.0" encoding="UTF-8"?>
<project xmlns="http://maven.apache.org/POM/4.0.0"
xmlns:xsi="http://www.w3.org/2001/XMLSchema-instance"
xsi:schemaLocation="http://maven.apache.org/POM/4.0.0 http://maven.apache.org/xsd/maven-4.0.0.xsd">
<parent>
<artifactId>springcloud</artifactId>
<groupId>org.example</groupId>
<version>1.0-SNAPSHOT</version>
</parent>
<modelVersion>4.0.0</modelVersion>
<artifactId>cloud-alibaba-consumer-nacos-order84</artifactId>
<properties>
<maven.compiler.source>8</maven.compiler.source>
<maven.compiler.target>8</maven.compiler.target>
</properties>
<dependencies>
<!--SpringCloud ailibaba nacos -->
<dependency>
<groupId>com.alibaba.cloud</groupId>
<artifactId>spring-cloud-starter-alibaba-nacos-discovery</artifactId>
</dependency>
<!--SpringCloud ailibaba sentinel -->
<dependency>
<groupId>com.alibaba.cloud</groupId>
<artifactId>spring-cloud-starter-alibaba-sentinel</artifactId>
</dependency>
<!--SpringCloud openfeign -->
<dependency>
<groupId>org.springframework.cloud</groupId>
<artifactId>spring-cloud-starter-openfeign</artifactId>
</dependency>
<!-- 引入自己定义的api通用包,可以使用Payment支付Entity -->
<dependency>
<groupId>org.example</groupId>
<artifactId>cloud-api-commons</artifactId>
<version>1.0-SNAPSHOT</version>
<scope>compile</scope>
</dependency>
<!-- SpringBoot整合Web组件 -->
<dependency>
<groupId>org.springframework.boot</groupId>
<artifactId>spring-boot-starter-web</artifactId>
</dependency>
<dependency>
<groupId>org.springframework.boot</groupId>
<artifactId>spring-boot-starter-actuator</artifactId>
</dependency>
<!--日常通用jar包配置-->
<dependency>
<groupId>org.springframework.boot</groupId>
<artifactId>spring-boot-devtools</artifactId>
<scope>runtime</scope>
<optional>true</optional>
</dependency>
<dependency>
<groupId>org.projectlombok</groupId>
<artifactId>lombok</artifactId>
<optional>true</optional>
</dependency>
<dependency>
<groupId>org.springframework.boot</groupId>
<artifactId>spring-boot-starter-test</artifactId>
<scope>test</scope>
</dependency>
</dependencies>
</project>
yml
server:
port: 84
spring:
application:
name
