【Flutter 问题系列第 79 篇】在 Flutter 中使用 ReorderableListView 实现拖拽排序列表组件的功能
这是【Flutter 问题系列第 79 篇】,如果觉得有用的话,欢迎关注专栏。
当前开发环境
Flutter 版本:3.10.5,Dart 版本:3.0.5,操作系统:macOS
文章目录
-
-
- 一:效果演示
- 二:ReorderableListView 源码分析
-
- 2-1:必需属性
- 2-2:可选属性
- 三:如何使用 ReorderableListView
- 四:如何指定组件中的部分区域进行拖拽
-
- 4-1:问题分析
- 4-2:解决方案
-
一:效果演示
在 Flutter 中,实现拖动某一个组件可以使用 Draggable,比如实现悬浮球功能。
除了拖拽一个组件外,在很多 App 中都会有对某个列表中的组件进行拖拽排序的功能。比如添加某个分类后,然后对这些分类进行拖拽排序。
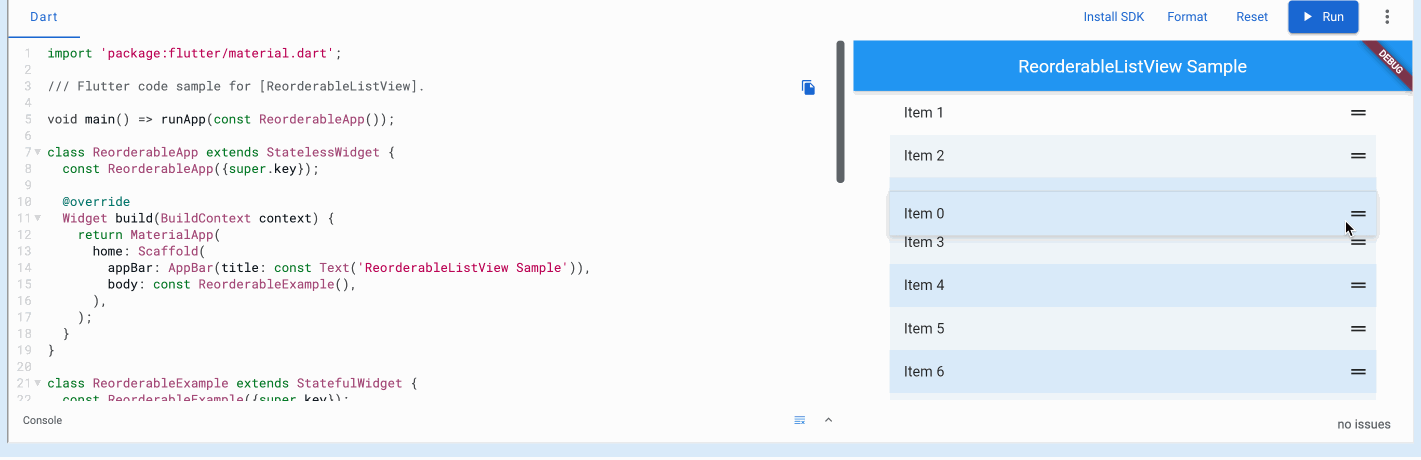
下面以排序动漫排名为案例,动态演示图的效果如下
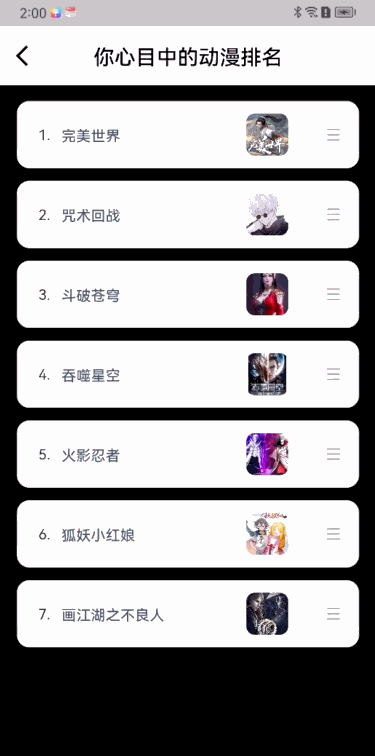
这种效果的话,使用 Draggable 组件的话就无法实现了。不过 Flutter 提供了另外一个实现拖拽排序列表的组件 ReorderableListView,上面的案例就是基于 ReorderableListView 实现的。
二:ReorderableListView 源码分析
查看 ReorderableListView 的源码可知,它继承自 StatefulWidget ,如下所示
/// 从预构建的小部件列表创建可重新排序的列表组件
class ReorderableListView extends StatefulWidget {
  ReorderableListView({
    super.key,
    required List<Widget> children, // 需要拖动排序的子组件列表
    required this.onReorder, // 拖拽完成后的回调。用于报告列表项已被拖到列表中的新位置,并且应用程序应更新项的顺序
    this.onReorderStart,
    this.onReorderEnd,
    this.itemExtent,
    this.prototypeItem,
    this.proxyDecorator,
    this.buildDefaultDragHandles = true,
    this.padding,
    this.header,
    this.footer,
    this.scrollDirection = Axis.vertical,
    this.reverse = false,
    this.scrollController,
    this.primary,
    this.physics,
    this.shrinkWrap = false,
    this.anchor = 0.0,
    this.cacheExtent,
    this.dragStartBehavior = DragStartBehavior.start,
    this.keyboardDismissBehavior = ScrollViewKeyboardDismissBehavior.manual,
    this.restorationId,
    this.clipBehavior = Clip.hardEdge,
})
除了有一个默认构造 ReorderableListView 外,还有一个 ReorderableListView.builder 的构造,用于懒加载显示。
2-1:必需属性
情况一:使用 ReorderableListView 的默认构造
默认构造有两个必传属性 children 和 onReorder,部分源码如下所示。
ReorderableListView({
    required List<Widget> children,
    required this.onReorder,
    ...
)}
children 就是我们将要拖动的 item 组件列表,这个没什么可说的。着重说一下属性 onReorder,它的类型是 ReorderCallback,源码如下所示
typedef ReorderCallback = void Function(int oldIndex, int newIndex);
其中 oldIndex 是拖拽完成前原 item 在列表中的索引,oldIndex 是拖拽完成后新的 item 在列表中的索引。
情况二:使用 ReorderableListView 的 builder 构造
builder 构造有三个必传属性,部分源码如下所示。
const ReorderableListView.builder({
	required this.itemBuilder,
	required this.itemCount,
	required this.onReorder,
	...
})
其中 itemCount 就是拖动列表的长度,onReorder 在默认构造中已作说明,不再赘述。着重说一下 itemBuilder 参数,它是 IndexedWidgetBuilder 类型,源码如下所示
typedef IndexedWidgetBuilder = Widget Function(BuildContext context, int index);
其中 context 是回调当前组件的上下文,index 是当前构造 item 组件时的索引。
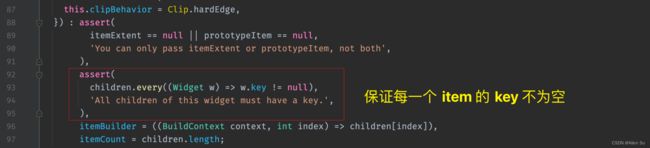
需要特别说明的是:
你需要在 itemBuilder 中,给你的 item 加一个唯一标识 Key,否则的话会报 All children of this widget must have a key. 的问题,这点在源码的断言中可以体现出来,如下图所示
2-2:可选属性
一:proxyDecorator
关于此属性,官方给出的解释太晦涩,用我的话来说它的作用可以理解为,拖动某一个组件时代替显示原组件。
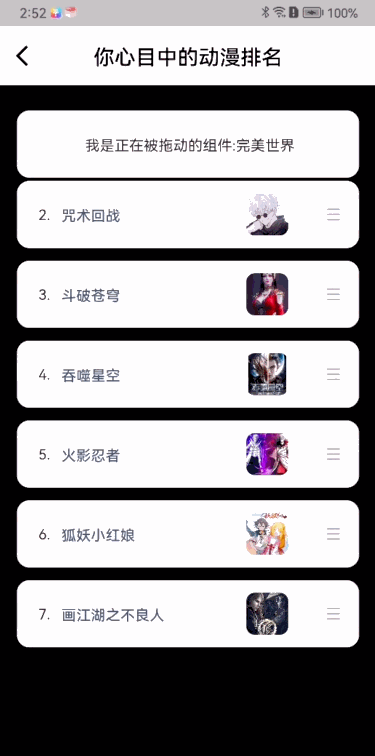
什么?还是看不懂什么意思?那就上动态演示图,主打一个宠粉
这样 proxyDecorator 属性什么作用就很明显了吧,下面看一下它的源码,它是一个可空的 ReorderItemProxyDecorator 类型
typedef ReorderItemProxyDecorator = Widget Function(Widget child, int index, Animation<double> animation);
其中,child 和 index 分别是当前拖动中的组件及索引,如果你想在拖动时显示的还是当前拖动的组件,把 child 返回出去就行了,而animation 是回调的拖动动画。
如果你想自定义拖拽中显示的组件,那就天马行空式的使用 proxyDecorator 属性吧。
二:其它属性
至于其它的参数,从源码 ReorderableListView 的状态类 _ReorderableListViewState 的 build 方法可知,ReorderableListView 组件的本质其实就是 CustomScrollView,如下图所示
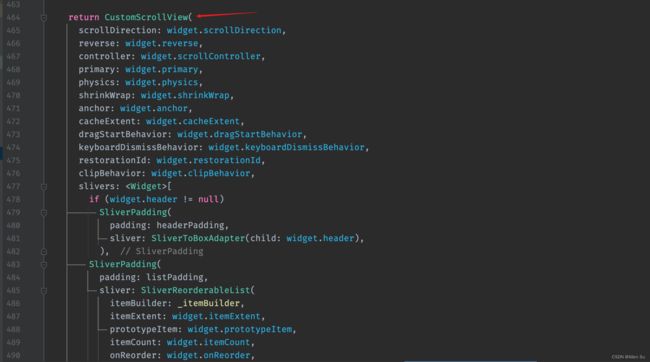
所以 ReorderableListView 的很多属性都是为 CustomScrollView 服务的,对 CustomScrollView 或者其父组件 ScrollView 不熟悉的,可以跳转查看官方文档。
到这里,铺垫工作算是完成了,下面开始说下如何使用 ReorderableListView。
三:如何使用 ReorderableListView
前面介绍源码看起来内容挺多的,用起来就很方便了。不过,说了那么多,如果不能学以致用,一切都是空谈。
下面以 ReorderableListView 的 builder 构造为例,说下 ReorderableListView 是如何使用的。
自定义一个 List,里面存储显示 item 组件所需的信息,这里我定义为 CartoonItem,伪代码如下所示
  Widget buildReorderableListView() {
    return ReorderableListView.builder(
      itemCount: list.length,
      itemBuilder: (context, index) {
      	// 自定义 item,注意这里设置了 ValueKey
        return CartoonItem(key: ValueKey(list[index].id), index: index, model: list[index]);
      },
      // 拖拽完成回调
      onReorder: (int oldIndex, int newIndex) {
      	// 更新拖拽后的索引
        if (oldIndex < newIndex) {
          newIndex -= 1;
        }
        // 更新 list 数组
        list.insert(newIndex, list.removeAt(oldIndex));
        setState(() {});
      },
      // 拖拽代理(回显当前拖拽中的组件)
      proxyDecorator: (Widget child, int index, Animation<double> animation) {
        return AnimatedBuilder(
          animation: animation,
          builder: (BuildContext context, child) {
            return Material(color: Colors.transparent, shadowColor: Colors.transparent, child: child);
          },
          child: child,
        );
      },
    );
  }
全部代码就只有上面这些,这样就实现了使用 ReorderableListView 实现拖拽排序列表组件的功能,用起来是不是很方便。
四:如何指定组件中的部分区域进行拖拽
4-1:问题分析
效果是实现了,可此时产品同学提出,我不想让点击整个卡片区域进行拖动,我想让用户只有拖动卡片最后面的拖动标识 icon 时,才可以拖拽。
这个怎么实现呢?
没有思路的话,那就去 ReorderableListView 的官方文档上找一找,看看有没有什么头绪。
官方文档给出了一个拖动排序的案例,当你点击卡片准备拖拽时,你发现拖拽后没有响应,好像没有作用一样。但你点击卡片后面的拖拽标识时,它竟然可以直接拖动了,动态效果演示图如下
这不就实现了产品需要的效果了吗?真是踏破铁鞋无觅处,得来全不费功夫啊。
你转念又一想,不对啊,用的是同一个组件 ReorderableListView 啊,怎么在手机上和在网页上的操作刚好是相反的呢。
可以肯定的是,源码中肯定对平台进行了判断。至于如何处理的,这个时候就需要再去看 ReorderableListView 的源码了。
ReorderableListView 源码的 _ReorderableListViewState 类的 _itemBuilder 方法中,渲染 item 时有一个对平台的判断,如下图所示
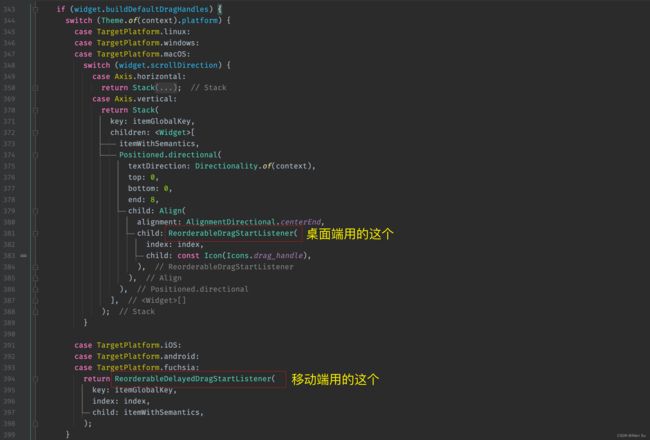
果然不出所料,移动端 iOS、android、fuchsia 的话,用的是 ReorderableDelayedDragStartListener,桌面端 linux、windows、macOS 的话用的 ReorderableDragStartListener,桌面端的话,增加了对拖拽方向的判断,不过最终都是用的 ReorderableDragStartListener。
这也是为什么在移动端和桌面端操作不同的根本原因了。
知道了原因,改起来就简单了,直接把 ReorderableListView 的源码改一下不就行了,伪代码如下
 ...
 switch (Theme.of(context).platform) {
    case TargetPlatform.iOS:
    case TargetPlatform.android:
    case TargetPlatform.fuchsia:
    	Stack(
           key: itemGlobalKey,
           children: <Widget>[
           itemWithSemantics,
           Positioned.directional(
             textDirection: Directionality.of(context),
               top: 0,
               bottom: 0,
               end: 8,
               child: Align(
                 alignment: AlignmentDirectional.centerEnd,
                 child: ReorderableDragStartListener(
                 	index: index,
                    child: your item child, // 传入自定义的 child
                  ),
                ),
              ),
            ],
          );
 ...
首先说下结论,这种方式当然是可以的。不过改起来有点麻烦,如果自定义的 child 需要额外传参的话,你还要同步带进来复制到源码中,而且后续 Flutter 升级对此进行修改的话,你还要去关注它修改了哪些地方,自己再去做适配。
那有没有更好的方案呢?
当然有,还是看源码,既然桌面端用的是 ReorderableDragStartListener,那就看一下它的源码,如下图所示
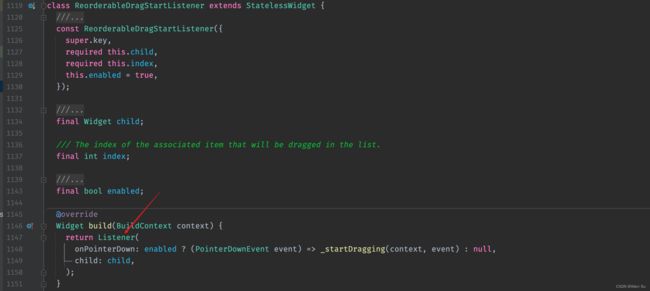
可以看出来,ReorderableDragStartListener 最终还是通过 Listener 实现的,这也就意味着,被 ReorderableDragStartListener 包括的组件,就可以响应到拖拽事件的通知,那事情就简单多了,接着往下看。
4-2:解决方案
如果想满足产品同学定义的只能通过拖拽标识 icon 进行拖动的话,两步实现。
第一步:
需要把 ReorderableDragStartListener 套在你需要响应拖拽事件的组件之外,
伪代码如下所示
ReorderableDragStartListener(
	index: index,
	child: Image.asset(R.ic_drag, width: 16, height: 16),
),
第二步:
设置 ReorderableListView 的属性 buildDefaultDragHandles 为 false。
默认是 true,代表在桌面平台上,拖拽句柄叠加在每项后边缘的中心,在移动平台上长按任意位置开始拖动。
但因为第一步我们已经重定义了拖拽句柄,所以在移动平台上,可以指定任意位置进行拖拽。
完整测试代码放在了 GitHub 的公开项目上了,需要的可自行查看。
至此,关于如何在 Flutter 中使用 ReorderableListView 实现拖拽排序列表组件的功能,便介绍完毕了。
你的问题得到解决了吗?欢迎在评论区留言。
赠人玫瑰,手有余香,如果觉得文章不错,希望可以给个一键三连,感谢。
Google 的 Flutter 越来越火,截止 2023年10月24日 GitHub 标星已达 158K,Flutter 毅然是一种趋势,所以作为前端开发者,没有理由不趁早去学习。
结束语
无论你是 Flutter 新手还是已经入门了,不妨先点个关注,后续我会将 Flutter 中的常用组件(含有源码分析、组件的用法及注意事项)以及可能遇到的问题写到 CSDN 博客中,希望自己学习的同时,也可以帮助更多的人。