ubuntu 安装串口工具和添加虚拟串口
目录
一、串口工具安装
二、使用Windows本身虚拟的串口
(一)添加串口
1、保证虚拟机是关闭状态,打开“虚拟机设置”,点击“添加”。
2、选中“串行端口”,点击“完成”。
3、选中刚添加的串口,下拉选择自己需要使用的端口,点击完成即可。
(二)注册权限
1、注意:在使用串口进行通信时,需要先注册其权限。
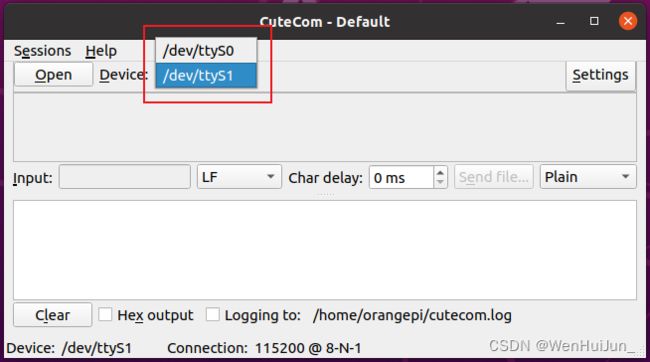
2、注册完权限后,打开CuteCom,选择串口,再点击Open,即可打开。如果没有注册权限,则打不开。
3、打开成功:
(三)通讯测试
三、添加虚拟串口
原文:
1.下载socat
2.使用socat配置虚拟串口
3.重新打开终端 编写串口通信的代码
4.执行程序
5.总结
一、串口工具安装
安装cute:
sudo apt-get install cutecom安装完成,打开如下,点击“Settings”可以进行设置:
二、使用Windows本身虚拟的串口
(一)添加串口
1、保证虚拟机是关闭状态,打开“虚拟机设置”,点击“添加”。
2、选中“串行端口”,点击“完成”。
3、选中刚添加的串口,下拉选择自己需要使用的端口,点击完成即可。
进行查看:
(二)注册权限
1、注意:在使用串口进行通信时,需要先注册其权限。
//注册所有:
sudo chmod 777 /dev -R
2、注册完权限后,打开CuteCom,选择串口,再点击Open,即可打开。如果没有注册权限,则打不开。
3、打开成功:
(三)通讯测试
1、在Windows下开启串口助手,选择与Ubuntu添加的端口成对的另一个虚拟串口,并使用Hex编码;
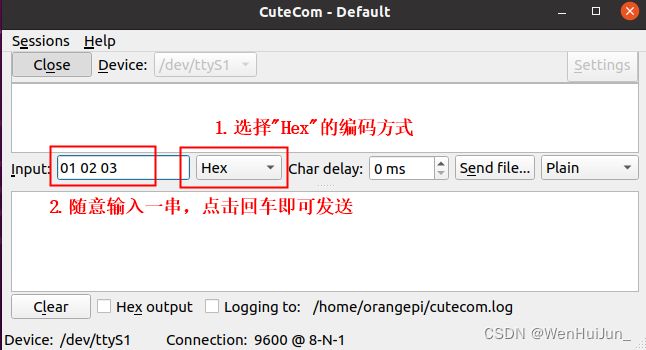
2、CuteCom选择Hex的编码方式,再随机输入发送的内容,按回车即可发送,然后就能在Windows上的串口助手上看到发送过来的数据了。
三、添加虚拟串口
原文:
https://blog.csdn.net/qq_62106718/article/details/130949814
使用socat完成虚拟串口的配置
1.下载socat
sudo apt install socat2.使用socat配置虚拟串口
socat -d -d pty,raw,echo=0 pty,raw,echo=0可以看到配置好的两个虚拟串口的路径:/dev/pts/3 /dev/pts/3, 不要关闭该进程。
3.重新打开终端 编写串口通信的代码
#include
#include
#include
#include
#include
#include
#include
#include
#include
#include
#include
#include
#include
typedef struct termios termios_t;

typedef struct serial_data{

    char databuf[100];//发送/接受数据
    int serfd;//串口文件描述符

}ser_Data;

void *sersend(void *arg);
void *serrecv(void *arg);
int main(int argc,char *argv[])
{
    pthread_t pid1,pid2;
    pthread_attr_t *pthread_arr1,*pthread_arr2;
    pthread_arr1 = NULL;
    pthread_arr2 = NULL;
    int serport1fd;


    /*   进行串口参数设置  */
    termios_t *ter_s = malloc(sizeof(*ter_s));

    serport1fd = open(argv[1],O_RDWR | O_NOCTTY | O_NDELAY);//不成为控制终端程序,不受其他程序输出输出影响
    if(serport1fd < 0){
        printf("%s open faild\r\n",argv[1]);
        return -1;
    }

    bzero(ter_s,sizeof(*ter_s));

    ter_s->c_cflag |= CLOCAL | CREAD; //激活本地连接与接受使能

    ter_s->c_cflag &= ~CSIZE;//失能数据位屏蔽
    ter_s->c_cflag |= CS8;//8位数据位

    ter_s->c_cflag &= ~CSTOPB;//1位停止位

    ter_s->c_cflag &= ~PARENB;//无校验位

    ter_s->c_cc[VTIME] = 0;
    ter_s->c_cc[VMIN] = 0;

    /*1 VMIN> 0 && VTIME> 0
        VMIN为最少读取的字符数,当读取到一个字符后,会启动一个定时器,在定时器超时事前,如果已经读取到了VMIN个字符,则read返回VMIN个字符。如果在接收到VMIN个字符之前,定时器已经超时,则read返回已读取到的字符,注意这个定时器会在每次读取到一个字符后重新启用,即重新开始计时,而且是读取到第一个字节后才启用,也就是说超时的情况下,至少读取到一个字节数据。
        2 VMIN > 0 && VTIME== 0
        在只有读取到VMIN个字符时,read才返回,可能造成read被永久阻塞。
        3 VMIN == 0 && VTIME> 0
        和第一种情况稍有不同,在接收到一个字节时或者定时器超时时,read返回。如果是超时这种情况,read返回值是0。
        4 VMIN == 0 && VTIME== 0
        这种情况下read总是立即就返回,即不会被阻塞。----by 解释粘贴自博客园
    */
    cfsetispeed(ter_s,B115200);//设置输入波特率
    cfsetospeed(ter_s,B115200);//设置输出波特率

    tcflush(serport1fd,TCIFLUSH);//刷清未处理的输入和/或输出

    if(tcsetattr(serport1fd,TCSANOW,ter_s) != 0){
            printf("com set error!\r\n");
    }


    char buffer[] = {"hello my world!\r\n"};
    char recvbuf[100] = {};

    ser_Data snd_data;
    ser_Data rec_data;

    snd_data.serfd = serport1fd;
    rec_data.serfd = serport1fd;

    memcpy(snd_data.databuf,buffer,strlen(buffer));//拷贝发送数据

    pthread_create(&pid1,pthread_arr1,sersend,(void *)&snd_data);
    pthread_create(&pid2,pthread_arr2,serrecv,(void *)&rec_data);


    ssize_t sizec;
    while(1){

            usleep(100000);
    }

    pthread_join(pid1,NULL);
    pthread_join(pid2,NULL);
    free(ter_s);
    return 0;
}


void *sersend(void *arg)//串口发送线程函数
{
    ser_Data *snd = (ser_Data *)arg ;
    int ret;
    while(1){
       scanf("%s",snd->databuf);
       ret = write(snd->serfd,snd->databuf,strlen(snd->databuf));
       if(ret > 0){
            printf("send success, data is  %s\r\n",snd->databuf);
       }else{
           printf("send error!\r\n");
       }
       usleep(300000);
       /*
       if(发生中断)
       break;//退出
       */
    }
}

void *serrecv(void *arg)//串口发送线程函数
{
 ser_Data *rec= (ser_Data *)arg ;
    int ret;
    while(1){
       ret = read(rec->serfd,rec->databuf,1024);
       if(ret > 0){
            printf("recv success,recv size is %d,data is  %s\r\n",ret,rec->databuf);
       }else{
           /*
            什么也不做
           */
       }
       usleep(1000);
       /*
       if(发生中断)
       break;//退出
       */
    }
}
使用下面命令编译
gcc serial.c -o serial -lpthread4.执行程序
认真看上面的串口通信代码 在运行程序需要传入main函数的参数,该参数就是虚拟串口的位置
所以执行下面的命令运行程序
./serial /dev/pts/2再打开一个终端输入下面命令
./serial /dev/pts/35.总结
如果出现open fail 可能原因:权限不够 或者 虚拟串口关闭或位置错误


