cesium初识 && canvas基础
canvas
尝试复制下面这段代码到你的F12控制台
const div = document.createElement('canvas');
const ctx = div.getContext('2d');
ctx.fillStyle = 'green';
ctx.fillRect(10, 10, 150, 100);
document.body.appendChild(div);
canvas基础学习
api
- fillRect(x, y, width, height) 绘制矩形
- arc(x, y, radius, startAngle, endAngle, anticlockwise) 绘制圆弧
- quadraticCurveTo(cp1x, cp1y, x, y) 绘制二次贝塞尔曲线
尝试复制下面的代码画一个笑脸
const div = document.createElement('canvas');
      canvas.setAttribute('width',200);
      canvas.setAttribute('height',200);
    var ctx = div.getContext('2d');
document.body.appendChild(div);
    ctx.beginPath();
    ctx.arc(75, 75, 50, 0, Math.PI * 2, true); // 绘制
    ctx.moveTo(110, 75);
    ctx.arc(75, 75, 35, 0, Math.PI, false);   // 口(顺时针)
    ctx.moveTo(65, 65);
    ctx.arc(60, 65, 5, 0, Math.PI * 2, true);  // 左眼
    ctx.moveTo(95, 65);
    ctx.arc(90, 65, 5, 0, Math.PI * 2, true);  // 右眼
    ctx.stroke();
- 使用SVG path data来初始化canvas上的路径
var p = new Path2D("M10 10 h 80 v 80 h -80 Z");
这条路径将先移动到点 (M10 10) 然后再水平移动80个单位(h 80),然后下移80个单位 (v 80),接着左移80个单位 (h -80),再回到起点处 (z)。
- translate 移动 canvas 原点
尝试复制下面的代码学习translate 代替在fillRect中手工调整坐标值
const canvas = document.createElement('canvas');
document.body.appendChild(canvas );
 var ctx = canvas.getContext('2d');
  for (var i = 0; i < 3; i++) {
    for (var j = 0; j < 3; j++) {
      ctx.save();
      ctx.fillStyle = 'rgb(' + (51 * i) + ', ' + (255 - 51 * i) + ', 255)';
      ctx.translate(10 + j * 50, 10 + i * 50);
      ctx.fillRect(0, 0, 25, 25);
      ctx.restore();
    }
  }
- rotate 以原点为中心旋转 canvas
这个方法只接受一个参数:旋转的角度(angle),它是顺时针方向的,以弧度为单位的值。
const canvas = document.createElement('canvas');
document.body.appendChild(canvas );
  var ctx = canvas.getContext('2d');
  ctx.translate(75,75);

  for (var i=1;i<6;i++){ // Loop through rings (from inside to out)
    ctx.save();
    ctx.fillStyle = 'rgb('+(10*i)+','+(255-51*i)+',255)';

    for (var j=0;j<i*6;j++){ // draw individual dots
      ctx.rotate(Math.PI*2/(i*6));
      ctx.beginPath();
      ctx.arc(0,i*12.5,5,0,Math.PI*2,true);
      ctx.fill();
    }

    ctx.restore();
  }
- 动画效果
尝试复制下面的代码 实现一个带拖尾的小球动效
document.body.innerHTML = ""
const canvas = document.createElement('canvas');
canvas.style.border = "1px solid red"
      canvas.setAttribute('width',500);
      canvas.setAttribute('height',500);
document.body.appendChild(canvas );
  var ctx = canvas.getContext('2d');
var raf;

var ball = {
  x: 100,	// 小球的起始位置
  y: 100,
  vx: 5,	// 小球的x方向速度
  vy: 2,
  radius: 25,	// 小球半径
  color: 'blue',	// 小球颜色
  draw: function() {
    ctx.beginPath();
    ctx.arc(this.x, this.y, this.radius, 0, Math.PI * 2, true); // 画弧线
    ctx.closePath();
    ctx.fillStyle = this.color;
    ctx.fill();
  }
};

function clear() {	// 实现拖尾效果
  ctx.fillStyle = 'rgba(255,255,255,0.3)';
  ctx.fillRect(0,0,canvas.width,canvas.height);
}

function draw() {
  //ctx.clearRect(0,0, canvas.width, canvas.height);
clear()
  ball.draw();
  ball.x += ball.vx;	// 移动
  ball.y += ball.vy;
  raf = window.requestAnimationFrame(draw);

// 判断超出画布
if (ball.y + ball.vy+ball.radius/2 > canvas.height || ball.y + ball.vy < 0) {
  ball.vy = -ball.vy;	// 回弹
}
if (ball.x + ball.vx+ball.radius/2 > canvas.width || ball.x + ball.vx+ball.radius/2 < 0) {
  ball.vx = -ball.vx;
}
}

canvas.addEventListener('mouseover', function(e){
  raf = window.requestAnimationFrame(draw);

});

canvas.addEventListener('mouseout', function(e){
  window.cancelAnimationFrame(raf);
});

ball.draw();
cesium
安装
https://cesium.com/downloads/
压缩包解压后npm i,安装依赖如express等
然后运行npm run start
参考网站
http://cesiumcn.org/?node=learning&page=3 官网
https://sandcastle.cesium.com/index.html?src=Imagery%20Adjustment.html 例子
https://blog.csdn.net/newston/article/details/99708014 相关博文
https://cesium.com/learn/cesiumjs/ref-doc/Camera.html?classFilter=camera 查API
使用
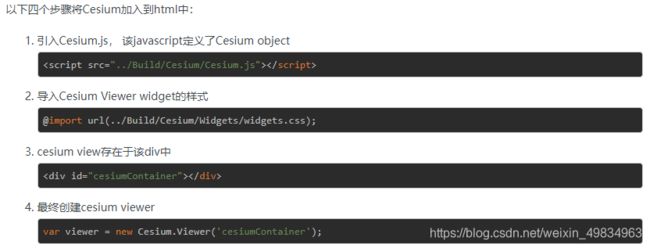
引入
可以按需引入项目
界面介绍
- 按住鼠标左键拖拽 - 让相机在数字地球平面平移。
- 按住鼠标右键拖拽 - 放缩相机。
- 鼠标滚轮滑动 - 放缩相机。
- 按住鼠标中键拖拽 - 在当前地球的屏幕中间点,旋转相机。

1.Geocoder : 一种地理位置搜索工具,用于显示相机访问的地理位置。默认使用微软的Bing地图。
2. HomeButton : 首页位置,点击之后将视图跳转到默认视角。
3. SceneModePicker : 切换2D、3D 和 Columbus View (CV) 模式。
4. BaseLayerPicker : 选择三维数字地球的底图(imagery and terrain)。
5. NavigationHelpButton : 帮助提示,如何操作数字地球。
6. Animation :控制视窗动画的播放速度。
7. CreditsDisplay : 展示商标版权和数据源。
8. Timeline : 展示当前时间和允许用户在进度条上拖动到任何一个指定的时间。
9. FullscreenButton : 视察全屏按钮。
相关API
创建地球的容器(盒子),和HTML中的一个id为"cesiumContainer"的div绑定,可通过配置参数添加/移除相关组件
var viewer = new Cesium.Viewer("cesiumContainer");
开始前的准备
初始化启动view之前,我们先简略的过一下一些基础的Cesium类型:
- Cartesian3 : 一个三维笛卡尔坐标——当它被用作相对于地球中心的位置时,使用地球固定框架(ECEF)。
- Cartographic : 由经度、纬度(弧度)和WGS84椭球面高度确定的位置。
- HeadingPitchRoll : 在东北向上的框架中关于局部轴的旋转(弧度)。航向是围绕负Z轴的旋转。俯仰是围绕负Y轴的旋转。滚动是关于正X轴的旋转。
- Quaternion :以4D坐标表示的3D旋转。
viewer.scene
viewer.scene控制viewer中的所有图形元素。
viewer.scene.camera.setView
camera控制
- Camera.setView(options): 在特定位置和方向立即设置相机。
- Camera.zoomIn(amount): 沿着视角矢量移动摄像机。
- Camera.zoomOut(amount): 沿视角矢量向后移动摄像机。
- Camera.flyTo(options): 创建从当前相机位置到新位置的动画相机飞行。
- Camera.lookAt(target, offset) : 定位并定位摄像机以给定偏移量瞄准目标点。
- Camera.move(direction, amount) : 朝任何方向移动摄像机。
- Camera.rotate(axis, angle) : 绕任意轴旋转相机。
camera下的setView方法可用于设置定位,刷新显示固定位置
//利用viewer.scene下的camera属性
var initialOrientation = new Cesium.HeadingPitchRoll.fromDegrees(7.1077496389876024807, -31.987223091598949054, 0.025883251314954971306);
viewer.scene.camera.setView({
    destination : Cesium.Cartesian3.fromDegrees(114.0595699327, 22.542875036, 10000), // 位置
    orientation : {  // 角度
        heading : initialOrientation.heading,
        pitch : initialOrientation.pitch,
        roll : initialOrientation.roll
    }
});
viewer.scene.pick
pick用于js交互,如点击事件、鼠标跟随显示经纬度。利用handler的setInputAction方法
事件类型:
左键单击:Cesium.ScreenSpaceEventType.LEFT_CLICK
左键双击LEFT_DOUBLE_CLICK
左键按下LEFT_DOWN
左键抬起LEFT_UP
中键单击MIDDLE_CLICK
。。。
滚轮事件WHEEL
解除鼠标左键单击事件handler.removeInputAction(Cesium.ScreenSpaceEventType.LEFT_CLICK);
	var handler = new Cesium.ScreenSpaceEventHandler(viewer.scene.canvas);
    handler.setInputAction(function(movement) {    //setInputAction绑定鼠标事件, 传入回调和事件
        var pick = viewer.scene.pick(movement.position);
        debugger
        if(Cesium.defined(pick) && (pick.id.id === 'point_id')) {
            alert('picked! 我是点');
        }
    },Cesium.ScreenSpaceEventType.LEFT_CLICK);
viewer.entity
官方文档:https://cesium.com/learn/cesiumjs/ref-doc/Entity.html?classFilter=entity。
viewer.entities属性实际上是一个EntityCollecton对象,是entity的一个集合,提供了add、remove、removeAll等等接口来管理场景中的entity

entity设置跟随标签,用于显示经纬度
var entity = viewer.entities.add({      //entity通过viewer中的entities加载到场景中
      //添加跟随鼠标标签,设置标签样式
        label: {
            show: false,
            showBackground: true,
            font: "18px monospace",
            horizontalOrigin: Cesium.HorizontalOrigin.LEFT,
            verticalOrigin: Cesium.VerticalOrigin.TOP,
            pixelOffset: new Cesium.Cartesian2(15, 0),
        }
    });

    // Mouse over the globe to see the cartographic position将鼠标移到地球上查看地图位置
    handler = new Cesium.ScreenSpaceEventHandler(viewer.scene.canvas);
    handler.setInputAction(function (movement) {
        var cartesian = viewer.camera.pickEllipsoid(
            movement.endPosition,
            viewer.scene.globe.ellipsoid
        );
        if (cartesian) {
            var cartographic = Cesium.Cartographic.fromCartesian(cartesian);
            var longitudeString = Cesium.Math.toDegrees(
                cartographic.longitude
            ).toFixed(2);
            var latitudeString = Cesium.Math.toDegrees(
                cartographic.latitude
            ).toFixed(2);

            // console.log("longitudeString: "+longitudeString , "latitudeString: "+latitudeString);

            entity.position = cartesian;
            entity.label.show = true;
            // 纬度latitude(南纬是负) ,经度longitude(西经是负) ,\u00B0度符号
            entity.label.text =
                "Lon: " +
                ("   " + longitudeString).slice(-7) +
                "\u00B0" +
                "\nLat: " +
                ("   " + latitudeString).slice(-7) +
                "\u00B0";
        } else {
            entity.label.show = false;
        }
    }, Cesium.ScreenSpaceEventType.MOUSE_MOVE);
entity样式通过材质material来控制,比如说颜色、透明度、纹理贴图、更高级的光照等等。我们常用到就是颜色和透明度。
entities的可用接口:
Cesium.EntityCollection.collectionChangedEventCallback(collection,added, removed, changed)
add(entity) → Entity
computeAvailability() → TimeInterval
contains(entity) → Boolean
getById(id) → Entity
getOrCreateEntity(id) → Entity
remove(entity) → Boolean
removeAll()
removeById(id) → Boolean
resumeEvents()
suspendEvents()
样式
- 地球样式 brightness, contrast, hue色温, saturation饱和度, Gamma灰度
https://sandcastle.cesium.com/index.html?src=Imagery%20Adjustment.html(调整影像颜色) - 标签样式
颜色、透明度、纹理贴图、更高级的光照等 - 拆分影像
https://sandcastle.cesium.com/index.html?src=Imagery%20Layers%20Split.html - 排序影响层
https://sandcastle.cesium.com/index.html?src=Imagery%20Layers%20Manipulation.html
(包括添加网格线,天气,红外)
