微服务-Feign
文章目录
-
- Feign介绍
- Feign的基本使用
- 自定义Feign的配置
- Feign性能优化
- Feign最佳实践
Feign介绍
RestTemplate远程调用存在的问题:代码可读性差,java代码中夹杂url;参数复杂很难维护
String url = "http://userservice/user/" + order.getUserId();
User user = restTemplate.getForObject(url, User.class);
Feign是一个声明式的http发送的客户端,用来替代RestTemplate;使用Feign可以通过直接写java接口发送http请求,而不需要定义url
Feign的基本使用
- 引入依赖
- 添加@EnableFeignClients注解
- 编写FeignClient接口
- 消费者(案例为order-service)中引入依赖
<dependency>
    <groupId>org.springframework.cloudgroupId>
    <artifactId>spring-cloud-starter-openfeignartifactId>
dependency>
- 启动类中添加注解@EnableFeignClients
- 定义UserClient接口,该接口可以发送http请求,且写法与SpringMVC相似。接口添加@FeignClient注解,userservice表示该类使用的http请求是用来访问userservice服务的。
@FeignClient("userservice")
public interface UserClient {
    @GetMapping("user/{id}")
    User findById(@PathVariable("id")Long id);
}
- OrderService中使用UserClient接口发送http请求
public class OrderService {

    @Autowired
    private OrderMapper orderMapper;

    //自动注入UserClient
    @Autowired
    UserClient userClient;

    public Order queryOrderById(Long orderId){
        Order order = orderMapper.findById(orderId);
        // 发送http请求,以order.getUserId()为参数
        User user = userClient.findById(order.getUserId());

        order.setUser(user);

        return order;
    }
}
以下是之前使用RestTemplate的OrderService
@Service
public class OrderService {

    @Autowired
    private OrderMapper orderMapper;

    //获取restTemplate对象
    @Autowired
    private RestTemplate restTemplate;

    public Order queryOrderById(Long orderId) {
        // 1.查询订单
        Order order = orderMapper.findById(orderId);
        // 2.定义url
        // String url = "http://localhost:8081/user/"+order.getUserId();
        String url = "http://userservice/user/"+order.getUserId(); //修改为服务名
        // 3.发送http请求
        User user = restTemplate.getForObject(url, User.class);
        // 4.封装user
        order.setUser(user);
        // 5.返回
        return order;
    }
}
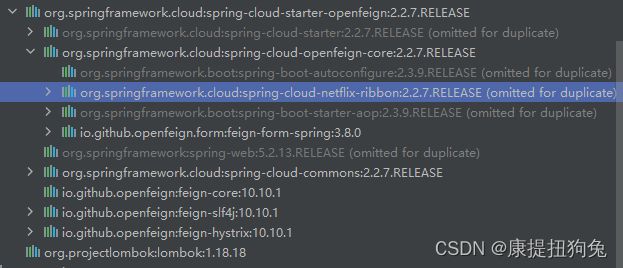
- 在浏览器中测试发送4次请求,http://localhost:8080/order/103。发现UserApplication和UserApplication2各自被访问两次。因此,Feign已经自动实现了负载均衡,在Feign的依赖中发现了Ribbon依赖。
自定义Feign的配置
- 在application.yml中配置
配置日志级别有两种:1、全局配置,对所有访问的服务的http请求都有效;2、单个service配置,对某个服务进行配置
- 全局配置
feign:
  client:
    config:
      default: # 这里用default就是全局配置,如果是写服务名称,则是针对某个微服务的配置
        loggerLevel: FULL # 日志级别
浏览器中测试,发现order-service访问userservice时控制台打印出来了很多http请求日志信息

- 单个服务的配置
feign:
  client:
    config:
      userservice: # 针对userservice微服务的配置
        loggerLevel: FULL
测试发现,仍打印出了日志信息
- 使用java代码配置
定义一个Feign配置类FeignClientConfiguration ,这里不用加@SpringBootConfiguration;
然后声明一个Logger.Level的Bean
public class FeignClientConfiguration {

    @Bean
    public Logger.Level level(){
        return Logger.Level.BASIC; //只打印基础日志
    }
}
全局配置,直接在启动类中配置,注入添加的Feign配置类
@EnableFeignClients(defaultConfiguration = FeignClientConfiguration.class)
局部配置,在对应的Client接口中配置,注入添加的Feign配置类
@FeignClient(value = “userservice”,configuration = FeignClientConfiguration.class)
@FeignClient(value = "userservice",configuration = FeignClientConfiguration.class)
public interface UserClient {
    @GetMapping("user/{id}")
    User findById(@PathVariable("id")Long id);
}
浏览器中测试,发现order-service访问userservice时控制台打印出来了基础的http请求日志信息
![]()
Feign性能优化
引入连接池的步骤
- 引入feign-httpclient依赖
<dependency>
	<groupId>io.github.openfeigngroupId>
	<artifactId>feign-httpclientartifactId>
dependency>
- 在applicaiton.yml中配置httpclient或者okhttp,添加连接池参数
feign:
	httpclient:    # 使用的连接池
		enabled: true # 开启feign对HttpClient的支持
		max-connections: 200 # 最大的连接数
		max-connections-per-route: 50 # 每个路径的最大连接
Feign最佳实践

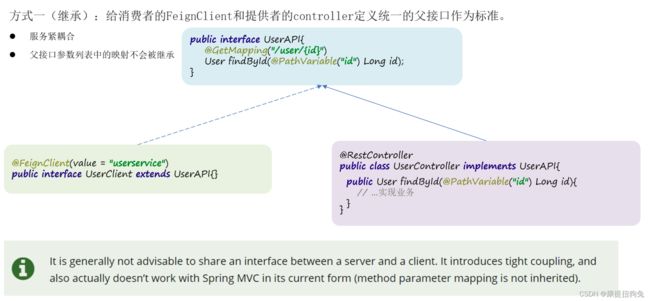
方式二:将FeignClient抽取为独立模块,并且把接口有关的POJO、默认的Feign配置都放到这个模块中,提供给所有消费者使用

- 首先创建一个module,命名为feign-api,然后引入feign的starter依赖
- 将order-service中编写的UserClient、User、DefaultFeignConfiguration都复制到feign-api项目中
- 在order-service中引入feign-api的依赖
- 修改order-service中的所有与上述三个组件有关的import部分,改成导入feign-api中的包
- 重启测试
- 创建module名叫feign-api,引入依赖
<dependency>
    <groupId>org.springframework.cloudgroupId>
    <artifactId>spring-cloud-starter-openfeignartifactId>
dependency>
-
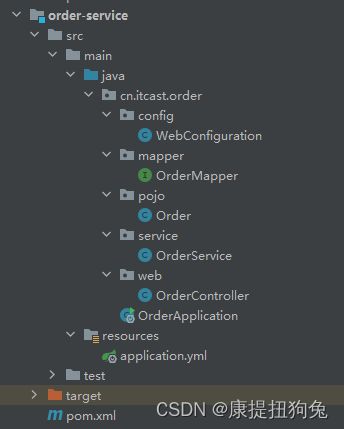
删除order-service中原有的UserClient,FeignClientConfiguration,User;修改后的order-service包结构如下

-
在order-service的pom文件中引入feign-api依赖
<dependency>
    <groupId>cn.itcast.demogroupId>
    <artifactId>feign-apiartifactId>
    <version>1.0version>
dependency>
在order-service重新导入UserClient,FeignClientConfiguration,User类,项目不再报红
- 启动,发现启动失败。OrdeApplication报错如下:UserClient的Bean不存在
Description:

Field userClient in cn.itcast.order.service.OrderService required a bean of type 'cn.itcast.feign.clients.UserClient' that could not be found.

The injection point has the following annotations:
	- @org.springframework.beans.factory.annotation.Autowired(required=true)


Action:

Consider defining a bean of type 'cn.itcast.feign.clients.UserClient' in your configuration.
前后的UserClient同样都加了@FeignClient注解,但现在没扫描到。原因是因为之前的UserClient在cn.itcast.order.clients包下面,而现在在cn.itcast.feign.clients包下面,但是spring创建对象时只能扫描到启动类所在包(cn.itcast.order)下面,因此并不会将UserClient创建对象放到spring容器中。
有以下解决方案
//方案一:在启动类的@EnableFeignClients注解后加入UserClient所在包basePackages = "cn.itcast.feign.clients"
@EnableFeignClients(basePackages = "cn.itcast.feign.clients")

//方案二(推荐):加入UserClient的字节码
@EnableFeignClients(clients = {UserClient.class})
- 修改OrderApplicaiton启动类后,测试。成功使用UserClient访问到userservice。
@EnableFeignClients(defaultConfiguration = FeignClientConfiguration.class,
                    clients = {UserClient.class}) //增加clients = {UserClient.class}
@MapperScan("cn.itcast.order.mapper")
@SpringBootApplication
public class OrderApplication {

    public static void main(String[] args) {
        SpringApplication.run(OrderApplication.class, args);
    }
}


