spring cloud alibaba中RestTemplate 、Ribbon、Nacos Discover整合源码简析
1 调用流程图
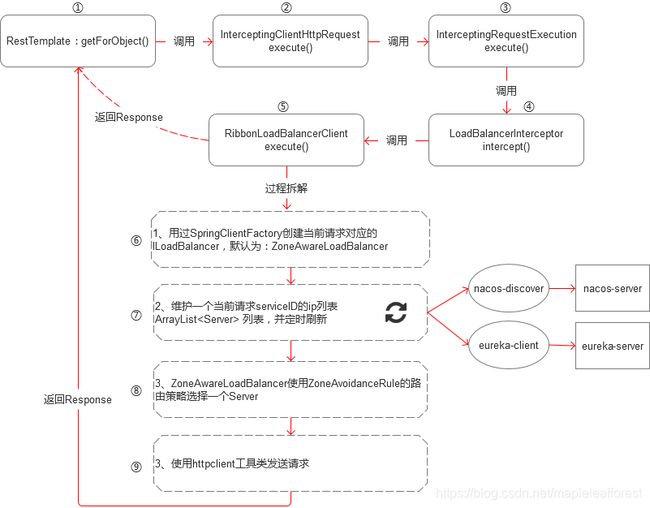
在spring cloud alibaba中,nacos discover提供了对ribbon的支持,其方式和eureka client对ribbon的支持一样,而ResTemplate客户端负载均衡又是依赖ribbon,下图是看完源码后画的一张简要的流程图:

2 流程图的源码分析
2.1 调用从RestTemplate到LoadBalancerInterceptor
从RestTemplate:getForObject()一路断点到 doExecute()方法
protected <T> T doExecute(URI url, @Nullable HttpMethod method, @Nullable RequestCallback requestCallback,
			@Nullable ResponseExtractor<T> responseExtractor) throws RestClientException {

		Assert.notNull(url, "URI is required");
		Assert.notNull(method, "HttpMethod is required");
		ClientHttpResponse response = null;
		try {
			ClientHttpRequest request = createRequest(url, method);
			if (requestCallback != null) {
				requestCallback.doWithRequest(request);
			}
			response = request.execute();
			handleResponse(url, method, response);
			return (responseExtractor != null ? responseExtractor.extractData(response) : null);
		}
		catch (IOException ex) {
		    …………
		}
		finally {
			if (response != null) {
				response.close();
			}
		}
	}
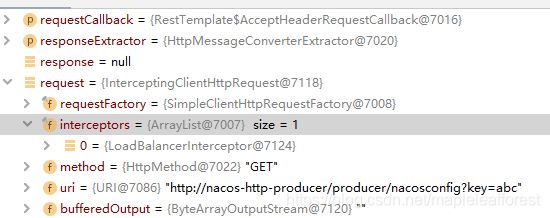
在request处端点可以发现request对象里的List中已经包含了LoadBalancerInterceptor这拦截器。

接着从request.execute()一路断点到executeInternal()
@Override
	protected final ClientHttpResponse executeInternal(HttpHeaders headers, byte[] bufferedOutput) throws IOException {
		InterceptingRequestExecution requestExecution = new InterceptingRequestExecution();
		return requestExecution.execute(this, bufferedOutput);
	}
	private class InterceptingRequestExecution implements ClientHttpRequestExecution {
		private final Iterator<ClientHttpRequestInterceptor> iterator;
		public InterceptingRequestExecution() {
			this.iterator = interceptors.iterator();
		}
		@Override
		public ClientHttpResponse execute(HttpRequest request, byte[] body) throws IOException {
			if (this.iterator.hasNext()) {
				ClientHttpRequestInterceptor nextInterceptor = this.iterator.next();
				//LoadBalancerInterceptor开始介入
				return nextInterceptor.intercept(request, body, this);
			}
可以看到在其子类InterceptingRequestExecution的execute方法中LoadBalancerInterceptor的intercept方法。
@Override
	public ClientHttpResponse intercept(final HttpRequest request, final byte[] body,
	final ClientHttpRequestExecution execution) throws IOException {
		final URI originalUri = request.getURI();
		String serviceName = originalUri.getHost();
		Assert.state(serviceName != null,
				"Request URI does not contain a valid hostname: " + originalUri);
		//this.loadBalancer为RibbonLoadBalancerClient
		//his.requestFactory为LoadBalancerRequestFactory
		return this.loadBalancer.execute(serviceName,
				this.requestFactory.createRequest(request, body, execution));
	}
到此为止代码已经走到流程图中的第步,Ribbon开始介入。
-------------到此为止进行到开篇流程图中的第④步--------------------------
2.2 RibbonLoadBalancerClient执行源码
从2.1 末尾代码中的this.loadBalancer.execute()一路狂奔到下面的execute方法,ribbon的核心逻辑的入口就在这:
public <T> T execute(String serviceId, LoadBalancerRequest<T> request, Object hint)
			throws IOException {
		ILoadBalancer loadBalancer = getLoadBalancer(serviceId);
		Server server = getServer(loadBalancer, hint);
		if (server == null) {
			throw new IllegalStateException("No instances available for " + serviceId);
		}
		RibbonServer ribbonServer = new RibbonServer(serviceId, server,
				isSecure(server, serviceId),
				serverIntrospector(serviceId).getMetadata(server));

		return execute(serviceId, ribbonServer, request);
	}
2.2.1 ILoadBalancer默认实现ZoneAwareLoadBalancer的创建
断点进入getLoadBalancer(serviceId);
这里的serviceId为需要调用的服务,即服务提供段在nacos server 中注册的spring.application.name
protected ILoadBalancer getLoadBalancer(String serviceId) {
		return this.clientFactory.getLoadBalancer(serviceId);
	}
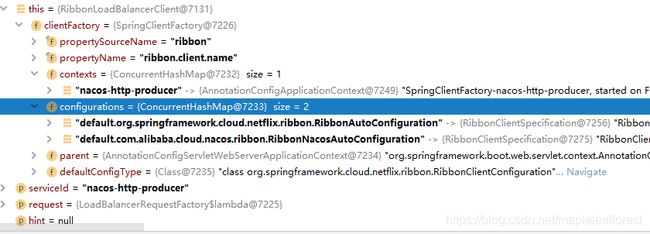
这个默认创建的ILoadBalancer,默认为:ZoneAwareLoadBalancer,创建过程复杂,先看一张截图:

可以看到在this.clientFactory中有一个contexts的ConcurrentHashp,key为serviceId,value则为对应的applicationContext,在首次访问 serviceId 时创建对应的applicationCotext,并将该serviceId下ribbon路由的对象放在自己的applicationContext以达到隔离的目的。
下面贴出部分关键代码:
断点到spring factory的createContext方法,
protected AnnotationConfigApplicationContext createContext(String name) {
		AnnotationConfigApplicationContext context = new AnnotationConfigApplicationContext();
		if (this.configurations.containsKey(name)) {
			for (Class<?> configuration : this.configurations.get(name)
					.getConfiguration()) {
				context.register(configuration);
			}
		}
		for (Map.Entry<String, C> entry : this.configurations.entrySet()) {
			if (entry.getKey().startsWith("default.")) {
				for (Class<?> configuration : entry.getValue().getConfiguration()) {
					context.register(configuration);
				}
			}
		}
		context.register(PropertyPlaceholderAutoConfiguration.class,
				this.defaultConfigType);
		context.getEnvironment().getPropertySources().addFirst(new MapPropertySource(
				this.propertySourceName,
				Collections.<String, Object>singletonMap(this.propertyName, name)));
		if (this.parent != null) {
			// Uses Environment from parent as well as beans
			context.setParent(this.parent);
			// jdk11 issue
			// https://github.com/spring-cloud/spring-cloud-netflix/issues/3101
			context.setClassLoader(this.parent.getClassLoader());
		}
		context.setDisplayName(generateDisplayName(name));
		context.refresh();
		return context;
	}
代码分析详见
[spring cloud gateway 整合ribbon、nacos discovery 实现负载均衡源码简析]
中的《3源码简析》 这一部分
-------------到此为止进行到开篇流程图中的第⑥步--------------------------
2.2.2 定时刷新ServerList的PollingServerListUpdater
在RibbonClientConfiguration中创建某一个serviceId对应的 ZoneAwareLoadBalancer对象时时会创建一个PollingServerListUpdater类
@Bean
	@ConditionalOnMissingBean
	public ServerListUpdater ribbonServerListUpdater(IClientConfig config) {
		return new PollingServerListUpdater(config);
	}
@Bean
	@ConditionalOnMissingBean
	public ILoadBalancer ribbonLoadBalancer(IClientConfig config,
			ServerList<Server> serverList, ServerListFilter<Server> serverListFilter,
			IRule rule, IPing ping, ServerListUpdater serverListUpdater) {
		if (this.propertiesFactory.isSet(ILoadBalancer.class, name)) {
			return this.propertiesFactory.get(ILoadBalancer.class, config, name);
		}
		return new ZoneAwareLoadBalancer<>(config, rule, ping, serverList,
				serverListFilter, serverListUpdater);
	}
在ZoneAwareLoadBalancer的创建构造方法中会执行PollingServerListUpdater中的
@Override
    public synchronized void start(final UpdateAction updateAction) {
        if (isActive.compareAndSet(false, true)) {
            final Runnable wrapperRunnable = new Runnable() {
                //定时执行的更新ServerList列表的线程
                @Override
                public void run() {
                    if (!isActive.get()) {
                        if (scheduledFuture != null) {
                            scheduledFuture.cancel(true);
                        }
                        return;
                    }
                    try {
                        //关键代码,加断点
                        updateAction.doUpdate();
                        lastUpdated = System.currentTimeMillis();
                    } catch (Exception e) {
                        logger.warn("Failed one update cycle", e);
                    }
                }
            };
            //开始定时任务,默认refreshIntervalMs=30000,即每30秒更新一下服务端列表
            scheduledFuture = getRefreshExecutor().scheduleWithFixedDelay(
                    wrapperRunnable,
                    initialDelayMs,
                    refreshIntervalMs,
                    TimeUnit.MILLISECONDS
            );
        } else {
            logger.info("Already active, no-op");
        }
    }
Nacos Discover对robbon 的支持
从updateAction.doUpdate();断点到
 public void updateListOfServers() {
        List<T> servers = new ArrayList<T>();
        if (serverListImpl != null) {
           //这里的serverListImpl为alibaba提供的NacosServerList
            servers = serverListImpl.getUpdatedListOfServers();
            LOGGER.debug("List of Servers for {} obtained from Discovery client: {}",
                    getIdentifier(), servers);

            if (filter != null) {
                servers = filter.getFilteredListOfServers(servers);
                LOGGER.debug("Filtered List of Servers for {} obtained from Discovery client: {}",
                        getIdentifier(), servers);
            }
        }
        updateAllServerList(servers);
    }
ServerList serverListImpl为NacosServerList
如图:

spring-cloud-starter-alibaba-nacos-discovery提供了ServerList的创建
 @Bean
    @ConditionalOnMissingBean
    public ServerList<?> ribbonServerList(IClientConfig config, NacosDiscoveryProperties nacosDiscoveryProperties) {
        if (this.propertiesFactory.isSet(ServerList.class, config.getClientName())) {
            ServerList serverList = (ServerList)this.propertiesFactory.get(ServerList.class, config, config.getClientName());
            return serverList;
        } else {
            NacosServerList serverList = new NacosServerList(nacosDiscoveryProperties);
            serverList.initWithNiwsConfig(config);
            return serverList;
        }
    }
现在更新服务列表的任务已经交给nacos discover了。
如果引入spring-cloud-netflix-eureka-client包,则serverListImpl的实现为DomainExtractingServerList
-------------到此为止进行到开篇流程图中的第⑦步--------------------------
2.2 RibbonLoadBalancerClient执行源码 中的ILoadBalancer loadBalancer = getLoadBalancer(serviceId);代码已经完毕。
2.2.3 ZoneAwareLoadBalancer 的 chooseServer详解
从 RibbonLoadBalancerClient类 Server server = getServer(loadBalancer, hint);一路断点狂奔到
关键代码
public Server chooseServer(Object key) {
        if (counter == null) {
            counter = createCounter();
        }
        counter.increment();
        if (rule == null) {
            return null;
        } else {
            try {
                //这里的rule为默认的ZoneAvoidanceRule,可以通过配置文件配置
                return rule.choose(key);
            } catch (Exception e) {
                logger.warn("LoadBalancer [{}]:  Error choosing server for key {}", name, key, e);
                return null;
            }
        }
    }
核心逻辑如下:
1、从ZoneAwareLoadBalancer中获取对server列表
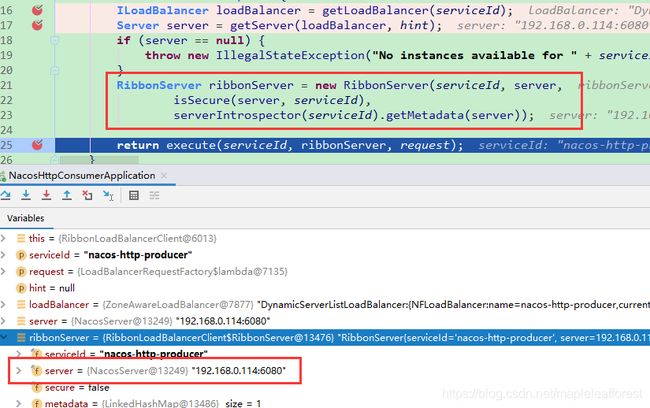
2、使用配置的路由策略来选择一个服务端给RestTemplate调用
如图:

-------------到此为止进行到开篇流程图中的第⑧步--------------------------
后面代码就没Ribbon、Nacos Discover什么事了,代码执行开篇流程图中的第⑨步返回response.