Spring源码-4.Aware接口、初始化和销毁执行顺序、Scope域
Aware接口
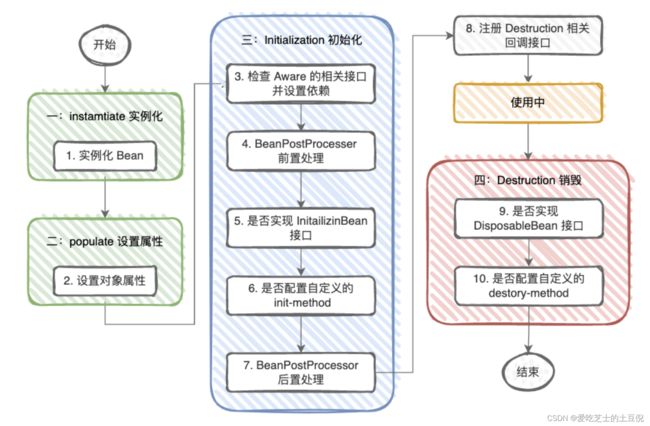
其实在生命周期中,Aware接口也参与进来了,如图所示:
如初始化时的第三步,其实就是调用了Aware相关接口。
以常见的Aware接口举例:
1.BeanNameAware 主要是注入Bean的名字
2.BeanFactoryAware 主要是时注入BeanFactory容器
3.ApplicationContextAware 主要是注入ApplicationContext容器
接下来以一段代码的方式来解析吧。
GenericApplicationContext context = new GenericApplicationContext();
context.registerBean("myBean", MyBean.class);

public class MyBean implements BeanNameAware, ApplicationContextAware, InitializingBean {

    private static final Logger log = LoggerFactory.getLogger(MyBean.class);

    @Override
    public void setBeanName(String name) {
        // 初始化之前回调 BeanNameAware接口
        log.debug("当前bean " + this + " 名字叫:" + name);
    }

    @Override
    public void setApplicationContext(ApplicationContext applicationContext) throws BeansException {
        log.debug("当前bean " + this + " 容器是:" + applicationContext);
    }

    @Override
    public void afterPropertiesSet() throws Exception {
        log.debug("当前bean " + this + " 初始化");
    }
}

context.refresh();
context.close();
输出:
[DEBUG] 11:36:41.083 [main] com.itheima.a06.MyBean              - 当前bean com.itheima.a06.MyBean@130161f7 名字叫:myBean
[DEBUG] 11:36:41.102 [main] com.itheima.a06.MyBean              - 当前bean com.itheima.a06.MyBean@130161f7 容器是:org.springframework.context.support.GenericApplicationContext@de3a06f, started on Tue Oct 24 11:36:41 CST 2023
[DEBUG] 11:36:41.103 [main] com.itheima.a06.MyBean              - 当前bean com.itheima.a06.MyBean@130161f7 初始化
不同于我们前面章节所介绍的后置处理,我们不需要添加任何的后置处理器,只需要实现对应的Aware接口,在运行的时候,就会执行对应的实现方法了。
以上就是Aware的初步认识了,那下面我们再来看,后置处理器的使用
context.registerBean("myConfig1", MyConfig1.class);
context.registerBean(AutowiredAnnotationBeanPostProcessor.class);
context.registerBean(CommonAnnotationBeanPostProcessor.class);

@Configuration
public class MyConfig1 {

    private static final Logger log = LoggerFactory.getLogger(MyConfig1.class);

    @Autowired
    public void setApplicationContext(ApplicationContext applicationContext) {
        log.debug("注入 ApplicationContext");
    }

    @PostConstruct
    public void init() {
        log.debug("初始化");
    }
}
输出:
[DEBUG] 11:41:48.451 [main] com.itheima.a06.MyConfig1           - 注入 ApplicationContext
[DEBUG] 11:41:48.456 [main] com.itheima.a06.MyConfig1           - 初始化
其实这里就和之前介绍的一样了,因为加入了对应的后置处理器,就能解析到 @Autowired 和 @PostConstruct注解了。
其实到这里来说,可以理解为Aware接口其实 和 后置处理器很像很像,都是能干预到生命周期的,在生命周期图中也能够很清晰的看到。
但是还是有本质的去别的,简单地说:
- @Autowired 的解析需要用到 bean 后处理器, 属于扩展功能
- 而 Aware 接口属于内置功能, 不加任何扩展, Spring 就能识别
其实这样说就非常清晰了,但是还有有一点很大的不同就是内置的注入和初始化不受扩展功能的影响,总会被执行,而扩展功能受某些情况影响可能会失效。
还是在Myconfig1中添加一个bean
@Bean //  beanFactory 后处理器
    public BeanFactoryPostProcessor processor1() {
        return beanFactory -> {
            log.debug("执行 processor1");
        };
    }
此时再运行,发现,并没有执行@Autowired 和 @PostConstruct
[INFO ] 11:45:21.941 [main] o.s.c.a.ConfigurationClassEnhancer  - @Bean method MyConfig1.processor1 is non-static and returns an object assignable to Spring's BeanFactoryPostProcessor interface. This will result in a failure to process annotations such as @Autowired, @Resource and @PostConstruct within the method's declaring @Configuration class. Add the 'static' modifier to this method to avoid these container lifecycle issues; see @Bean javadoc for complete details.
[DEBUG] 11:45:21.952 [main] com.itheima.a06.MyConfig1           - 执行 processor1
这是什么原因导致了@Autowired失效呢?
其实 Context.refresh()方法中,是有一个默认的初始化顺序
1.beanfactory后处理器
2.bean后处理器
3.初始化单例
以一张图来形容一下:
Java 配置类包含 BeanFactoryPostProcessor 的情况,因此要创建其中的 BeanFactoryPostProcessor 必须提前创建 Java 配置类,而此时的 BeanPostProcessor 还未准备好,导致 @Autowired 等注解失效
根据以上分析的再给出一段代码举例:
@Configuration
public class MyConfig2 implements InitializingBean, ApplicationContextAware {

    private static final Logger log = LoggerFactory.getLogger(MyConfig2.class);

    @Override
    public void afterPropertiesSet() throws Exception {
        log.debug("初始化");
    }

    @Override
    public void setApplicationContext(ApplicationContext applicationContext) throws BeansException {
        log.debug("注入 ApplicationContext");
    }


    @PostConstruct
    public void init() {
        log.debug("初始化");
    }


    @Bean //  beanFactory 后处理器
    public BeanFactoryPostProcessor processor2() {
        return beanFactory -> {
            log.debug("执行 processor2");
        };
    }
}
输出:
[DEBUG] 11:51:22.230 [main] com.itheima.a06.MyConfig2           - 注入 ApplicationContext
[DEBUG] 11:51:22.235 [main] com.itheima.a06.MyConfig2           - 初始化
[INFO ] 11:51:22.237 [main] o.s.c.a.ConfigurationClassEnhancer  - @Bean method MyConfig2.processor2 is non-static and returns an object assignable to Spring's BeanFactoryPostProcessor interface. This will result in a failure to process annotations such as @Autowired, @Resource and @PostConstruct within the method's declaring @Configuration class. Add the 'static' modifier to this method to avoid these container lifecycle issues; see @Bean javadoc for complete details.
[DEBUG] 11:51:22.245 [main] com.itheima.a06.MyConfig2           - 执行 processor2
由此可以分析总结:
- Aware 接口提供了一种【内置】 的注入手段, 可以注入 BeanFactory, ApplicationContext
- InitializingBean 接口提供了一种【内置】的初始化手段
- 内置的注入和初始化不受扩展功能的影响, 总会被执行, 因此 Spring 框架内部的类常用它们
初始化和销毁的执行顺序
想要验证初始化 和 销毁的执行顺序,最直接的办法其实就是打印出来,其实Aware接口我们已经很详细的介绍了后置处理器与Aware接口的执行顺序了,在此处,再加上@Bean指定的初始化方法进行综合对比:
ConfigurableApplicationContext context = SpringApplication.run(A.class, args);
context.close();


    @Bean(initMethod = "init3")
    public Bean1 bean1() {
        return new Bean1();
    }

    @Bean(destroyMethod = "destroy3")
    public Bean2 bean2() {
        return new Bean2();
    }

public class Bean1 implements InitializingBean {
    private static final Logger log = LoggerFactory.getLogger(Bean1.class);

    // 扩展
    @PostConstruct
    public void init1() {
        log.debug("初始化1");
    }


    // 内置
    @Override
    public void afterPropertiesSet() throws Exception {
        log.debug("初始化2");
    }

    public void init3() {
        log.debug("初始化3");
    }
}

public class Bean2 implements DisposableBean {
    private static final Logger log = LoggerFactory.getLogger(Bean2.class);

    @PreDestroy
    public void destroy1() {
        log.debug("销毁1");
    }

    @Override
    public void destroy() throws Exception {
        log.debug("销毁2");
    }

    public void destroy3() {
        log.debug("销毁3");
    }
}
输出:
[DEBUG] 14:52:57.353 [main] com.itheima.a07.Bean1               - 初始化1
[DEBUG] 14:52:57.353 [main] com.itheima.a07.Bean1               - 初始化2
[DEBUG] 14:52:57.354 [main] com.itheima.a07.Bean1               - 初始化3

......

[DEBUG] 14:52:57.758 [main] com.itheima.a07.Bean2               - 销毁1
[DEBUG] 14:52:57.758 [main] com.itheima.a07.Bean2               - 销毁2
[DEBUG] 14:52:57.758 [main] com.itheima.a07.Bean2               - 销毁3
其初始化顺序为:
- @PostConstruct 标注的初始化方法
- InitializingBean 接口的初始化方法
- @Bean(initMethod) 指定的初始化方法
销毁顺序为:
- @PreDestroy 标注的销毁方法
- DisposableBean 接口的销毁方法
- @Bean(destroyMethod) 指定的销毁方法
Scope
在当前版本的 Spring 和 Spring Boot 程序中,scope范围共有五个,singleton, prototype, request, session, application(globalSession已经废弃了)
- singleton,容器启动时创建(未设置延迟),容器关闭时销毁
- prototype,每次使用时创建,不会自动销毁,需要调用 DefaultListableBeanFactory.destroyBean(bean) 销毁
- request,每次请求用到此 bean 时创建,请求结束时销毁
- session,每个会话用到此 bean 时创建,会话结束时销毁
- application,web 容器用到此 bean 时创建,容器停止时销毁
其中 前两个为最常见的scope,不多做赘述,主要是介绍后三个,以一个Springboot长须举例
SpringApplication.run(A.class, args);

@Scope("request")
@Component
public class BeanForRequest {
    private static final Logger log = LoggerFactory.getLogger(BeanForRequest.class);

    @PreDestroy
    public void destroy() {
        log.debug("destroy");
    }

}

@Scope("session")
@Component
public class BeanForSession {
    private static final Logger log = LoggerFactory.getLogger(BeanForSession.class);

    @PreDestroy
    public void destroy() {
        log.debug("destroy");
    }
}

@Scope("application")
@Component
public class BeanForApplication {
    private static final Logger log = LoggerFactory.getLogger(BeanForApplication.class);

    @PreDestroy
    public void destroy() {
        log.debug("destroy");
    }
}

@RestController
public class MyController {


    @Lazy
    @Autowired
    private BeanForRequest beanForRequest;

    @Lazy
    @Autowired
    private BeanForSession beanForSession;

    @Lazy
    @Autowired
    private BeanForApplication beanForApplication;

    @GetMapping(value = "/test", produces = "text/html")
    public String test(HttpServletRequest request, HttpSession session) {
        ServletContext sc = request.getServletContext();
        String sb = "" +
                    "" + "request scope:" + beanForRequest + "" +
                    "" + "session scope:" + beanForSession + "" +
                    "" + "application scope:" + beanForApplication + "" +
                    "";
        return sb;
    }

}
启动springboot,访问http://localhost:8080/test发现:
对于一个请求来说,会涉及到这三个作用域,当重新刷新页面的时候
![]()
可以发现对应的BeanForRequest是变化的了,这就是request的作用域,随着每次请求而变化。
同理,对应的session对应的是一个会话,在这里可以修改会话的时间或者重新启动一个新的浏览器再次访问
![]()
发现对应的BeanForSession也随着发生了变化。
以上就是scope域的作用范围,但是细心的同学其实能发现,在Controller中,由于Spring的Bean默认是单例的,而我们@Autowired都不是单例,甚至随着作用域的变化而变化,都分别加了@Lazy 注解,那么这个注解的作用是什么呢?
将注解去掉重新测试,发现,无论我们怎么刷新,request 和 session都不会再变化了,这是为什么呢?
其实这就是一个典型的singleton注入其它scope失效的问题。
以单例注入多例为例
有一个单例对象E
@Component
public class E {
    private static final Logger log = LoggerFactory.getLogger(E.class);

    private F f;

    public E() {
        log.info("E()");
    }

    @Autowired
    public void setF(F f) {
        this.f = f;
        log.info("setF(F f) {}", f.getClass());
    }

    public F getF() {
        return f;
    }
}
要注入的对象 F 期望是多例
@Component
@Scope("prototype")
public class F {
    private static final Logger log = LoggerFactory.getLogger(F.class);

    public F() {
        log.info("F()");
    }
}
测试
E e = context.getBean(E.class);
F f1 = e.getF();
F f2 = e.getF();
System.out.println(f1);
System.out.println(f2);
输出
com.itheima.demo.cycle.F@6622fc65
com.itheima.demo.cycle.F@6622fc65
发现它们是同一个对象,而不是期望的多例对象
对于单例对象来讲,依赖注入仅发生了一次,后续再没有用到多例的 F,因此 E 用的始终是第一次依赖注入的 F
解决:
使用@Lazy生成代理
代理对象虽然还是同一个,但当每次使用代理对象的任意方法的时候,由代理创建新的f对象
所以就能很有效的解决singleton注入 其他scope的问题啦。


