fastai 图像分类
TL; DR (TL;DR)
If you are beginning to feel burnt out on learning a subject it is often beneficial to take a step out of the weeds. I like to build something fun and easy to regain positive momentum on my learning journey. This is one project that helped get my creative juices flowing again. Load my notebook from my GitHub repository into Google Colab and upload the Kaggle data set to learn how to build an image classifier using the fastai software! Don’t forget to set the hardware accelerator to GPU!
如果您开始对学习一门学科感到疲倦,那么走出杂草通常是有益的。 我喜欢在学习过程中建立一些有趣且易于恢复积极动力的东西。 这是一个使我的创造力重新流行的项目。 将我的笔记本从GitHub存储库加载到Google Colab,并上传Kaggle数据集,以了解如何使用fastai软件构建图像分类器! 不要忘记将硬件加速器设置为GPU!
P.S. Directly upload notebook to Colab by going to File →Upload Notebook → GitHub Tab→BSamaha/Chest-Xray-FastAI
PS通过转到文件→上传笔记本→GitHub选项卡→BSamaha / Chest-Xray-FastAI将笔记本直接直接上传到Colab

介绍 (Intro)
邓宁-克鲁格效应 (The Dunning-Kruger Effect)
You have set a goal such as wanting to be a data scientist or data engineer. Your passion and energy are through the roof as you rifle through all the material on the subject you can find. Perhaps you even started a coding boot camp or a Coursera class to be your guide on your path to data mastery. Your brain becomes saturated with dopamine as you quickly rack up quick wins. First, it was basic python programming. Then you made your first linear regression with sci-kit learn — machine learning isn’t so bad after all! You quickly absorbed all information thrown at you. Nothing can stop you.
您已经设定了一个目标,例如想要成为一名数据科学家或数据工程师。 当您浏览所有可以找到的主题的材料时,您的激情和能量就在屋顶上散发出来。 也许您甚至开始了编码训练营或Coursera类,以指导您掌握数据。 当您Swift赢得快速胜利时,您的大脑就会变得多巴胺饱和。 首先,它是基本的python编程。 然后,您使用sci-kit learning进行了首次线性回归-机器学习毕竟还算不错! 您Swift吸收了所有扔给您的信息。 没有什么可以阻止你。
I’ve been there, and I still go there. I am human after all. I’m referring to the peak of “Mt. Stupid” in The Dunning-Kruger Effect. Linear regression was easy with a perfectly curated data set, but that’s not reality. Finally, after about a month or two of flying through the material with ease, you hit a wall named statistics. You grind through it and barely make it out — except you feel like you haven’t retained anything. Do people remember all this distribution stuff? Spoiler Alert: yes, and you will be questioned about them. As you pursue on you realize your python skills are nowhere near where they should be. You decide to look at a couple of job postings and then it hits you. You don’t have an advanced graduate degree in computer science, and you don’t know how to pronounce some requirements of the job much less know what they are — Hadoop? Welcome to the Valley of Despair. You want to quit and move on with your life.
我去过那里,但我仍然去那里。 我毕竟是人 。 我指的是“ Dunning-Kruger Effect中的“愚蠢”。 线性回归使用完善的数据集很容易,但这不是事实。 最终,在轻松浏览材料约一两个月之后,您碰到了一堵名为统计信息的墙。 您会仔细研究并几乎没有发现它-除非您觉得自己没有保留任何东西。 人们还记得所有这些分发材料吗? 扰流板警报:是的,您将被问到它们。 当您继续前进时,您会发现自己的python技能远没有达到应有的水平。 您决定查看几个职位发布,然后打中您。 您没有计算机科学的高级研究生学位,并且您不知道如何表达工作的某些要求,更不用说它们是什么了-Hadoop? 欢迎来到绝望谷。 您想辞职并继续生活。

治愈 (The Cure)
My drill instructor, Staff Sergeant Rivera, at Marine Corps Recruit Depot Parris Island — real boot camp — once said,
我的演习教练里维拉中士在海军陆战队新兵基地帕里斯岛- 真正的新兵训练营-曾经说过,
“Motivation is like caffeine, it eventually wears off. What you are truly looking for is inspiration.”
动机就像咖啡因,它最终会消失。 您真正寻找的是灵感。”
I remember this quote every time I find myself heading towards the Valley of Despair on whatever new learning journey I am on. The best cure to get back on your game is to remember what made you excited in the first place. Find yourself a quick win to get some positive momentum again.
我记得每次我进入绝望之谷,无论我正在经历什么新的学习旅程时,都会引用这句话。 恢复游戏的最佳方法是记住最初让您兴奋的原因。 找到一个快速的胜利,再次获得一些积极的动力。
This project was my quick win. It re-opened my eyes to the amazing power of machine learning and how simple it could be. My imagination began running wild with ideas of all the tools I could build to help others in the world. I found my inspiration again and my passion was relit. I hope it does the same for you.
这个项目是我的快速胜利。 它使我再次看到了机器学习的强大功能以及它的简单性 。 我的想像力开始激起人们对我可以用来帮助世界上其他人的所有工具的想法。 我再次找到了灵感,激发了我的热情。 希望对您也一样。
建造时间 (Time to build)
The goal of this blog post isn’t to be highly technical and teach you everything about deep learning. I want you to go learn from the master himself, Jeremy Howard at Fast.ai. I am currently going through the course myself and I can’t recommend it enough. I love his top-down teaching philosophy and his aim to make deep learning accessible and usable for everyone. Best of all its free!
这篇博文的目的不是要具有很高的技术水平,而是要教给您有关深度学习的所有知识。 我希望您向Fast.ai的大师Jeremy Howard学习 。 我目前正在自己上这门课,所以我对它的推荐不够。 我喜欢他的自上而下的教学理念,他的目标是使所有人都能使用和使用深度学习。 最好的免费!
The goal of this post is to get you inspired by quickly building a deep learning model that has a very obvious use case. This project will take about 10 minutes to code. However, the training of our convolutional neural network (CNN) learner may take 30 minutes due to the large data set and your hardware.
这篇文章的目的是通过快速构建具有非常明显的用例的深度学习模型来激发您的灵感。 该项目将花费大约10分钟的代码。 但是,由于庞大的数据集和您的硬件,训练我们的卷积神经网络(CNN)学习者可能需要30分钟。
平台:Google Colab (Platform: Google Colab)
I highly recommend Google Colab for all tasks where you need a GPU — this is one of those instances. If you are familiar with Jupyter notebooks then you will quickly realize it is almost a replica. If you aren’t familiar with any of these then please do the tutorial for Google Colab.
我强烈建议您在需要GPU的所有任务中使用Google Colab ,这是其中的一种。 如果您熟悉Jupyter笔记本,那么您很快就会意识到它几乎是复制品。 如果您不熟悉其中任何一种,请执行Google Colab教程。
In Colab, make sure you go to Runtime → Change Runtime Type → Set hardware accelerator to GPU.
在Colab中,确保您转到运行时→更改运行时类型→将硬件加速器设置为GPU。
数据集:Kaggle胸部X线肺炎数据集 (Dataset: Kaggle Chest X-ray Pneumonia Dataset)
The data set I used in this project is found here on Kaggle. It is a little over 1 GB so I downloaded it to my local drive and then uploaded it to my Google Drive. This allowed me to delete the file from my local hard drive.
我在此项目中使用的数据集可在Kaggle上找到 。 它的大小略超过1 GB,因此我将其下载到本地驱动器,然后将其上传到我的Google云端硬盘。 这使我可以从本地硬盘驱动器中删除文件。
The data set is over 5,800 JPGs of chest x-rays. The photos are labeled by the folder they are in ‘Pneumonia’ and ‘Normal’ respectively. This will prove beneficial later on.
数据集超过5800张胸部X射线JPG。 这些照片分别用“肺炎”和“普通”文件夹标记。 稍后将证明这是有益的。
This data set is a bit unique. Usually, for Kaggle competitions a validation data set measures your model’s performance throughout training. When you are ready you would use the test data set to make your predictions to submit for competition scoring. For this special case, we will use our test data set as our validation data set to measure how our model is performing. There is no competition for this data set and the validation set is only 16 images which is much too small.
该数据集有点独特。 通常,对于Kaggle比赛,验证数据集会在整个训练过程中衡量模型的性能。 准备就绪后,您将使用测试数据集进行预测,以提交比赛评分。 对于这种特殊情况,我们将使用测试数据集作为验证数据集来衡量模型的性能。 此数据集没有竞争,验证集只有16张图像,这太小了。
码 (Code)
First, you may need to install the fastai software in the Google Colab notebook. Run the following code in the first cell, if it says it is already installed we are ready to begin.
首先,您可能需要在Google Colab笔记本中安装fastai软件。 如果第一个单元格已安装,请运行以下代码,我们可以开始了。
!pip install fastaiNow we will need to import all the necessary libraries with some additional functionality. The code below will import all of the libraries necessary to run the code. The last two lines are optional.
现在,我们将需要导入具有所有其他功能的所有必需的库。 下面的代码将导入运行代码所需的所有库。 最后两行是可选的。
Only run the last two lines if you have uploaded the data set into a Google drive folder, which I recommend. You will have to perform an authentication action to finish mounting your Google Drive to Colab.
如果您已将数据集上载到Google驱动器文件夹中,则建议仅运行最后两行。 您必须执行身份验证操作才能完成将Google云端硬盘安装到Colab。
from fastai.vision import *
from fastai.metrics import error_rate, accuracyimport warnings
warnings.filterwarnings('ignore')from google.colab import drive
drive.mount('/content/drive')
The data set should be a set of parent and children folders like the images below. It is very important your file structure mirrors mine. The hardest part of this whole project is organizing your data. I’m going to assume from here on out you have uploaded the data to Google Colab.
数据集应该是一组父文件夹和子文件夹,如下图所示。 文件结构镜像我的文件非常重要。 整个项目中最难的部分是组织数据。 我要假设从现在开始,您已将数据上传到Google Colab。


Once you have all your data organized the fun can begin. We will set the root directory of where your data is stored. This is the path of the folder where your test, train, and val folders reside. When we save our trained models later they will be saved in this directory.
整理好所有数据后,就可以开始乐趣了。 我们将设置数据存储的根目录。 这是您的test,train和val文件夹所在的文件夹的路径。 当我们稍后保存训练有素的模型时,它们将被保存在此目录中。
# Set path to root directory
path = Path('/content/drive/My Drive/Colab Notebooks/chest_xray')# View all files in directory
path.ls()
Then we must create an “ImageDataBunch” object which is special to the fastai software. This object pulls together all our train data, test data, and validation data and performs the necessary transformations to the images. The ds_tfms is specifying the transforms which are outside the scope of this blog and to learn more about it I recommend completing the Fast.ai course.
然后,我们必须创建一个Fastai软件特有的“ ImageDataBunch”对象。 该对象将我们所有的火车数据,测试数据和验证数据汇总在一起,并对图像执行必要的转换。 ds_tfms指定的转换不在本博客的讨论范围内,要了解更多信息,我建议您完成Fast.ai课程。
# We are creating a fastai DataBunch from our dataset
# Preprocessing takes place when creating the databunch
# May need to decrease batch size and num_workers depending on GPUdata = ImageDataBunch.from_folder(path, train='train', valid='test', ds_tfms=get_transforms(do_flip=False), size=224, bs=64, num_workers=8)
Now you can see why it is important to structure the folders as we did earlier. This allows us to use the from_folder method to correctly label all of the images while keeping our data sets separated so there is no data leakage. All images are normalized to a size of 224 pixels by 224 pixels. The “bs” stands for batch size which is how many images are shown to the model at the same time. You may need to reduce “bs” if your GPU does not have enough memory — try 32 or 16.
现在,您可以了解为什么像我们之前那样构造文件夹的重要性。 这使我们能够使用from_folder方法正确标记所有图像,同时保持数据集分离, 从而不会造成数据泄漏 。 将所有图像规格化为224像素乘以224像素。 “ bs”代表批量大小,即同时向模型显示多少图像。 如果您的GPU没有足够的内存,则可能需要减少“ bs”-尝试32或16。
Use the block of code below to view the images and see how they have been changed by the ImageDataBunch.
使用下面的代码块查看图像,并查看ImageDataBunch如何对其进行更改。
# Show what the data looks like after being transformed
data.show_batch()# See the classes and count of classes in your dataset
print(data.classes,data.c)# See the number of images in each data set
print(len(data.train_ds), len(data.valid_ds)
The output of the above code should look similar to my output below.
上面代码的输出应与下面的输出相似。

Now we will build our neural network. In fastai, the model being trained is called a “learner”. A learner is a general concept that can learn to fit a model. We are using the cnn_learner which will use the ResNet34 architecture. If you are curious here is a good article describing ResNet34.
现在我们将建立我们的神经网络。 在Fastai中,正在训练的模型称为“学习者”。 学习者是可以学习适应模型的一般概念。 我们正在使用将使用ResNet34体系结构的cnn_learner。 如果您好奇,这里有一篇很好的文章介绍了ResNet34。
The code to create our learner is a simple one-liner. Once we create the learner we will use the fit_one_cycle method to train the model on our data set. The ResNet34 model is a pre-trained model in which we are fine-tuning on our data. This is called transfer learning and it is the premise of what fastai is built upon.
创建学习者的代码很简单。 创建学习者后,我们将使用fit_one_cycle方法在数据集上训练模型。 ResNet34模型是经过预训练的模型,在该模型中我们可以对数据进行微调。 这就是所谓的转移学习,这是Fastai建立的前提。
# Build the CNN model with the pretrained resnet34
# Error rate = 1 - accuracy
learn = cnn_learner(data, models.resnet34, metrics = [accuracy])# Train the model on 4 epochs of data at the default learning rate
learn.fit_one_cycle(4)
Since we substituted our validation data set with our test data set we can see exactly how accurate our model is at the end of every epoch. The results show that we probably could have stopped training after 2 epochs. After the 2nd epoch, you can see the valid_loss increase and the accuracy decrease. However, the train_loss decreased at every epoch. This is a good example of what overfitting your training data looks like. Our results show an accuracy of 87.6%! What is even more amazing is how simple the coding was to get here!
由于我们将验证数据集替换为测试数据集,因此我们可以准确看到模型在每个时期结束时的准确性。 结果表明,我们可能会在2个时期后停止训练。 在第二个时期之后,您可以看到有效损失增加而准确性下降。 但是,train_loss在每个时期都会减少。 这是过度拟合训练数据看起来的一个很好的例子。 我们的结果显示准确度为87.6%! 更令人惊讶的是,编码到达这里是如此简单!
# Save the model
learn.save('stage-1')# Load the Model
learn.load('stage-1')
Don’t forget to save your model. This way if you make corrections down the road that does not affect this ‘stage-1’ part of the model you can reload it without wasting time retraining it. When you reload your model you will see a long output detailing the inner workings of the CNN, this is normal.
不要忘记保存模型。 这样,如果您在不影响模型的“ stage-1”部分的情况下进行校正,则可以重新加载它,而不会浪费时间重新训练它。 重新加载模型时,您会看到很长的输出,详细说明了CNN的内部工作原理,这很正常。
Right now all the layers except the very last layer are frozen. When we called fit_one_cycle on these frozen layers we only trained the final layer which is the part that classifies the x-ray image as “normal” or “pneumonia”.
现在,除了最后一层以外的所有层都已冻结。 当我们在这些冻结层上调用fit_one_cycle时,我们仅训练了最后一层,这是将X射线图像分类为“正常”或“肺炎”的部分。
Now we will unfreeze all the layers in the CNN and retrain it a bit more. This will change how the model evaluates the image and not only how it classifies images. Before we train a bit more, let’s find what a good learning rate to train on is.
现在,我们将解冻CNN中的所有层,并对其进行更多的重新训练。 这将改变模型评估图像的方式,不仅改变图像的分类方式。 在进行更多培训之前,让我们先找到一个好的学习率。
# Unfreeze all layers of the CNN
learn.unfreeze()# Find the optimal learning rate and plot a visual
learn.lr_find()
learn.recorder.plot(suggestion=True)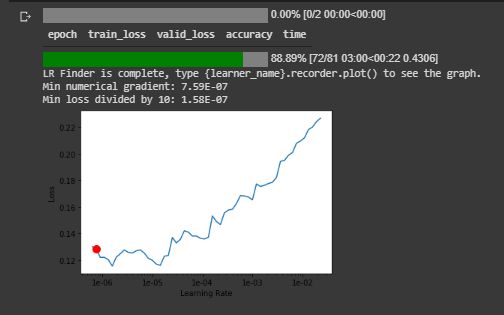
This plot shows how the learning rate can affect the model’s accuracy. We can see as the learning rate increases, so does the loss of our model. Now that we have unfrozen all of the layers in our learner we will retrain with these optimal learning rates. We enter the learning rates using the slice() function. Choosing a good learning rate seems to be more of an art than science and the Fastai course helps you learn the rules of thumb.
该图显示了学习率如何影响模型的准确性。 我们可以看到,随着学习率的提高,模型的损失也随之增加。 既然我们已经冻结了学习者的所有层次,我们将以这些最佳学习率进行再培训。 我们使用slice()函数输入学习率。 选择一个好的学习率似乎比科学更像是一门艺术,而Fastai课程可以帮助您学习经验法则。
Now that we have an idea of our learning rate let’s train all the layers of our learner again on our data.
现在我们有了学习率的概念,让我们再次在数据上训练学习者的所有层次。
# Fit the model over 2 epochs
learn.fit_one_cycle(2, max_lr=slice(3e-7, 3e-6))
We have now increased our accuracy to 89.1%. In other terms, we only predict 1 incorrect x-ray for every 10 we inspect. It’s not perfect, but it’s pretty good for the amount of work we put in! Let’s train a couple more times to see if we can squeeze out a few more percentage points.
现在,我们将准确度提高到89.1% 。 换句话说,我们每检查10个射线,只会预测出1个不正确的X射线。 这不是完美的,但对于我们投入的工作量来说却是相当不错的! 让我们再训练几次,看看是否可以再挤出几个百分点。

Great! We squeezed another 2% points of accuracy out of our model! Now, let’s explore what the model got wrong. In many cases this allows you to understand your data a bit better which may lead to different preprocessing techniques or architecture used.
大! 我们从模型中又挤出了2%的精度! 现在,让我们探讨一下模型出了什么问题。 在许多情况下,这使您可以更好地理解数据,这可能会导致使用不同的预处理技术或体系结构。
解释 (Interpretation)
First, we need to create an interpreter object. From this “interp” object, we can call methods such as plot_confusion_matrix and plot_top_losses.
首先,我们需要创建一个解释器对象。 从这个“ interp”对象中,我们可以调用诸如plot_confusion_matrix和plot_top_losses之类的方法。
# Rebuild interpreter and replot confusion matrix
interp = ClassificationInterpretation.from_learner(learn)interp.plot_confusion_matrix(figsize=(12,12), dpi=60)
The confusion matrix above shows we incorrectly predicted a total of 53 images. 50 images we predicted incorrectly as pneumonia, and 3 images we predicted normal had pneumonia. This plot also works for multilabel classifications. If you have a lot of classes confusion matrices are often hard to interpret. Lucky for us, fastai has a text version of confusion matrices that can be accessed using the most_confused method.
上面的混淆矩阵显示我们错误地预测了总共53张图像。 我们错误地将50幅图像预测为肺炎,而我们预测正常的3幅图像则患有肺炎。 该图也适用于多标签分类。 如果您有很多类,混淆矩阵通常很难解释。 对于我们来说幸运的是,fastai具有混乱矩阵的文本版本,可以使用most_confused方法进行访问。

Another very helpful method is plot_top_losses. This allows you to examine the images your model was most confident it predicted correctly, but the model was wrong. This can often show errors in the data set. For example, if an image was incorrectly mislabeled you should go correctly label the image.
另一个非常有用的方法是plot_top_losses。 这使您可以检查模型最确信模型可以正确预测的图像,但是模型是错误的。 这通常会显示数据集中的错误。 例如,如果图像标签错误,则应正确标记图像。

Now you have the framework of how to build an image classifier using the powerful fastai software! I hope this model inspired you to create all sorts of tools using these techniques. The Fast.ai group is putting together a great program and I highly encourage you to check it out!
现在,您有了如何使用功能强大的fastai软件构建图像分类器的框架! 我希望这个模型能够启发您使用这些技术来创建各种工具。 Fast.ai小组正在组织一个很棒的计划,我强烈建议您检查一下!
Now go deploy this model as a web application that allows people to upload an x-ray for your model to predict a diagnosis! If you do, of course, please don’t use this model in place of consulting a doctor. If you are interested in seeing how to deploy this model as a web app let me know! If there is interest in a follow-up post on deployment I will give it a go!
现在,将此模型部署为Web应用程序,使人们可以为您的模型上传X射线以预测诊断! 当然,如果您这样做,请不要使用该模型来咨询医生。 如果您有兴趣了解如何将此模型部署为Web应用程序,请告诉我! 如果对部署方面的后续职位感兴趣,我会努力的!
Thank you for taking the time to read my blog. If you have any questions or have constructive criticism, please feel free to reach out to me!
感谢您抽出宝贵的时间阅读我的博客。 如果您有任何疑问或有建设性的批评,请随时与我联系!
LinkedIn:
领英
www.linkedin.com/in/blakesamaha
www.linkedin.com/in/blakesamaha
Personal Website:
个人网站:
aggressiontothemean.com
aggressiontothemean.com
Twitter:
推特:
@Mean_Agression
@Mean_Agression
翻译自: https://towardsdatascience.com/deep-learning-image-classification-with-fast-ai-fc4dc9052106
fastai 图像分类