Spring security OAuth2.0学习笔记(持续更新)
Spring security 学习笔记
-
- 1. 环境
- 2 spring security
-
- 2.1 引入
- 2.2 使用入门
-
- 2.2.1 定义简单接口
- 2.2.2 获取随机密码
- 2.2.3 测试
- 2.2.4 设置用户名密码
-
- 2.2.4.1 配置文件
- 2.2.4.2 配置类
- 2.2.5 自定义登录页
-
- 2.2.5.1 配置类修改
- 2.2.5.2 静态文件
- 2.2.5.3 登录回调
- 2.2.5.4 登出
- 3 spring security oauth2
-
- 3.1 授权模式对比
- 3.2 引入
- 3.3 配置
-
- 3.3.1 客户端
- 3.3.2 授权服务器
- 3.3.3 资源服务器
- 4.
- 5. 问题
-
- 5.1 新建项目启动报错
- 5.2 Authorization Server自带的auth/check_token接口返回403
- 5.3 Gateway 转发请求 503
- 5.4 Mybatis-plus 报错,未找到绑定的xml
- 5.5
- 6. 参考
1. 环境
JAVA 11
Maven 3.8.1
Spring boot 2.5.1
Spring security 5.5.1
OAuth2 2.2.4
spring-cloud-alibaba-dependencies 2021.1
Gateway 3.0.3
2 spring security
spring security 本质是一套 过滤器链
主要针对安全方面的两大难题——
鉴权(Authentication)
授权(Authorization,又叫访问控制[access-control])
2.1 引入
① 可以直接在项目初始化的时候选择 spring security

② 也可以在 pom.xml 中引入,无需填写版本号
<dependency>
     <groupId>org.springframework.bootgroupId>
     <artifactId>spring-boot-starter-securityartifactId>
dependency>
2.2 使用入门
2.2.1 定义简单接口
首先,定义一个 Controller,并定义一个简单接口

2.2.2 获取随机密码
运行项目,可以看到,随机密码已经在控制台中打印出来。

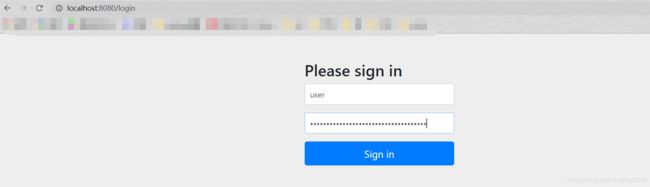
2.2.3 测试
输入默认用户名 user 以及上一步获取到的 随机密码, sign in 即可。
2.2.4 设置用户名密码
每次都要从控制台获取密码,还是比较繁琐,可以在配置文件中写入自定义的账号密码。
2.2.4.1 配置文件
这是yaml中的,写在application.properties中也可。
spring:
  security:
    user:
      name: user-me
      password: year2021
2.2.4.2 配置类
可以直接使用以下方式来配置用户名和密码。
@Configuration
public class SecurityConfig extends WebSecurityConfigurerAdapter {
    @Bean
    PasswordEncoder passwordEncoder() {
        return NoOpPasswordEncoder.getInstance();
    }
    @Override
    protected void configure(AuthenticationManagerBuilder auth) throws Exception {
    	// inMemoryAuthentication 来开启在内存中定义用户
        auth.inMemoryAuthentication()
                .withUser("user-me")
                .password("year2021").roles("admin");
    }
}
可以简单看一下 PasswordEncoder 的源码
public interface PasswordEncoder {
	// 将明文加密,返回密文
    String encode(CharSequence var1);
	// 密码校对,判断页面传过来的明文密码是否匹配
    boolean matches(CharSequence var1, String var2);
	// 是否再次加密
    default boolean upgradeEncoding(String encodedPassword) {
        return false;
    }
}
再来看一下NoOpPasswordEncoder的源码,它是 PasswordEncoder 的一个实现类,直接将明文返回,并没有进行加密操作,而且已经是废弃状态。
@Deprecated
public final class NoOpPasswordEncoder implements PasswordEncoder {
    private static final PasswordEncoder INSTANCE = new NoOpPasswordEncoder();

    private NoOpPasswordEncoder() {
    }

    public String encode(CharSequence rawPassword) {
        return rawPassword.toString();
    }

    public boolean matches(CharSequence rawPassword, String encodedPassword) {
        return rawPassword.toString().equals(encodedPassword);
    }

    public static PasswordEncoder getInstance() {
        return INSTANCE;
    }
}
PasswordEncoder 的实现类有很多,在IDEA中 快捷键 Ctrl+H 就可以看到关联关系

(官方推荐使用 BCryptPasswordEncoder,BCryptPasswordEncoder 使用 BCrypt 强哈希函数,开发者在使用时可以选择提供 strength 和 SecureRandom 实例。strength 越大,密钥的迭代次数越多,密钥迭代次数为 2^strength。strength 取值在 4~31 之间,默认为 10。)
2.2.5 自定义登录页
2.2.5.1 配置类修改
在上面提到的配置类 SecurityConfig 中进行补充,重写如下两个方法。
@Override
public void configure(WebSecurity web) throws Exception {
// web.ignoring() 用来配置忽略掉的 URL 地址,一般对于静态文件,采用此操作。
web.ignoring().antMatchers("/js/**", "/css/**","/images/**");
}
@Override
protected void configure(HttpSecurity http) throws Exception {
// authorizeRequests 对应了 。
// formLogin 对应了 2.2.5.2 静态文件
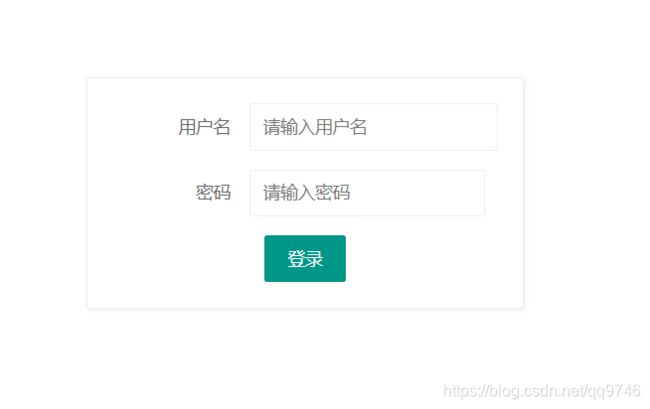
修改完配置类之后, 需要把登录页用到html、js、css、图片等放在 resources/static 下面。
需要注意的是,需要使用 form 表单提交,我这里也有一个简单的例子可以参考一下(使用了 LayUI)
DOCTYPE html>
<html>
<head>
    <meta charset="utf-8">
    <title>Layuititle>
    <meta name="renderer" content="webkit">
    <meta http-equiv="X-UA-Compatible" content="IE=edge,chrome=1">
    <meta name="viewport" content="width=device-width, initial-scale=1, maximum-scale=1">
    <link rel="stylesheet" href="//unpkg.com/[email protected]/dist/css/layui.css">
head>
<body style="width: 100%; height: 100%;">

<div style="height: fit-content; width: fit-content; margin: 100px auto; padding: 20px;" class="layui-panel">
    <form class="layui-form" action="/myLogin" method="post">
        <div class="layui-form-item">
            <label class="layui-form-label">用户名label>
            <div class="layui-input-block">
                <input id="name" type="text" name="username" required  lay-verify="required" placeholder="请输入用户名" autocomplete="off" class="layui-input">
            div>
        div>

        <div class="layui-form-item">
            <label class="layui-form-label">密码label>
            <div class="layui-input-inline">
                <input id="pass" type="password" name="password" required lay-verify="required" placeholder="请输入密码" autocomplete="off" class="layui-input">
            div>
        div>

        <div class="button login" style="width: fit-content;margin: 0 auto;">
            <button type="submit" class="layui-btn">
                <span>登录span>
            button>
        div>
    form>
div>

<script src="//unpkg.com/[email protected]/dist/layui.js">script>
<script> script>

body>
html>
重新运行之后,可以看到默认的登录页已经被替换了
2.2.5.3 登录回调
这里又根据前后端是否分离分成两种情况:
前后端分离
① 登录成功
② 登录失败
前后端不分离
① 登录成功
以下两个回调接口我们设置一个即可。
- defaultSuccessUrl
- successForwardUrl
defaultSuccessUrl: 有两个重载的方法,如果手动设置第二个参数为 true,则 defaultSuccessUrl 的效果和 successForwardUrl 一致。
第二个参数默认为false,如果直接调用登录接口(比如默认的 /login),就跳转到设置的默认回调接口,如果指定了跳转接口如 /hello,登录成功后就进入 /hello
successForwardUrl: 登录后一律跳转到 successForwardUrl 指定的地址
② 登录失败
以下两个回调接口我们设置一个即可。
- failureForwardUrl
- failureUrl
failureForwardUrl 是登录失败之后会发生服务端跳转,failureUrl 则在登录失败之后,会发生重定向。
2.2.5.4 登出
默认登出接口为 /logout,GET请求,我们也可以在配置类中对其进行个性化配置。
logoutUrl 和 logoutRequestMatcher 不同的是,logoutRequestMatcher 可以设置请求方式,这两个设置一个就行。
clearAuthentication 和 invalidateHttpSession 分别表示清除认证信息和使 HttpSession 失效,默认为true。
.and()
.logout()
.logoutUrl("/logout")
.logoutRequestMatcher(new AntPathRequestMatcher("/logout","POST"))
.logoutSuccessUrl("/index")
.deleteCookies()
.clearAuthentication(true)
.invalidateHttpSession(true)
.permitAll()
.and()
3 spring security oauth2
OAuth是一个关于授权(authorization)的开放网络标准,在全世界得到广泛应用,目前的版本是2.0版, 参考RFC 6749。
OAuth定义了四个角色:
-
资源所有者(Resource Owner)
一个能够授权访问受保护资源的实体。当资源所有者是一个人时,它被称为最终用户。
又引入一个user agent的概念,比如浏览器,替代用户来进行交互。 -
资源服务器(Resource Server)
托管受保护资源的服务器能够使用访问令牌接受和响应受保护的资源请求。
-
客户(client)
代表资源所有者及其授权的应用程序进行受保护的资源请求。术语客户端并不意味着任何特定的实现特征(例如,应用程序是在服务器,台式机还是其他设备上执行的)。
-
授权服务器(Authorization Server)
服务器在成功认证资源所有者并获得授权后向客户端发放访问令牌。
四种授权模式
- 授权码模式(authorization code)
- 简化(implicit)
- 密码(resource owner password credentials)
- 客户端(client credentials)
3.1 授权模式对比
下面是我参考网上文章还加上自己的理解整理的,如有错误,请大家指正。
| 模式 | 流程 | 优缺点 | 适用场景 |
|---|---|---|---|
| 授权码 | 1. 前端信道,传递client id 等参数给授权服务器,获取一次性的授权码 2. 后台信道,传递client id和授权码给授权服务器,获取token和refresh_token |
优点: 1. 获取token为后端信道,更加安全 2. 功能完整,流程严密,四种方案中安全性最高 |
大部分情况,推荐使用 |
| 简化 | 1. 前端信道,传递client id 等参数给授权服务器,获取token | 优点: 1. 认证流程简化 缺点: 1. 安全性不足 2. access_token 容易泄露且不可刷新 |
1. user agent 受信任 2. 纯静态页面应用 |
| 密码 | 1. 用户把用户名密码给客户端 2. 客户端直接用用户名密码获取token |
优点:流程简单 缺点:密码容易泄露 |
1. 用户对客户端高度信任,比如说公司内部系统 |
| 客户端 | 1. 直接以客户端自己的身份去授权服务器进行认证获取token | 优点:流程更加简化 缺点:要求较高 |
1. 用户对客户端高度信任 2. 只是访问公共资源 3. 客户端只是一个后端模块,没有界面 |
3.2 引入
在pom.xml引入如下依赖(版本可以在主项目控制,注意与spring boot版本对应)
<dependency>
      <groupId>org.springframework.cloudgroupId>
      <artifactId>spring-cloud-starter-oauth2artifactId>
      <version>2.2.4.RELEASEversion>
dependency>
可以先通过Github上的 官方建表语句 建数据库表
需要注意的是,官方SQL基于 HSQL,需要适配MySQL,比如主键长度修改为128,用 BLOB 替换语句中的 LONGVARBINARY 类型。
也可以直接用下面的SQL
CREATE TABLE `clientdetails` (
  `appId` varchar(128) NOT NULL,
  `resourceIds` varchar(256) DEFAULT NULL,
  `appSecret` varchar(256) DEFAULT NULL,
  `scope` varchar(256) DEFAULT NULL,
  `grantTypes` varchar(256) DEFAULT NULL,
  `redirectUrl` varchar(256) DEFAULT NULL,
  `authorities` varchar(256) DEFAULT NULL,
  `access_token_validity` int(11) DEFAULT NULL,
  `refresh_token_validity` int(11) DEFAULT NULL,
  `additionalInformation` varchar(4096) DEFAULT NULL,
  `autoApproveScopes` varchar(256) DEFAULT NULL,
  PRIMARY KEY (`appId`)
) ENGINE=InnoDB DEFAULT CHARSET=utf8;

CREATE TABLE `oauth_access_token` (
  `token_id` varchar(256) DEFAULT NULL,
  `token` blob,
  `authentication_id` varchar(128) NOT NULL,
  `user_name` varchar(256) DEFAULT NULL,
  `client_id` varchar(256) DEFAULT NULL,
  `authentication` blob,
  `refresh_token` varchar(256) DEFAULT NULL,
  PRIMARY KEY (`authentication_id`)
) ENGINE=InnoDB DEFAULT CHARSET=utf8;

CREATE TABLE `oauth_approvals` (
  `userId` varchar(256) DEFAULT NULL,
  `clientId` varchar(256) DEFAULT NULL,
  `scope` varchar(256) DEFAULT NULL,
  `status` varchar(10) DEFAULT NULL,
  `expiresAt` timestamp NULL DEFAULT NULL,
  `lastModifiedAt` timestamp NULL DEFAULT NULL
) ENGINE=InnoDB DEFAULT CHARSET=utf8;

CREATE TABLE `oauth_client_details` (
  `client_id` varchar(128) NOT NULL,
  `resource_ids` varchar(256) DEFAULT NULL,
  `client_secret` varchar(256) DEFAULT NULL,
  `scope` varchar(256) DEFAULT NULL,
  `authorized_grant_types` varchar(256) DEFAULT NULL,
  `web_server_redirect_uri` varchar(256) DEFAULT NULL,
  `authorities` varchar(256) DEFAULT NULL,
  `access_token_validity` int(11) DEFAULT NULL,
  `refresh_token_validity` int(11) DEFAULT NULL,
  `additional_information` varchar(4096) DEFAULT NULL,
  `autoapprove` varchar(256) DEFAULT NULL,
  PRIMARY KEY (`client_id`)
) ENGINE=InnoDB DEFAULT CHARSET=utf8;

CREATE TABLE `oauth_client_token` (
  `token_id` varchar(256) DEFAULT NULL,
  `token` blob,
  `authentication_id` varchar(128) NOT NULL,
  `user_name` varchar(256) DEFAULT NULL,
  `client_id` varchar(256) DEFAULT NULL,
  PRIMARY KEY (`authentication_id`)
) ENGINE=InnoDB DEFAULT CHARSET=utf8;

CREATE TABLE `oauth_code` (
  `code` varchar(256) DEFAULT NULL,
  `authentication` blob
) ENGINE=InnoDB DEFAULT CHARSET=utf8;

CREATE TABLE `oauth_refresh_token` (
  `token_id` varchar(256) DEFAULT NULL,
  `token` blob,
  `authentication` blob
) ENGINE=InnoDB DEFAULT CHARSET=utf8;
3.3 配置
首先使用 注解 启用 OAuth2 相关功能,将下面的注解放在对应服务的启动类上.
@EnableOAuth2Client
@EnableAuthorizationServer
@EnableResourceServer
3.3.1 客户端
3.3.2 授权服务器
使用@EnableAuthorizationServer注解后,应用启动后将自动生成几个Endpoint:
- /oauth/authorize:验证
- /oauth/token:获取token
- /oauth/confirm_access:用户授权
- /oauth/error:认证失败
- /oauth/check_token:资源服务器用来校验token
- /oauth/token_key:如果jwt模式则可以用此来从认证服务器获取公钥
1. 继承 AuthorizationServerConfigurerAdapter
代码如下:
@Configuration
public class AuthServerConfig extends AuthorizationServerConfigurerAdapter {

    @Autowired
    DataSource dataSource;  // 数据库

    @Bean
    public TokenStore tokenStore() {
        // 基于 JDBC 实现,令牌保存到数据
        return new JdbcTokenStore(dataSource);
    }

    @Bean
    public ClientDetailsService jdbcClientDetails() {
        // 基于 JDBC 实现,需要事先在数据库配置客户端信息
        return new JdbcClientDetailsService(dataSource);
    }

    @Override
    public void configure(AuthorizationServerEndpointsConfigurer endpoints) throws Exception {
        // 设置令牌
        endpoints.tokenStore(tokenStore());
    }

    @Override
    public void configure(ClientDetailsServiceConfigurer clients) throws Exception {
        // 读取客户端配置
        clients.withClientDetails(jdbcClientDetails());
    }


    @Override
    public void configure(AuthorizationServerSecurityConfigurer security) throws Exception {
        super.configure(security);
        security.tokenKeyAccess("permitAll()").checkTokenAccess("permitAll()");
    }
}
2. 继承 WebSecurityConfigurerAdapter
代码如下:
@Configuration
public class SecurityConfig extends WebSecurityConfigurerAdapter {

    @Bean
    public BCryptPasswordEncoder passwordEncoder() {
        // 设置默认的加密方式
        return new BCryptPasswordEncoder();
    }

    @Override
    protected void configure(AuthenticationManagerBuilder builder) throws Exception {
        builder
                .inMemoryAuthentication()
                .withUser("user1")
                .password(passwordEncoder().encode("password1"))
                .roles("USER")
                .and()
                .withUser("admin")
                .password(passwordEncoder().encode("password2"))
                .roles("USER", "ADMIN");
    }
}
简单测试
在数据库 oauth_client_details 表中添加一条数据,之后请求 /oauth/authorize 获取授权码

然后请求 授权服务器 host:port/oauth/authorize?client_id=client&response_type=code(替换为自己授权服务器的地址和端口号) ,可以进入到默认的请求授权页面
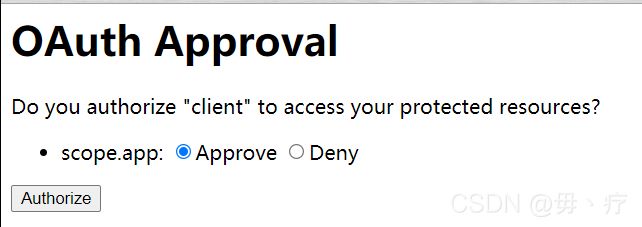
点击 Approve,然后点击 Authorize,就可以看到进入了我们设置的redirect_uri 并且返回了授权码

然后使用 Postman 进行 POST请求 /oauth/token 接口 ,把 grant_type和code放在body中,url中加上客户端的id和secret
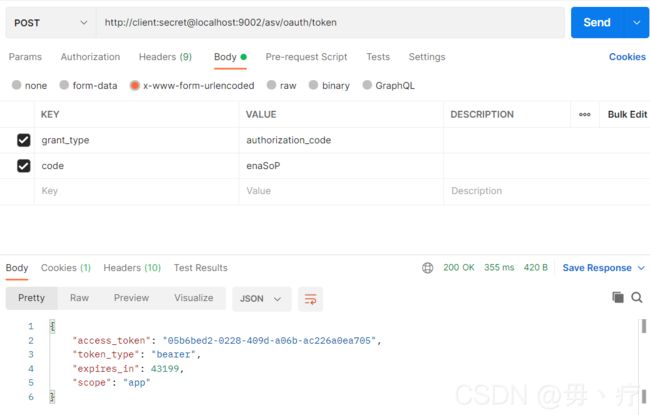
同时,在数据库 oauth_access_token 表中也会新增一条记录

3.3.3 资源服务器
4.
5. 问题
5.1 新建项目启动报错
问题:
新建项目完毕,启动项目失败,报错如下:
***************************
APPLICATION FAILED TO START
***************************

Description:

Failed to configure a DataSource: 'url' attribute is not specified and no embedded datasource could be configured.

Reason: Failed to determine a suitable driver class


Action:

Consider the following:
	If you want an embedded database (H2, HSQL or Derby), please put it on the classpath.
	If you have database settings to be loaded from a particular profile you may need to activate it (no profiles are currently active).


Process finished with exit code 1
解决:
这是由于项目勾选了 JDBC 依赖,但是没有配置数据库,可以暂时在启动类 @SpringBootApplication 注解上加一个属性。
等配置完数据库之后,再删除这个属性
(注意:目前 mysql 连接不需要配置 driver-class-name)
@SpringBootApplication(exclude={DataSourceAutoConfiguration.class})
5.2 Authorization Server自带的auth/check_token接口返回403
问题:
在Resource Server中 继承 ResourceServerConfigurerAdapter 的配置类中,使用 setCheckTokenEndpointUrl 设置校验token接口,测试返回403
@Primary
@Bean
public RemoteTokenServices tokenServices() {
    final RemoteTokenServices tokenService = new RemoteTokenServices();
    tokenService.setCheckTokenEndpointUrl("http://localhost:9002/oauth/check_token");
    tokenService.setClientId("spring");
    tokenService.setClientSecret("spring_secret");
    return tokenService;
}
解决:
在 Authorization Server 继承 AuthorizationServerConfigurerAdapter 的配置类中,加入以下代码
@Override
public void configure(AuthorizationServerSecurityConfigurer security) throws Exception {
    super.configure(security);
    security.tokenKeyAccess("permitAll()").checkTokenAccess("permitAll()");
}
下面是我找的关于 tokenKeyAccess 和 checkTokenAccess 的内容:
Spring Security OAuth公开了两个用于检查 token 的端点( /oauth/check_token 和 /oauth/token_key )。这些端点默认情况下不公开(可以访问“denyAll()”)。
因此,如果要使用此端点验证 token ,则必须将其添加到授权服务器的配置中:
@Override
public void configure(AuthorizationServerSecurityConfigurer oauthServer) throws Exception {
    oauthServer.tokenKeyAccess("isAnonymous() || hasAuthority('ROLE_TRUSTED_CLIENT')")
               .checkTokenAccess("hasAuthority('ROLE_TRUSTED_CLIENT')");
}
5.3 Gateway 转发请求 503
问题:
使用 Nacos + Gateway,直接运行网关服务会报错,需要引入 loadbalancer依赖
<dependency>
     <groupId>org.springframework.cloudgroupId>
     <artifactId>spring-cloud-starter-loadbalancerartifactId>
dependency>
引入之后,启动成功,再进行请求转发,RoundRobinLoadBalancer 报错如下:
o.s.c.l.core.RoundRobinLoadBalancer : No servers available for service: resource-server-one
解决:
这是 spring-cloud-alibaba-dependencies 依赖版本问题(主要是里面的Nacos的版本),下面是我开始使用的,与我的Spring Boot版本不符
<dependency>
      <groupId>org.springframework.cloudgroupId>
      <artifactId>spring-cloud-alibaba-dependenciesartifactId>
      <version>0.9.0.RELEASEversion>
      <type>pomtype>
      <scope>importscope>
dependency>
需要修改为新的依赖
<dependency>
      <groupId>com.alibaba.cloudgroupId>
      <artifactId>spring-cloud-alibaba-dependenciesartifactId>
      <version>2021.1version>
      <type>pomtype>
      <scope>importscope>
dependency>
具体对应关系可以参考 spring-cloud-alibaba Git地址
5.4 Mybatis-plus 报错,未找到绑定的xml
问题:
将 xml 放在 src/main/java 下
- 加了 MapperScan 注解
- 在pom.xml中设置了resource
- 配置文件中加了 mybatis-plus.mapper-locations
还是报错,如下:
org.apache.ibatis.binding.BindingException: Invalid bound statement (not found)
解决:
只能把xml放在 src/main/resources 下,这个时候只需要修改配置文件中的 mybatis-plus.mapper-locations 即可, MapperScan 和 resource可以删掉。
5.5
6. 参考
- 问题备忘:Spring Cloud OAuth2.0 开发过程中碰到的问题
- 如何使用AuthorizationServerSecurityConfigurer?
- Spring Security oAuth2-千锋教育-李卫民