SpringBoot
SpringBoot
Spring常用注解
一、@SpringBootApplication
@SpringBootApplication包括@EnableAutoConfiguration、@ComponentScan通常用在主类上
| 注解 | 说明 |
|---|---|
| @SpringBootApplication | 用来声明当前类是一个配置类 |
| @EnableAutoConfiguration | 是springboot实现自动化配置的核心注解,通过这个注解把spring应用所需的bean注入容器中 |
| @ComponentScan | 用来自动扫描注解标识的类,生成ioc容器里的bean,默认扫描范围是@ComponentScan注解所在配置类包及子包的类 |
二、@Service、@Controller、@Repository、@Component
| 注解 | 说明 |
|---|---|
| @Service | 用于业务层 ,业务逻辑层 service 注入spring容器 |
| @Controller | 控制层 controller 注入spring容器 |
| @Repository | 持久层 dao 注入spring容器 |
| @Component | 普通domain注入spring容器 |
三、@ResponseBody、@RestController
@ResponseBody作用在方法上或类上,让该方法的返回结果直接写入 HTTP response body 中,不会经过视图解析器,返回数据直接在页面展示。
@RestController是@Controller和@ResponseBody的结合体,作用于类,作用等于在类上面添加了@ResponseBody和@Controller
四、@AutoWired
@Autowired默认按类型装配,常用于业务层实现类和持久层实现类
五、@RequestMapping、@GetMapping、@PostMapping
| 注解 | 说明 |
|---|---|
| @RequestMapping | 使用该注解就可以通过配置的url进行访问,可以是get也可以是post,路径映射 |
| @GetMapping | 使用该注解就可以通过配置的url进行访问,限定get请求方式 |
| @PostMapping | 使用该注解就可以通过配置的url进行访问,限定post请求方式 |
六、@Configuration、@Bean
| 注解 | 说明 |
|---|---|
| @Configuration | 作用于类之上,配置spring容器(应用上下文),相当于把该类作为spring的xml配置文件中 |
| @Bean | 产生bean对象加入容器,作用于方法 |
七、@RequestParam、@RequestBody
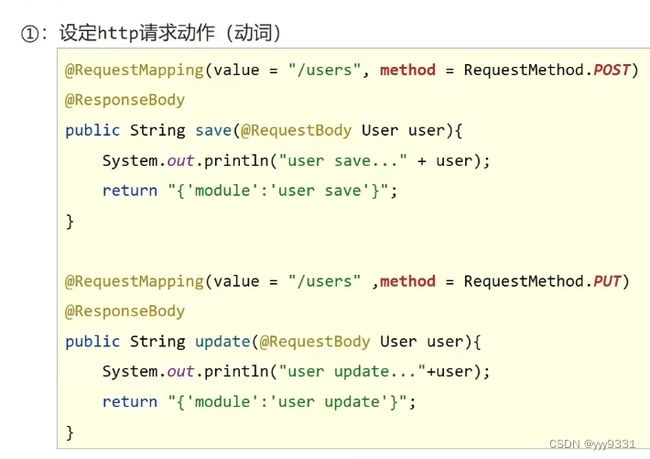
@RequestParam主要用于接收url?后面的参数,get或post请求,只要后面的url?有参数都可以获取到对应的参数
@RequestBody该注解用于获取请求体数据(body),get没有请求体,故而一般用于post请求(接收json数据)
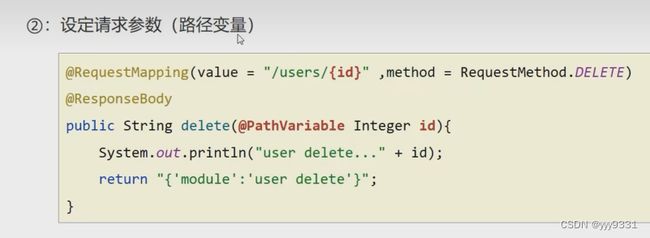
@PathVariable用于接收路径参数,使用{参数名称}描述路径参数
SpringBoot基础篇
简介
SpringBoot是由Pivotal团队提供的全新框架,其设计目的是用来简化Spring应用的初始化搭建以及开发过程
- Spring程序缺点
- 依赖设置繁琐配置繁琐
- SpringBoot程序优点
- 起步依赖(简化依赖配置)
- 自动配置(简化常用工程相关配置)
- 辅助功能(内置服务器,…)
parent作用
1.开发SpringBoot程序要继承spring-boot-starter-parent
2. spring-boot-starter-parent中定义了若干个依赖管理
3.继承parent模块可以避免多个依赖使用相同技术时出现依赖版本冲突
4.继承parent的形式也可以采用引入依赖的形式实现效果
- starter
- SpringBoot中常见项目名称,定义了当前项目使用的所有依赖坐标,以达到减少依赖配置的目的
- parent
- 所有SpringBoot项目要继承的项目,定义了若干个坐标版本号(依赖管理,而非依赖),以达到减少依赖冲突的目的
- spring-boot-starter-parent各版本间存在着诸多坐标版本不同
- 实际开发
- 使用任意坐标时,仅书写GAV中的G和A,V由SpringBoot提供,除非SpringBoot未提供对应版本v
starter作用
1.开发SpringBoot程序需要导入坐标时通常导入对应的starter
2.每个不同的starter根据功能不同,通常包含多个依赖坐标
3.使用starter可以实现快速配置的效果,达到简化配置的目的
引导类
- SpringBoot工程提供引导类用来启动程序
- SpringBoot工程启动后创建并初始化Spring容器
REST风格
简介:表现形式状态转换。
- 传统风格资源描述形式
- http: / / localhost/user/getById?id=1
- http:/ / localhost/user/saveUser
- REST风格描述形式
- http: / / localhost/user/1
- http: / / localhost/user
- 优点:
- 上述行为是约定方式,约定不是规范,可以打破,所以称REST风格,而不是REST规范
- 描述模块的名称通常使用复数,也就是加s的格式描述,表示此类资源,而非单个资源,例如:users、books、account…
根据REST风格对资源进行访问成为RESTful
基础配置
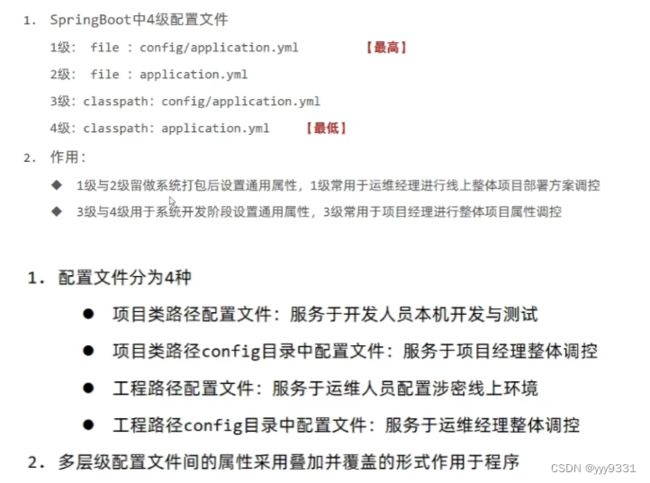
application.properties(1)
application.yml(目前主流,2)
application.yaml(3)
共存叠加,相互覆盖
yaml
优点:容易阅读,容易与脚本语言交互,以数据为核心重数据轻格式
yaml语法规则:
- 大小写敏感
- 属性层级关系使用多行描述,每行结尾使用冒号结束
- 使用缩进表示层级关系,同层级左侧对齐,只允许使用空格(不允许使用Tab键)
- 属性值前面添加空格(属性名与属性值之间使用冒号+空格作为分隔)
- #表示注释
- 核心:数据前要加空格与冒号隔开


1.使用@ConfigurationProperties注解绑定配置信息到封装类中
2.封装类需要定义为Spring管理的bean,否则无法进行属性注入
整合第三方技术
1.导入测试对应的starter
2.测试类使用@SpringBootTest修饰
3.使用自动装配的形式添加要测试的对象
测试类要和引导类放到同层包下

1.测试类如果存在于引导类所在包或子包中无需指定引导类
2.测试类如果不存在于引导类所在的包或子包中需要通过classes属性指定引导类
整合MyBatis:
1.勾选MyBatis技术,也就是导入MyBatis对应的starter
2.数据库连接相关信息转换成配置
3.数据库SQL映射需要添加@Mapper被容器识别到
Mybatis中Mapper何时写sql、何时写wrapper:
- 约定:
- a.单表增删改查,简单查询用MybatisPlus的提供的wrapper,并且在我们的Mapper类中使用wrapper
- b.多表或者单表复杂sql可以在xml文件里写sql,也可以在mapper类中写@Select(尽量在xml写格式化更好看和更容易维护)
整合Mybatisplus:
- MyBatis-Plus与MyBatis区别
- 导入坐标不同
- 数据层实现简化
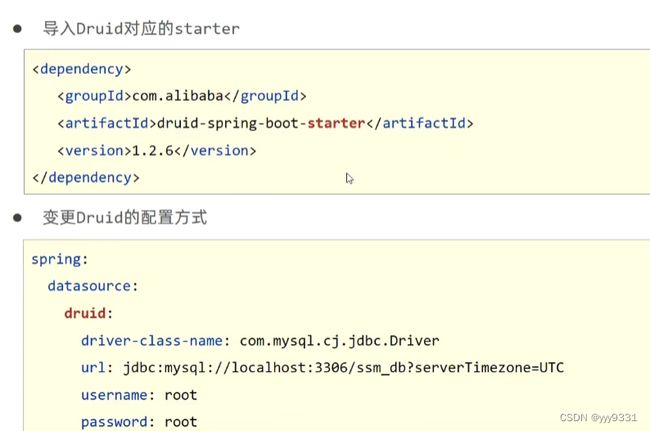
整合Druid:
整合Lombok
为当前实体类在编译器设置对应的get/set,toString,hashCode,equals方法
SSMP案例
开启mybatisplus的日志
mybatis-plus:
 configuration:
    log-impl: org.apache.ibatis.logging.stdout.StdOutImpl
mybatisplus分页:
//1.调用方法
IPage page = new Page(1,5);
userDao.selectPage(page,null);
//2.设置拦截器,在conf下面新建一个MPConf类
@Configuration
public class MPConfig {
    //拦截器
    @Bean
    public MybatisPlusInterceptor mybatisPlusInterceptor(){
        MybatisPlusInterceptor interceptor = new MybatisPlusInterceptor();
        interceptor.addInnerInterceptor(new PaginationInnerInterceptor());
        return interceptor;
    }
}
//page中的方法
System.out.println(page.getCurrent());//当前页号
System.out.println(page.getSize());//每页数据总量
System.out.println(page.getTotal());//总数据条数
System.out.println(page.getPages());//最大页面值
System.out.println(page.getRecords());//当前页的全部数据
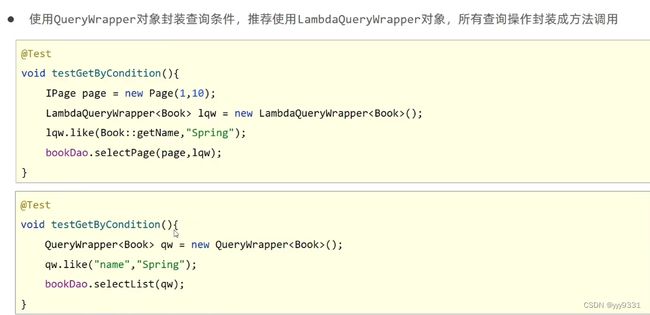
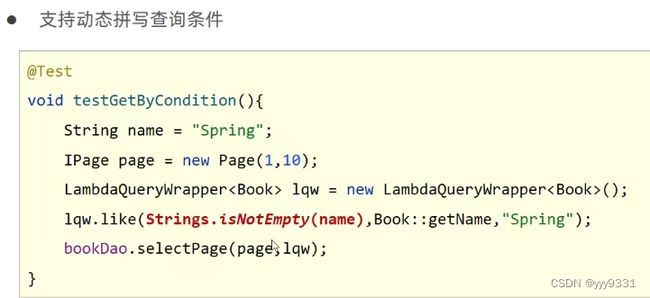
条件查询:
QueryWrapper<User> qw = new QueryWrapper<>();//实例化对象
qw.like("name","小");//设置条件
userDao.selectList(qw);//传入条件
后台抛出异常:
1.使用注解@RestcontrollerAdvice定义springMVC异常处理器用来处理异常的
2.异常处理器必须被扫描加载,否则无法生效
3.表现层返回结果的模型类中添加消息属性用来传递消息到页面
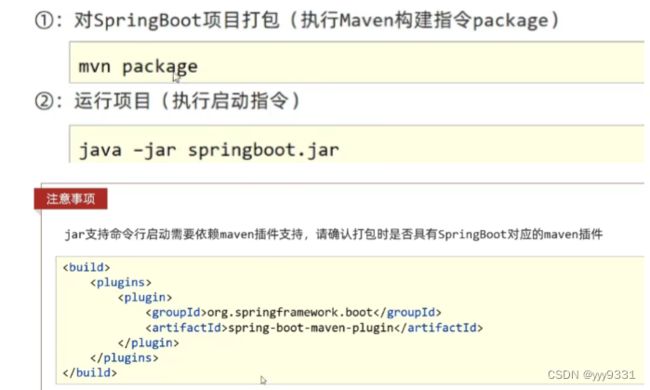
SpringBoot项目快速启动(Windows版)
netstat -ano | findstr "80" 查找80端口
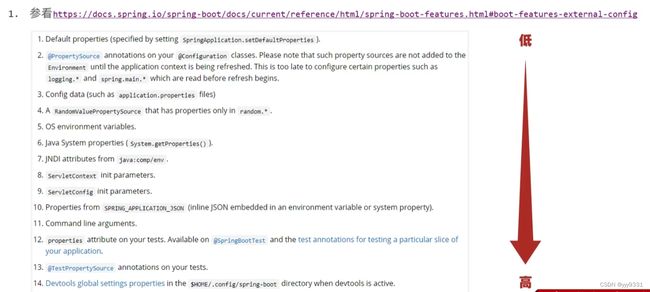
更换临时属性
java -jar (jar包名称) --server.port=8080(更换端口)
携带多个属性启动SpringBoot,属性间使用空格分隔
SpringBoot运维实用篇
多环境开发
spring:
  profiles:
    active: pro
#设置环境
---
#生产环境
spring:
  profiles: pro

server:
  port: 80
---
#开发环境
spring:
  profiles: dev

server:
  port: 81
---
#测试环境
spring:
  config:
    activate:
      on-profile: test

server:
  port: 82
多配置文件格式
多环境开发独立配置文件书写技巧
根据功能对配置文件中的信息进行拆分,并制作独立的配置文件:
- application-devDB.yml
- application-devRedis.yml
- application-devMvC.yml
使用include属性在激活指定环境的情况下,同时对多个环境进行加载使其生效,多个环境间使用逗号分隔1
spring:
  profiles:
    active: dev
    include: devDB,devRedis,devMVC
后加载覆盖先加载
spring:
  profiles:
    active: dev
    group:
      "dev": devDB,devMVC
      "pro": proDB,proMVC
多环境开发控制
Maven与SpringBoot多环境兼容
Spring:
  profiles:
    active: @profile.active@
3.执行Maven打包指令,并在生产的boot打包文件.jar文件中查看对应信息。
如果IDEA中,换环境不成功,则执行Maven生命周期的compile清除缓存
日志基础操作
日志作用
- 编程期调试代码
- 运营期记录信息
- 记录日常运营重要信息(峰值流量、平均响应时长… )
- 记录应用报错信息(错误堆栈)
- 记录运维过程数据(扩容、宕机、报警…)
1.添加日志纪录操作
import org.slf4j.*;
private static final Logger log = LoggerFactory.getLogger(UserController.class);

 log.info("info");
 log.error("error");
 log.warn("warn");
 log.debug("debug");
日志级别
- TRACE:运行堆栈信息,使用率低
- DEBUG:程序员调试代码使用
- INFO:记录运维过程数据
- WARN:记录运维过程报警数据
- ERROR:记录错误堆栈信息
- FATAL:灾难信息,合并计入ERROR
2.设置日志输出级别(在yaml配置)
#开启debug模式,输出调试信息,常用于检查系统运行状态
debug: true
#设置日志级别,root代表根节点,即整体应用日志级别
logging:
  level:
    root: debug
    com.controller: debug(设置某个包级别为debug)
3.设置日志组,控制指定包对应的日志输出级别
logging:
  #设置日志组
  group:
    ebank: com.controller,com.dao
  level:
    root: warn
	#为对应组设置日志级别
	ebank: warn
    #设对包设置级别
    com.controller: debug
使用lombok提供的注解@Slf4j简化开发,减少日志对象的声明操作

日志输出格式:

xxxxxxxxxx .item {align-self: auto | flex-start | flex-end | center | baseline | stretch;}css
logging:
  pattern:
    console: "%d - %m%n"
    console: "%d - %clr(%5p) --- [%16t] %clr(%-40.40c){cyan} : %m %n"(-:左对齐;40.40读取类名长度;{cyan}颜色:青)
- %d:日期
- %m:消息
- %n:换行
- %p:日志级别
- %t:线程名
- %c:类名
文件纪录日志
logging:
  file:
    name: sever.log  #在工程同层包
  logback:
    rollingpolicy:
      max-file-size: 10MB #设置日志文件最大容量
      file-name-pattern: server.%d{yyyy-MM-dd}.%i.log #设置文件名(此方法生产的文件名为:server.2022-01-01.0.log)
开发实用篇
热部署
默认不触发重启的目录列表
- /META-INF /maven
- /META-INF /resources
- /resources
- /static
- /public
- /templates
自定义不参与重启排除项
devtools:
  restart:
    exclude: public/**,static/**
关闭热部署
System.setProperty("spring.devtools.restart.enabled","false");//在主启动类添加这句话
第三方bean属性绑定
使用@ConfigurationProperties为第三方bean绑定数据
 @Bean
    @ConfigurationProperties(prefix = "datasource")
    public DruidDataSource dataSource(){
        DruidDataSource ds = new DruidDataSource();
        return ds;
    }
datasource:
  driverClassName: com.mysql.cj.jdbc.Driver11
@EnableConfigurationProperties注解可以将使用@ConfigurationProperties注解对应的类加入Spring
@SpringBootApplication
@EnableConfigurationProperties(Servlet.class)
public class Demo13Application {}
//@Component
@Data
@ConfigurationProperties(prefix = "servers")
public class Servlet {
}
注意事项:@EnableConfigurationProperties与@Component不能同时使用。
宽松绑定
@ConfigurationProperties绑定属性支持属性名宽松绑定
ipAddress #驼峰
ip_address #unline
ip-address #烤肉串模式
IP_ADDRESS #常量
@Bean
@ConfigurationProperties(prefix = "datasource")
    public DruidDataSource dataSource(){
        DruidDataSource ds = new DruidDataSource();
        return ds;
    }
注意事项:绑定前缀名命名规范:仅能使用纯小写字母、数字、下划线作为合法的字符;@Valuez注解不支持松散绑定。
常用计算单位
@Component
@Data
@ConfigurationProperties(prefix = "servers")
public class Servlet {
    private String ipAddress;
    private int port;
    private long timeout;
    @DurationUnit(ChronoUnit.HOURS) //小时
    private Duration serverTimeOut;
    @DataSizeUnit(DataUnit.MEGABYTES) //M
    private DataSize dataSize;
}
bean数据校验
1.添加JSR303规范坐标与Hibernate校验框架对于坐标
 <dependency>
            <groupId>javax.validationgroupId>
            <artifactId>validation-apiartifactId>
        dependency>

        <dependency>
            <groupId>org.hibernate.validatorgroupId>
            <artifactId>hibernate-validatorartifactId>
        dependency>
2对Bean开启校验功能,并设置校验规则
@Component
@Data
@ConfigurationProperties(prefix = "servers")
//2.开启对当前bean的属性引入校验
@Validated
public class Servlet {
	@Max(value = 8888,message = "最大值不能超过8888")
    private int port;
}
加载测试专属属性
//properties属性可以为当前测试用例添加临沭的属性配置,优先级大于配置yml文件
@SpringBootTest(properties = {"test.prop=qwbkqwkq"})
class Demo13ApplicationTests {
    @Value("${test.prop}")
    private String prop;
    @Test
    void contextLoads() {
        System.out.println(prop);
    }
}
//方式2添加临时的命令行参数
@SpringBootTest(args = {"--test.prop=qwbkqwkq2"})
//优先级:方式2大于方式1大于yml
使用@Import注解加载当前测试类专用的配置
@SpringBootTest
@Import(MsgConfig.class)
class Demo13ApplicationTests {
    @Autowired
    private  String msg;
    @Test
    void testConfig(){
        System.out.println(msg);
    }
}
模拟端口
@SpringBootTest(webEnvironment = SpringBootTest.WebEnvironment.DEFINED_PORT)
public class webTest {
    @Test
    void  web(){

    }
}
虚拟请求
@SpringBootTest(webEnvironment = SpringBootTest.WebEnvironment.DEFINED_PORT)
//开启虚拟mvc调用
@AutoConfigureMockMvc
public class webTest {
    @Test
    void  web(){

    }
    @Test
    void tsetweb(@Autowired MockMvc mvc) throws Exception {
        //创建虚拟请求
        MockHttpServletRequestBuilder builder = MockMvcRequestBuilders.get("/users");
        mvc.perform(builder);//执行请求
    }
}
虚拟请求状态匹配
@SpringBootTest(webEnvironment = SpringBootTest.WebEnvironment.DEFINED_PORT)
//开启虚拟mvc调用
@AutoConfigureMockMvc
public class webTest {
    @Test
    void  web(){

    }
    @Test
    void tsetweb(@Autowired MockMvc mvc) throws Exception {
        //创建虚拟请求
        MockHttpServletRequestBuilder builder = MockMvcRequestBuilders.get("/users");
        ResultActions actions = mvc.perform(builder);
        //设定预期值与真实值进行比较,成功则测试通过
        //定义本次调用的预期值
        StatusResultMatchers status = MockMvcResultMatchers.status();
        //预计本次调用时成功的:状态为200
        ResultMatcher ok = status.isOk();
        //添加预计值到本次调用结果进行匹配
        actions.andExpect(ok);
    }
}
执行结果的匹配
//字符串匹配
@Test
    void tsetBody(@Autowired MockMvc mvc) throws Exception {
        //创建虚拟请求
        MockHttpServletRequestBuilder builder = MockMvcRequestBuilders.get("/users");
        ResultActions actions = mvc.perform(builder);
        ContentResultMatchers contentResultMatchers = MockMvcResultMatchers.content();
        ResultMatcher ok = contentResultMatchers.string("springboot");
        //添加预计值到本次调用结果进行匹配
        actions.andExpect(ok);
   }
//json匹配
 ResultMatcher ok = contentResultMatchers.json("");//里面写入匹配的json数据
匹配响应头
HeaderResultMatchers contentResultMatchers = MockMvcResultMatchers.header();
        ResultMatcher ok = contentResultMatchers.string("Content-Type","application/json");
        //添加预计值到本次调用结果进行匹配
        actions.andExpect(ok);
给测试类添加测试回滚
@Transactional //添加事务
@Rollback(true) //默认true ,如果想提交变为FALSE
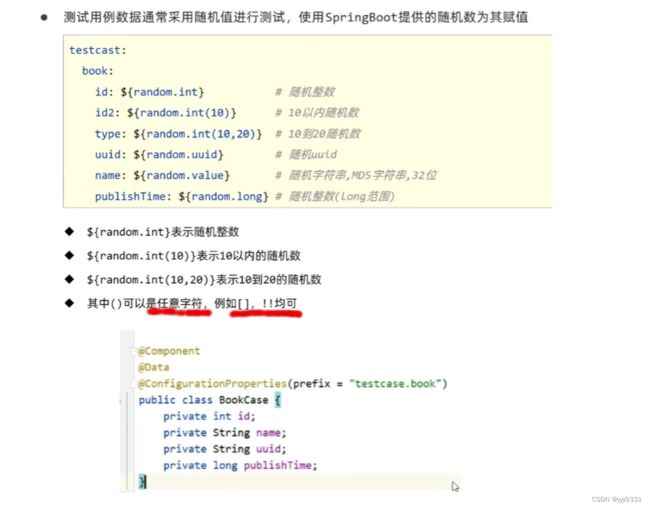
配置随机值
yml配置,要配置对应实体类,可以在$前面加固定字段,id2:指定范围
数据层解决方案
数据源配置

NoSql解决方案:Redis、MongoDB、ES
Redis安装与启动
- Windows解压安装或一键式安装
- 服务端启动命令
redis-server.exe redis.windows.conf - 客户端启动命令
redis-cli.exe
整合redis
导入
<dependency>
            <groupId>org.springframework.bootgroupId>
            <artifactId>spring-boot-starter-data-redisartifactId>
dependency>
yml配置
spring:
  redis:
    host: localhost
    port: 6379
基本使用
 @Autowired
    private RedisTemplate redisTemplate;
    @Test
    void set() {
         ValueOperations ops = redisTemplate.opsForValue();
         ops.set("age",14);
    }

    @Test
    void get() {
        ValueOperations ops = redisTemplate.opsForValue();
        Object age = ops.get("age");
        System.out.println(age);
    }
springboot操作客户端
客户端:RedisTemplate以对象作为key和value,内部对数据进行序列化。
StringRedisTemplate以字符串作为key和value,与redis客户端操作等效。
@Autowired
    private StringRedisTemplate stringRedisTemplate;
@Test
    void hSet1() {
        ValueOperations ops = stringRedisTemplate.opsForValue();
        Object age = ops.get("name");
        System.out.println(age);
    }
//常用
jedis使用
导包

            redis.clients
            jedis

yml配置文件配置
spring:
  redis:
    host: localhost
    port: 6379
    client-type: jedis
//默认使用的是lettuce
lettuce与jedis的区别
- jedis连接Redis服务器是直连模式,当多线程模式下使用jedis会存在线程安全问题,解决方案可以通过配置连接池使每个连接专用,这样整体性能就大受影响。
- lettcus基于Netty框架进行与Redis服务器连接,底层设计中采用StatefulRedisConnection,StatefulRedisConnection自身是线程安全的,可以保障并发访问安全问题,所以一个连接可以被多线程复用。当然lettcus也支持多连接实例一起工作。
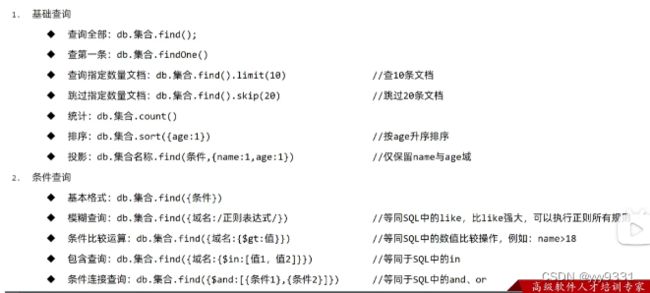
MongoDB
- MongoDB是一个开源、高性能、无模式的文档型数据库。NoSql数据库产品,是最像关系型数据库的非关系型数据库。
导入

			org.springframework.boot
			spring-boot-starter-data-mongodb

yml配置:
spring:
  data:
    mongodb:
      uri: mongodb://localhost/itheima
使用:
@Autowired
	private MongoTemplate mongoTemplate;
	@Test
	void contextLoads() {
		Book book = new Book();
		book.setId(1);
		book.setName("springboot");
		book.setType("springboot");

		mongoTemplate.save(book);
	}
	@Test
	void find(){
		List all = mongoTemplate.findAll(Book.class);
		System.out.println(all);
	}
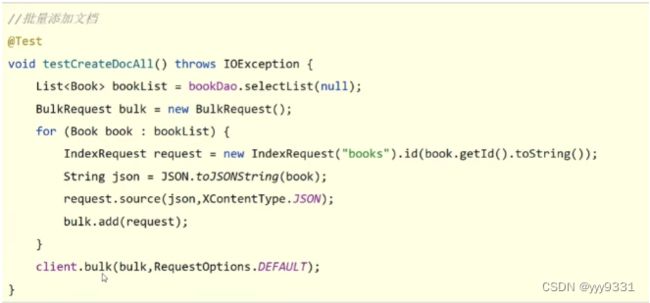
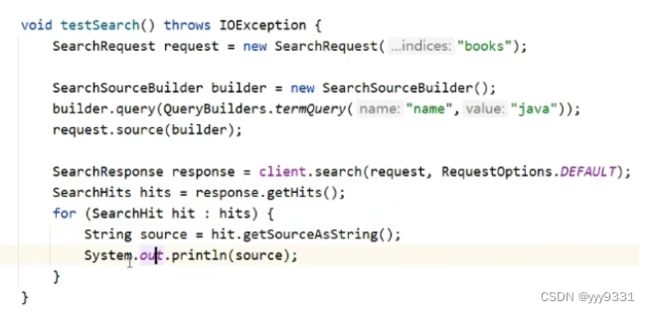
ES(Elasticsearch)
- Elasticsearch是一个分布式全文搜索引擎
倒排索引
运行
点击elasticsearch.bat文件
端口9200
            org.elasticsearch.client
            elasticsearch-rest-high-level-client

 创建客户端
 HttpHost host = HttpHost.create("http://localhost:9200");
        RestClientBuilder builder = RestClient.builder(host);
        client = new RestHighLevelClient(builder);
 //操作索引
 CreateIndexRequest request = new CreateIndexRequest("books");
        client.indices().create(request, RequestOptions.DEFAULT);
        //关闭客户端
client.close();
Swagger
Open APT规范
Open APT规范以前叫做Swagger规范,是REST APT的API描述格式
Open APT文件允许描述整个API,包括:
- 每个访问地址的类型。
- 每个操作的参数。
- 认证方式。
- 连接信息,声明,使用团队合其他信息。
Open APT规范可以使用YAMl或者JSON格式进行编写。
Swagger简介
是一套围绕Open API规范构建的开源工具,可以帮助设计,构建,纪录和使用REST API。
- Swagger Editor:基于浏览器编辑器,可以在里面编写Open APi规范
- Swagger UI:将Open API规范呈现为交互式API文档。用可视化UI展示描述文件。
- Swagger Codegen:将Open API规范生产为服务器存根和客户端库。通过Swagger Codegen可以将描述文件生产html格式和cwiki形式的接口文档,同时也可以生产多种语言的客户端和服务端代码。
- Swagger Instpector:和Swagger UI有点类似,但可以返回更多信息,也会保存请求的实际参数数据。
- Swagger Hub:集成了上面所有项目的各个功能,你可以以项目和版本为单位,将你的描述文件上传到Swagger Hub中。在Swagger Hub中可以完成上面项目的所有工作,需要注册账号。
使用Swagger,就是把相关的信息存储在它定义的描述文件里面,再通过维护这个描述文件可以去更新接口文档,以及生成各端代码。
Springfix
在spring启动类加注解@EnableSwagger2,它是springfix提供的一个注解,代表swagger2相关技术开启。会扫描当前类所在包,及子包中所有的类型中的注解。做swagger文档定值。
SwaggerConfiguration类的使用
@Configuration
public class SwaggerConfiguration {
    /**
     * 创建Docket类型的对象。并且使用spring容器管理。
     * Docket是swagger中的全局配置对象
     * @return
     */
    @Bean
    public Docket docket(){
        Docket docket = new Docket(DocumentationType.SWAGGER_2);
        ApiInfo apiInfo = new ApiInfoBuilder()
                .contact(
                        new Contact(
                                "LW的开发文档",//文档发布者
                                "123",//文档发布者的网站地址,企业网站
                                "[email protected]")//发布者的电子邮箱

                )
                .title("Swagger学习")//
                .description("Swagger框架学习12-10")
                .version("1.4")
                .build();
        docket.apiInfo(apiInfo);//给docket上下文配置api描述信息
        docket
                .select()//获取docket中的选择器。返回ApiSelectorBuilder。构建选择器的。如:扫描什么包的注解
                .apis(RequestHandlerSelectors.basePackage("com.example.controller"));//设定扫描哪个包(包含子包)的注解
        return docket;
    }
}
自定义注解属性
/**
 * @Target-描述当前注解可以定义在什么资源上
 * 属性value
 * -定义具体的资源。包括:
 *      -ElementType.METHOD 可以定义在方法上
 *      -ElementType.TYPE 可以定义在类型上
 *      -ElementType.FIELD 可以定义在属性上
 *      -ElementType.PARAMETER 可以定义在方法参数上
 * @Retention -当前注解在什么时候有效
 * 属性 value
 *      -RetentionPolicy.RUNTIME-运行时有效
 *      -RetentionPolicy.SOURCE-源码中有效
 *      -RetentionPolicy.CLASS -字节码有效
 */
@Target(value={ElementType.METHOD,ElementType.TYPE})
@Retention(RetentionPolicy.RUNTIME)
public @interface MyAnnotation4Swagger {
    //自定义注解中的属性。相当于@MyAnnotation4Swagger(value="")
    String value() default "";
}
常用注解
//@Api是类上注解,控制整个类生成帮助文档的信息
//在Controller层上添加
@Api(tags = {"MyController","Swagger学习控制器"},description="测试API类型描述信息")
//tags:给当前类型定义别名,可以有多个。定义几个别名在ui视图中就显示几个控制器访问菜单-description:给当前类型生成的帮助文档定义一个描述信息.(过时)
@ApiOperation(value = "查询所有用户",notes = "Swagger学习使用")
//在Controller层方法上使用,notes:描述

@ApiParam(name = "页号",value = "分页时提供的参数",required = true)//在方法的参数左边添加required:必要的

@ApiIgnore
//方法或属性,当前注解描述的类型不生成文档
@ApiImplicitParam(name = "id",value = "id参数描述",required = true,paramType = "整形",dataType = "名值对")
//描述方法中的参数
@ApiImplicitParams(value={
    @ApiImplicitParam(name = "id",value = "id参数描述",required = true,paramType = "整形",dataType = "名值对"),
    @ApiImplicitParam(name = "uuid",value = "uuid参数描述",required = true,paramType = "整形",dataType = "名值对")
})

/**
 *ApiModel-描述一个实体类型。这个实体类型如果成为任何一个生成API帮助文档方法的
 * 返回值类型的时候,此注解被解析
 */

@ApiModel(value = "用户实体",description = "用户数据")
@Data
public class User {
    @ApiModelProperty(value = "主键",name = "主键id",required = true,example = "1",hidden = false)
    //hidden是否隐藏
Mybatis
    <select id="select" resultType="pojo.User">
        select * from users.user
        <where>
            <if test="id !=null">
                and id=#{id}
            if>
            <if test="name !=null and name !=''">
                and name=#{name}
            if>
        where>
    select>

    <update id="updateplus" >
        update users.user
        <set>
            <if test="usersname !=null and usersname !=''">
                usersname=#{usersname},
            if>
            <if test="password !=null and password !=''">
                password=#{password},
            if>
            <if test="name !=null and name !=''">
                name=#{name},
            if>
            <if test="work !=null and work !=''">
                work=#{work},
            if>
            <if test="interest !=null and interest !=''">
                interest=#{interest},
            if>
            <if test="sex !=null and sex !=''">
                sex=#{sex},
            if>
            <if test="remark !=null and remark !=''">
                remark=#{remark},
            if>
            <if test="permissions !=0">
                permissions=#{permissions}
            if>
        set>
        where id=#{id};

    update>
缓存
- 缓存是一种介于数据永久存储介质与数据应用之间的数据临时存储介质
- 使用缓存可以有效减少低速数据读取过程的次数提高系统性能
springboot内置缓存
1.导入maven

            org.springframework.boot
            spring-boot-starter-cache

2.在主启动类中添加启动缓存注解
@EnableCaching
3.在对应方法前面添加,key值即为传入值
@Cacheable(value = "cacheSpace",key="#userId")
public R getByIdUser(Integer userId)
变更缓存供应商
spring:
	cache:
    type: ehcache
    ehcache:
      config: ehcache.xml
      #config,指定配置文件
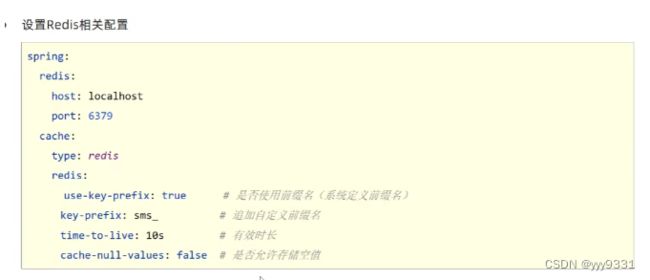
缓存供应商变更:redis
缓存供应商变更:memcached
- memcached客户端选择
- Memcached client for Java:最早期客户端,稳定可靠,用户群广
- SpyMemcached:效率更高
- xmemcached:并发处理更好
- SpringBoot未提供对memcached的整合,需要使用硬编码方式实现客户端初始化管理
jetCache
-
它对springCache进行了封装,在原有功能基础上实现多记缓存,缓存统计,自动刷新,异步调用,数据报表等功能。
-
jetcache设定了本地缓存与远程缓存的多记缓存解决方案
-
本地缓存(local)
-
LinkedHashMap
-
Caffeine
-
-
远程缓存(remote)
- Redis
- Tair
-
启动方法注解
@SpringBootApplication
//jetcache启用缓存的主开关
@EnableCreateCacheAnnotation
//开启方法注解缓存
@EnableMethodCache(basePackages = "com.itheima")
public class Springboot20JetCacheApplication {

    public static void main(String[] args) {
        SpringApplication.run(Springboot20JetCacheApplication.class, args);
    }

}
使用方法注解操作缓存
@Service
public class BookServiceImpl implements BookService {//缓存对象必须保障可序列化
    @Autowired
    private BookDao bookDao;

    @Override
    @Cached(name="book_",key="#id",expire = 3600,cacheType = CacheType.REMOTE)
//    @CacheRefresh(refresh = 5,timeUnit = TimeUnit.SECONDS) 开启自动刷新
    public Book getById(Integer id) {
        return bookDao.selectById(id);
    }
     @Override//更新缓存
    @CacheUpdate(name="book_",key="#book.id",value="#book")
    public boolean update(Book book) {
        return bookDao.updateById(book) > 0;
    }

    @Override//删除缓存
    @CacheInvalidate(name="book_",key = "#id")
    public boolean delete(Integer id) {
        return bookDao.deleteById(id) > 0;
    }
}
配置文件yaml
jetcache:
	remote:
    default:
      type: redis
      keyConvertor: fastjson
      valueEncode: java
      valueDecode: java
#查看缓存统计报告
jetcache:
  statIntervalMinutes: 1
缓存供应商变更:j2cache
- j2cache是一个缓存整合框架,可以提供缓存的整合方案,使各种缓存搭配使用,自身不提供缓存功能。
- 基于ehcache+redis进行整合
maven导入依赖
		<dependency>
            <groupId>net.oschina.j2cachegroupId>
            <artifactId>j2cache-coreartifactId>
            <version>2.8.4-releaseversion>
        dependency>

        <dependency>
            <groupId>net.oschina.j2cachegroupId>
            <artifactId>j2cache-spring-boot2-starterartifactId>
            <version>2.8.0-releaseversion>
        dependency>
		<dependency>
            <groupId>net.sf.ehcachegroupId>
            <artifactId>ehcacheartifactId>
        dependency>
yml配置文件做的相关配置
j2cache:
  config-location: j2cache.properties #指定配置文件
j2cache.properties配置文件
# 1级缓存
j2cache.L1.provider_class = ehcache
ehcache.configXml = ehcache.xml

# 设置是否启用二级缓存
j2cache.l2-cache-open = false

# 2级缓存
j2cache.L2.provider_class = net.oschina.j2cache.cache.support.redis.SpringRedisProvider
j2cache.L2.config_section = redis
redis.hosts = localhost:6379

# 1级缓存中的数据如何到二级缓存
j2cache.broadcast = net.oschina.j2cache.cache.support.redis.SpringRedisPubSubPolicy

redis.mode = single
# 自定义前缀
redis.namespace = j2cache
impl
@Service
public class SMSCodeServiceImpl implements SMSCodeService {

    @Autowired
    private CodeUtils codeUtils;

    @Autowired
    private CacheChannel cacheChannel;//缓存操作

    @Override
    public String sendCodeToSMS(String tele) {
        String code = codeUtils.generator(tele);
        cacheChannel.set("sms",tele,code);//设置
        return code;
    }

    @Override
    public boolean checkCode(SMSCode smsCode) {
        String code = cacheChannel.get("sms",smsCode.getTele()).asString();
        return smsCode.getCode().equals(code);//取值
    }

}
任务
- 定时任务是企业级应用中常见操作
- 年度报表
- 缓存统计报告
springboot整合quartz
quartz:定时任务框架
Spring Task
- 相关概念
- 工作(job):用于定义具体执行的工作
- 工作明细(jobDetail):用于描述定时工作相关的信息
- 触发器(Trigger):用于描述触发工作的规则,通常使用cron表达式定义调度规则
- 调度器(Scheduler):描述了工作明细与触发器的对应关系
导入依赖
<dependency>
            <groupId>org.springframework.bootgroupId>
            <artifactId>spring-boot-starter-quartzartifactId>
        dependency>
定义具体要执行的任务,继承QuartzJobBean
public class MyQuartz extends QuartzJobBean {
    @Override
    protected void executeInternal(JobExecutionContext context) throws JobExecutionException {
        System.out.println("quartz task run...");
    }
}
定义工作明细与触发器,并绑定对应关系
@Configuration
public class QuartzConfig {

    @Bean
    public JobDetail printJobDetail(){
        //绑定具体的工作
        return JobBuilder
                .newJob(MyQuartz.class)
                .storeDurably()
                .build();
    }

    @Bean
    public Trigger printJobTrigger(){
        ScheduleBuilder schedBuilder = CronScheduleBuilder.cronSchedule("0/5 * * * * ?");
        //绑定对应的工作明细
        return TriggerBuilder.newTrigger().forJob(printJobDetail())
            .withSchedule(schedBuilder).build();
    }

}
Spring Task
开启定时任务功能
@SpringBootApplication
//开启定时任务功能
@EnableScheduling
public class Springboot22TaskApplication {

    public static void main(String[] args) {
        SpringApplication.run(Springboot22TaskApplication.class, args);
    }
}
设置定时执行任务,并设定执行周期
@Component
public class MyBean {

    @Scheduled(cron = "0/1 * * * * ?")
    public void print(){
        System.out.println(Thread.currentThread().getName()+" :spring task run...");
    }
}// 一秒钟执行一次,任意分钟、任意小时、任意天、任意月、无限星期
yml相关配置
spring:
  task:
    scheduling:
      # 任务调度线程池大小 默认1
      pool:
        size: 1
      # 调度线程名称前缀,默认 scheduling-
      thread-name-prefix: spring_tasks_
      shutdown:
        # 线程池关闭时等待所有任务完成
        await-termination: false
        # 调度线程关闭前最大等待时间,确保最后一定关闭
        await-termination-period: 10s
整合JavaMail
- SMTP(SImple Mail Transfer Protocol):简单右键传输协议,用于发送电子邮件的传输协议
- POP3(Post Office Protocol - Version3):用于接收电子邮箱的标准协议
- IMAP(Internet Mail Access Protocol):互联网消息协议,是POP3的代替协议
导入
<dependency>
            <groupId>org.springframework.bootgroupId>
            <artifactId>spring-boot-starter-mailartifactId>
        dependency>
配置JavaMail
spring:
  mail:
    host: smtp.qq.com
    username: [email protected]
    password: guvamwcmsglcbagj
# 密码需要去邮箱设置里面获取
功能-发送简单邮件
@Service
public class SendMailServiceImpl implements SendMailService {
    @Autowired
    private JavaMailSender javaMailSender;
    //发送人
    private String from = "[email protected]";
    //接收人
    private String to = "[email protected]";
    //标题
    private String subject = "原神新年福利";
    //正文
    private String context = "这你也信?";
    @Override
    public void sendMail() {
        SimpleMailMessage message = new SimpleMailMessage();
        message.setFrom(from+"(米哈游)");
        message.setTo(to);
        message.setSubject(subject);
        message.setText(context);
        javaMailSender.send(message);
    }
}
功能-发送复杂邮件
@Service
public class SendMailServiceImpl2 implements SendMailService {
@Autowired
private JavaMailSender javaMailSender;
//发送人
private String from = "[email protected]";
//接收人
private String to = "[email protected]";
//标题
private String subject = "测试邮件";
//正文
private String context = " 点开有惊喜";
@Override
public void sendMail() {
try {
MimeMessage message = javaMailSender.createMimeMessage();
MimeMessageHelper helper = new MimeMessageHelper(message,true);
helper.setFrom(from);
helper.setTo(to);
helper.setSubject(subject);
helper.setText(context,true);
//添加附件
File f1 = new File("D:\\workspace\\springboot\\springboot_23_mail\\target\\springboot_23_mail-0.0.1-SNAPSHOT.jar");
File f2 = new File("D:\\workspace\\springboot\\springboot_23_mail\\src\\main\\resources\\logo.png");
helper.addAttachment(f1.getName(),f1);
helper.addAttachment("最靠谱的培训结构.png",f2);
javaMailSender.send(message);
} catch (Exception e) {
e.printStackTrace();
}
}
}
消息
- 消息发送方
- 生产者
- 消息接收方
- 消费者
分类
- 同步消息
- 异步消息
企业级应用中广泛使用的三种异步消息传递技术
- JMS(Java Message Service):一个规范,等同于JBDC规范,提供了与消息服务相关的API接口
- JMS消息模型
- peer-2-peer:点对点模型,消息发送到一个队列中,队列保存消息。队列消息只能被一个消费者消费,或超时。
- publish-subscribe:发布订阅模式,消息可以被多个消费者消费,生产者和消费者完全独立,不需要感知对方的存在。
- JMS消息种类
- TextMessage
- MapMessage
- BytesMessage
- StreamMessage
- ObjectMessage
- Message(只有消息头和属性)
- JMS实现:ActiveMQ,Redis,HornetMQ,RdbbitMQ,RocketMQ(没有完全遵守JMS规范)
- JMS消息模型
- AMQP(advanced message queuing protocol):一种协议(高级消息队列协议,也是消息代理协议),规范了网络交换的数据格式,兼容JMS
- 优点:跨平台性,服务器供应商,生产者,消费者可以使用不同语言来实现
- AMQP消息模型
- direct exchange交换机
- fanout exchange
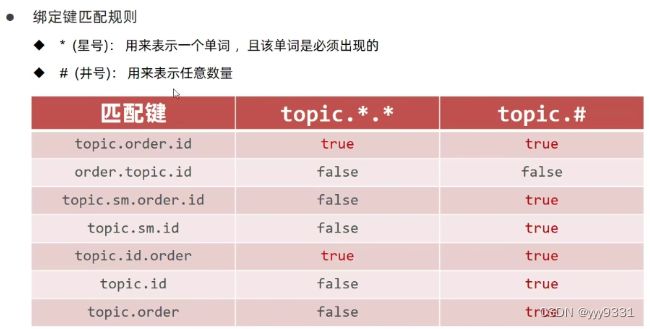
- topic exchange
- headers exchange
- system exchange
- 消息种类:byte[]
- AMQP实现:RabbitMQ,StormMQ,RocketMQ
- MQTT(Message Queueing Telemetry Transport)消息队列遥测传输,专为小设备设计,是物联网(IOT)生态系统中主要成分之一
- kafka,一种高吞吐量的分布式发布订阅消息系统,提供实时消息功能
ActiveMQ
下载地址:https://activemq.apache.org/components/classic/download/
解压安装
启动服务
activemq.bat
访问服务器
http://127.0.0.1:8161/
服务端口61616,管理后台端口:8161
用户名和密码:admin
springboot整合ActiveMQ
1.导入坐标

     org.springframework.boot
     spring-boot-starter-activemq

2.yml配置
spring:
  activemq:
    broker-url: tcp://localhost:61616
  jms:
    template:
      default-destination: example
    pub-sub-domain: true #发布订阅,开启
3.
RabbitMQ
RabbitMQ是基于Erlang语言编写,所以需要安装Erlang
Erlang下载地址:https://www.erlang.org/downloads
启动服务
rabbitmq-service.bat start
关闭服务
rabbitmq-service.bat stop
开启可视化界面
rabbitmq-plugins.bat enable rabbitmq_management
访问服务器:http://localhost:15672
服务端口:5672,管理后台端口:15672
用户名密码:guest
导坐标
<dependency>
            <groupId>org.springframework.boot</groupId>
            <artifactId>spring-boot-starter-amqp</artifactId>
</dependency>
写配置
spring:
	rabbitmq:
        host: localhost
        port: 5672
定义消息队列 直连模式
@Configuration
public class RabbitConfigDirect {
    @Bean
    public Queue  directQueue(){
        //第一个true:是否持久化,第二个:当前的消息队列是不是当前连接专用,第三个:是否删除
        return new Queue("direct_queue");
    }
    @Bean
    public DirectExchange directExchange(){
        return new DirectExchange("directEXchange");
    }
    @Bean
    public Binding binding(){
        return BindingBuilder.bind(directQueue()).to(directExchange()).with("direct");
    }
}
生产与消费消息
    @Service
public class MessageServiceRabbitmqDirectImpl implements MessageService {
    @Autowired
    private AmqpTemplate amqpTemplate;
    @Override
    public void sendMessage(String id) {
        System.out.println("待发送短信的订单已纳入处理队列(rabbitmq direct),id"+id);
        amqpTemplate.convertAndSend("directEXchange","direct",id);//交换机名称,绑定队列名称
    }
}
使用消息监听器对消息队列监听
 @Component
public class MessageListener {
    @RabbitListener(queues = "direct_queue")
    public  void receive(String id){
        System.out.println("已完成发送业务(rabbit):id"+id);
    }
}//如果有两个以上监听器,就乱换处理消息
RocketMQ
- 安装:解压缩
- 默认服务端口:9876
- 环境变量配置
- ROCKETMQ_HOME
- PATH
- NAMESRV_ADDR(建议)∶127.0.0.1:9876
启动命名服务器
mqnamesrv
启动broker
mqbroker
服务器功能测试
生产者
tools org.apache.rocketmq.example.quickstart.Producer
消费者
tools org.apache.rocketmq.example.quickstart.Consumer
Kafka
监控
监控的意义
- 监控服务状态是否宕机
- 监控服务运行指标(内存,虚拟机,线程,请求等)
- 监控日志
- 管理服务(服务下线)
监控的实施方式
- 显示监控信息的服务器:用于获取服务信息,并显示对应的信息
- 运行的服务:启动时主动上报,告知监控服务器自己需要受到监控
可视化监控平台
Spring Boot Admin,开源社区项目,用于管理和监控Springboot应用程序。客户端注册服务器后,通过http请求方式,服务端定期从客户端获取对应的信息,并通过ui界面展示对应信息。
地址:https://github.com/codecentric/spring-boot-admin
监控原理
- Actuator提供了SpringBoot生产就绪功能,通过端点的配置与访问,获取端点信息
- 端点描述了一组监控信息,SpringBoot提供了多个内置端点,也可以根据需要自定义端点信息
- 访问当前应用所有端点信息:/actuator
- 访问端点详细信息:/actuator/端点名称
| ID | 描述 | 默认启用 |
|---|---|---|
| health | 显示应用程序健康信息(不能自定义) | 是 |
| loggers | 显示和修改应用程序中日志记录器的配置(可以自定义) | 是 |
| metrics | 显示当前应用程序的Liquibase数据库迁移(对应性能) | 是 |
bean的加载方式
一、用xml方式定义bean
在applicationContext.xml
<beans xmlns="http://www.springframework.org/schema/beans"xmlns:xsi="http://www.w3.org/2001/XMLSchema-instance"
       xsi:schemaLocation="http://www.springframework.org/schema/beans http://www.springframework.org/schema/beans/spring-beans.xsd">

    <bean id="cat" class="com.itheima.bean.Cat"/>
    <bean class="com.itheima.bean.Dog"/>

    <bean id="dataSource" class="com.alibaba.druid.pool.DruidDataSource"/>
    <bean class="com.alibaba.druid.pool.DruidDataSource"/>
    <bean class="com.alibaba.druid.pool.DruidDataSource"/>
beans>
使用
public class App1 {
    public static void main(String[] args) {
        ApplicationContext ctx = new ClassPathXmlApplicationContext("applicationCOntext1.xml");
//        Object cat = ctx.getBean("cat");
//        System.out.println(cat);
//        Dog dog = ctx.getBean(Dog.class);
//        System.out.println(dog);
        String[] names = ctx.getBeanDefinitionNames();
        for (String name : names) {
            System.out.println(name);
        }
    }
}
如果没有定义id,就有默认名称,在类后面加#0,#1
二、使用类上注解定义bean+xml组件扫描
使用@Component及其衍生注解@Controller,@Service,@Repository定义bean
@Component("tom")//tom表示id,bean的名称
public class Cat {}
@Service("jerry")
public class Mouse {
}
需要在xml指定加载bean的位置
[外链图片转存失败,源站可能有防盗链机制,建议将图片保存下来直接上传(img-GAPGjlDV-1677392226654)(C:\Users\LW\AppData\Roaming\Typora\typora-user-images\image-20230118190444318.png)]
加载第三方类
//@Component
@Configuration //配置类
public class DbConfig {
    @Bean
    public DruidDataSource dataSource(){
        DruidDataSource ds = new DruidDataSource();
        return ds;
    }
}
三、使用注解方式声明配置类
[外链图片转存失败,源站可能有防盗链机制,建议将图片保存下来直接上传(img-GhpjOriX-1677392226655)(C:\Users\LW\AppData\Roaming\Typora\typora-user-images\image-20230120121946327.png)]
@ComponentScan({"com.itheima.bean","com.itheima.config"})//也可以用这种注解
FactoryBean
- 工厂bean,初始化实现FactoryBean接口的类,实现对bean加载到容器之前的批处理操作
public class DogFactoryBean implements FactoryBean<Dog> {
    @Override
    public Dog getObject() throws Exception {
        Dog d = new Dog();
        return d;
    }//造出来的对象是什么

    @Override
    public Class<?> getObjectType() {
        return Dog.class;
    }//对象类型

    @Override
    public boolean isSingleton() {
        return true;
    }//是否单例
}
@ComponentScan({"com.itheima.bean","com.itheima.config"})
public class SpringConfig3 {

    @Bean
    public DogFactoryBean dog(){
        return new DogFactoryBean();
    }

}
造出来的对象是实现接口中的泛型的类型
proxyBeanMethod
//加载配置类并加载配置文件(系统迁移)
@Configuration
@Component
@ImportResource("applicationContext1.xml")
public class SpringConfig32 {
}
@Configuration(proxyBeanMethods = true)
//此注解属性含义,开启CGLIB代理,可以保障调用此方法得到的对象是从容器中获取的而不是重新创建的
四、使用@Import注解
- 使用@Import注解导入要注入的bean对应的字节码
@Import({Dog.class})
public class SpringConfig5{
}
- 被导入的bean无需使用注解声明为bean
pubilc class Dog{}
此形式可以有效的降低源代码与Spring技术的耦合度,在spring技术底层及诸多框架的整合中大量使用。
- 使用@Import注解导入配置类
可以把配置类加载的bean,也加载到容器中。
五、使用上下文对象在容器初始化完毕后注入bean
public static void main(String[] args) {
        AnnotationConfigApplicationContext ctx = new AnnotationConfigApplicationContext(SpringConfig4.class);
        //上下文容器对象已经初始化完毕后,手工加载bean
        ctx.registerBean("tom", Cat.class,0);
        ctx.registerBean("tom", Cat.class,1);
        ctx.registerBean("tom", Cat.class,2);
        ctx.register(Mouse.class);//这种注册bean,名称是类名小写。
        String[] names = ctx.getBeanDefinitionNames();
        for (String name : names) {
            System.out.println(name);
        }
        System.out.println("----------------------");
        System.out.println(ctx.getBean(Cat.class));
    }
注册相同名字的bean,最后一个会保留下来
六、导入实现ImportSelector接口的类,实现对导入源的编程式处理
public class MyImportSelector implements ImportSelector {
    @Override
    public String[] selectImports(AnnotationMetadata metadata) {
//        System.out.println("提示:"+metadata.getClassName());加载谁,描述谁
//        System.out.println(metadata.hasAnnotation("org.springframework.context.annotation.Configuration"));有没有一个Configuration注解
//        Map attributes = metadata.getAnnotationAttributes("org.springframework.context.annotation.ComponentScan");
//        System.out.println(attributes);

        //各种条件的判定,判定完毕后,决定是否装在指定的bean
        boolean flag = metadata.hasAnnotation("org.springframework.context.annotation.Configuration");
        if(flag){
            return new String[]{"com.itheima.bean.Dog"};
        }
        return new String[]{"com.itheima.bean.Cat"};//要加载的bean的全路径类名
    }
}
七、继承ImportBeanDefinitionRegistrar接口
导入实现了ImportBeanDefinitionRegistrar接口的类,通过BeanDefinition的注册器注册实名bean,实现对容器中bean的裁定,例如对现有bean的覆盖,进而达成不修改源代码的情况更换实现的效果。
public class MyRegistrar implements ImportBeanDefinitionRegistrar {
    @Override
    public void registerBeanDefinitions(AnnotationMetadata importingClassMetadata, BeanDefinitionRegistry registry) {
        //1.使用元数据去做判定
        BeanDefinition beanDefinition = BeanDefinitionBuilder.rootBeanDefinition(BookServiceImpl2.class).getBeanDefinition();
        registry.registerBeanDefinition("bookService",beanDefinition);
    }
}
八、实现BeanDefinitionRegistryPostProcessor接口
//导入实现了BeanDefinitionRegistryPostProcessor接口的类,通过BeanDefinition的注册器注册实名bean,实现对容器中bean的最终裁定
public class MyPostProcessor implements BeanDefinitionRegistryPostProcessor {
    @Override
    public void postProcessBeanDefinitionRegistry(BeanDefinitionRegistry registry) throws BeansException {
        BeanDefinition beanDefinition = BeanDefinitionBuilder.rootBeanDefinition(BookServiceImpl4.class).getBeanDefinition();
        registry.registerBeanDefinition("bookService",beanDefinition);
    }//后处理定义bean注册
}
顺序
@Import({BookServiceImpl1.class, MyPostProcessor.class, MyRegistrar2.class, MyRegistrar.class})
public class SpringConfig8 {
}
MyPostProcessor类一定会是最终起作用的
bean的加载控制(编程式)
-
bean的加载控制指根据特定情况对bean进行选择性以达到适用于项目的目标。
-
bean的加载方式5678都可以控制。
-
根据任意条件确认是否加载bean
public class MyImportSelector implements ImportSelector {
    @Override
    public String[] selectImports(AnnotationMetadata importingClassMetadata) {
        try {
            Class<?> clazz = Class.forName("com.itheima.bean.Mouse");
            if(clazz != null) {
                return new String[]{"com.itheima.bean.Cat"};
            }
        } catch (ClassNotFoundException e) {
//            e.printStackTrace();
            return new String[0];
        }
        return null;
    }
}
bean的加载控制(注解式)
- 使用@Conditional注解的派生注解设置各种组合条件控制bean的加载
@ConditionalOnClass(name = "com.itheima.bean.Wolf")//如果有这个bean就加载,如没有就不加载
@ConditionalOnMissingClass("com.itheima.bean.Mouse") //如果没有这个bean就加载,如有就不加载
public Cat tom(){
        return new Cat();
}
@ConditionalOnBean(name="jerry")   @ConditionalOnMissingClass("com.itheima.bean.Dog")//组合加载,如果没有狗,且有bean的别名叫Jerry,tom才会被加载

@ConditionalOnNotWebApplication
@ConditionalOnWebApplication
//否/是web环境才加载
一般使用情况:在类上加以上注解
@Component("tom")
@ConditionalOnBean(name="jerry")
//@ConditionalOnWebApplication
@ConditionalOnNotWebApplication
public class Cat {
}
bean依赖属性配置
@EnableConfigurationProperties(CartoonProperties.class)//强制加载一个类成bean
- 将业务功能bean运行需要的资源抽取成独立的属性类(**Properties),设置读取配置文件信息
@ConfigurationProperties(prefix = "cartoon")//读取yml文件中的属性
@Data
public class CartoonProperties {
    private Cat cat;
    private Mouse mouse;
}
- 配置文件中使用固定格式为属性类注入数据
cartoon:
  cat:
    name: "图多盖洛"
    age: 5
  mouse:
    name: "泰菲"
    age: 1
- 定义业务功能bean,通常使用@Improt导入,解耦强制加载bean
- 使用@EnableConfigurationProperties注解设定使用属性类时加载bean
@Component
@EnableConfigurationProperties(CartoonProperties.class)
public class CartoonCatAndMouse {
    private Cat cat;
    private Mouse mouse;
    public void play(){
        System.out.println(cat.getAge()+"岁的"+cat.getName()+"和"+mouse.getAge()+"岁的"+mouse.getName()+"打起来了");
    }
    private CartoonProperties cartoonProperties;

    public CartoonCatAndMouse(CartoonProperties cartoonProperties){
        this.cartoonProperties = cartoonProperties;
        cat = new Cat();
        cat.setAge(cartoonProperties.getCat()!=null && cartoonProperties.getCat().getAge()!=null ? cartoonProperties.getCat().getAge() : 3);
    }
}
自动配置原理
1.收集Spring开发者的编程习惯,整理开发过程使用的常用技术列表
–》(技术集A)
2.收集常用技术(技术集A)的使用参数,整理开发过程中的每个技术的常用设置列表–》(设置集B)
3.初始化SpringBoot基础环境,加载用户自定义的bean和导入的其他坐标,形成初始化环境
4.将技术集A包含的所有技术都定义出来,在Spring/SpringBoot启动时默认全部加载
5.将技术集A中具有使用条件的技术约定出来,设置成按条件加载,由开发者决定是否使用该技术(与初始化环境对比)
6.将设置集B作为默认配置加载(约定大于配置),减少开发者配置工作量
7.开放设置集B的配置覆盖接口,由开发者根据自身需要决定是否覆盖默认配置
- spring默认启动的时候加了无数技术的自动配置类用来检查你当前系统要不要加对应的技术
- 根据自动配置类的加载去确定这个东西是否激活
- 属性的加载过程归属于属性的加载
变更自动配置
- 自定义自动配置(META-INF/spring.factories)
# Auto Configure
org.springframework.boot.autoconfigure.EnableAutoConfiguration=\
  com.itheima.bean.CartoonCatAndMouse
- 控制SpringBoot内置自动配置类
spring:
  autoconfigure:
    exclude:
      -org.springframework.boot.autoconfigure.task.TaskExecutionAutoConfiguration
@EnableAutoConfiguration(excludeName = "",exclode={})
- 通过配置文件exclude属性排除自动配置
- 通过注解@EnableAutoConfiguration属性排除自动配置项
- 启动自动配置只需要满足自动配置调剂即可
- 可以根据需求开发自定义自动
Springboot启动流程
-
初始化各种属性,加载成对象
读取环境属性(Environment)
系统配置(spring.factories)
参数(Arguments、application.properties)
-
创建Spring容器对象ApplicationContext,加载各种配置
-
在容器创建前,通过监听器机制,应对不同阶段加载数据,更新数据的需求
-
容器初始化过程中追加各种功能,例如统计时间、输出日志等
阿里云短信服务
需要设置AccessKey
        <dependency>
            <groupId>com.aliyungroupId>
            <artifactId>aliyun-java-sdk-coreartifactId>
            <version>4.5.16version>
        dependency>
        <dependency>
            <groupId>com.aliyungroupId>
            <artifactId>aliyun-java-sdk-dysmsapiartifactId>
            <version>2.1.0version>
        dependency>
发送验证码
public class SMSUtils {

   /**
    * 发送短信
    * @param signName 签名
    * @param templateCode 模板
    * @param phoneNumbers 手机号
    * @param param 参数
    */
   public static void sendMessage(String signName, String templateCode,String phoneNumbers,String param){
      DefaultProfile profile = DefaultProfile.getProfile("cn-hangzhou", "", "");//AccessKey账号和密码
      IAcsClient client = new DefaultAcsClient(profile);

      SendSmsRequest request = new SendSmsRequest();
      request.setSysRegionId("cn-hangzhou");
      request.setPhoneNumbers(phoneNumbers);//发送手机号
      request.setSignName(signName);//指定签名
      request.setTemplateCode(templateCode);//模板code
      request.setTemplateParam("{\"code\":\""+param+"\"}");
      try {
         SendSmsResponse response = client.getAcsResponse(request);
         System.out.println("短信发送成功");
      }catch (ClientException e) {
         e.printStackTrace();
      }
   }

}
redis入门
redis存储的是key-value结构的数据,其中key是字符串类型,value有5种常用的数据类型:
- 字符串 String
- 哈希 hash 适合存储对象
- 列表 list 按照插入顺序排序,可以有重复元素
- 集合 set 无序集合,没有重复元素
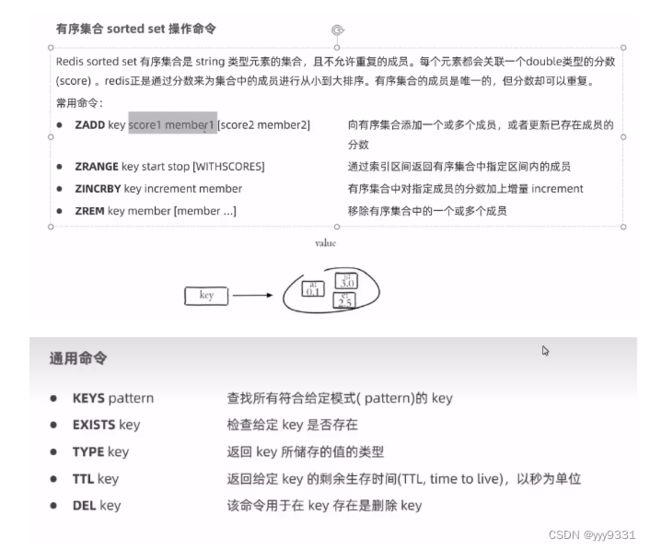
- 有序集合 sorted set 没有重复元素
Reids常用命令
字符串操作命令
SET key value 设置指定key的值
GET key 获取指定key的值
SETEX key seconds value 设置指定key的值,并将key的过期时间设为seconds秒
SETNX key value 只有在key不存在是设置key的值
更多:https://www.redis.net.cn/order/
哈希hash操作命令
- HSET key field value 将哈希表key中的字段filed的值设为value
- HGET key field 获取存储在哈希表中指定字段的值
- HDEL key field 删除存储在哈希表中的指定字段
- HKEYS key 获取哈希表中所有字段
- HVALS key 获取哈希表中所有值
- HGETALL key 获取在哈希表中指定key的所有字段和值

列表list操作命令
- LPUSH key value1 [value2] 讲一个或多个值插入到列表头部
- LRANGE key start stop 获取列表指定范围内的元素
- RPOP key 移除并获取列表最后一个元素
- LLEN key 获取列表长度
- BRPOP key1 [key2] timeout 移出并获取列表最后一个元素,如果列表没有元素会阻塞列表直到等待超时或发现可弹出元素为止,timeout:指定的超时时间

集合set操作命令
有序集合sorted set操作命令
java操作redis
<dependency>
    <groupId>redis.clientsgroupId>
    <artifactId>jedisartifactId>
    <version>2.8.0version>
dependency>
public void testRedis(){
    //1获取连接
    Jedis jedis = new Jedis("localhost",6379);
    //2执行具体操作
    jedis.set("username","xiaoming");
    jedis.del("username");//删除
    jedis.hset("my"hash,"addr","bj")
    //3关闭连接
    jedis.close();
}
Spring Date Redis
导入坐标
<dependency>
  <groupId>org.springframework.bootgroupId>
    <artifactId>spring-boot-starter-data-redisartifactId>
dependency>
Spring Date Redis中提供了一个高度封装的类:RedisTemplate,针对jedis客户端中大量api进行了归类封装,将同一类型操作封装为operation接口:
- Valueoperations:简单K-V操作
- Setoperations:set类型数据操作
- ZSetoperations:zset类型数据操作
- Hashoperations:针对map类型的数据操作
- Listoperations:针对list类型的数据操作
yaml配置文件
spring:
	redis:
		host: localhost
		prot: 6379
		#password: 123456
		database: 0 #第几号数据库
		jedis: #redis连接池配置
			pool:
				max-active: 8 #最大连接数
				max-wait: 1ms #连接池最大阻塞等待时间
				max-idle: 4 #连接池中的最大空闲连接
				min-idle: 0 #连接池中的最小空闲连接
实例
@Autowired
   private RedisTemplate redisTemplate;
public void testRedis(){
    //Valueoperations valueoperations = redisTemplate.opsForValue();
    redisTemplate.opsForValue().set("city","beijing");
}
改变redis的默认序列化:添加redis配置类
@Configuration
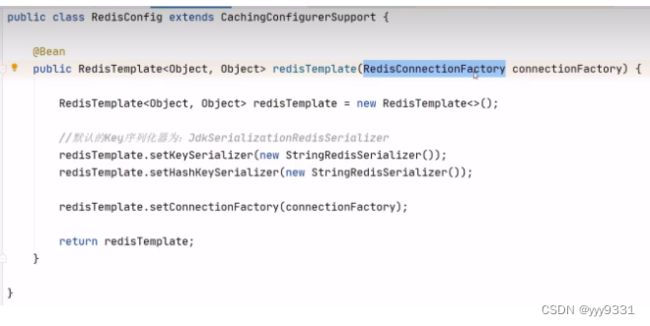
操作哈希hash

操作list

Spring Cache
| 注解 | 说明 |
|---|---|
| @EnableCaching | 开启缓存注解功能 |
| @Cacheable | 在方法执行前spring先查看缓存中是否有数据,如果有数据,则直接返回缓存数据;若无,调用方法将方法返回值放到缓存中 |
| @CachePut | 将方法返回值放到缓存中 |
| @CacheEvict | 将一条或多条数据从缓存中删除 |
在springboot中,在启动类加上@EnableCaching开启缓存支持
读写分离
MySQL主从复制:
是一个异步的复制过程,底层是基于MySQL数据库自带的二进制日志功能。就是一台或多台MySQL数据库从另一台MySQL数据库进行日志的复制然后再解析日志并应用到自身,最终实现从库的数据和主库的数据保存一致。MySQL主从复制时候MySQL自带功能。
步骤:
- master将改变纪录到二进制日志
- slave将master的binary log拷贝到它的中继日志
- slave重做中继日志中的事件,将改变应用到自己的数据库中
配置-主库Master
1.修改mysql数据库的配置文件/ect/my.cnf

2.重启mysql
systemctl start mysqld
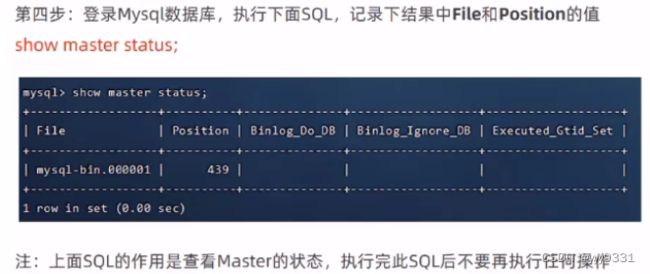
3.登录mysql,执行sql
GRANT REPLICATION SLAVE ON *.* to 'xiaoming'@'%' identified by 'Root123456';
注:上面SQL的作用是创建一个用户xiaoming,密码为Root@123456,并且给xiaoming用户授予REPLICATION SLAVE权限。常用于建立复制时所需要用到的用户权限,也就是slave必须被master授权具有该权限的用户,才能通过该用户复制。
配置从库

2.重启mysql
systemctl start mysqld
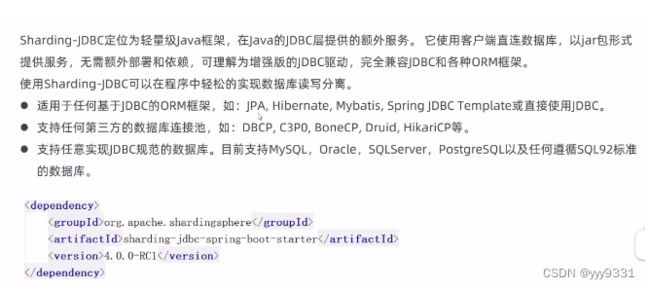
Sharding-JDBC
<dependency>
    <groupId>org.apache.shardingspheregroupId>
    <artifactId>sharding-jdbc-spring-boot-starterartifactId>
    <version>4.0.0-RC1version>
dependency>

