Zookeeper典型使用场景实战:分布式锁、注册中心
目录
- Zookeeper 非公平锁/公平锁/共享锁
- Leader 选举在分布式场景中的应用
- Spring Cloud Zookeeper注册中心实战
一、Zookeeper分布式锁实战
1、ZK分布式锁实现类型和优缺点
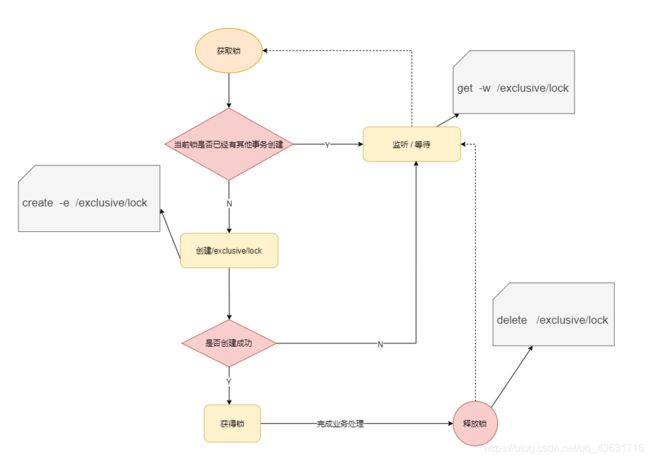
Zookeeper 分布式锁加锁原理:
使用ZK的监听机制可以实现分布式锁。
我们首先创建一个节点"/lock",然后准备进行我们的业务操作。
其他请求也尝试去创建节点"/locl"发现创建失败,节点已经存在了,然后去获取并监听这个节点"get -w /lock"。
此时第一个请求执行完自己的业务代码后需要释放这个锁,即删除"/lock"节点;
监听这个节点的请求此时就会收到事件通知说这个节点已经被删除了,即锁被释放了,此时可以去加锁了。
这样实现的是非公平锁,因为其他请求在接收到锁释放的消息时会同时去竞争锁。
如上实现方式在并发问题比较严重的情况下,性能会下降的比较厉害,主要原因是,所有的连接都在对同一个节点进行监听,当服务器检测到删除事件时,要通知所有的连接,所有的连接同时收到事件,再次并发竞争,这就是惊(羊)群效应。
这种加锁方式是非公平锁的具体实现:如何避免呢,我们看下面这种方式。
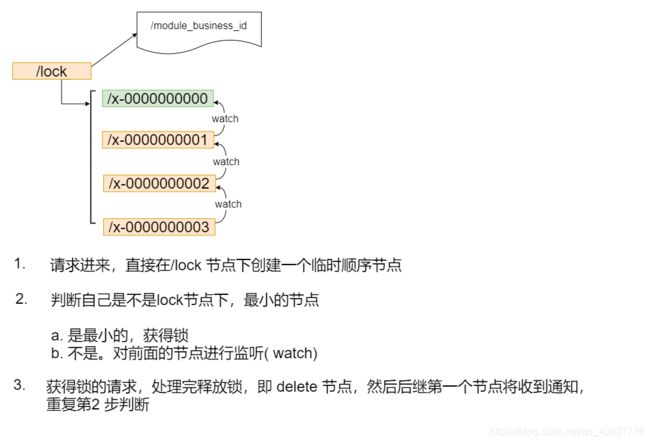
如上借助于临时顺序节点,可以避免同时多个节点的并发竞争锁,缓解了服务端压力。这种实现方式所有加锁请求都进行排队加锁,是公平锁的具体实现。
注意,对于服务端保存成功,但是通知客户端失败的时候,由于重试机制产生的幽灵节点,可以使用curator的保护模式创建。会在创建节点的时候加一个UUID前缀,并将其维护在内存中。当重试的时候首先会在服务端判断该UUID节点是否存在,只有不存在的时候才会重新创建。
前面这两种加锁方式有一个共同的特质,就是都是互斥锁,同一时间只能有一个请求占用,如果是大量的并发上来,性能是会急剧下降的,所有的请求都得加锁,那是不是真的所有的请求都需要加锁呢?
答案是否定的,比如如果数据没有进行任何修改的话,是不需要加锁的,但是如果读数据的请求还没读完,这个时候来了一个写请求,怎么办呢?有人已经在读数据了,这个时候是不能写数据的,不然数据就不正确了。直到前面读锁全部释放掉以后,写请求才能执行,所以需要给这个读请求加一个标识(读锁),让写请求知道,这个时候是不能修改数据的。不然数据就不一致了。如果已经有人在写数据了,再来一个请求写数据,也是不允许的,这样也会导致数据的不一致,所以所有的写请求,都需要加一个写锁,是为了避免同时对共享数据进行写操作。
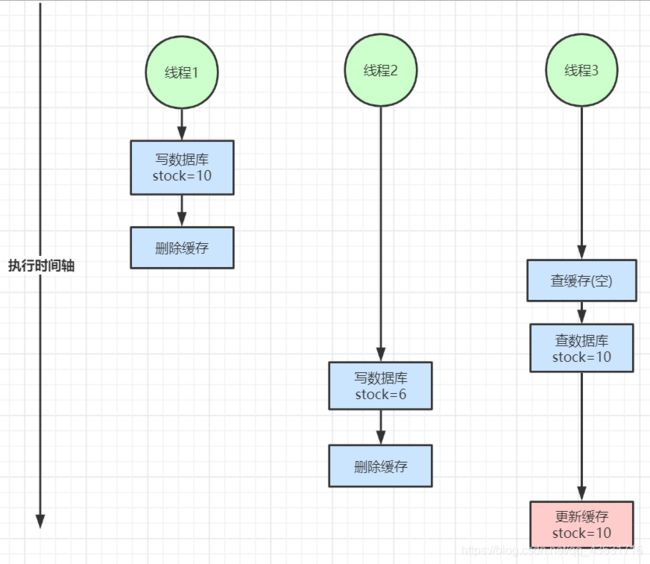
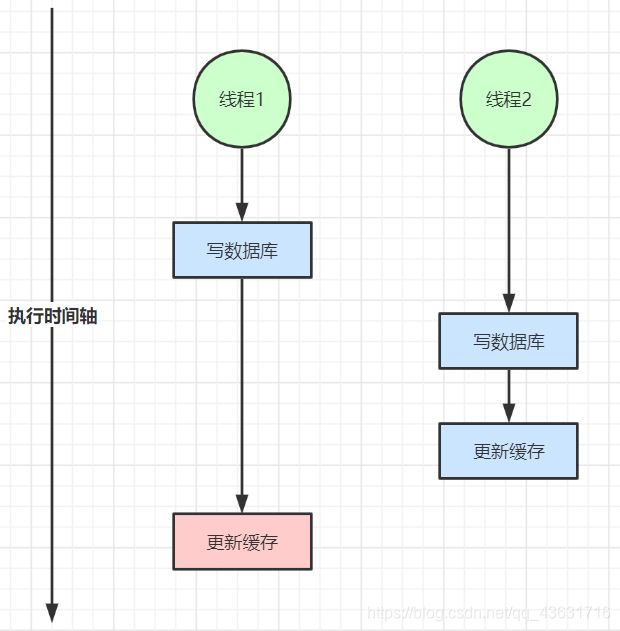
2、数据不一致问题
2、双写不一致情况
3、Zookeeper 共享锁实现原理
二、Curator分布式锁实现
1、阻塞等待型
@Autowired
CuratorFramework curatorFramework;

@GetMapping("/stock/deduct")
    public Object reduceStock(Integer id) throws Exception {

        // 创建一个互斥锁
        InterProcessMutex interProcessMutex = new InterProcessMutex(curatorFramework, "/product_" + id);

        try {
            // ...
            // 加锁后其他线程要一直等待
            interProcessMutex.acquire();
            // 锁有超时时间,到时间后自动释放
            // interProcessMutex.acquire(5, TimeUnit.SECONDS);
            orderService.reduceStock(id);

        } catch (Exception e) {
            if (e instanceof RuntimeException) {
                throw e;
            }
        }finally {
            interProcessMutex.release();
        }
        return "ok:" + port;
    }
上面实现的这种分布式锁,每一个请求获取到锁之后,其他请求都要阻塞等待,性能不是很好。
在实际的使用中,读请求并不需要加锁的。所以,有时候我们需要一把共享锁。
Curator分布式锁实现源码分析
我们来看这个acquire方法:
@Override
    public void acquire() throws Exception
    {
        if ( !internalLock(-1, null) )
        {
            throw new IOException("Lost connection while trying to acquire lock: " + basePath);
        }
    }
跟到internalLock方法中再看看:
private final ConcurrentMap<Thread, LockData> threadData = Maps.newConcurrentMap();

private boolean internalLock(long time, TimeUnit unit) throws Exception
    {
        /*
           Note on concurrency: a given lockData instance
           can be only acted on by a single thread so locking isn't necessary
        */

		// ==============  判断是否加锁成功 ==============
        Thread currentThread = Thread.currentThread();

        LockData lockData = threadData.get(currentThread);
        // 如果已加锁成功,增加重入次数
        if ( lockData != null )
        {
            // re-entering
            lockData.lockCount.incrementAndGet();
            return true;
        }

		// 加锁
        String lockPath = internals.attemptLock(time, unit, getLockNodeBytes());

        // 加锁成功后将其加入到map中返回true
        if ( lockPath != null )
        {
            LockData newLockData = new LockData(currentThread, lockPath);
            threadData.put(currentThread, newLockData);
            return true;
        }

        return false;
    }
我们再来重点看一下attemptLock这个方法的实现:
String attemptLock(long time, TimeUnit unit, byte[] lockNodeBytes) throws Exception
    {
        final long      startMillis = System.currentTimeMillis();
        final Long      millisToWait = (unit != null) ? unit.toMillis(time) : null;
        final byte[]    localLockNodeBytes = (revocable.get() != null) ? new byte[0] : lockNodeBytes;
        int             retryCount = 0;

        String          ourPath = null;
        boolean         hasTheLock = false;
        boolean         isDone = false;
        while ( !isDone )
        {
            isDone = true;

            try
            {
            	// 调用driver创建锁:创建一个容器节点,并添加临时顺序子节点
                ourPath = driver.createsTheLock(client, path, localLockNodeBytes);
                // 查询出临时顺序节点的最小子节点
                hasTheLock = internalLockLoop(startMillis, millisToWait, ourPath);
            }
            catch ( KeeperException.NoNodeException e )
            {
                // gets thrown by StandardLockInternalsDriver when it can't find the lock node
                // this can happen when the session expires, etc. So, if the retry allows, just try it all again
                if ( client.getZookeeperClient().getRetryPolicy().allowRetry(retryCount++, System.currentTimeMillis() - startMillis, RetryLoop.getDefaultRetrySleeper()) )
                {
                    isDone = false;
                }
                else
                {
                    throw e;
                }
            }
        }

        if ( hasTheLock )
        {
            return ourPath;
        }

        return null;
    }


	// 调用curator以保护模式去ZK上创建容器节点为父节点,临时顺序节点为子节点(顺序节点是为了实现公平性)
	// 使用容器节点的好处:当容器节点中的子节点都被删除后,容器节点会自动删除,这样我们就不用再去手动维护了
	@Override
    public String createsTheLock(CuratorFramework client, String path, byte[] lockNodeBytes) throws Exception
    {
        String ourPath;
        if ( lockNodeBytes != null )
        {
            ourPath = client.create().creatingParentContainersIfNeeded().withProtection().withMode(CreateMode.EPHEMERAL_SEQUENTIAL).forPath(path, lockNodeBytes);
        }
        else
        {
            ourPath = client.create().creatingParentContainersIfNeeded().withProtection().withMode(CreateMode.EPHEMERAL_SEQUENTIAL).forPath(path);
        }
        return ourPath;
    }


// 查询出临时循序节点中的最小节点
private boolean internalLockLoop(long startMillis, Long millisToWait, String ourPath) throws Exception
    {
        boolean     haveTheLock = false;
        boolean     doDelete = false;
        try
        {
            if ( revocable.get() != null )
            {
            	// 获取数据并添加监听(感知是否锁被释放),这个监听会唤醒synchronized中等待获取锁的线程
                client.getData().usingWatcher(revocableWatcher).forPath(ourPath);
            }

            while ( (client.getState() == CuratorFrameworkState.STARTED) && !haveTheLock )
            {
            	// 顺序获取子节点
                List<String>        children = getSortedChildren();
                // 截取子节点序号
                String              sequenceNodeName = ourPath.substring(basePath.length() + 1); // +1 to include the slash
				// 找出序号最小的子节点(具体实现思路是判断最小节点的索引号位置是不是小于1)
                PredicateResults    predicateResults = driver.getsTheLock(client, children, sequenceNodeName, maxLeases);
                // 已经找到最小节点并获取到了锁
                if ( predicateResults.getsTheLock() )
                {
                    haveTheLock = true;
                }
                // 如果没有获取到锁,会返回第二小的节点数据的路径,下面准备去监听这个路径
                else
                {
                	// 拼接全路径,准备添加监听
                    String  previousSequencePath = basePath + "/" + predicateResults.getPathToWatch();

                    synchronized(this)
                    {
                        try
                        {
                            // use getData() instead of exists() to avoid leaving unneeded watchers which is a type of resource leak
                            // 获取数据并添加监听
                            client.getData().usingWatcher(watcher).forPath(previousSequencePath);
							// 如果使用的是有超时时间的acquire(time, TimeUnit)方法
                            if ( millisToWait != null )
                            {
                            	// 判断已经执行的时间 - 要等待的时间的差值
                                millisToWait -= (System.currentTimeMillis() - startMillis);
                                startMillis = System.currentTimeMillis();
                                // 如果已经超时,则删除节点,释放锁!!!
                                // 注意,这里好像并没有类似于Redisson中的看门狗的功能!!!
                                if ( millisToWait <= 0 )
                                {
                                    doDelete = true;    // timed out - delete our node
                                    break;
                                }

                                wait(millisToWait);
                            }
                            else
                            // 如果没有添加超时时间,则一直等待
                            {
                                wait();
                            }
                        }
                        catch ( KeeperException.NoNodeException e )
                        {
                            // it has been deleted (i.e. lock released). Try to acquire again
                        }
                    }
                }
            }
        }
        catch ( Exception e )
        {
            ThreadUtils.checkInterrupted(e);
            doDelete = true;
            throw e;
        }
        finally
        {
            if ( doDelete )
            {
                deleteOurPath(ourPath);
            }
        }
        return haveTheLock;
    }


	@Override
    public PredicateResults getsTheLock(CuratorFramework client, List<String> children, String sequenceNodeName, int maxLeases) throws Exception
    {
    	// 获取到子节点中第一次出现sequenceNodeName的索引位置
        int             ourIndex = children.indexOf(sequenceNodeName);
        validateOurIndex(sequenceNodeName, ourIndex);

		// 如果这个索引位置小于1,则是0,即是否为第一个元素
        boolean         getsTheLock = ourIndex < maxLeases;
        // 如果是第一个元素,pathToWatch 设置为null,即不需要加锁了;否则,设置下一次自节点去加锁
        String          pathToWatch = getsTheLock ? null : children.get(ourIndex - maxLeases);

        return new PredicateResults(pathToWatch, getsTheLock);
    }

// ============== 获取数据并添加监听(感知是否锁被释放),这个监听会唤醒synchronized中等待获取锁的线程 =====
private final Watcher watcher = new Watcher()
    {
        @Override
        public void process(WatchedEvent event)
        {
            client.postSafeNotify(LockInternals.this);
        }
    };
default CompletableFuture<Void> postSafeNotify(Object monitorHolder)
    {
        return runSafe(() -> {
            synchronized(monitorHolder) {
                monitorHolder.notifyAll();
            }
        });
    }
注意,超时等待中的代码好像没有做续命处理呀,没有像Redissson中添加看门狗功能。那如果超时了锁被释放了,但是扣减后的库存还没写到redis和数据库中,其他的请求已经来了获取新的锁和读取到库存了,这样岂不是会存在超卖问题???
2、ZK共享锁实现
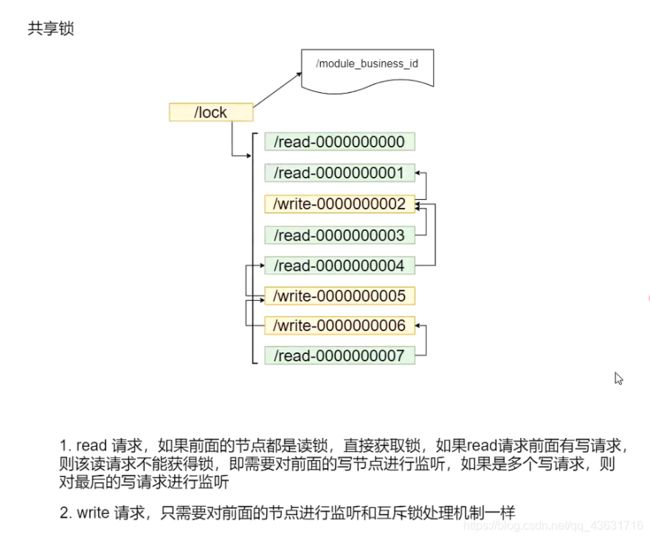
即,如果前面都是读请求, 直接获得锁。
如果读请求前面有写锁的话,不管有多少个写锁,只监听最后一个写锁。
如果最后一个写锁被释放后,当前请求就可以获取到锁。
InterProcessReadWriteLock readWriteLock = new InterProcessReadWriteLock(curatorFramework, "/product_" + id);
readWriteLock.readLock();
readWriteLock.writeLock();
Curator共享锁实现源码分析
我们来看构造方法:
/**
    * @param client the client
    * @param basePath path to use for locking
    */
    public InterProcessReadWriteLock(CuratorFramework client, String basePath)
    {
        this(client, basePath, null); // 调用InterProcessReadWriteLock方法
    }


/**
    * @param client the client
    * @param basePath path to use for locking
    * @param lockData the data to store in the lock nodes
    */
    public InterProcessReadWriteLock(CuratorFramework client, String basePath, byte[] lockData)
    {
        lockData = (lockData == null) ? null : Arrays.copyOf(lockData, lockData.length);

		// 写锁和我们上面分析的一样,注意有个参数maxLeases:是1
        writeMutex = new InternalInterProcessMutex
        (
            client,
            basePath,
            WRITE_LOCK_NAME,
            lockData,
            1,
            new SortingLockInternalsDriver()
            {
                @Override
                public PredicateResults getsTheLock(CuratorFramework client, List<String> children, String sequenceNodeName, int maxLeases) throws Exception
                {
                    return super.getsTheLock(client, children, sequenceNodeName, maxLeases);
                }
            }
        );

		// 读锁的参数maxLeases:是 Integer.MAX_VALUE
        readMutex = new InternalInterProcessMutex
        (
            client,
            basePath,
            READ_LOCK_NAME,
            lockData,
            Integer.MAX_VALUE,
            new SortingLockInternalsDriver()
            {
                @Override
                public PredicateResults getsTheLock(CuratorFramework client, List<String> children, String sequenceNodeName, int maxLeases) throws Exception
                {
                    return readLockPredicate(children, sequenceNodeName);
                }
            }
        );
    }
这里写锁和我们上面分析的一样,我们来看看读锁的readLockPredicate方法:
private PredicateResults readLockPredicate(List<String> children, String sequenceNodeName) throws Exception
    {
    	// 如果写锁已经获取到了锁,直接返回
        if ( writeMutex.isOwnedByCurrentThread() )
        {
            return new PredicateResults(null, true);
        }

        int         index = 0;
        int         firstWriteIndex = Integer.MAX_VALUE;
        int         ourIndex = -1;
        // 遍历所有的子节点
        for ( String node : children )
        {	// 如果子节点中存在write节点
            if ( node.contains(WRITE_LOCK_NAME) )
            {	// 记录写锁的位置,此时index是当前遍历node的索引位置(找到离自己最新的写锁位置)
                firstWriteIndex = Math.min(index, firstWriteIndex);
            } // 找到当前读锁节点的名称,并记录其索引位置
            else if ( node.startsWith(sequenceNodeName) )
            {
                ourIndex = index;
                break;
            }

            ++index;
        }

        StandardLockInternalsDriver.validateOurIndex(sequenceNodeName, ourIndex);

		// 判断当前读锁索引位置是否小于第一个写锁的索引位置,从而决定是否获取到了锁
        boolean     getsTheLock = (ourIndex < firstWriteIndex);
        // 如果小于,说明写锁在该读锁的后面,不用加锁,因为此时是读请求
        // 如果不小于,得到第一个写锁的路径,然后添加监听。因为要等待这次写锁释放之后,再进行读取
        String      pathToWatch = getsTheLock ? null : children.get(firstWriteIndex);
        return new PredicateResults(pathToWatch, getsTheLock);
    }
我们再看一下加读写锁的代码:
private final InterProcessMutex readMutex;
private final InterProcessMutex writeMutex;

/**
 * Returns the lock used for reading.
 *
 * @return read lock
 */
public InterProcessMutex     readLock()
{
    return readMutex;
}

/**
 * Returns the lock used for writing.
 *
 * @return write lock
 */
public InterProcessMutex     writeLock()
{
    return writeMutex;
}
我们再来看看获取锁的逻辑:
readWriteLock.readLock().acquire();
readWriteLock.writeLock().acquire();


@Override
public void acquire() throws Exception
{
    if ( !internalLock(-1, null) )
    {
        throw new IOException("Lost connection while trying to acquire lock: " + basePath);
    }
}
三、Leader选举
选举测试代码:
public class LeaderSelectorDemo {


    private static final String CONNECT_STR = "192.168.131.171:2181";

    private static RetryPolicy retryPolicy = new ExponentialBackoffRetry(5 * 1000, 10);

    private static CuratorFramework curatorFramework;


    private static CountDownLatch countDownLatch = new CountDownLatch(1);


    public static void main(String[] args) throws InterruptedException {


        String appName = System.getProperty("appName");

        CuratorFramework curatorFramework = CuratorFrameworkFactory.newClient(CONNECT_STR, retryPolicy);
        LeaderSelectorDemo.curatorFramework = curatorFramework;
        curatorFramework.start();

        LeaderSelectorListener listener = new LeaderSelectorListenerAdapter() {
            @Override
            public void takeLeadership(CuratorFramework client) throws Exception {

                System.out.println(" I' m leader now . i'm , " + appName);

                TimeUnit.SECONDS.sleep(15);

            }
        };

        LeaderSelector selector = new LeaderSelector(curatorFramework, "/cachePreHeat_leader", listener);
        selector.autoRequeue();  // not required, but this is behavior that you will probably expect
        selector.start();
        countDownLatch.await();

    }
}
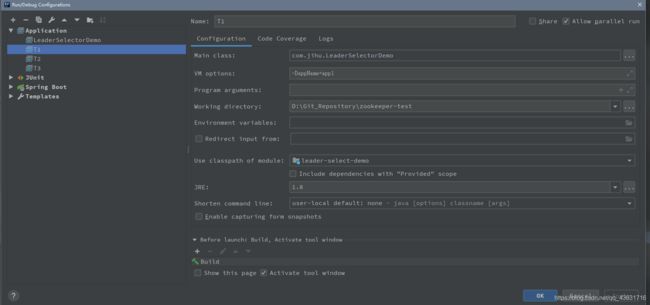
我们分别启动三个进程,并设置appName:
配置启动三个服务:
启动以后查看ZK:
![]()
可以看到三个服务都在列表中。此时我们关闭T3:
![]()
T3已经不再列表中了,也会选举出新的leader.
leader选举源码分析
public LeaderSelector(CuratorFramework client, String leaderPath, CloseableExecutorService executorService, LeaderSelectorListener listener)
    {
        Preconditions.checkNotNull(client, "client cannot be null");
        PathUtils.validatePath(leaderPath);
        Preconditions.checkNotNull(listener, "listener cannot be null");

        this.client = client;
        this.listener = new WrappedListener(this, listener);
        hasLeadership = false;

        this.executorService = executorService;
        // 互斥锁
        mutex = new InterProcessMutex(client, leaderPath)
        {
            @Override
            protected byte[] getLockNodeBytes()
            {
                return (id.length() > 0) ? getIdBytes(id) : null;
            }
        };
    }

    static byte[] getIdBytes(String id)
    {
        try
        {
            return id.getBytes("UTF-8");
        }
        catch ( UnsupportedEncodingException e )
        {
            throw new Error(e); // this should never happen
        }
    }
四、Redis和ZK分布式锁对比
Redis中不管是使用主从、哨兵还是cluster集群,从节点都需要从主节点上去定时的拉取数据。即表明主从节点上的数据有可能不同步,如果我们使用Redis实现分布式锁,就很有可能带来一个问题:setnx设置的值刚保存到主节点上,还没来得及同步到从节点上,主节点却挂了。这时候如果选举出新的主节点,这个锁就会丢失。从而导致其他请求竞争到锁资源,导致分布式锁失效。
与Redis不同的是,ZK使用的并不是主从模式,而是leader和follower模式。ZK中判断一个数据是否保存成功,并不是单单的判断该数据是否已经写到了leader节点上,而是需要遵从过半原则,只有超过半数的机器上都保存了这个数据,才会认为数据是保存成功的。这样,即使leader节点挂掉了,其他的follower节点中仍然保存有新的值。未拥有最新数据的follower节点此时会从新选举出的leader节点中同步数据。
所以说,ZK的可靠性要强于Redis,但是Redis效率要高于ZK,因为Redis只写一台机器。
五、注册中心实战
1、注册中心场景分析:
1、在分布式服务体系结构比较简单的场景下,我们的服务可能是这样的

现在 Order-Service 需要调用外部服务的 User-Service ,对于外部的服务依赖,我们直接配置在我们的服务配置文件中,在服务调用关系比较简单的场景,是完全OK的。
随着服务的扩张,User-Service 可能需要进行集群部署,如下:
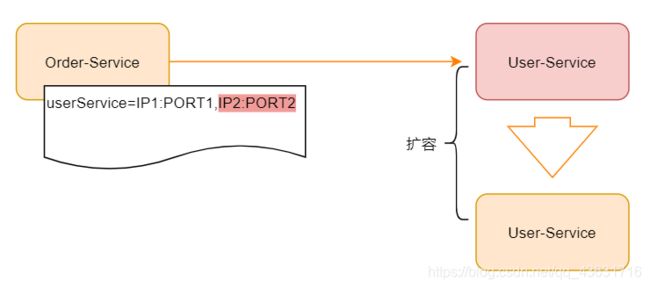
如果系统的调用不是很复杂,可以通过配置管理,然后实现一个简单的客户端负载均衡也是OK的,但是随着业务的发展,服务模块进行更加细粒度的划分,业务也变得更加复杂,再使用简单的配置文件管理,将变得难以维护。
当然我们可以再前面加一个服务代理,比如nginx做反向代理, 如下:
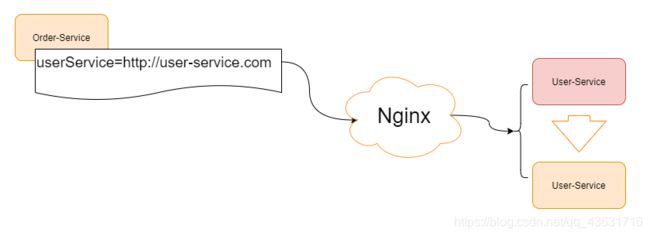
如果我们是如下场景呢?
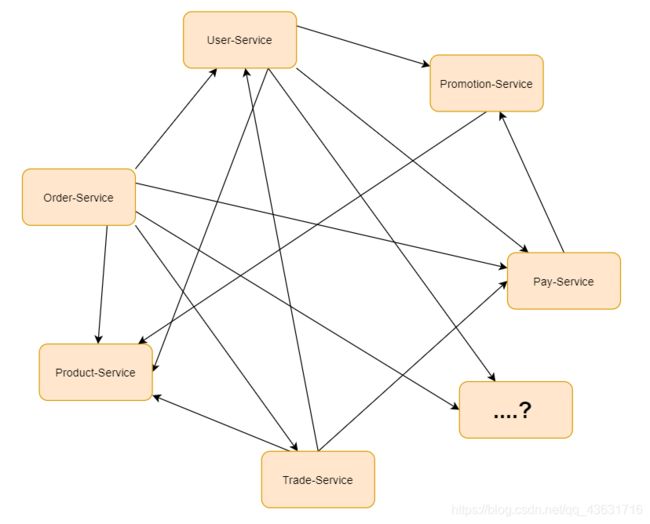
服务不再是A-B,B-C 那么简单,而是错综复杂的微小服务的调用。
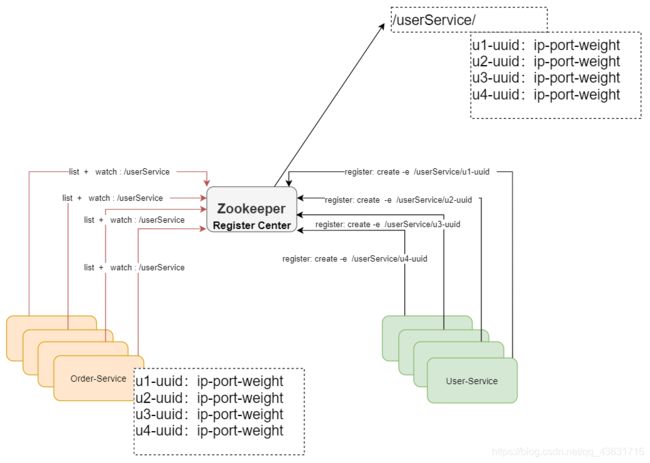
这个时候我们可以借助于Zookeeper的基本特性来实现一个注册中心,什么是注册中心,顾名思义,就是让众多的服务,都在Zookeeper中进行注册。
什么是注册,注册就是把自己的一些服务信息,比如IP,端口,还有一些更加具体的服务信息,都写到 Zookeeper节点上, 这样有需要的服务就可以直接从zookeeper上面去拿。
怎么拿呢? 这时我们可以定义统一的名称,比如,User-Service, 那所有的用户服务在启动的时候,都在User-Service 这个节点下面创建一个子节点(临时节点),这个子节点保持唯一就好,代表了每个服务实例的唯一标识。
有依赖用户服务的比如Order-Service 就可以通过User-Service 这个父节点,就能获取所有的User-Service 子节点,并且获取所有的子节点信息(IP,端口等信息)。
拿到子节点的数据后Order-Service可以对其进行缓存,然后实现一个客户端的负载均衡,同时还可以对这个User-Service 目录进行监听, 这样有新的节点加入,或者退出,Order-Service都能收到通知。这样Order-Service重新获取所有子节点,且进行数据更新。这个用户服务的子节点的类型为临时节点。
Zookeeper中临时节点生命周期是和SESSION绑定的,如果SESSION超时了,对应的节点会被删除,被删除时,Zookeeper 会通知对该节点父节点进行监听的客户端, 这样对应的客户端又可以刷新本地缓存了。当有新服务加入时,同样也会通知对应的客户端,刷新本地缓存,要达到这个目标需要客户端重复的注册对父节点的监听。这样就实现了服务的自动注册和自动退出。
Spring Cloud 生态也提供了Zookeeper注册中心的实现,这个项目叫 Spring Cloud Zookeeper 下面我们来进行实战。
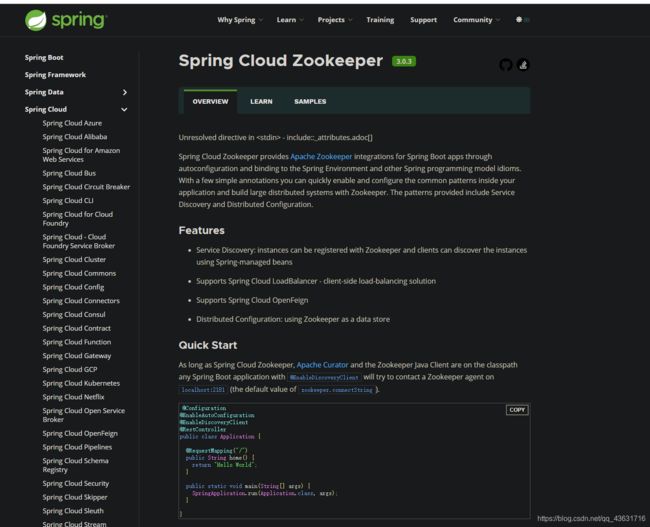
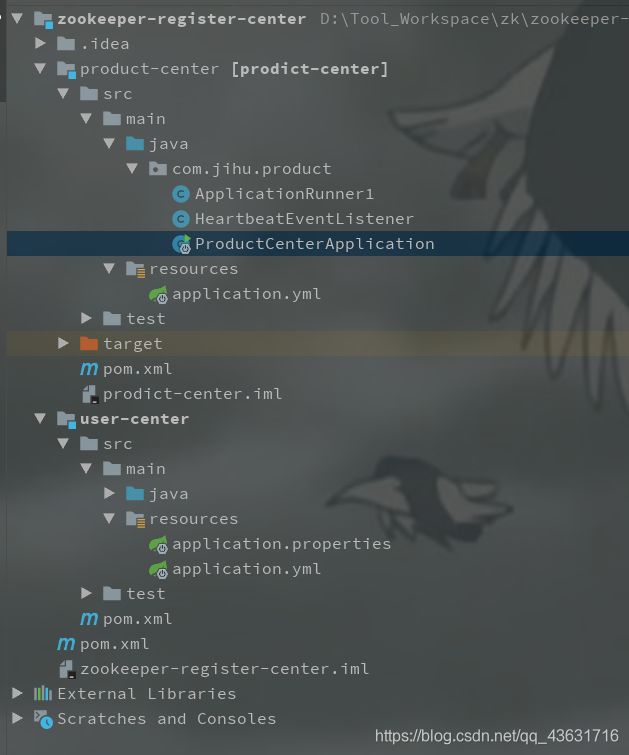
项目说明:
为了简化需求,我们以两个服务来进行讲解,实际使用时可以举一反三
user-center : 用户服务
product-center: 产品服务
项目构建
product-center
<?xml version="1.0" encoding="UTF-8"?>
<project xmlns="http://maven.apache.org/POM/4.0.0"
         xmlns:xsi="http://www.w3.org/2001/XMLSchema-instance"
         xsi:schemaLocation="http://maven.apache.org/POM/4.0.0 http://maven.apache.org/xsd/maven-4.0.0.xsd">
    <parent>
        <groupId>org.springframework.boot</groupId>
        <artifactId>spring-boot-starter-parent</artifactId>
        <version>2.3.5.RELEASE</version>
        <relativePath/> <!-- lookup parent from repository -->
    </parent>
    <modelVersion>4.0.0</modelVersion>

    <groupId>com.jihu</groupId>
    <artifactId>prodict-center</artifactId>
    <version>1.0-SNAPSHOT</version>

    <properties>
        <java.version>1.8</java.version>
        <spring-cloud.version>Hoxton.SR8</spring-cloud.version>
    </properties>

    <dependencies>
        <dependency>
            <groupId>org.springframework.boot</groupId>
            <artifactId>spring-boot-starter-web</artifactId>
        </dependency>
        <dependency>
            <groupId>org.springframework.cloud</groupId>
            <artifactId>spring-cloud-starter-zookeeper-discovery</artifactId>
            <version>2.2.5.RELEASE</version>
        </dependency>

        <dependency>
            <groupId>org.projectlombok</groupId>
            <artifactId>lombok</artifactId>
            <optional>true</optional>
        </dependency>
        <dependency>
            <groupId>org.springframework.boot</groupId>
            <artifactId>spring-boot-starter-test</artifactId>
            <scope>test</scope>
            <exclusions>
                <exclusion>
                    <groupId>org.junit.vintage</groupId>
                    <artifactId>junit-vintage-engine</artifactId>
                </exclusion>
            </exclusions>
        </dependency>
    </dependencies>

    <dependencyManagement>
        <dependencies>
            <dependency>
                <groupId>org.springframework.cloud</groupId>
                <artifactId>spring-cloud-dependencies</artifactId>
                <version>${spring-cloud.version}</version>
                <type>pom</type>
                <scope>import</scope>
            </dependency>
        </dependencies>
    </dependencyManagement>

    <build>
        <plugins>
            <plugin>
                <groupId>org.springframework.boot</groupId>
                <artifactId>spring-boot-maven-plugin</artifactId>
            </plugin>
        </plugins>
    </build>
</project>
server:
  port: 8080

spring:
  application:
    name: product-center
  cloud:
    zookeeper:
      connect-string: 192.168.131.171:2181
      discovery:
        register: true
      session-timeout: 30000
再来看启动类:
@SpringBootApplication
@RestController
public class ProductCenterApplication {

	@Value("${server.port}")
	private String port;

	@Value( "${spring.application.name}" )
	private String name;

	/**
	 * 打印当前服务的名称和短裤信息
	 * @return s
	 */
	@GetMapping("/getInfo")
	public String getServerPortAndName(){

		return  this.name +" : "+ this.port;
	}
	public static void main(String[] args) {
		SpringApplication.run(ProductCenterApplication.class, args);
	}

}
此时我们启动上面的项目后,修改端口为8090后再启动一个服务。然后查看ZK服务客户端,发现其多了一个services节点,并且创建了两个子节点来保存两个product服务的信息。

我们查看某一个节点看看其内容是什么:

可以看到,里面是8090这个product服务的注册信息包括IP、端口等等。
此时说明两个product服务都已经成功注册到ZK上了。那我们现在停掉一台服务看看会有什么变化:
停掉8090这个服务:

可以看到,停掉8090服务一段时间后,ZK中也删除了相应的子节点数据。
user-center
pom依赖:
<?xml version="1.0" encoding="UTF-8"?>
<project xmlns="http://maven.apache.org/POM/4.0.0"
         xmlns:xsi="http://www.w3.org/2001/XMLSchema-instance"
         xsi:schemaLocation="http://maven.apache.org/POM/4.0.0 http://maven.apache.org/xsd/maven-4.0.0.xsd">
    <parent>
        <groupId>org.springframework.boot</groupId>
        <artifactId>spring-boot-starter-parent</artifactId>
        <version>2.3.5.RELEASE</version>
        <relativePath/> <!-- lookup parent from repository -->
    </parent>
    <modelVersion>4.0.0</modelVersion>

    <groupId>com.jihu</groupId>
    <artifactId>user-center</artifactId>
    <version>1.0-SNAPSHOT</version>

    <properties>
        <java.version>1.8</java.version>
        <spring-cloud.version>Hoxton.SR8</spring-cloud.version>
    </properties>

    <dependencies>
        <dependency>
            <groupId>org.springframework.boot</groupId>
            <artifactId>spring-boot-starter-web</artifactId>
        </dependency>
        <dependency>
            <groupId>org.springframework.cloud</groupId>
            <artifactId>spring-cloud-starter-zookeeper-discovery</artifactId>
            <version>2.2.5.RELEASE</version>
        </dependency>
        <!--<dependency>-->
        <!--<groupId>org.springframework.cloud</groupId>-->
        <!--<artifactId>spring-cloud-starter-openfeign</artifactId>-->
        <!--</dependency>-->


        <dependency>
            <groupId>org.projectlombok</groupId>
            <artifactId>lombok</artifactId>
            <optional>true</optional>
        </dependency>
        <dependency>
            <groupId>org.springframework.boot</groupId>
            <artifactId>spring-boot-starter-test</artifactId>
            <scope>test</scope>
            <exclusions>
                <exclusion>
                    <groupId>org.junit.vintage</groupId>
                    <artifactId>junit-vintage-engine</artifactId>
                </exclusion>
            </exclusions>
        </dependency>
    </dependencies>

    <dependencyManagement>
        <dependencies>
            <dependency>
                <groupId>org.springframework.cloud</groupId>
                <artifactId>spring-cloud-dependencies</artifactId>
                <version>${spring-cloud.version}</version>
                <type>pom</type>
                <scope>import</scope>
            </dependency>
        </dependencies>
    </dependencyManagement>

    <build>
        <plugins>
            <plugin>
                <groupId>org.springframework.boot</groupId>
                <artifactId>spring-boot-maven-plugin</artifactId>
            </plugin>
        </plugins>
    </build>

</project>
配置文件:
server:
  port: 8081

spring:
  application:
    name: user-center
  cloud:
    zookeeper:
      connect-string: 192.168.131.171:2181
启动类:
import org.springframework.boot.SpringApplication;
import org.springframework.boot.autoconfigure.SpringBootApplication;
import org.springframework.cloud.client.loadbalancer.LoadBalanced;
import org.springframework.context.annotation.Bean;
import org.springframework.web.client.RestTemplate;

@SpringBootApplication
public class UserCenterApplication {

    public static void main(String[] args) {
        SpringApplication.run(UserCenterApplication.class, args);
    }


    @Bean
    @LoadBalanced  // 远程调用实现负载均衡
    public RestTemplate restTemplate() {
        RestTemplate restTemplate = new RestTemplate();
         return restTemplate;
    }
}
看一下测试的controller:
@RestController
public class TestController {

    @Autowired
    private RestTemplate restTemplate;

    @Autowired
    private LoadBalancerClient loadBalancerClient;

	 /**
     * 调用product服务,这里restTemplate中使用的是服务的注册地址product-center,并不是具体的IP
     *
     * 我们在restTemplate中设置了负载均衡,调用product-center的时候会有负载均衡
     *
     * @return s
     */
    @GetMapping("/test")
    public String test() {
        return this.restTemplate.getForObject("http://product-center/getInfo", String.class);
    }

    @GetMapping("/lb")
    public String getLb(){
        ServiceInstance choose = loadBalancerClient.choose("product-center");
        String serviceId = choose.getServiceId();
        int port = choose.getPort();
        return serviceId + " : "+port;
    }
}
接下来,我们启动两个product服务,然后来测试调用:

user服务运行于8081端口,所以我们使用“http://localhost:8081/test”测试接口:

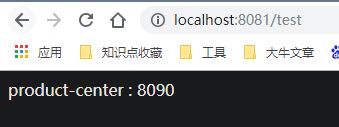
发现负载均衡的默认算法是轮训。此时也已经可以成功的调用了。
即当我们调用product服务的时候,user服务首先根据reseTemplate中的服务名称“product-center”去ZK上查询服务信息:

然后将读取到的这两个子节点的值获取出来:

将读取出来的服务注册信息保存在内存中,并采用轮训算法去实现负载均衡调用。
如果此时某一个product服务宕机了,那么ZK上也会对应的删除整个节点的注册信息,并将这个事件通知给user项目,然后user项目重新去ZK上拉取product服务的注册信息。
当宕机的服务重启后,和上面的步骤相同。
这样,我们就使用ZK实现了服务的注册中心机制。
