Nacos使用(二):Spring Boot集成Nacos配置中心动态配置
![]()
Nacos使用(一):什么是Nacos
Nacos使用(三):Spring Cloud集成Nacos配置中心动态配置
使用Nacos之前需要先安装,网上有很多教程,这里略过。
Nacos提供了类似于SpringCloud Config的配置中心功能,可以实现动态配置
动态配置服务可以让您以中心化、外部化和动态化的方式管理所有环境的应用配置和服务配置。
动态配置消除了配置变更时重新部署应用和服务的需要,让配置管理变得更加高效和敏捷。
配置中心化管理让实现无状态服务变得更简单,让服务按需弹性扩展变得更容易。
Nacos官方也提供了样例程序,但是代码版本比较老,很多新版本特性都没有用到,本教程使用较新的版本,差别还是比较大的。
首先在Nacos管理页面新增配置
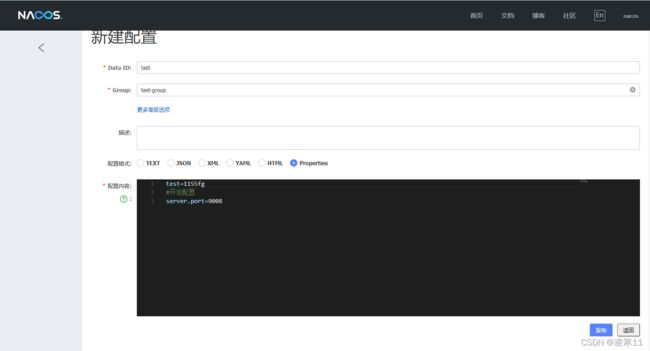
test=1155fg
#开发配置
server.port=9008
pom.xml
	4.0.0


		org.springframework.boot
		spring-boot-starter-parent
		2.3.12.RELEASE


	com.test
	test
	0.0.1-SNAPSHOT
	jar

	test
	http://maven.apache.org


		UTF-8


		    com.alibaba.boot
		    nacos-config-spring-boot-starter
		    0.2.8


			org.springframework.boot
			spring-boot-starter-web


			junit
			junit
			test
新版本Nacos支持使用注解+配置文件和纯配置文件两种使用方式,推荐使用纯配置文件方式
方式一:注解+配置文件
配置文件application.properties
nacos.config.server-addr=127.0.0.1:8848
#命名空间id
nacos.config.namespace=e23e7505-efa0-47be-bc5b-6ce8f3e973bf
项目启动入口App.java
import org.springframework.boot.SpringApplication;
import org.springframework.boot.autoconfigure.SpringBootApplication;
import org.springframework.context.annotation.ComponentScan;

import com.alibaba.nacos.spring.context.annotation.config.EnableNacosConfig;
import com.alibaba.nacos.spring.context.annotation.config.NacosPropertySource;

@SpringBootApplication//入口,排除jpa的内容
@NacosPropertySource(groupId = "test-group", dataId = "test", autoRefreshed = true)//开启nacos在线配置,并开启自动更新,新版本在配置文件配置后可以不加此注解
public class App {
    public static void main( String[] args ) {
    	SpringApplication.run(App.class, args);
    }
}
测试接口类TestController.java
import javax.servlet.http.HttpServletRequest;
import javax.servlet.http.HttpServletResponse;

import org.springframework.web.bind.annotation.RequestMapping;
import org.springframework.web.bind.annotation.RequestMethod;
import org.springframework.web.bind.annotation.RestController;

import com.alibaba.nacos.api.config.annotation.NacosValue;

@RestController
@RequestMapping("/test")
public class TestController {
	@NacosValue(value = "${test:5522}", autoRefreshed = true)
	private String test;

	@RequestMapping(value = "/get", method = { RequestMethod.GET })
	public String fileUrl(HttpServletRequest request, HttpServletResponse response) {
		return test;
	}

}
启动服务,看到控制台输出的端口号为Nacos服务上配置的端口,说明成功了

访问http://127.0.0.1:9008/test/get,输出结果为服务器上配置的值1155fg
方式二:纯配置文件
现在网上的很多教程用的配置还是比较老版本的,不够全面,新版本新增了很多属性
配置文件application.properties
nacos.config.server-addr=127.0.0.1:8848
#允许nacos上的配置优先于本地配置
nacos.config.remote-first=true
#开启配置预加载功能
nacos.config.bootstrap.enable=true
nacos.config.group=test-group
# 主配置 data-id
nacos.config.data-id=test
# 主配置 配置文件类型
nacos.config.type=properties
# 主配置 最大重试次数
nacos.config.max-retry=10
# 主配置 开启自动刷新
nacos.config.auto-refresh=true
#命名空间id
nacos.config.namespace=e23e7505-efa0-47be-bc5b-6ce8f3e973bf
项目启动入口App.java(只是去掉@NacosPropertySource注解)
import org.springframework.boot.SpringApplication;
import org.springframework.boot.autoconfigure.SpringBootApplication;
import org.springframework.context.annotation.ComponentScan;

import com.alibaba.nacos.spring.context.annotation.config.EnableNacosConfig;
import com.alibaba.nacos.spring.context.annotation.config.NacosPropertySource;

@SpringBootApplication//入口,排除jpa的内容
//@NacosPropertySource(groupId = "test-group", dataId = "test", autoRefreshed = true)//开启nacos在线配置,并开启自动更新,新版本在配置文件配置后可以不加此注解
public class App {
    public static void main( String[] args ) {
    	SpringApplication.run(App.class, args);
    }
}
测试接口类TestController.java与第一种方法一样
运行结果也与第一种方法一样