Bazel简介:编译一个C++工程
原文参见这里
文章目录
- 你将会学到什么
- 在开始之前
- 使用bazel编译
-
- 设置好workspace
- 搞清楚 BUILD 文件
- 怎么编译工程
- 查看依赖关系图
- 重构Bazel编译
-
- 指定多个target
- 使用多个包
- 使用标签来引用target
在这份指南中你将会学习怎么使用bazel来编译一个C++工程。你将可以从一个简单的C++工程编译中学习到bazel的一些核心概念,例如
targets和 BUILD文件。读完这个指南后,你还可以再看下 C++编译用例了解下更高级的特性。
你将会学到什么
在这份指南中你将会学到怎么:
- 编译一个
target - 查看工程的依赖
- 把一个工程分成多个
target和package - 控制target在
package之间的可见性 - 通过标签(
label)来引用target
在开始之前
开始之前你先得把bazel给装上了,然后从bazel的Github仓库中检出下示例工程:
git clone https://github.com/bazelbuild/examples/
示例工程在examples/cpp-tutorial目录下,结构长这样:
examples
└── cpp-tutorial
    ├──stage1
    │  ├── main
    │  │   ├── BUILD
    │  │   └── hello-world.cc
    │  └── WORKSPACE
    ├──stage2
    │  ├── main
    │  │   ├── BUILD
    │  │   ├── hello-world.cc
    │  │   ├── hello-greet.cc
    │  │   └── hello-greet.h
    │  └── WORKSPACE
    └──stage3
       ├── main
       │   ├── BUILD
       │   ├── hello-world.cc
       │   ├── hello-greet.cc
       │   └── hello-greet.h
       ├── lib
       │   ├── BUILD
       │   ├── hello-time.cc
       │   └── hello-time.h
       └── WORKSPACE
就像你看到的,这里有3个集合的文件,每一个代表了一个阶段。在第一个阶段,你将学会在单一包(package)中的单一target的编译,在第二阶段,你将把工程分割成多个target,但是在同一个包里。最后一个阶段,将会把工程分割成多个包(main和lib)和多个target,然后编译。
使用bazel编译
设置好workspace
在开始编译之前,你需要先设置好workspace,workspace是包含了工程源码和bazel编译输出文件的一个目录,同时它还包含了一些特殊的文件:
WORKSPACE文件:用于标示这个目录以及里面的内容是bazel workspace,它位于workspace的根目录。- 一个或多个
BUILD文件:用于告诉bazel怎么编译工程的各个部分(在workspace中包含BUILD文件的目录被称为一个包[package],后面会介绍)。
为了把一个目录变成bazel的workspace你只需要在这个目录下创建一个WORKSPACE空文件。
当bazel编译一个工程时,所有的输入和依赖必须都在同一个workspace里。在不同的workspace中文件是彼此隔离的,这个超出了这个指南的范畴。
搞清楚 BUILD 文件
BUILD文件中包含了多个不同类型的bazel指令。其中最重要的是编译规则(build rule),它告诉bazel怎么编译目标输出,是一个执行文件还是一个库。BUILD文件中每一个编译规则被称为target,指向了一堆源文件和相关的依赖,一个target也可以指向其他target。
咱瞅瞅cpp-tutorial/stage1/main目录下的BUILD文件:
cc_binary(
    name = "hello-world",
    srcs = ["hello-world.cc"],
)
在上面的例子中,hello-worldtarget使用了bazel内置的cc_binary rule,它告诉bazel怎么从没有依赖的hhello-world.cc源文件编译出可执行文件。
target中的属性包含编译的依赖和选项,例如:name是必须的,就是名字,而其他有好多可选项,srcs指定了编译的源文件。
怎么编译工程
现在我们就使用bazel来编译下示例工程,cd到cpp-tutorial/stage1,执行下面的命令:
bazel build //main:hello-world
可以看到,这里的//main是BUILD文件相对于workspace根目录的相对路径,hello-world是BUILD文件中定义的target的名字(target的标签后面会介绍)。然后bazel会有下面的输出:
INFO: Analyzed target //main:hello-world (13 packages loaded, 66 targets configured).
INFO: Found 1 target...
Target //main:hello-world up-to-date:
  bazel-bin/main/hello-world
INFO: Elapsed time: 0.621s, Critical Path: 0.28s
INFO: 2 processes: 2 linux-sandbox.
INFO: Build completed successfully, 6 total actions
恭喜,你已经编译出了你的第一个bazel target,bazel把编译的输出文件放到了workspace根目录的bazel-bin目录下,去瞅瞅里面的目录结构吧。
现在就可以用下面的命令测试下编译好的文件了:
./bazel-bin/main/hello-world
查看依赖关系图
为了能够成功编译BUILD文件中必须包含所有的编译依赖,bazel使用这些来生成编译依赖关系图,而后用于增量编译。
让我们来看看示例工程的依赖吧,首先使用下面的命令来生成一个依赖图的文本(请在workspace根目录下运行):
bazel query 'deps(//main:hello-world)' --noimplicit_deps --output=graph
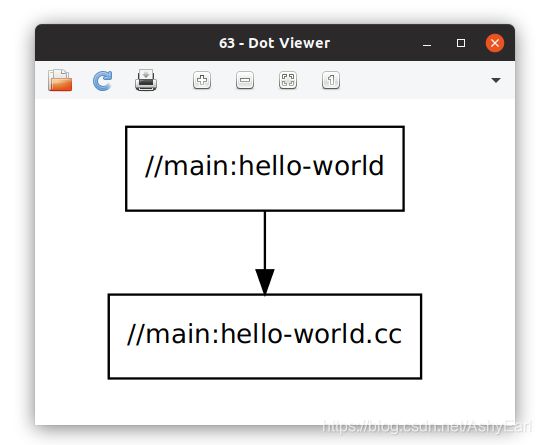
上面的命令用于查找//main:hello-worldtarget的所有依赖,然后将输出格式化为图,在我电脑上输出是下面的样子:
digraph mygraph {
  node [shape=box];
  "//main:hello-world"
  "//main:hello-world" -> "//main:hello-world.cc"
  "//main:hello-world.cc"
}
然后就可以把生成的文本复制到网页端的小工具GraphViz上查看这个依赖图。Ubuntu上你也可以在本地安装个GraphViz和xdot Dot Viewer在本地查看:
sudo apt update && sudo apt install graphviz xdot
装好后就可以把上面的的依赖图文本直接通过管道输出显示到xdot上:
xdot <(bazel query 'deps(//main:hello-world)' --noimplicit_deps --output=graph)
然后你就可以看到下面这张依赖图:从单一源文件编译的单一target

重构Bazel编译
单一target对于小项目是比较高效的,对于大项目来说,能够拆分成多个target和包来使用增量编译的特性就太棒了,这样可以通过把项目的多个部分同时编译来加快速度。
指定多个target
让我们把上面第一个阶段的示例工程分成多个target,看下cpp-tutorial/stage2/main目录的BUILD文件:
cc_library(
    name = "hello-greet",
    srcs = ["hello-greet.cc"],
    hdrs = ["hello-greet.h"],
)

cc_binary(
    name = "hello-world",
    srcs = ["hello-world.cc"],
    deps = [
        ":hello-greet",
    ],
)
在这个BUILD文件中bazel先编译hello-greet库(使用内置的cc_library rule)然后编译hello-world可执行文件,hello-world中的deps告诉bazel:hello-greet是编译hello-world可执行文件时的必须库。
让我们用下面的命令编译下这个新的工程(先cd到cpp-tutorial/stage2目录):
bazel build //main:hello-world
bazel会有类似下面的输出:
INFO: Analyzed target //main:hello-world (13 packages loaded, 69 targets configured).
INFO: Found 1 target...
Target //main:hello-world up-to-date:
  bazel-bin/main/hello-world
INFO: Elapsed time: 0.860s, Critical Path: 0.41s
INFO: 3 processes: 3 linux-sandbox.
INFO: Build completed successfully, 7 total actions
我们来试试编译出的文件:
./bazel-bin/main/hello-world
你可以修改下hello-greet.cc,bazel会自动重新编译那个文件。
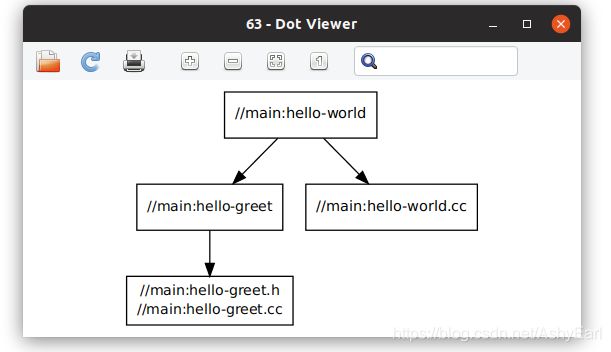
来瞅瞅依赖图,可以看到hello-world输入是相同的,但是依赖图变得不一样了:

现在你已经用两个target来编译这个工程 了:hello-worldtarget从一个源文件和另一个target(//main:hello-greet)编译,而它是从两个源文件编译的。
使用多个包
现在让我们把工程分成多个包,瞅瞅cpp-tutorial/stage3目录结构:
└──stage3
   ├── main
   │   ├── BUILD
   │   ├── hello-world.cc
   │   ├── hello-greet.cc
   │   └── hello-greet.h
   ├── lib
   │   ├── BUILD
   │   ├── hello-time.cc
   │   └── hello-time.h
   └── WORKSPACE
注意这里有两个子目录,每个里面都包含一个单独的BUILD文件,因此在这个workspace中,对于bazel它包含两个包:main和lib(对于两个目录的名称)。
看下lib/BUILD文件:
cc_library(
    name = "hello-time",
    srcs = ["hello-time.cc"],
    hdrs = ["hello-time.h"],
    visibility = ["//main:__pkg__"],
)
和main/BUILD文件
cc_library(
    name = "hello-greet",
    srcs = ["hello-greet.cc"],
    hdrs = ["hello-greet.h"],
)

cc_binary(
    name = "hello-world",
    srcs = ["hello-world.cc"],
    deps = [
        ":hello-greet",
        "//lib:hello-time",
    ],
)
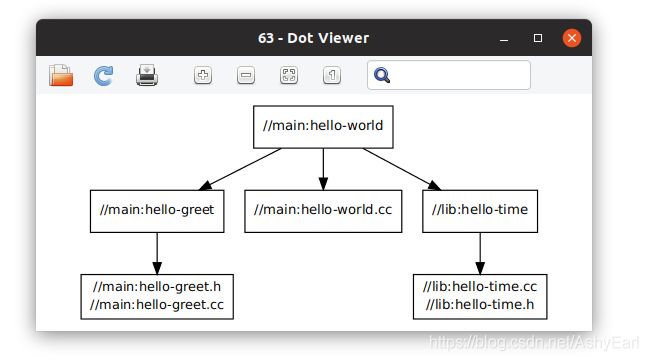
如你所见,main包中的hello-worldtarget依赖于lib包中的hello-time(deps中的//lib:hello-time,'lib’是包名[目录名],hello-time是lib/BUILD文件中定义的库名称),来看下依赖图:

注意为了能够成功编译,这里把lib/BUILD中//lib:hello-timetarget的可见性暴露给了main/BUILD(通过设置visibility属性)。这样做是由于bazel的target只对于同一个BUILD文件里的其他target可见(bazel通过设置可见性来防止库的内部实现被公开到外部api中)。
让我们来编译下最终版的工程,cd到cpp-tutorial/stage3执行下面的命令:
bazel build //main:hello-world
bazel会输出类似下面的log:
INFO: Analyzed target //main:hello-world (14 packages loaded, 77 targets configured).
INFO: Found 1 target...
Target //main:hello-world up-to-date:
  bazel-bin/main/hello-world
INFO: Elapsed time: 1.399s, Critical Path: 0.43s
INFO: 4 processes: 4 linux-sandbox.
INFO: Build completed successfully, 8 total actions
我们来试试编译出的文件:
./bazel-bin/main/hello-world
这会儿工程已经从两个包三个target中编译了,你也了解了他们之间的关系了。
使用标签来引用target
在BUILD文件和命令行中bazel使用标签来引用target,例如://main:hello-world或者//lib:hello-time,标签的定义是:
//path/to/package:target-name
如果target是一个编译target(rule target),那么path/to/package是包含BUILD文件的路径,target-name是这个BUILD文件中target的名称(其中的name属性);如果target是文件target(file target)那么path/to/package是包的目录,target-name是目标文件的全路径。
如果target是在workspace根目录下定义的,那么它的包就是空的,可以使用//:target-name来引用它;如果在同一个BUILD文件中引用target你甚至可以省掉//直接用:target-name来引用它。