计算机视觉中的深度学习
Deep learning has achieved great success in computer vision since AlexNet was proposed in 2012. This success is mainly related to two factors: a well-designed deep learning model, and a large-scale annotated data set to train the model.
自从AlexNet于2012年提出以来,深度学习在计算机视觉方面就取得了巨大的成功。这一成功主要与两个因素有关:设计良好的深度学习模型和训练模型的大规模带注释数据集。
Nowadays, deep learning has become a go-to method on computer vision projects. Solving a supervised learning problem in computer vision such as classification, detection, and segmentation commonly takes two steps:
如今,深度学习已成为计算机视觉项目的首选方法。 解决计算机视觉中的监督学习问题,例如分类,检测和分段通常需要两个步骤:
- choosing and downloading a pretrained model which is suitable for the problem 选择并下载适合该问题的预训练模型
- retraining the model using customized annotated data by applying transfer learning 通过应用转移学习使用定制的带注释数据重新训练模型
Many pretrained models are available to download from the internet. The second step — retraining the model using the customized annotated dataset — is therefore the main issue.
许多预训练的模型可以从互联网上下载。 因此,第二步(使用定制的带注释的数据集重新训练模型)是主要问题。
Annotating images is a time-consuming task. People normally start from a small dataset and then apply image augmentation to increase the size of the dataset. Image augmentation has been widely used in deep learning of computer vision. It uses traditional image processing, such as blurring, adding noise, and changing color channels to generate new images from an existing image. Shorten and Khoshgoftaar gave a good overview on image augmentation in their paper. However, to apply image augmentation, we need to have existing annotated images, otherwise it is not helpful.
给图像添加注释是一项耗时的任务。 人们通常从一个小的数据集开始,然后应用图像增强来增加数据集的大小。 图像增强已广泛用于计算机视觉的深度学习。 它使用传统的图像处理,例如模糊,添加噪点和更改颜色通道,以从现有图像生成新图像。 Shorten和Khoshgoftaar在他们的论文中对图像增强做了很好的概述。 但是,要应用图像增强,我们需要有现有的带注释的图像,否则将无济于事。
This post will introduce another technique which generates annotated images without any existing annotated images. It is image synthesis — more specifically, green screen.
这篇文章将介绍另一种生成带注释图像而没有任何现有带注释图像的技术。 它是图像合成-更具体地说,是绿色屏幕。
Green screen is not a new technology. It has been widely applied in film production (as well as in news and weather reports) for many years. Green screen is a visual effects technique where two images or video streams are composited together. It basically drops an object into whatever background images you want behind the object. Figure 1 shows an example of movie scenes before and after green screen effects have been applied.
绿屏不是一项新技术。 多年来,它已广泛应用于电影制作(以及新闻和天气预报)中。 绿屏是一种视觉效果技术,其中将两个图像或视频流合成在一起。 它基本上将一个对象放到您想要在该对象后面的任何背景图像中。 图1显示了在应用绿屏效果之前和之后的电影场景示例。
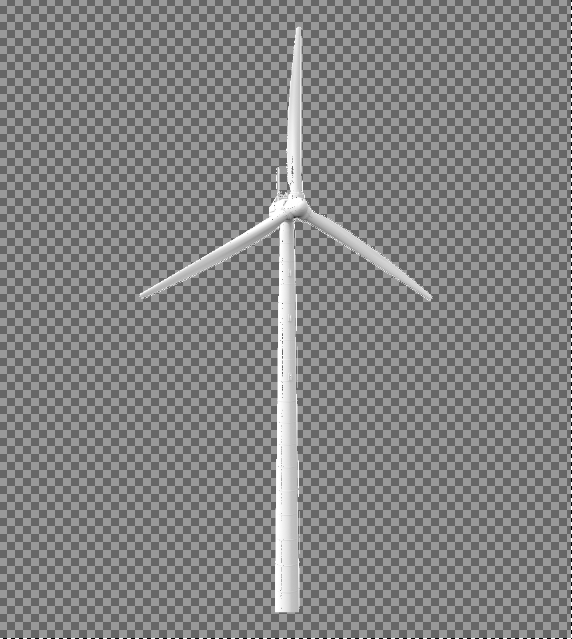
We can borrow the same idea from green screen to image annotation. First we need to define an object to be detected and then prepare the object image with a transparent background. Next, we can paste the object image on some background image. Figures 2–4 show an example of generating an image with a windmill for windmill detection.
我们可以将相同的想法从绿色屏幕借用到图像注释。 首先,我们需要定义要检测的对象,然后准备具有透明背景的对象图像。 接下来,我们可以将对象图像粘贴到一些背景图像上。 图2-4显示了使用风车生成图像以进行风车检测的示例。
Figure 2: A windmill with a transparent background (Note: It would be better to have the object image from different viewpoints). 图2:具有透明背景的风车(注意:从不同的角度看物体图像会更好)。Before we merge the object image and the background image, we can predefine the size of the object and its location in the background. In other words, we are able to annotate the image automatically. Here is the code:
在合并对象图像和背景图像之前,我们可以预定义对象的大小及其在背景中的位置。 换句话说,我们能够自动注释图像。 这是代码:
import randomfrom PIL import Imagedef create_annotated_image(background_file, object_file):
   bg_image = Image.open(background_file)
   obj_image = Image.open(object_file)#You need to implement the random_resize function to resize
   #the object according to the real size in your application
   #scenario.obj_image = random_resize(obj_image)
   width, height = bg_image.size
   obj_w, obj_h = obj_image.size
   x1 = random.randint(0, width - obj_w)
   y1 = random.randint(0, height - obj_h)
   x2 = x1 + obj_w
   y2 = y1 + obj_h
   bbox = [x1, y1, x2, y2]
   bg_image.paste(obj_image, (x1, y1), obj_image)#You could also apply image augmentation here before returnreturn bg_image, bbox
Choosing the background images depends on the real environment of the detected objects. You can use images that look similar to the environment. If you have no idea about the real environment, then feel free to use a public image dataset as the background, such as SUN, COCO, or ImageNet.
选择背景图像取决于所检测对象的实际环境。 您可以使用看起来与环境相似的图像。 如果您不了解实际环境,请随时使用公共图像数据集作为背景,例如SUN,COCO或ImageNet。
The basic idea behind image synthetic data is simple but practical. The advantage is that we are able to generate infinite annotated data for training models. We can also integrate synthetic data with data generator for training on the fly, then the model is trained using the data that it has never seen before. This will enable us to avoid overtraining problems as well.
图像合成数据背后的基本思想很简单但很实用。 优点是我们能够为训练模型生成无限的带注释的数据。 我们还可以将合成数据与数据生成器集成在一起,以进行即时训练,然后使用从未见过的数据来训练模型。 这也将使我们避免过度训练的问题。
翻译自: https://medium.com/cognite/deep-learning-using-synthetic-data-in-computer-vision-6df86dd12970
计算机视觉中的深度学习
