Elasticsearch数据迁移从aliyun到aws
一. Aliyun Opensearch 快照备份
前言: Aliyun Opeasearch 6.8.6 迁移 Aws OpenSearch 7.10
数据量: 32.5G左右, 数据传输方法 Aliyun OSS -→ Aliyun ECS/ AWS EC2 --→ AWS S3
        备份还原方式: snapshot 离线快照,备份时间大概10-15分钟。

        还原时间: 35-55分钟(具体根据网络波动)
        xxxxxxx
1. 创建阿里云 oss 仓库用作快照的备份
endpoint: oss-cn-hongkong-internal.aliyuncs.com
bucket: meimei
2. 通过 kibana dev tools 创建快照存储库
登陆Aliyun Kibana
https://xxxxx.aliyuncs.com:5601/app/kibana

#新建快照仓库
PUT _snapshot/aliyun_es/
{
    "type": "oss",
    "settings": {
        "endpoint": "http://oss-cn-hongkong-internal.aliyuncs.com",
        "access_key_id": "xxxx",
        "secret_access_key":"xxxx",
        "bucket": "meimei",
        "compress": true,
        "chunk_size": "500mb",
        "base_path": "/"
    }
}
3. 进行全量快照备份 并 查看快照是否备份成功
#为全部索引创建快照备份,备份完等待10-15分钟才能够备份完全!!
PUT _snapshot/aliyun_es/snapshot_202220408


GET _snapshot/aliyun_es/_all

{
  "snapshots" : [
    {
      "snapshot" : "snapshot_202220408",  #这个快照的名字要记住,需要在aws中使用!!!
      "uuid" : "eP9EEmJtQ6i7HRjzdVEF0w",
      "version_id" : 6080699,
      "version" : "6.8.6",
      "indices" : [
        "message_index",
        "order_index"
      ],
      "include_global_state" : true,
      "state" : "SUCCESS",
      "start_time" : "2022-04-08T12:56:43.918Z",
      "start_time_in_millis" : 1649422603918,
      "end_time" : "2022-04-08T12:57:39.838Z",
      "end_time_in_millis" : 1649422659838,
      "duration_in_millis" : 55920,
      "failures" : [ ],
      "shards" : {
        "total" : 6,
        "failed" : 0,
        "successful" : 6
      }
    }
  ]
}
二. Aliyun Opensearch 快照传输到 Aws S3
1.通过阿里的oss 将快照备份文件下载到aws 服务器
在aws 服务器上下载oss Linux 工具,做好aliyun oss 的认证后下载oss 快照备份。

aws es快照数据的目录地址: /data/es
cd /data/es
oss sync -u oss://meimei/  .      #从aliyun oss 复制到aws EC2 目录
2.将 阿里云oss 快照文件上传 aws s3中
在aws 服务器上下载aws cli工具,做好aws s3认证后,上传快照备份文件到 aws s3仓库。
aws s3仓库地址:s3://aliyun-es/20220406/


# 将快照所有文件sync 同步到aws s3中
cd /data/es
aws s3 sync . s3://aliyun-es/20220406/
三. Aws 创建 域 Opensearch (aws 控制台创建或者用aws-cli命令行创建)
 aws opensearch create-domain   --domain-name aws-opensearch-1   --engine-version Elasticsearch_7.10   --cluster-config InstanceType=m5.large.search,InstanceCount=3,DedicatedMasterEnabled=true,DedicatedMasterType=m5.large.search,DedicatedMasterCount=3   --ebs-options EBSEnabled=true,VolumeType=gp2,VolumeSize=100   --node-to-node-encryption-options Enabled=true   --encryption-at-rest-options Enabled=true   --domain-endpoint-options EnforceHTTPS=true,TLSSecurityPolicy=Policy-Min-TLS-1-2-2019-07   --advanced-security-options Enabled=true,InternalUserDatabaseEnabled=true,MasterUserOptions='{MasterUserName=xxxxxx,MasterUserPassword=xxxxxx}'   --access-policies '{"Version":"2012-10-17","Statement":[{"Effect":"Allow","Principal":{"AWS":["*"]},"Action":["es:ESHttp*"],"Resource":"arn:aws:es:ap-east-1:xxxxxxxxx:domain/aws-opensearch-1/*"}]}'   --region ap-east-1


注意修改地方:
--domain-name aws-opensearch-1    #opensearch的名字
--engine-version Elasticsearch_7.10  # opensearch的版本
--ebs-options EBSEnabled=true,VolumeType=gp2,VolumeSize=100 #opensearch 的存储大小
--advanced-security-options Enabled=true,InternalUserDatabaseEnabled=true,MasterUserOptions='{MasterUserName=xxx,MasterUserPassword=xxxxx}' #设置opensearch 管理账号
--access-policies '{"Version":"2012-10-17","Statement":[{"Effect":"Allow","Principal":{"AWS":["*"]},"Action":["es:ESHttp*"],"Resource":"arn:aws:es:ap-east-1:xxxxxxx:domain/aws-opensearch-1/*"}]}' #域 ARN
--region ap-east-1 #设置区域为香港地区
四. 创建 Aws Opensearch 使用的策略,角色,用户
1.创建policy-es-s3策略
进入aws IAM 中选择策略,并创建:
使用以下json创建策略
{
    "Version": "2012-10-17",
    "Statement": [
        {
            "Action": [
                "s3:ListBucket"
            ],
            "Effect": "Allow",
            "Resource": [
                "arn:aws:s3:::aliyun-es" #这里为之前创建的s3仓库地址的名字
            ]
        },
        {
            "Action": [
                "s3:GetObject",
                "s3:PutObject",
                "s3:DeleteObject"
            ],
            "Effect": "Allow",
            "Resource": [
                "arn:aws:s3:::aliyun-es/*"
            ]
        }
    ]
}
2.创建角色 OpenSearchSnapshotRole
1):点击创建角色,AWS服务搜索S3:
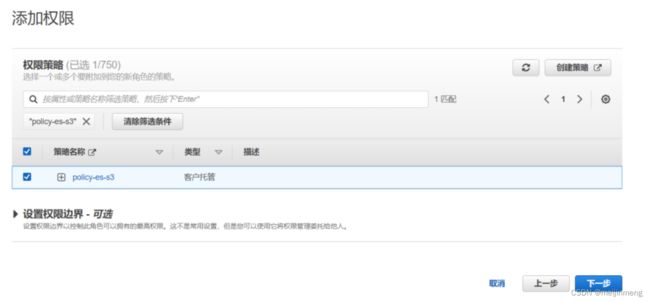
2): 附加策略policy-es-s3:
3):输入角色名称OpenSearchSnapshotRole创建角色
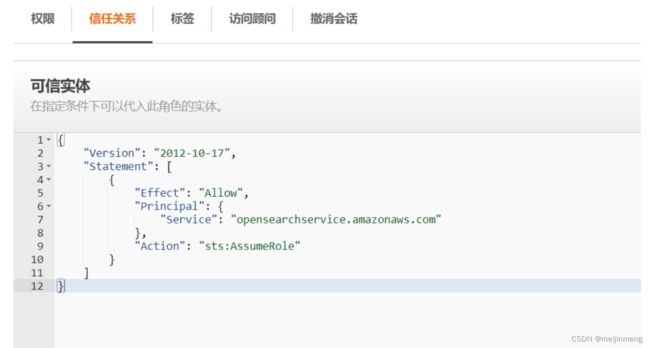
4):修改信任实体
在角色列表中点击OpenSearchSnapshotRole,在信任关系中编辑信任策略,将以下内容覆盖原有json,更新策略:
{
  "Version": "2012-10-17",
  "Statement": [{
    "Sid": "",
    "Effect": "Allow",
    "Principal": {
      "Service": "opensearchservice.amazonaws.com"
    },
    "Action": "sts:AssumeRole"
  }]

}
3.创建策略policy_iam2role
{
    "Version": "2012-10-17",
    "Statement": [
        {
            "Effect": "Allow",
            "Action": "iam:PassRole",
            "Resource": "arn:aws:es:ap-east-1:XXXXXXXX:role/OpenSearchSnapshotRole"
        },
        {
            "Effect": "Allow",
            "Action": "es:ESHttp*",
            "Resource": "arn:aws:es:ap-east-1:XXXXXXXX:domain/aws-opensearch-1/*"
        }
    ]
}

#其中OpenSearchSnapshotRole为第2步创建的角色
#arn:aws:es:ap-east-1:xxxxxxxxxx:domain/aws-opensearch-1为上面创建的域的arn,注意arn后有/*
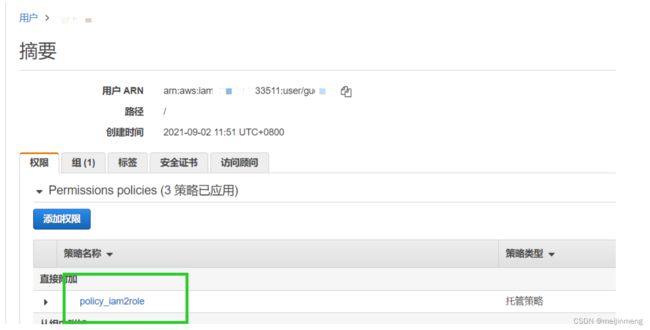
4.对AK/SK用户附加策略policy_iam2role
五. 配置Kibana 的用户和角色权限
在域信息中获取Kibana URL,进行打开,使用创建域的用户名及密码登录
在Security->Role Mappings中新增role mapping
Role选择manage_snapshots
新增User输入ak/sk用户的arn
新增Backend Role输入第5步创建的角色的arn
点击Submit进行提交

7.10的位置:
 分别填写到上面的为:
user arn
role arn
六.使用python脚本注册S3存储库
1.配置环境和执行脚本
在执行python脚本之前,需配置AWS CLI,将AK/SK账号配置到CLI中。

要执行python脚本,请按照python环境,并安装boto3、 requests、 requests_aws4auth程序包

以下为python脚本:
import boto3
import requests
from requests_aws4auth import AWS4Auth #下载pip3 install requests   requests_aws4auth 包

host = 'https://xxxxxxxxxx.ap-east-1.es.amazonaws.com/'   #这里打开opensearch中找到域端点 复制进去!!!
# 域端点后加/
region = 'ap-east-1'
service = 'es'
credentials = boto3.Session().get_credentials()
awsauth = AWS4Auth(credentials.access_key, credentials.secret_key, region, service, session_token=credentials.token)

# Register repository

path = '_snapshot/es-snapshot' # the OpenSearch API endpoint
url = host + path

payload = {
          "type": "s3",
            "settings": {
            "bucket": "aliyun-es",
            "region": "ap-east-1",
            "base_path": "20220406",  #这里为s3中的一个目录,上面将快照文件上传到这个目录下的!!!
            "role_arn": "arn:aws:iam::xxxxxxxx:role/OpenSearchSnapshotRole"  #这里为上面创建的角色的arn
                        }
            }

headers = {"Content-Type": "application/json"}

r = requests.put(url, auth=awsauth, json=payload, headers=headers)

print(r.status_code)
print(r.text)

#执行
python3 es.py
2.执行完成后在Kibana的Dev Tools中执行GET _snapshot/_all进行查看:
七.执行命令进行快照还原
POST _snapshot/es-snapshot/snapshot_202220408/_restore
{
  "indices" : [ "amazon_message_index", "wms_request_log_index", "user_feedback_index", "wms_log", "feedback_exception_icon_index", "erp_api_log", "amazon_direct_message_log", "feedback_sys_log_index", "order_index", "amazon_group_message_log", "wms_sync_request_log", "inquiry_detail_index", "return_request_detail_index", "inquiry_index", "message_index", "log", "direct_message_log", "group_message_log", "return_request_index" ],
  "include_global_state": false  #默认为true,这里设置false表示不带入原来集群的设置。
}
es-snapshot注册的es快照仓库名称。
snapshot_202220408为快照内容中snapshot的值,amazon_message_index为快照内索引名称。
八. 验证索引
九. 注意事项
oss aws 的认证好提前做好
aws s3仓库要提前新建好
aws opensearch 的策略,角色,用户要按照上述步骤做好
快照还原后,要查看索引是否分片成功 ,aws opensearch 7.7 以上才有ik 分词器要注意!
参考文档:
https://help.aliyun.com/document_detail/65675.html?spm=a2cba.elasticsearch_backup.help.dexternal.35ea68de3uLZ6n
https://docs.aws.amazon.com/zh_cn/opensearch-service/latest/developerguide/migration.html
https://aws.amazon.com/cn/premiumsupport/knowledge-center/opensearch-red-yellow-status/?nc1=h_ls


