linux系统之Centos7 本地源配置+静态IP配置
当前使用的是VMware虚拟机
系统:centos7
准备工作
在虚拟机种安装好centos7后,或者直接在电脑中安装centos7系统。
首先使用进入命令行窗口,输入命令,查看网络。
# ficonfig
如果,没有ifconfig指令,需要使用yum安装。
首先是查询哪个包有ifconfig
# yum search ifconfig
结果如下:
[root@bogon ~]# yum search ifconfig
已加载插件:fastestmirror, langpacks
Determining fastest mirrors
 * base: mirrors.bfsu.edu.cn
 * extras: mirrors.163.com
 * updates: mirrors.163.com
base                                                                                | 3.6 kB  00:00:00
extras                                                                              | 2.9 kB  00:00:00
updates                                                                             | 2.9 kB  00:00:00
(1/4): extras/7/x86_64/primary_db                                                   | 222 kB  00:00:01
(2/4): base/7/x86_64/group_gz                                                       | 153 kB  00:00:01
(3/4): updates/7/x86_64/primary_db                                                  | 4.7 MB  00:00:08
(4/4): base/7/x86_64/primary_db                                                     | 6.1 MB  00:00:09
============================================= 匹配:ifconfig ==============================================
net-tools.x86_64 : Basic networking tools
[root@bogon ~]#
接下来,自然是安装net-tools.x86_64这个包
# yum install net-tools.x86_64
安装完毕,可以使用ifconfig指令。
配置本地源:如果不能联网,想要使用yum
进入yum.repos.d目录下
# cd /etc/yum.repos.d/
# ll
总用量 32
-rw-r--r--. 1 root root 1664 4月  29 2018 CentOS-Base.repo
-rw-r--r--. 1 root root 1309 4月  29 2018 CentOS-CR.repo
-rw-r--r--. 1 root root  649 4月  29 2018 CentOS-Debuginfo.repo
-rw-r--r--. 1 root root  314 4月  29 2018 CentOS-fasttrack.repo
-rw-r--r--. 1 root root  630 4月  29 2018 CentOS-Media.repo
-rw-r--r--. 1 root root 1331 4月  29 2018 CentOS-Sources.repo
-rw-r--r--. 1 root root 4768 4月  29 2018 CentOS-Vault.repo
本地源主要配置CentOS-Media.repo这个文件,既然网都连不上,其他的都可以删掉了。以防万一,保存原数据文件。
# cp -R /etc/yum.repos.d/ /etc/yum.old/
# rm -rf /etc/yum.repos.d/*
# cp /etc/yum.old/CentOS-Media.repo /etc/yum.repos.d/
开始修改配置
原数据:
# CentOS-Media.repo
#
#  This repo can be used with mounted DVD media, verify the mount point for
#  CentOS-7.  You can use this repo and yum to install items directly off the
#  DVD ISO that we release.
#
# To use this repo, put in your DVD and use it with the other repos too:
#  yum --enablerepo=c7-media [command]
#
# or for ONLY the media repo, do this:
#
#  yum --disablerepo=\* --enablerepo=c7-media [command]

[c7-media]
name=CentOS-$releasever - Media
baseurl=file:///media/CentOS/
        file:///media/cdrom/
        file:///media/cdrecorder/
gpgcheck=1
enabled=0
gpgkey=file:///etc/pki/rpm-gpg/RPM-GPG-KEY-CentOS-7
改后:
# CentOS-Media.repo
#
#  This repo can be used with mounted DVD media, verify the mount point for
#  CentOS-7.  You can use this repo and yum to install items directly off the
#  DVD ISO that we release.
#
# To use this repo, put in your DVD and use it with the other repos too:
#  yum --enablerepo=c7-media [command]
#
# or for ONLY the media repo, do this:
#
#  yum --disablerepo=\* --enablerepo=c7-media [command]

[c7-media]
name=CentOS-$releasever - Media
baseurl=file:///media/
gpgcheck=1
enabled=1
gpgkey=file:///etc/pki/rpm-gpg/RPM-GPG-KEY-CentOS-7
修改baseurl后,即将镜像文件挂载到/media目录下即可加载本地源。
enabled=1表示,启动该配置。
然后挂在镜像,VMware虚拟机中,连接镜像时,/dev/cdrom表示镜像设备。此时挂在镜像到media目录下:
# mount /dev/cdrom /media
再一步清空yum旧缓存数据,更新yum的包安装目录
# yum clean all
# yum makecache
配置静态IP
以上都是废话,其实配置只需要看这一部分就可。以上都是搭建需要的环境。
编辑网卡的配置文件ifcfg-ens33。
# vim /etc/sysconfig/network-scripts/ifcfg-ens33
注意:使用ifconfig时,可能看到有ens和lo开头的网卡,一个是ens是与外部连接用的,一个是本地localhost。
原数据:
TYPE=Ethernet
PROXY_METHOD=none
BROWSER_ONLY=no
BOOTPROTO=dhcp
DEFROUTE=yes
IPV4_FAILURE_FATAL=no
IPV6INIT=yes
IPV6_AUTOCONF=yes
IPV6_DEFROUTE=yes
IPV6_FAILURE_FATAL=no
IPV6_ADDR_GEN_MODE=stable-privacy
NAME=ens33
UUID=b477f6d0-b933-46b5-97fb-ad5f690dcbb9
DEVICE=ens33
ONBOOT=yes
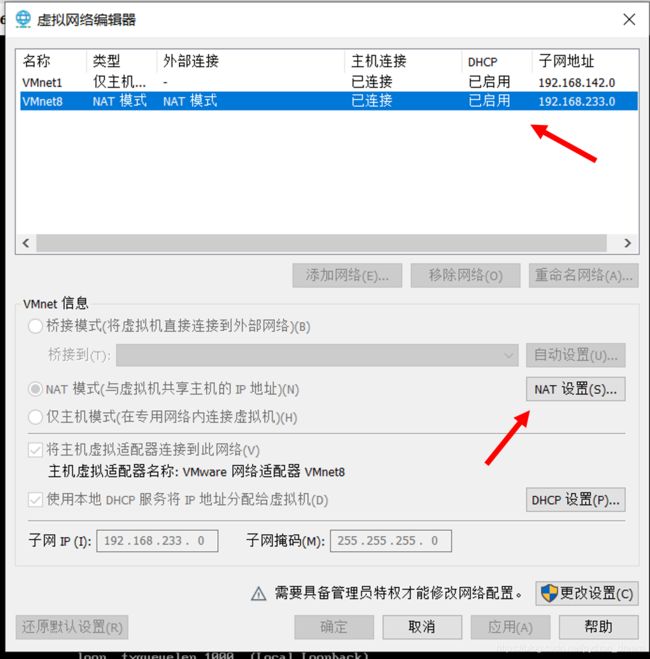
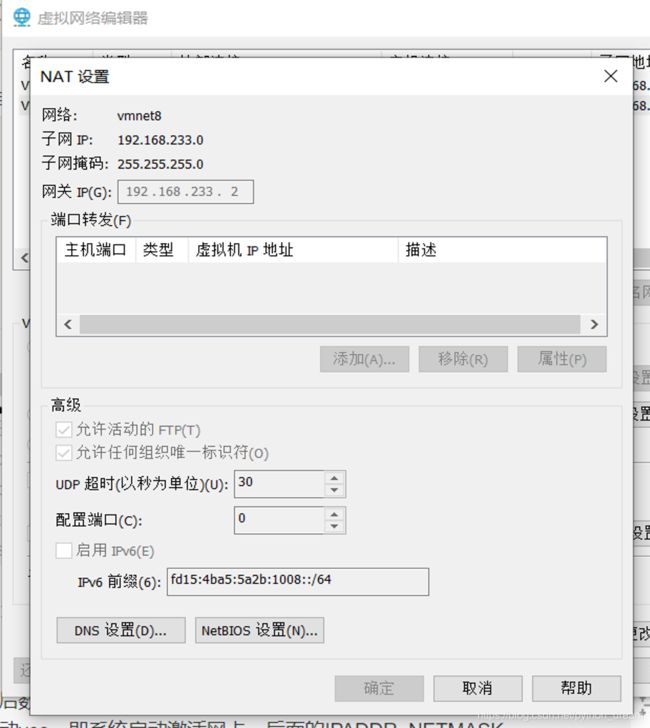
修改静态IP,需要知道网关地址。
如果使用的是VMware,则进行一下步骤:
改后数据:改了BOOTPROTO为静态配置static, 有的ONBOOT也需要改动yes,即系统启动激活网卡,后面的IPADDR(静态IP地址,自己配置), NETMASK(掩码,自己查看,一般为255.255.255.0), GATEWAY(网关)和DNS1(DNS, 与网关一样IP或自定义)是添加的。
TYPE=Ethernet
PROXY_METHOD=none
BROWSER_ONLY=no
BOOTPROTO=static
DEFROUTE=yes
IPV4_FAILURE_FATAL=no
IPV6INIT=yes
IPV6_AUTOCONF=yes
IPV6_DEFROUTE=yes
IPV6_FAILURE_FATAL=no
IPV6_ADDR_GEN_MODE=stable-privacy
NAME=ens33
UUID=b477f6d0-b933-46b5-97fb-ad5f690dcbb9
DEVICE=ens33
ONBOOT=yes
IPADDR=192.168.233.111
NETMASK=255.255.255.0
GATEWAY=192.168.233.2
DNS1=192.168.233.2
最后重启network。使用ifconfig看到网络已经改变。
# systemctl restart network


