UnityShader学习笔记 Unity的表面着色器
将渲染流程划分为表面着色器、光照模型和光照着色器这样的层面。
其中,表面着色器定义了模型表面的反射率、法线和高光等,光照模型选择是使用兰伯特还是Blinn-Phong等模型。而光照着色器负责计算光照衰减、阴影等。
表面着色器实际上就是在顶点/片元着色器之上又添加了一层抽象。
表面着色器的一个例子
使用表面着色器来实现一个使用了法线纹理的漫反射效果。
Shader "Custom/Bumped Diffuse" {
	Properties {
		_Color ("Main Color", Color) = (1,1,1,1)
		_MainTex ("Base (RGB)", 2D) = "white" {}
		_BumpMap ("Normalmap", 2D) = "bump" {}
	}
	SubShader {
		Tags { "RenderType"="Opaque" }
		LOD 300

		CGPROGRAM
		#pragma surface surf Lambert
		#pragma target 3.0

		sampler2D _MainTex;
		sampler2D _BumpMap;
		fixed4 _Color;

		struct Input {
			float2 uv_MainTex;
			float2 uv_BumpMap;
		};

		void surf (Input IN, inout SurfaceOutput o) {
			fixed4 tex = tex2D(_MainTex, IN.uv_MainTex);
			o.Albedo = tex.rgb * _Color.rgb;
			o.Alpha = tex.a * _Color.a;
			o.Normal = UnpackNormal(tex2D(_BumpMap, IN.uv_BumpMap));
		}

		ENDCG
	}

	FallBack "Legacy Shaders/Diffuse"
}
表面着色器代码很少,非常轻松地实现了常见地光照模型,甚至不需要和任何光照变量打交道,Unity就帮我们处理好了每个光源的光照结果。
表面着色器例子:表面着色器
和顶点/片元着色器需要包含到一个特定的Pass块不同,表面着色器的CG代码是直接而且也必须写在SubShader块中,Unity会在背后为我们生成多个Pass。
也可以在SubShader一开始处使用Tags来设置该表面着色器使用的标签。
使用了LOD命令设置了该表面着色器的LOD值。然后使用CGPROGRAM和ENDCG定义了表面着色器的具体代码。
一个表面着色器最重要的部分是两个结构体以及它的编译指令。其中,两个结构体是表面着色器中不同函数之间信息传递的桥梁,而编译指令是我们和Unity沟通的重要手段。
编译指令
编译指令最重要的作用是指明该表面着色器使用的表面函数和光照函数,并设置一些可选参数。
表面着色器的CG块的第一句往往就是它的编译指令。格式一般如下:
![]()
其中#pragma surface用于指明该编译指令是用于定义表面着色器的,在它的后面需要指明使用它的表面函数和光照模型,同时还可以使用一些可选参数来控制着色器的一些行为。
表面函数
void surf(Input IN, inout SurfaceOutput o)
void surf(Input IN, inout SurfaceOutputStandard o)
void surf(Input IN, inout SurfaceOutputStandardSpecular o)
在表面函数中,会使用输入结构体Input IN来设置各种表面属性,并把这些属性存储在输出结构体
SurfaceOutput 、SurfaceOutputStandard、SurfaceOutputStandardSpecular中,再传递给光照函数计算光照结果。
光照函数
光照函数会使用表面函数中设置的各种表面属性,来应用某些光照模型,进而模拟物体表面的光照效果。Unity内置了基于物理的光照模型函数Standard和StandardSpecular(在UnityPBSLighting.cginc文件中被定义),以及简单的光照模型函数Lambert和BlinnPhong(在Lighting.cginc文件中被定义)。
当然可以使用下面的函数来定义用于前向渲染中的光照函数:
//用于不依赖视角的光照模型,例如漫反射
half4 Lighting (SurfaceOutput s, half3 lightDir, half atten);

//用于依赖视角的光照模型,例如高光反射
half4 Lighting (SurfaceOutput s, half3 lightDir, half3 viewDir, half atten);
Unity手册的表面着色器中的自定义光照模型一文中找到更全面的自定义光照模型的介绍。
其他可选参数
可以在Unity官方手册的编写表面着色器一文中找到更加详细的参数和设置说明。
- 自定义的修改函数。顶点修改函数,允许我们自定义一些顶点属性,例如,把顶点颜色传递给表面函数,或是修改顶点位置,实现某些顶点动画等。颜色修改函数,可以在颜色绘制到屏幕前,最后一次修改颜色值,例如实现自定义的雾效等。
- 阴影。
- 透明度混合和透明度测试。
- 光照。
- 控制代码的生成。如果确定该表面着色器只会在某些渲染路径中使用,可以使用参数来告诉Unity不需要为某些渲染路径生成代码。
两个结构体
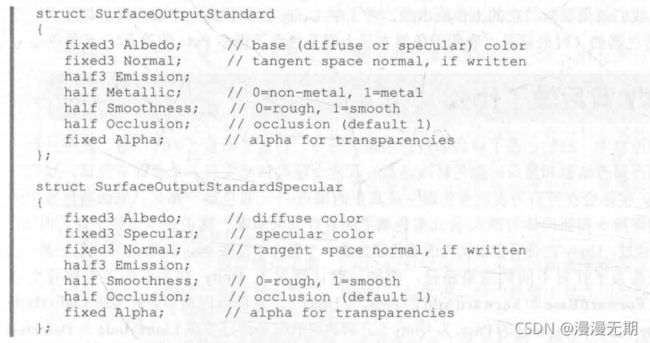
一个表面着色器需要两个结构体:表面函数的输入结构体Input,以及存储了表面属性的结构体SurfaceOutput(SurfaceOutputStandard和SurfaceOutputStandardSpecular)。
数据来源:Input结构体
它会作为表面函数的输入结构体(顶点修改函数的输出结构体)。
Input支持的内置变量名,uv_MainTex和uv_BumpMap(主纹理和法线纹理的采样坐标)。
表面属性:SurfaceOutput结构体
它的声明可以在Lighting.cginc中找到:
而SurfaceOutputStandard和SurfaceOutputStandardSpecular的声明可以在UnityPBSLighting.cginc中找到:
SurfaceOutputStandard结构体用于默认的金属工作流程。
SurfaceOutputStandardSpecular结构体用于高光工作流程。
SurfaceOutput结构体中的表面属性:
- Albedo:对光源的反射率。通常由纹理采样和颜色属性的乘积计算得到。
- Normal: 表面的法线方向。
- Emission:自发光。
- Specular:高光反射中的指数部分的系数,影响高光反射的计算。
- Gloss:高光反射中的强度系数。一般在包含了高光反射的光照模型中使用。
- Alpha:透明通道。如果开启了透明度的话,会使用该值进行颜色混合。
Unity背后做了什么
Unity在背后会根据表面着色器生成了一个包含了很多Pass的顶点/片元着色器。
以Unity生成的LightMode为ForwardBase的pass为例,它的渲染计算流水线如下。
Unity对该Pass的自动生成过程如下。
(1)直接将表面着色器中的CGPROGRAM和ENDCG之间的代码复制过来。
(2)分析上述代码,生成顶点着色器的输出——v2f_surf结构体,用于在顶点着色器和片元着色器之间进行数据传递。
(3)接着生成顶点着色器。
(4)生成片元着色器。
表面着色器实例分析
对模型进行膨胀效果。
Shader "Custom/Normal Extrusion" {
	Properties {
		_ColorTint ("Color Tint", Color) = (1,1,1,1)
		_MainTex ("Base (RGB)", 2D) = "white" {}
		_BumpMap ("Normalmap", 2D) = "bump" {}
		_Amount ("Extrusion Amount", Range(-0.5, 0.5)) = 0.1
	}
	SubShader {
		Tags { "RenderType"="Opaque" }
		LOD 300

		CGPROGRAM

		// surf - which surface function.
		// CustomLambert - which lighting model to use.
		// vertex:myvert - use custom vertex modification function.
		// finalcolor:mycolor - use custom final color modification function.
		// addshadow - generate a shadow caster pass. Because we modify the vertex position, the shder needs special shadows handling.
		// exclude_path:deferred/exclude_path:prepas - do not generate passes for deferred/legacy deferred rendering path.
		// nometa - do not generate a “meta” pass (that’s used by lightmapping & dynamic global illumination to extract surface information).
		#pragma surface surf CustomLambert vertex:myvert finalcolor:mycolor addshadow exclude_path:deferred exclude_path:prepass nometa
		#pragma target 3.0

		fixed4 _ColorTint;
		sampler2D _MainTex;
		sampler2D _BumpMap;
		half _Amount;

		struct Input {
			float2 uv_MainTex;
			float2 uv_BumpMap;
		};

		void myvert (inout appdata_full v) {
			v.vertex.xyz += v.normal * _Amount;
		}

		void surf (Input IN, inout SurfaceOutput o) {
			fixed4 tex = tex2D(_MainTex, IN.uv_MainTex);
			o.Albedo = tex.rgb;
			o.Alpha = tex.a;
			o.Normal = UnpackNormal(tex2D(_BumpMap, IN.uv_BumpMap));
		}

		half4 LightingCustomLambert (SurfaceOutput s, half3 lightDir, half atten) {
			half NdotL = dot(s.Normal, lightDir);
			half4 c;
			c.rgb = s.Albedo * _LightColor0.rgb * (NdotL * atten);
			c.a = s.Alpha;
			return c;
		}

		void mycolor (Input IN, SurfaceOutput o, inout fixed4 color) {
			color *= _ColorTint;
		}

		ENDCG
	}
	FallBack "Legacy Shaders/Diffuse"
}
顶点修改函数,使用顶点法线对顶点位置进行膨胀;
表面函数使用主纹理设置了表面属性中的反射率,并使用法线纹理设置了表面法线方向;
光照函数实现了简单的兰伯特反射光照模型;
在最后的颜色修改函数中,简单地使用了颜色参数对输出颜色进行调整。
当使用“Show generated code”后,可以看到Unity生成地顶点/片元着色器。
一共生成了3个Pass,它们地LightMode分别是ForwardBase、ForwardAdd和ShadowCaster。
ForwardBase Pass
(1)指明了编译指令:
	// ---- forward rendering base pass:
	Pass {
		Name "FORWARD"
		Tags { "LightMode" = "ForwardBase" }

CGPROGRAM
// compile directives
#pragma vertex vert_surf
#pragma fragment frag_surf
#pragma target 3.0
#pragma multi_compile_instancing
#pragma multi_compile_fwdbase
#include "HLSLSupport.cginc"
#define UNITY_INSTANCED_LOD_FADE
#define UNITY_INSTANCED_SH
#define UNITY_INSTANCED_LIGHTMAPSTS
#include "UnityShaderVariables.cginc"
#include "UnityShaderUtilities.cginc"
顶点着色器vert_surf和片元着色器frag_surf都是自动生成的。
(2)生成了一些注释。
(3)定了了一些宏辅助计算。
#define INTERNAL_DATA half3 internalSurfaceTtoW0; half3 internalSurfaceTtoW1; half3 internalSurfaceTtoW2;
#define WorldReflectionVector(data,normal) reflect (data.worldRefl, half3(dot(data.internalSurfaceTtoW0,normal), dot(data.internalSurfaceTtoW1,normal), dot(data.internalSurfaceTtoW2,normal)))
#define WorldNormalVector(data,normal) fixed3(dot(data.internalSurfaceTtoW0,normal), dot(data.internalSurfaceTtoW1,normal), dot(data.internalSurfaceTtoW2,normal))
这些宏在修改表面法线的情况下,可以辅助计算得到世界空间下的反射方向和法线方向,与之对应的是Input结构体中的一些变量。
(4)在表面着色器中编写的CG代码复制过来,作为Pass的一部分,以便后续调用。
(5)Unity定义了顶点着色器到片元着色器的插值结构体(即顶点着色器的输出结构体)v2f_surf。
// vertex-to-fragment interpolation data
// no lightmaps:
#ifndef LIGHTMAP_ON
// half-precision fragment shader registers:
#ifdef UNITY_HALF_PRECISION_FRAGMENT_SHADER_REGISTERS
struct v2f_surf {
  UNITY_POSITION(pos);
  float4 pack0 : TEXCOORD0; // _MainTex _BumpMap
  float4 tSpace0 : TEXCOORD1;
  float4 tSpace1 : TEXCOORD2;
  float4 tSpace2 : TEXCOORD3;
  fixed3 vlight : TEXCOORD4; // ambient/SH/vertexlights
  UNITY_LIGHTING_COORDS(5,6)
  #if SHADER_TARGET >= 30
  float4 lmap : TEXCOORD7;
  #endif
  UNITY_VERTEX_INPUT_INSTANCE_ID
  UNITY_VERTEX_OUTPUT_STEREO
};


// with lightmaps:
#ifdef LIGHTMAP_ON
// half-precision fragment shader registers:
#ifdef UNITY_HALF_PRECISION_FRAGMENT_SHADER_REGISTERS
struct v2f_surf {
  UNITY_POSITION(pos);
  float4 pack0 : TEXCOORD0; // _MainTex _BumpMap
  float4 tSpace0 : TEXCOORD1;
  float4 tSpace1 : TEXCOORD2;
  float4 tSpace2 : TEXCOORD3;
  float4 lmap : TEXCOORD4;
  UNITY_LIGHTING_COORDS(5,6)
  UNITY_VERTEX_INPUT_INSTANCE_ID
  UNITY_VERTEX_OUTPUT_STEREO
};
#endif
(6)随后,定义了真正的顶点着色器。
// vertex shader
v2f_surf vert_surf (appdata_full v) {
  UNITY_SETUP_INSTANCE_ID(v);
  v2f_surf o;
  UNITY_INITIALIZE_OUTPUT(v2f_surf,o);
  UNITY_TRANSFER_INSTANCE_ID(v,o);
  UNITY_INITIALIZE_VERTEX_OUTPUT_STEREO(o);
  myvert (v);

  ......
  return o;
}
(7)在Pass的最后,Unity定义了真正的片元着色器。
// fragment shader
fixed4 frag_surf (v2f_surf IN) : SV_Target {
  UNITY_SETUP_INSTANCE_ID(IN);
  // prepare and unpack data
  Input surfIN;

  ......

  surfIN.uv_MainTex = IN.pack0.xy;
  surfIN.uv_BumpMap = IN.pack0.zw;

  ......

  // call surface function
  surf (surfIN, o);

  // compute lighting & shadowing factor
  UNITY_LIGHT_ATTENUATION(atten, IN, worldPos)
  fixed4 c = 0;
  float3 worldN;
  worldN.x = dot(_unity_tbn_0, o.Normal);
  worldN.y = dot(_unity_tbn_1, o.Normal);
  worldN.z = dot(_unity_tbn_2, o.Normal);
  worldN = normalize(worldN);
  o.Normal = worldN;
  #ifndef LIGHTMAP_ON
  c.rgb += o.Albedo * IN.vlight;
  #endif // !LIGHTMAP_ON

  ......

  // realtime lighting: call lighting function
  #ifndef LIGHTMAP_ON
  c += LightingCustomLambert (o, lightDir, atten);
  #else
    c.a = o.Alpha;
  #endif


  mycolor (surfIN, o, c);
  UNITY_OPAQUE_ALPHA(c.a);
  return c;
}
Surface Shader的缺点
表面着色器虽然可以快速地实现各种光照效果,但失去了对各种优化和各种特效实现的控制。因此,使用表面着色器往往由一些性能上的影响。
除了性能比较差以外,表面着色器还无法完成一些自定义的渲染效果。


