Flutter 第三方 flutter_screenutil(屏幕适配)
一直觉得自己写的不是技术,而是情怀,一个个的教程是自己这一路走来的痕迹。靠专业技能的成功是最具可复制性的,希望我的这条路能让你们少走弯路,希望我能帮你们抹去知识的蒙尘,希望我能帮你们理清知识的脉络,希望未来技术之巅上有你们也有我。
推荐一篇写的非常不过的文章:Flutter应用框架搭建(二)屏幕适配
安装+导入
flutter_screenutil: ^5.9.0
import 'package:flutter_screenutil/flutter_screenutil.dart';
举例
iPhone 12 mini
初始化
初始化 - 设置参考尺寸1
ScreenUtilInit
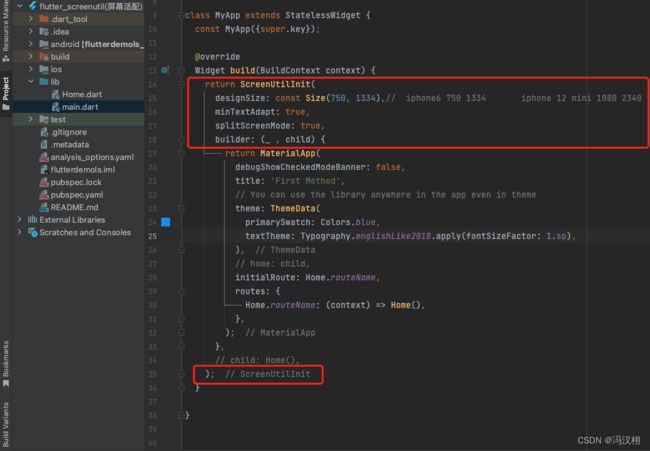
class MyApp extends StatelessWidget {
  const MyApp({super.key});

  @override
  Widget build(BuildContext context) {
    return ScreenUtilInit(
      designSize: const Size(750, 1334),//  iphone6 750 1334       iphone 12 mini 1080 2340
      minTextAdapt: true,
      splitScreenMode: true,
      builder: (_ , child) {
        return MaterialApp(
          debugShowCheckedModeBanner: false,
          title: 'First Method',
          // You can use the library anywhere in the app even in theme
          theme: ThemeData(
            primarySwatch: Colors.blue,
            textTheme: Typography.englishLike2018.apply(fontSizeFactor: 1.sp),
          ),
          // home: child,
          initialRoute: Home.routeName,
          routes: {
            Home.routeName: (context) => Home(),
          },
        );
      },
      // child: Home(),
    );
  }

}
初始化 - 设置方式2
ScreenUtil.init
可以在每个页面设置
class MyApp extends StatelessWidget {
  @override
  Widget build(BuildContext context) {
    return MaterialApp(
      debugShowCheckedModeBanner: false,
      title: 'Flutter_ScreenUtil',
      theme: ThemeData(
        primarySwatch: Colors.blue,
      ),
      home: HomePage(title: 'FlutterScreenUtil Demo'),
    );
  }
}

class HomePage extends StatefulWidget {
  const HomePage({Key key, this.title}) : super(key: key);

  final String title;

  @override
  _HomePageState createState() => _HomePageState();
}

class _HomePageState extends State<HomePage> {
  @override
  Widget build(BuildContext context) {
    //设置尺寸(填写设计中设备的屏幕尺寸)如果设计基于360dp * 690dp的屏幕
    ScreenUtil.init(context, designSize: const Size(360, 690));
    ...
  }
}
使用这种方式只需在使用 flutter_screenutil 前进行初始化即可,一般放在根路由即第一个页面加载的时候进行初始化。
注意:ScreenUtil.init 不能在 MyApp 中进行初始化,会报如下错误 No MediaQuery ancestor could be found starting from the context that was passed to MediaQuery.of(). This can happen because you have not added a WidgetsApp, CupertinoApp, or MaterialApp widget (those widgets introduce a MediaQuery), or it can happen if the context you use comes from a widget above those widgets. 因为这个时候还没加载 MaterialApp 无法使用 MediaQuery.of(context ) 获取到屏幕宽高
关于上面两种初始化方法,flutter_screenutil 作者推荐使用第二种方式。
使用
double screenWidth = MediaQuery.of(context).size.width;
double screenHeight = MediaQuery.of(context).size.height;
print('系统宽: $screenWidth');//375.0
print('系统高: $screenHeight');//812.0

double utilWidth = ScreenUtil().screenWidth;
double utilHeight = ScreenUtil().screenHeight;
print('ScreenUtil宽: $utilWidth');//设备宽度 375.0
print('ScreenUtil高: $utilHeight');//设备高度 812.0

double pixelRatio = ScreenUtil().pixelRatio ?? 0.0;
print('pixelRatio  $pixelRatio');//设备的像素密度 3.0

double bottomBarHeight = ScreenUtil().bottomBarHeight;
print('bottomBarHeight  $bottomBarHeight');//底部安全区距离,适用于全面屏下面有按键的 34.0

double statusBarHeight = ScreenUtil().statusBarHeight;
print('statusBarHeight  $statusBarHeight');//状态栏高度 刘海屏会更高 50.0

double textScaleFactor = ScreenUtil().textScaleFactor;
print('textScaleFactor  $textScaleFactor');//系统字体缩放比例 1.0

double scaleWidth = ScreenUtil().scaleWidth;// 实际宽度设计稿宽度的比例 0.5
print('scaleWidth  $scaleWidth');
double scaleHeight = ScreenUtil().scaleHeight;// 实际高度与设计稿高度度的比例 0.6
print('scaleHeight  $scaleHeight');

Orientation orientation = ScreenUtil().orientation;// 屏幕方向 .portrait
print('orientation  $orientation');
设置屏幕的Container的宽度是屏幕宽度的一半
/// 宽高是宽度的 0.5 倍 , 显示正方形
Container(
  width: 0.5.sw,
  height: 0.5.sw,
  color: Colors.green,
),
根据宽度进行设置
//方式一:
ScreenUtil().setWidth(540)  //根据屏幕宽度适配尺寸

//方式二:
540.w
根据高度进行设置
//方式一:
ScreenUtil().setHeight(200) //根据屏幕高度适配尺寸(一般根据宽度适配即可)

//方式二:
200.h
根据宽度或高度中的较小者进行调整
//方式一:
ScreenUtil().radius(200)    //根据宽度或高度中的较小者进行调整

//方式二:
200.r
字体大小适配
ScreenUtil().setSp(24)      //字体大小适配

//方式一:
Text("Hello", style: TextStyle(fontSize: ScreenUtil().setSp(24)),),

//方式二:
Text("Hello", style: TextStyle(fontSize: 24.sp),),
除了上面 4 种扩展属性以外,还提供了 sm 以及 sw、 sh
sm :取数值本身与 sp 的值最小的值,如 12.sm 则取 12 与 12.sp 的值进行比较,取最小的值。
sw :screen width 的缩写,即屏幕宽度,作用是按屏幕宽度比例返回值。如 0.2.sw 则返回屏幕宽度的 20%,1.sw 则是整个屏幕宽度
sh :screen height 的缩写,及屏幕高度,作用与 sw 类似,返回指定比例的屏幕高度值。如 1.sh 为整个屏幕高度
注意
如果使用sp去设置字体,那么字体会根据屏幕的宽高缩放字体的,如果需要设置成,所有屏幕的字体大小都一样的可以像下面这么设计:
全局设置:
MaterialApp(
  debugShowCheckedModeBanner: false,
  title: 'Flutter_ScreenUtil',
  theme: ThemeData(
    primarySwatch: Colors.blue,
  ),
  builder: (context, widget) {
    return MediaQuery(
      ///设置文字大小不随系统设置改变
      data: MediaQuery.of(context).copyWith(textScaleFactor: 1.0),
      child: widget,
    );
  },
  home: HomePage(title: 'FlutterScreenUtil Demo'),
),
Text 单独设置:
Text("text", textScaleFactor: 1.0)
其他 Api
除了适配的 api 以外,flutter_screenutil 还提供了很多实用的 api ,如下 :
ScreenUtil().pixelRatio :设备的像素密度
ScreenUtil().screenWidth :屏幕宽度,等同于 1.sw
ScreenUtil().screenHeight :屏幕高度,等同于 1.sh
ScreenUtil().bottomBarHeight :底部导航高度,如全屏底部按键的高度
ScreenUtil().statusBarHeight :状态栏高度
ScreenUtil().textScaleFactor :系统字体缩放比例
ScreenUtil().scaleWidth :实际宽度与设计图宽度的比例
ScreenUtil().scaleHeight :实际高度与设计图高度的比例
ScreenUtil().orientation :屏幕方向