k8s之环境部署
一,环境部署简介
1,kubeadm方式进行部署

master主机
	--api-server
	--controller-manager
	--scheduler
	--etcd
	--flannel
	--coredns
	--kube-proxy

node主机
	-- kubelet
	-- kube-proxy
	-- flannel

基础环境
	-- docker

依赖环境
	-- docker仓库(harbor)


2,主机安排

	master1 10.10.10.12
	master2 10.10.10.13
	master3 10.10.10.14
	node1 10.10.10.15
	node2 10.10.10.16
	ha1 10.10.10.17
	ha2 10.10.10.18
	harbor 10.10.10.19
二,部署前准备工作
1,修改主机名

在每台主机的/etc/hosts文件中加入下面内容
vim /etc/hosts

10.0.0.12master1.whp.com master1
10.0.0.13 master2.whp.com master2
10.0.0.14 master3.whp.com master3
10.0.0.15 node1.whp.com node1
10.0.0.16 node2.whp.com node2
10.0.0.17 ha1.whp.com ha1
10.0.0.18 ha2 whp.com ha2
10.0.0.19 register.whp.com register

[root@localhost ~]# hostnamectl set-hostname master1
[root@localhost ~]# ssh [email protected] "hostnamectl set-hostname node1"
[root@localhost ~]# ssh [email protected] "hostnamectl set-hostname node2"
[root@localhost ~]# ssh [email protected] "hostnamectl set-hostname register"

[root@localhost ~]# exec /bin/bash
[root@localhost ~]# ssh [email protected] "/bin/bash"
[root@localhost ~]# ssh [email protected] "/bin/bash"
[root@localhost ~]# ssh [email protected] "/bin/bash"

2,关闭交换分区


临时关闭
swapoff -a
[root@master1 ~]# ssh [email protected] "swapoff -a"
[root@master1 ~]# ssh [email protected] "swapoff -a"
永久关闭
sed -i 's/.*swap.*/#&/' /etc/fstab
[root@master1 ~]# ssh [email protected] "sed -i 's/.*swap.*/#&/' /etc/fstab"
[root@master1 ~]# ssh [email protected] "sed -i 's/.*swap.*/#&/' /etc/fstab"

内核关闭
cat >> /etc/sysctl.d/k8s.conf << EOF
vm.swappiness=0
#配置转发
net.bridge.bridge-nf-call-iptables = 1
net.bridge.bridge-nf-call-ip6tables = 1
net.ipv4.ip_forward = 1
EOF


[root@localhost ~]# sysctl -p /etc/sysctl.d/k8s.conf
[root@localhost ~]# modprobe br_netfilter
[root@localhost ~]# modprobe overlay
三,环境部署
1,安装docker(所有节点都安装)
	wget -qO- https://get.docker.com/ |sh

2,安装harbor

	(1),下载离线安装包(2.3.2版本)
	https://github.com/goharbor/harbor/releases?page=2

	(2),把下载好的安装包上传到10.0.0.19上
	[root@register softs]# ls
	harbor-offline-installer-v2.3.2.tgz

	(3),安装docker-compose(harbor依赖docker-compose)
	[root@register harbor]# yum install docker-compose -y

	(4),解压harbor离线安装包到对应目录
	[root@register softs]# tar xf harbor-offline-installer-v2.3.2.tgz -C /usr/local/

	(5),配置harbor
		[root@register harbor]# cd /usr/local/harbor/
		加载镜像:
		[root@register harbor]# docker load < harbor.v2.3.2.tar.gz


	[root@register harbor]# docker images
	REPOSITORY                      TAG       IMAGE ID       CREATED        SIZE
	goharbor/harbor-exporter        v2.3.2    37f41f861e77   4 months ago   81.1MB
	goharbor/chartmuseum-photon     v2.3.2    ad5cd42a4977   4 months ago   179MB
	goharbor/redis-photon           v2.3.2    812c6f5c260b   4 months ago   155MB
	goharbor/trivy-adapter-photon   v2.3.2    3f07adb2e138   4 months ago   130MB
	goharbor/notary-server-photon   v2.3.2    49aadd974d6d   4 months ago   110MB
	goharbor/notary-signer-photon   v2.3.2    6051589deaf9   4 months ago   108MB
	goharbor/harbor-registryctl     v2.3.2    0e551984a22c   4 months ago   133MB
	goharbor/registry-photon        v2.3.2    193d952b4f10   4 months ago   81.9MB
	goharbor/nginx-photon           v2.3.2    83bd32904c30   4 months ago   45MB
	goharbor/harbor-log             v2.3.2    dae52c0f300e   4 months ago   159MB
	goharbor/harbor-jobservice      v2.3.2    5841788c17a4   4 months ago   211MB
	goharbor/harbor-core            v2.3.2    cf6ad69c2dd4   4 months ago   193MB
	goharbor/harbor-portal          v2.3.2    4f68bc2f0a41   4 months ago   58.2MB
	goharbor/harbor-db              v2.3.2    3cc534e09148   4 months ago   227MB
	goharbor/prepare                v2.3.2    c2bd99a13157   4 months ago   252MB


	修改配置:
	[root@register harbor]# cp harbor.yml.tmpl harbor.yml
	[root@register harbor]# vim harbor.yml
	修改如下配置:
	34:harbor_admin_password: 123456
	47:data_volume: /data/harbor
	如果没有启用https,注释掉相关部分的内容


	3,启动harbor
	[root@register harbor]# ./prepare
	[root@register harbor]# ./install.sh

	4,编辑服务启动文件

	vim /usr/lib/systemd/system/harbor.service

	[Unit]
	Description=Harbar
	After=docker.service systemd-networkd.service systemd-resolved.service
	Requires=docker.service
	Documentation=http://github.com/vmware/harbor

	[Service]
	Type=simple
	Restart=on-failure
	RestartSec=5

	ExecStart=/usr/bin/docker-compose -f /usr/local/harbor/docker-compose.yml up
	ExecStop=/usr/bin/docker-compose -f /usr/local/harbor/docker-compose.yml down

4,创建普通用户
	whp,密码Whp@123456

3,kubeadm方式安装kubenetes
参考资料:https://developer.aliyun.com/mirror/kubernetes

配置yum源
	cat < /etc/yum.repos.d/kubernetes.repo
	[kubernetes]
	name=Kubernetes
	baseurl=https://mirrors.aliyun.com/kubernetes/yum/repos/kubernetes-el7-x86_64/
	enabled=1
	gpgcheck=1
	repo_gpgcheck=1
	gpgkey=https://mirrors.aliyun.com/kubernetes/yum/doc/yum-key.gpg 	https://mirrors.aliyun.com/kubernetes/yum/doc/rpm-package-key.gpg
	EOF
setenforce 0
查看有哪些版本
[root@master1 ~]# yum list kubelet --showduplicates
已加载插件:fastestmirror
Loading mirror speeds from cached hostfile
 * base: mirrors.163.com
 * epel: mirrors.bfsu.edu.cn
 * extras: mirrors.163.com
 * remi-safe: mirrors.tuna.tsinghua.edu.cn
 * updates: mirrors.163.com
已安装的软件包
kubelet.x86_64                                                      1.22.1-0                                                       @kubernetes
可安装的软件包
kubelet.x86_64                                                      1.5.4-0                                                        kubernetes
kubelet.x86_64                                                      1.5.4-1                                                        kubernetes
kubelet.x86_64                                                      1.6.0-0                                                        kubernetes
kubelet.x86_64                                                      1.6.0-1                                                        kubernetes
kubelet.x86_64                                                      1.6.1-0                                                        kubernetes
kubelet.x86_64                                                      1.6.1-1                                                        kubernetes
kubelet.x86_64                                                      1.6.2-0                                                        kubernetes
kubelet.x86_64                                                      1.6.2-1                                                        kubernetes
kubelet.x86_64                                                      1.6.3-0                                                        kubernetes
kubelet.x86_64                                                      1.6.3-1                                                        kubernetes
kubelet.x86_64                                                      1.6.4-0                                                        kubernetes
kubelet.x86_64                                                      1.6.4-1                                                        kubernetes
kubelet.x86_64                                                      1.6.5-0                                                        kubernetes
kubelet.x86_64                                                      1.6.5-1                                                        kubernetes
kubelet.x86_64                                                      1.6.6-0                                                        kubernetes
kubelet.x86_64                                                      1.6.6-1                                                        kubernetes
kubelet.x86_64                                                      1.6.7-0                                                        kubernetes
kubelet.x86_64                                                      1.6.7-1                                                        kubernetes
kubelet.x86_64                                                      1.6.8-0                                                        kubernetes
kubelet.x86_64                                                      1.6.8-1                                                        kubernetes
kubelet.x86_64                                                      1.6.9-0                                                        kubernetes
kubelet.x86_64                                                      1.6.9-1                                                        kubernetes
kubelet.x86_64                                                      1.6.10-0                                                       kubernetes
kubelet.x86_64                                                      1.6.10-1                                                       kubernetes
kubelet.x86_64                                                      1.6.11-0                                                       kubernetes
kubelet.x86_64                                                      1.6.11-1                                                       kubernetes
kubelet.x86_64                                                      1.6.12-0                                                       kubernetes
kubelet.x86_64                                                      1.6.12-1                                                       kubernetes
kubelet.x86_64                                                      1.6.13-0                                                       kubernetes

yum install kubelet-1.22.1-0 kubeadm-1.22.1-0 kubectl-1.22.1-0 -y
systemctl enable kubelet && systemctl start kubelet


启动kubelet报错:
E0218 01:01:38.663049   20525 server.go:302] "Failed to run kubelet" err="failed to run Kubelet: misconfiguration: kubelet cgroup driver: \"cgroupfs\" is different from docker cgroup driver: \"systemd\""

原因:kubelet的cgroup driver和docker的cgroup driver不一致,当前kubelet的cgroup driver 是"systemd”,而kubelet的cgroup driver是"cgroupfs"
解决办法:修改kubelet的cgroup driver为"systemd”


报错:
 master1 kubelet: E0306 22:45:08.261618    2617 server.go:206] "Failed to load kubelet config file" err="failed to load Kubelet config file /vn /var/lib/kubelet/config.yaml: no such file or directory" path="/var/lib/kubelet/config.yaml"


初始化master
可以通过配置文件的方式来初始化master,我们需要手动修改一些文件中的配置项,来使集群被初始化成我们想要的样子。
初始化方法1:

[root@node2 ~]#  kubeadm init --kubernetes-version=1.22.1 --apiserver-advertise-address=10.0.0.12 --image-repository 10.0.0.19:80/google_containers --service-cidr=10.96.0.0/12 --pod-network-cidr=10.244.0.0/16 --ignore-preflight-errors=Swap
[init] Using Kubernetes version: v1.22.1
[preflight] Running pre-flight checks
[preflight] Pulling images required for setting up a Kubernetes cluster
[preflight] This might take a minute or two, depending on the speed of your internet connection
[preflight] You can also perform this action in beforehand using 'kubeadm config images pull'
[certs] Using certificateDir folder "/etc/kubernetes/pki"
[certs] Generating "ca" certificate and key
[certs] Generating "apiserver" certificate and key
[certs] apiserver serving cert is signed for DNS names [kubernetes kubernetes.default kubernetes.default.svc kubernetes.default.svc.cluster.local node2] and IPs [10.96.0.1 10.0.0.12]
[certs] Generating "apiserver-kubelet-client" certificate and key
[certs] Generating "front-proxy-ca" certificate and key
[certs] Generating "front-proxy-client" certificate and key
[certs] Generating "etcd/ca" certificate and key
[certs] Generating "etcd/server" certificate and key
[certs] etcd/server serving cert is signed for DNS names [localhost node2] and IPs [10.0.0.12 127.0.0.1 ::1]
[certs] Generating "etcd/peer" certificate and key
[certs] etcd/peer serving cert is signed for DNS names [localhost node2] and IPs [10.0.0.12 127.0.0.1 ::1]
[certs] Generating "etcd/healthcheck-client" certificate and key
[certs] Generating "apiserver-etcd-client" certificate and key
[certs] Generating "sa" key and public key
[kubeconfig] Using kubeconfig folder "/etc/kubernetes"
[kubeconfig] Writing "admin.conf" kubeconfig file
[kubeconfig] Writing "kubelet.conf" kubeconfig file
[kubeconfig] Writing "controller-manager.conf" kubeconfig file
[kubeconfig] Writing "scheduler.conf" kubeconfig file
[kubelet-start] Writing kubelet environment file with flags to file "/var/lib/kubelet/kubeadm-flags.env"
[kubelet-start] Writing kubelet configuration to file "/var/lib/kubelet/config.yaml"
[kubelet-start] Starting the kubelet
[control-plane] Using manifest folder "/etc/kubernetes/manifests"
[control-plane] Creating static Pod manifest for "kube-apiserver"
[control-plane] Creating static Pod manifest for "kube-controller-manager"
[control-plane] Creating static Pod manifest for "kube-scheduler"
[etcd] Creating static Pod manifest for local etcd in "/etc/kubernetes/manifests"
[wait-control-plane] Waiting for the kubelet to boot up the control plane as static Pods from directory "/etc/kubernetes/manifests". This can take up to 4m0s
[apiclient] All control plane components are healthy after 12.505301 seconds
[upload-config] Storing the configuration used in ConfigMap "kubeadm-config" in the "kube-system" Namespace
[kubelet] Creating a ConfigMap "kubelet-config-1.22" in namespace kube-system with the configuration for the kubelets in the cluster
[upload-certs] Skipping phase. Please see --upload-certs
[mark-control-plane] Marking the node node2 as control-plane by adding the labels: [node-role.kubernetes.io/master(deprecated) node-role.kubernetes.io/control-plane node.kubernetes.io/exclude-from-external-load-balancers]
[mark-control-plane] Marking the node node2 as control-plane by adding the taints [node-role.kubernetes.io/master:NoSchedule]
[bootstrap-token] Using token: zkd4kn.5acfjbqhh88kqytj
[bootstrap-token] Configuring bootstrap tokens, cluster-info ConfigMap, RBAC Roles
[bootstrap-token] configured RBAC rules to allow Node Bootstrap tokens to get nodes
[bootstrap-token] configured RBAC rules to allow Node Bootstrap tokens to post CSRs in order for nodes to get long term certificate credentials
[bootstrap-token] configured RBAC rules to allow the csrapprover controller automatically approve CSRs from a Node Bootstrap Token
[bootstrap-token] configured RBAC rules to allow certificate rotation for all node client certificates in the cluster
[bootstrap-token] Creating the "cluster-info" ConfigMap in the "kube-public" namespace
[kubelet-finalize] Updating "/etc/kubernetes/kubelet.conf" to point to a rotatable kubelet client certificate and key
[addons] Applied essential addon: CoreDNS
[addons] Applied essential addon: kube-proxy

Your Kubernetes control-plane has initialized successfully!

To start using your cluster, you need to run the following as a regular user:

  mkdir -p $HOME/.kube
  sudo cp -i /etc/kubernetes/admin.conf $HOME/.kube/config
  sudo chown $(id -u):$(id -g) $HOME/.kube/config

Alternatively, if you are the root user, you can run:

  export KUBECONFIG=/etc/kubernetes/admin.conf

You should now deploy a pod network to the cluster.
Run "kubectl apply -f [podnetwork].yaml" with one of the options listed at:
  https://kubernetes.io/docs/concepts/cluster-administration/addons/

Then you can join any number of worker nodes by running the following on each as root:

kubeadm join 10.0.0.12:6443 --token nh5cu9.us4lj0kydwlef92t \
--discovery-token-ca-cert-hash sha256:b56b1420c2b0de21c209de11bc3ab7ca2d20a5aee7a42599e9683c413b5e1069

初始化方法2:
生成初始化文件
kubeadm config print init-defaults > init.config.yaml
 修改init.config.yaml文件

将advertiseAddress: 1.2.3.4修改为本机IP地址 10.0.0.12
将imageRepository: k8s.gcr.io修改为imageRepository: registry.cn-hangzhou.aliyuncs.com/google_containers , 这里是修改成阿里云的仓库。
修改节点名称,如果不修改就是默认的’node'
修改podSubnet,如果采用calico作为网络插件,需要改为192.168.0.0/16


	[root@node1 ~]#  kubeadm init --config=init.config.yaml
	[init] Using Kubernetes version: v1.22.0
	[preflight] Running pre-flight checks
	error execution phase preflight: [preflight] Some fatal errors occurred:
		[ERROR NumCPU]: the number of available CPUs 1 is less than the required 2
	[preflight] If you know what you are doing, you can make a check non-fatal with `--ignore-preflight-errors=...`
	To see the stack trace of this error execute with --v=5 or higher
	[root@node1 ~]#  kubeadm init --config=init.config.yaml
	[init] Using Kubernetes version: v1.22.0
	[preflight] Running pre-flight checks
	[preflight] Pulling images required for setting up a Kubernetes cluster
	[preflight] This might take a minute or two, depending on the speed of your internet connection
	[preflight] You can also perform this action in beforehand using 'kubeadm config images pull'
	[certs] Using certificateDir folder "/etc/kubernetes/pki"
	[certs] Generating "ca" certificate and key
	[certs] Generating "apiserver" certificate and key
	[certs] apiserver serving cert is signed for DNS names [kubernetes kubernetes.default kubernetes.default.svc kubernetes.default.svc.cluster.local master1] and IPs [10.96.0.1 10.0.0.12]
	[certs] Generating "apiserver-kubelet-client" certificate and key
	[certs] Generating "front-proxy-ca" certificate and key
	[certs] Generating "front-proxy-client" certificate and key
	[certs] Generating "etcd/ca" certificate and key
	[certs] Generating "etcd/server" certificate and key
	[certs] etcd/server serving cert is signed for DNS names [localhost master1] and IPs [10.0.0.12 127.0.0.1 ::1]
	[certs] Generating "etcd/peer" certificate and key
	[certs] etcd/peer serving cert is signed for DNS names [localhost master1] and IPs [10.0.0.12 127.0.0.1 ::1]
	[certs] Generating "etcd/healthcheck-client" certificate and key
	[certs] Generating "apiserver-etcd-client" certificate and key
	[certs] Generating "sa" key and public key
	[kubeconfig] Using kubeconfig folder "/etc/kubernetes"
	[kubeconfig] Writing "admin.conf" kubeconfig file
	[kubeconfig] Writing "kubelet.conf" kubeconfig file
	[kubeconfig] Writing "controller-manager.conf" kubeconfig file
	[kubeconfig] Writing "scheduler.conf" kubeconfig file
	[kubelet-start] Writing kubelet environment file with flags to file "/var/lib/kubelet/kubeadm-flags.env"
	[kubelet-start] Writing kubelet configuration to file "/var/lib/kubelet/config.yaml"
	[kubelet-start] Starting the kubelet
	[control-plane] Using manifest folder "/etc/kubernetes/manifests"
	[control-plane] Creating static Pod manifest for "kube-apiserver"
	[control-plane] Creating static Pod manifest for "kube-controller-manager"
	[control-plane] Creating static Pod manifest for "kube-scheduler"
	[etcd] Creating static Pod manifest for local etcd in "/etc/kubernetes/manifests"
	[wait-control-plane] Waiting for the kubelet to boot up the control plane as static Pods from directory "/etc/kubernetes/manifests". This can take up to 4m0s
	[apiclient] All control plane components are healthy after 11.506754 seconds
	[upload-config] Storing the configuration used in ConfigMap "kubeadm-config" in the "kube-system" Namespace
	[kubelet] Creating a ConfigMap "kubelet-config-1.22" in namespace kube-system with the configuration for the kubelets in the cluster
	[upload-certs] Skipping phase. Please see --upload-certs
	[mark-control-plane] Marking the node master1 as control-plane by adding the labels: [node-role.kubernetes.io/master(deprecated) node-role.kubernetes.io/control-plane node.kubernetes.io/exclude-from-external-load-balancers]
	[mark-control-plane] Marking the node master1 as control-plane by adding the taints [node-role.kubernetes.io/master:NoSchedule]
	[bootstrap-token] Using token: abcdef.0123456789abcdef
	[bootstrap-token] Configuring bootstrap tokens, cluster-info ConfigMap, RBAC Roles
	[bootstrap-token] configured RBAC rules to allow Node Bootstrap tokens to get nodes
	[bootstrap-token] configured RBAC rules to allow Node Bootstrap tokens to post CSRs in order for nodes to get long term certificate credentials
	[bootstrap-token] configured RBAC rules to allow the csrapprover controller automatically approve CSRs from a Node Bootstrap Token
	[bootstrap-token] configured RBAC rules to allow certificate rotation for all node client certificates in the cluster
	[bootstrap-token] Creating the "cluster-info" ConfigMap in the "kube-public" namespace
	[kubelet-finalize] Updating "/etc/kubernetes/kubelet.conf" to point to a rotatable kubelet client certificate and key
	[addons] Applied essential addon: CoreDNS
	[addons] Applied essential addon: kube-proxy

	Your Kubernetes control-plane has initialized successfully!

	To start using your cluster, you need to run the following as a regular user:

	  mkdir -p $HOME/.kube
	  sudo cp -i /etc/kubernetes/admin.conf $HOME/.kube/config
	  sudo chown $(id -u):$(id -g) $HOME/.kube/config

	Alternatively, if you are the root user, you can run:

	  export KUBECONFIG=/etc/kubernetes/admin.conf

	You should now deploy a pod network to the cluster.
	Run "kubectl apply -f [podnetwork].yaml" with one of the options listed at:
	  https://kubernetes.io/docs/concepts/cluster-administration/addons/

	Then you can join any number of worker nodes by running the following on each as root:

	kubeadm join 10.0.0.12:6443 --token abcdef.0123456789abcdef \
		--discovery-token-ca-cert-hash sha256:c75c40197c8bc74c81f3fe6f6e06653fe2310878e232c8ba0b430f2f44b52154

	[root@master1 ~]# ls -al /var/lib/kubelet/
	总用量 20
	drwxr-xr-x.  8 root root  208 3月   6 23:14 .
	drwxr-xr-x. 34 root root 4096 3月   6 23:09 ..
	-rw-r--r--.  1 root root  893 3月   6 23:09 config.yaml   **# 生成了config.yaml文件,此时再去启动kubelet就不会再报错了**
	-rw-------.  1 root root   62 2月  18 02:45 cpu_manager_state
	drwxr-xr-x.  2 root root   45 3月   6 23:09 device-plugins
	-rw-r--r--.  1 root root  166 3月   6 23:09 kubeadm-flags.env
	-rw-------.  1 root root   61 2月  18 02:45 memory_manager_state
	drwxr-xr-x.  2 root root  124 3月   6 23:09 pki
	drwxr-x---.  2 root root    6 2月  18 02:45 plugins
	drwxr-x---.  2 root root    6 2月  18 02:45 plugins_registry
	drwxr-x---.  2 root root   26 3月   6 23:09 pod-resources
	drwxr-x---.  7 root root  210 3月   6 23:09 pods


	执行提示中的命令:
	To start using your cluster, you need to run the following as a regular user:

	  mkdir -p $HOME/.kube
	  sudo cp -i /etc/kubernetes/admin.conf $HOME/.kube/config
	  sudo chown $(id -u):$(id -g) $HOME/.kube/config

	Alternatively, if you are the root user, you can run:

	  export KUBECONFIG=/etc/kubernetes/admin.conf


[root@node2 ~]# kubectl get cs
Warning: v1 ComponentStatus is deprecated in v1.19+
NAME                 STATUS      MESSAGE                                                                                       ERROR
scheduler            Unhealthy   Get "http://127.0.0.1:10251/healthz": dial tcp 127.0.0.1:10251: connect: connection refused
controller-manager   Healthy     ok
etcd-0               Healthy     {"health":"true","reason":""}
[root@node2 ~]# vim /etc/kubernetes/
admin.conf               kubelet.conf             pki/
controller-manager.conf  manifests/               scheduler.conf
[root@node2 ~]# vim /etc/kubernetes/manifests/

[root@node2 ~]# vim /etc/kubernetes/manifests/kube-scheduler.yaml
将- --port=0 这行注释掉,上面scheduler            Unhealthy就会恢复正常

[root@node2 ~]# kubectl get cs
Warning: v1 ComponentStatus is deprecated in v1.19+
NAME                 STATUS    MESSAGE                         ERROR
scheduler            Healthy   ok
controller-manager   Healthy   ok
etcd-0               Healthy   {"health":"true","reason":""}

查看节点状态
[root@node2 ~]# kubectl get nodes
NAME    STATUS     ROLES                  AGE   VERSION
node2   NotReady   control-plane,master   10m   v1.22.1

因为还没有安装网络插件

You should now deploy a pod network to the cluster.
Run "kubectl apply -f [podnetwork].yaml" with one of the options listed at:
  https://kubernetes.io/docs/concepts/cluster-administration/addons/
到这地址上面去下载kube-flannel.yml文件

[root@node2 flannel]# kubectl apply -f kube-flannel.yml
Warning: policy/v1beta1 PodSecurityPolicy is deprecated in v1.21+, unavailable in v1.25+
podsecuritypolicy.policy/psp.flannel.unprivileged created
clusterrole.rbac.authorization.k8s.io/flannel created
clusterrolebinding.rbac.authorization.k8s.io/flannel created
serviceaccount/flannel created
configmap/kube-flannel-cfg created
daemonset.apps/kube-flannel-ds created


[root@node2 flannel]# kubectl get node
NAME    STATUS   ROLES                  AGE   VERSION
node2   Ready    control-plane,master   32m   v1.22.1


添加node节点到集群(10.0.0.15,10.0.0.16)
首先两个节点也需要安装docker,kubelet,kubeadm 安装方法跟master节点一样

[root@node1 ~]# kubeadm join 10.0.0.12:6443 --token zkd4kn.5acfjbqhh88kqytj \
> --discovery-token-ca-cert-hash sha256:40987a81b9407d434bf4c57fc2ef29bae1b58015e30bc56057381dde1162ee2f

[preflight] Running pre-flight checks
	[WARNING Service-Kubelet]: kubelet service is not enabled, please run 'systemctl enable kubelet.service'
[preflight] Reading configuration from the cluster...
[preflight] FYI: You can look at this config file with 'kubectl -n kube-system get cm kubeadm-config -o yaml'
[kubelet-start] Writing kubelet configuration to file "/var/lib/kubelet/config.yaml"
[kubelet-start] Writing kubelet environment file with flags to file "/var/lib/kubelet/kubeadm-flags.env"
[kubelet-start] Starting the kubelet
[kubelet-start] Waiting for the kubelet to perform the TLS Bootstrap...

This node has joined the cluster:
* Certificate signing request was sent to apiserver and a response was received.
* The Kubelet was informed of the new secure connection details.

Run 'kubectl get nodes' on the control-plane to see this node join the cluster

节点添加成功后在master节点执行kubectl get nodes 命令显示如下内容说明节点创建成功
[root@master1 flannel]# kubectl get nodes
NAME      STATUS   ROLES                  AGE   VERSION
master1   Ready    control-plane,master   26m   v1.22.1
node1     Ready                     15m   v1.22.1
node2     Ready                     22s   v1.22.1
四,命令实践
1,kubectl get 的常见用法
[root@master1 flannel]# kubectl get cs #查看master节点kubernetes核心组件的状态
Warning: v1 ComponentStatus is deprecated in v1.19+
NAME STATUS MESSAGE ERROR
scheduler Healthy ok
controller-manager Healthy ok
etcd-0 Healthy {"health":"true","reason":""}
[root@master1 flannel]# kubectl get nodes # 查看kubernetes集群中各个节点的状态
NAME STATUS ROLES AGE VERSION
master1 Ready control-plane,master 33m v1.22.1
node1 Ready 22m v1.22.1
node2 Ready 7m32s v1.22.1
[root@master1 flannel]# kubectl get ns # 查看namespace的信息
NAME STATUS AGE
default Active 33m
kube-node-lease Active 33m
kube-public Active 33m
kube-system Active 33m
[root@master1 flannel]# kubectl get pod -n kube-system # 查看具体某个namespace里面的信息
NAME READY STATUS RESTARTS AGE
coredns-fd5877b89-q5ns4 1/1 Running 0 35m
coredns-fd5877b89-qmsdj 1/1 Running 0 35m
etcd-master1 1/1 Running 0 35m
kube-apiserver-master1 1/1 Running 0 35m
kube-controller-manager-master1 1/1 Running 0 35m
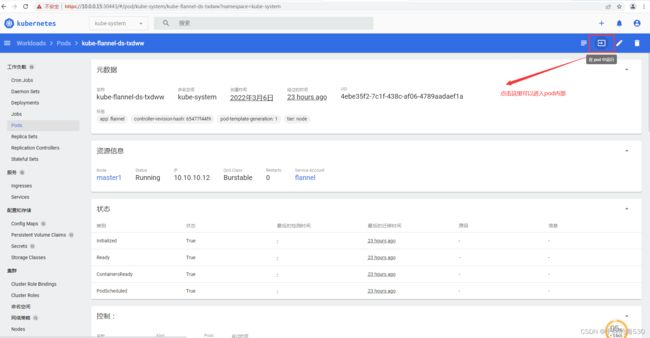
kube-flannel-ds-kwptj 1/1 Running 0 9m27s
kube-flannel-ds-sh7bn 1/1 Running 0 24m
kube-flannel-ds-txdww 1/1 Running 0 27m
kube-proxy-94dk2 1/1 Running 0 24m
kube-proxy-pcr2n 1/1 Running 0 9m27s
kube-proxy-z2vqr 1/1 Running 0 35m
kube-scheduler-master1 1/1 Running 0 28m
2,命令tab补全配置
[root@master1 flannel]# echo "source <(kubectl completion bash)" >> ~/.bashrc
[root@master1 flannel]# source ~/.bashrc
3,污点处理
	k8s主节点默认是不作为工作节点参与任务调度的,它只负责管理k8s集群

	[root@master1 ~]# kubectl describe nodes master
	Name:               master1
	Roles:              control-plane,master
	Labels:             beta.kubernetes.io/arch=amd64
	                    beta.kubernetes.io/os=linux
	                    kubernetes.io/arch=amd64
	                    kubernetes.io/hostname=master1
	                    kubernetes.io/os=linux
	                    node-role.kubernetes.io/control-plane=
	                    node-role.kubernetes.io/master=
	                    node.kubernetes.io/exclude-from-external-load-balancers=
	Annotations:        flannel.alpha.coreos.com/backend-data: null
	                    flannel.alpha.coreos.com/backend-type: host-gw
	                    flannel.alpha.coreos.com/kube-subnet-manager: true
	                    flannel.alpha.coreos.com/public-ip: 10.10.10.12
	                    kubeadm.alpha.kubernetes.io/cri-socket: /var/run/dockershim.sock
	                    node.alpha.kubernetes.io/ttl: 0
	                    volumes.kubernetes.io/controller-managed-attach-detach: true
	CreationTimestamp:  Sun, 06 Mar 2022 22:13:50 +0800
	Taints:             node-role.kubernetes.io/master:NoSchedule  # NoSchedule 定义次节点不参与工作调度,

假如工作节点资源不够,希望master节点也承担一部分业务负载改如何处理?


	清除master上面的污点
	[root@master1 ~]# kubectl taint nodes --all node-role.kubernetes.io/master-node/master untainted

	重新给master添加污点
	[root@master1 ~]# kubectl taint nodes master node-role.kubernetes.io/master:NoSchedule
4,token处理
token默认有效时间是24小时

[root@master1 ~]# kubeadm token list
TOKEN                     TTL         EXPIRES                USAGES                   DESCRIPTION                                                EXTRA GROUPS
nh5cu9.us4lj0kydwlef92t   22h         2022-03-07T14:13:52Z   authentication,signing   The default bootstrap token generated by 'kubeadm init'.   system:bootstrappers:kubeadm:default-node-token
5,node的隔离与恢复
node的隔离与恢复有几种方式:

通过kubectl的子命令:
[root@master1 flannel]# kubectl cordon node1  (cordon将node1节点隔离起来,不再参与调度)
node/node1 cordoned
[root@master1 flannel]# kubectl get nodes
NAME      STATUS                     ROLES                  AGE   VERSION
master1   Ready                      control-plane,master   68m   v1.22.1
node1     Ready,SchedulingDisabled                    57m   v1.22.1
node2     Ready                                       42m   v1.22.1
[root@master1 flannel]# kubectl uncordon node1 (uncordon将node1节点解除隔离起来)
node/node1 uncordoned
[root@master1 flannel]# kubectl get nodes
NAME      STATUS   ROLES                  AGE   VERSION
master1   Ready    control-plane,master   69m   v1.22.1
node1     Ready                     58m   v1.22.1
node2     Ready                     43m   v1.22.1


通过编写配置文件的方式:
后续补充
6,node节点删除
五,dashboard安装配置
参考资料:https://kubernetes.io/docs/concepts/cluster-administration/addons/
				  https://github.com/kubernetes/dashboard#kubernetes-dashboard

下载镜像:k8s-dashboard-v2.3.1.tar

[root@master1 softs]# docker load < k8s-dashboard-v2.3.1.tar
8ca79a390046: Loading layer [==================================================>]  223.1MB/223.1MB
c94f86b1c637: Loading layer [==================================================>]  3.072kB/3.072kB
Loaded image: 10.0.0.19:80/google_containers/dashboard:v2.3.1
6de384dd3099: Loading layer [==================================================>]  34.55MB/34.55MB
a652c34ae13a: Loading layer [==================================================>]  3.584kB/3.584kB
Loaded image: 10.0.0.19:80/google_containers/metrics-scraper:v1.0.6

把镜像推送到10.0.0.19私有仓库
docker push 10.0.0.19:80/google_containers/dashboard:v2.3.1
docker push 10.0.0.19:80/google_containers/metrics-scraper:v1.0.6

下载recommended.yaml 文件
[root@master1 dashboard]# wget 	https://raw.githubusercontent.com/kubernetes/dashboard/v2.3.1/aio/deploy/recommended.yaml

修改recommended.yaml
			把镜像仓库地址改为私有harbor仓库地址
          image: 10.0.0.19:80/google_containers/dashboard:v2.3.1
          image: 10.0.0.19:80/google_containers/metrics-scraper:v1.0.6

         spec:
			  ports:
			    - port: 443
			      targetPort: 8443
			      nodePort: 30443   #新增
			  type: NodePort			#新增  新增这个参数可以在所有节点上都开启一个端口用于dashboard访问
			  selector:
			    k8s-app: kubernetes-dashboard
安装dashboard
[root@master1 dashboard]# kubectl apply -f recommended.yaml
namespace/kubernetes-dashboard created
serviceaccount/kubernetes-dashboard created
service/kubernetes-dashboard created
secret/kubernetes-dashboard-certs created
secret/kubernetes-dashboard-csrf created
secret/kubernetes-dashboard-key-holder created
configmap/kubernetes-dashboard-settings created
role.rbac.authorization.k8s.io/kubernetes-dashboard created
clusterrole.rbac.authorization.k8s.io/kubernetes-dashboard created
rolebinding.rbac.authorization.k8s.io/kubernetes-dashboard created
clusterrolebinding.rbac.authorization.k8s.io/kubernetes-dashboard created
deployment.apps/kubernetes-dashboard created
service/dashboard-metrics-scraper created
Warning: spec.template.metadata.annotations[seccomp.security.alpha.kubernetes.io/pod]: deprecated since v1.19; use the "seccompProfile" field instead
deployment.apps/dashboard-metrics-scraper created

[root@master1 dashboard]# kubectl get all -n kubernetes-dashboard

NAME                                             READY   STATUS              RESTARTS   AGE
pod/dashboard-metrics-scraper-5ccc9dd85b-plxvj   0/1     ContainerCreating   0          64s
pod/kubernetes-dashboard-856748fbb8-w5dcq        0/1     ContainerCreating   0          64s

NAME                                TYPE        CLUSTER-IP       EXTERNAL-IP   PORT(S)         AGE
service/dashboard-metrics-scraper   ClusterIP   10.105.183.187           8000/TCP        64s
service/kubernetes-dashboard        NodePort    10.103.243.29            443:30443/TCP   75s

NAME                                        READY   UP-TO-DATE   AVAILABLE   AGE
deployment.apps/dashboard-metrics-scraper   0/1     1            0           64s
deployment.apps/kubernetes-dashboard        0/1     1            0           64s

NAME                                                   DESIRED   CURRENT   READY   AGE
replicaset.apps/dashboard-metrics-scraper-5ccc9dd85b   1         1         0       64s
replicaset.apps/kubernetes-dashboard-856748fbb8        1         1         0       64s

dashboard启动失败,查看信息发现状态为ImagePullBackOff
[root@master1 softs]# kubectl get pods --namespace=kubernetes-dashboard
NAME                                         READY   STATUS             RESTARTS   AGE
dashboard-metrics-scraper-5ccc9dd85b-plxvj   0/1     ImagePullBackOff   0          18m
kubernetes-dashboard-856748fbb8-w5dcq        0/1     ImagePullBackOff   0          18m

失败原因是10.0.0.19 上面harbor服务没有正常启动,重新启动一下harbor服务后就正常了
[root@master1 data]# kubectl get pods --namespace=kubernetes-dashboard
NAME                                         READY   STATUS    RESTARTS   AGE
dashboard-metrics-scraper-5ccc9dd85b-plxvj   1/1     Running   0          45m
kubernetes-dashboard-856748fbb8-w5dcq        1/1     Running   0          45m
创建专用服务账号
[root@master1 data]# kubectl create serviceaccount dashboard-admin -n kube-system
serviceaccount/dashboard-admin created
使用集群角色绑定
[root@master1 data]# kubectl create clusterrolebinding dashboard-admin --clusterrole=cluster-admin --serviceaccount=kube-system:dashboard-admin
clusterrolebinding.rbac.authorization.k8s.io/dashboard-admin created
查看创建的token
[root@master1 data]# kubectl -n kube-system get secret |grep dashboard-admin
dashboard-admin-token-2nwtj                      kubernetes.io/service-account-token   3      5m31s
查看token具体信息
[root@master1 data]# kubectl describe secret -n kube-system dashboard-admin-token-2nwtj
Name:         dashboard-admin-token-2nwtj
Namespace:    kube-system
Labels:
Annotations:  kubernetes.io/service-account.name: dashboard-admin
              kubernetes.io/service-account.uid: 31869c7b-6895-4b25-9eb3-5890ee391574

Type:  kubernetes.io/service-account-token

Data
====
token:      eyJhbGciOiJSUzI1NiIsImtpZCI6IlJGSVJQWUQxQ29NWFJSQ3UtZ3hfck9sd1cwN19YeHRBeWYxQmJlLXVydFUifQ.eyJpc3MiOiJrdWJlcm5ldGVzL3NlcnZpY2VhY2NvdW50Iiwia3ViZXJuZXRlcy5pby9zZXJ2aWNlYWNjb3VudC9uYW1lc3BhY2UiOiJrdWJlLXN5c3RlbSIsImt1YmVybmV0ZXMuaW8vc2VydmljZWFjY291bnQvc2VjcmV0Lm5hbWUiOiJkYXNoYm9hcmQtYWRtaW4tdG9rZW4tMm53dGoiLCJrdWJlcm5ldGVzLmlvL3NlcnZpY2VhY2NvdW50L3NlcnZpY2UtYWNjb3VudC5uYW1lIjoiZGFzaGJvYXJkLWFkbWluIiwia3ViZXJuZXRlcy5pby9zZXJ2aWNlYWNjb3VudC9zZXJ2aWNlLWFjY291bnQudWlkIjoiMzE4NjljN2ItNjg5NS00YjI1LTllYjMtNTg5MGVlMzkxNTc0Iiwic3ViIjoic3lzdGVtOnNlcnZpY2VhY2NvdW50Omt1YmUtc3lzdGVtOmRhc2hib2FyZC1hZG1pbiJ9.Zep7pznKvivKT6rGAu7cNgTj4DzCcSel9DOLQFEKGr74T2uwGF6CDVdN4dCOlhiN2ZWsU2WEZNdQGrdzaSOUy9OdeBZ1jrF2IwcOls615dIkZNKX1dFhR4_7gYpjZjs_5OMcYk6S2ZXRD7kkkwChKVr1IaP60sLNx0JHrKgn-cyMXOQSizYHTYERzeNt_IaWoLu0UhKkMK6blCL7JxmtTRFu8z6Hqn_fRYofPSZfZjn1S5FIO82xJBlFVzUqFBC-vDG_mY5PySTaMXFT5GT7Q-udUNXVIHv0Hf58jhoczYUWaQEkUrj7Q1qe78M2AN9F_avIRefY5ZAoe0fq28YdyA
ca.crt:     1099 bytes
namespace:  11 bytes
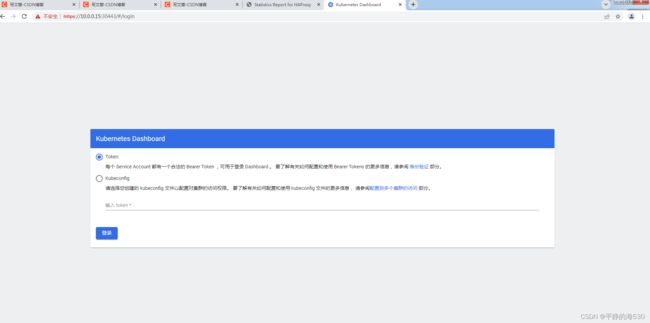
使用上面生成的token就能登录dashboard了
注意:生成的token是有时间限制的,所以在生产环境中推荐使用配置文件的方式登录