【小白】使用 Amazon SageMaker 构建机器学习应用【附全程部署视频】
使用 Amazon SageMaker 构建机器学习应用
全程部署视频看这里,原视频30分钟左右为了观看体验剪掉了等待时间:
小白使用Amazon SageMaker 构建机器学习应用
一、创建Sagemaker Notebook实例
Amazon SageMaker: https://aws.amazon.com/cn/sagemaker/

输入名称、选择实例类型、配置磁盘大小,具体如下图

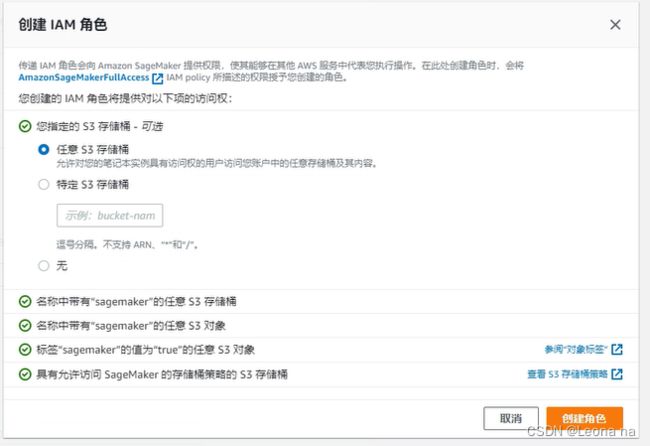
创建新角色,选择任意S3存储桶,点击创建角色

配置VPC网络,选择VPC、子网和安全组,并点击创建笔记本实例

等待5-6分钟,状态变为inSerice,点击打开jupyter
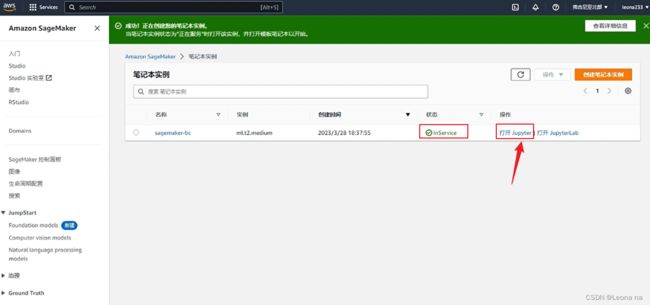
新建文件,如下图

二、下载数据集
输入如下代码,下载数据集并解压:
!wget -N https://archive.ics.uci.edu/ml/machine-learning-databases/00222/bank-additional.zip
!unzip -o bank-additional.zip
通过pandas展示数据集
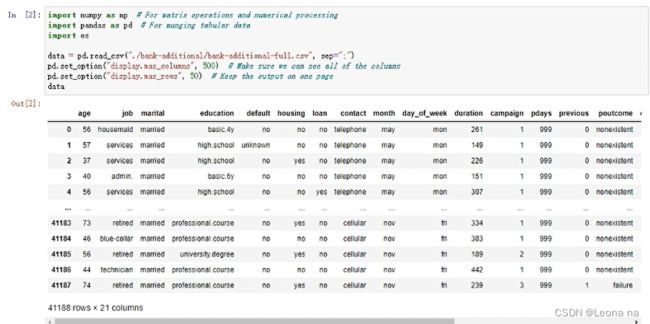
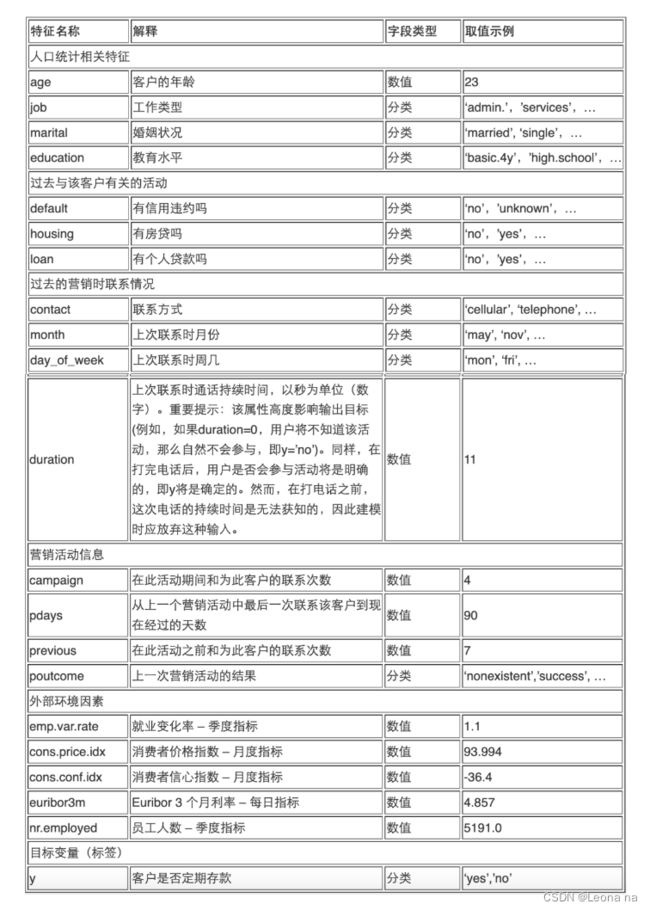
使用 bank-additional-full.csv 数据集文件,将其通过 pandas 读入并展示:
import numpy as np  # For matrix operations and numerical processing
import pandas as pd  # For munging tabular data
import os

data = pd.read_csv("./bank-additional/bank-additional-full.csv", sep=";")
pd.set_option("display.max_columns", 500)  # Make sure we can see all of the columns
pd.set_option("display.max_rows", 50)  # Keep the output on one page
data
三、数据预处理
数据清洗将分类类型数据通过独热编码转换为数字。
data["no_previous_contact"] = np.where(
    data["pdays"] == 999, 1, 0
)  # Indicator variable to capture when pdays takes a value of 999
data["not_working"] = np.where(
    np.in1d(data["job"], ["student", "retired", "unemployed"]), 1, 0
)  # Indicator for individuals not actively employed
model_data = pd.get_dummies(data)  # Convert categorical variables to sets of indicators
model_data
model_data = model_data.drop(
["duration", "emp.var.rate", "cons.price.idx", "cons.conf.idx", "euribor3m", "nr.employed"], axis=1)
model_data = model_data.drop(["y_no"], axis=1)
model_data

将数据集拆分为训练(90%)和测试(10%)数据集,并将数据集转换为算法期望的正确格式。 在训练期间使用训练数据集,这些测试数据集将在模型训练完成后用于评估模型性能。

四、使用XGBoost训练模型
安装XGBoost
!pip install xgboost
使用python XGBoost API
启动模型训练,并在完成后保存模型。然后将前面预留出的测试数据集送入模型中进行推理,我们将推理结果大于阈值(0.5)的认为是1,否则为0,然后与测试集中的标签进行对比来评估模型效果。
import numpy as np
import pandas as pd
import xgboost as xgb
from sklearn.model_selection import train_test_split

# 用sklearn.cross_validation进行训练数据集划分,这里训练集和交叉验证集比例为8:2,可以自己根据需要设置
X, val_X, y, val_y = train_test_split(
    train_x,
    train_y,
    test_size=0.2,
    random_state=2022,
    stratify=train_y
)

# xgb矩阵赋值
xgb_val = xgb.DMatrix(val_X, label=val_y)
xgb_train = xgb.DMatrix(X, label=y)
xgb_test = xgb.DMatrix(test_x)

# xgboost模型 #####################
params = {
    'booster': 'gbtree',
    'objective': 'binary:logistic',
    'eval_metric': 'auc', #logloss
    'gamma': 0.1,  # 用于控制是否后剪枝的参数,越大越保守,一般0.1、0.2
    'max_depth': 8,  # 构建树的深度,越大越容易过拟合
    'alpha': 0,   # L1正则化系数
    'lambda': 10,  # 控制模型复杂度的权重值的L2正则化项参数,参数越大,模型越不容易过拟合
    'subsample': 0.7,  # 随机采样训练样本
    'colsample_bytree': 0.5,  # 生成树时进行的列采样
    'min_child_weight': 3,
    # 这个参数默认是 1,是每个叶子里面 h 的和至少是多少,对正负样本不均衡时的 0-1 分类而言
    # ,假设 h 在 0.01 附近,min_child_weight 为 1 意味着叶子节点中最少需要包含 100 个样本。
    # 这个参数非常影响结果,控制叶子节点中二阶导的和的最小值,该参数值越小,越容易 overfitting。
    'silent': 0,  # 设置成1则没有运行信息输出,最好是设置为0.
    'eta': 0.03,  # 如同学习率
    'seed': 1000,
    'nthread': -1,  # cpu 线程数
    'missing': 1,
    'scale_pos_weight': (np.sum(y==0)/np.sum(y==1))  # 用来处理正负样本不均衡的问题,通常取:sum(negative cases) / sum(positive cases)
}

plst = list(params.items())
num_rounds = 500  # 迭代次数
watchlist = [(xgb_train, 'train'), (xgb_val, 'val')]

# 训练模型并保存
# early_stopping_rounds 当设置的迭代次数较大时,early_stopping_rounds 可在一定的迭代次数内准确率没有提升就停止训练
model = xgb.train(plst, xgb_train, num_rounds, watchlist, early_stopping_rounds=200)
model.save_model('./xgb.model')  # 用于存储训练出的模型

preds = model.predict(xgb_test)

# 导出结果
threshold = 0.5
ypred = np.where(preds > 0.5, 1, 0)

from sklearn import metrics

print ('AUC: %.4f' % metrics.roc_auc_score(test_y,ypred))
print ('ACC: %.4f' % metrics.accuracy_score(test_y,ypred))
print ('Recall: %.4f' % metrics.recall_score(test_y,ypred))
print ('F1-score: %.4f' %metrics.f1_score(test_y,ypred))
print ('Precesion: %.4f' %metrics.precision_score(test_y,ypred))
print(metrics.confusion_matrix(test_y,ypred))
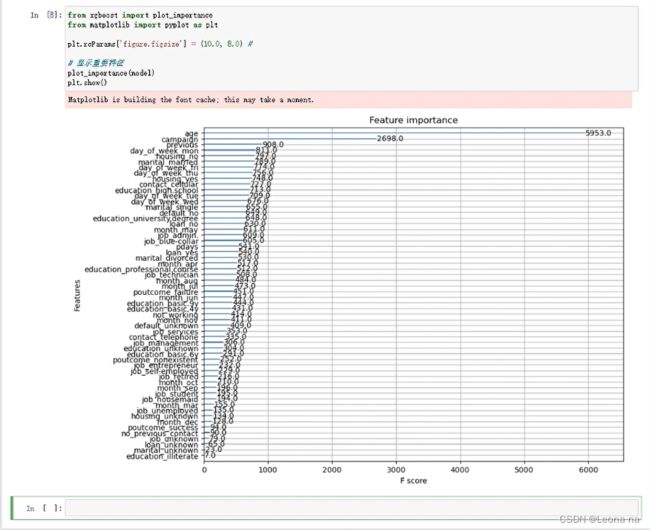
输出模型中不同特征的重要性,这通常帮忙我们更好的理解模型行为。
from xgboost import plot_importance
from matplotlib import pyplot as plt

plt.rcParams['figure.figsize'] = (10.0, 8.0) #

# 显示重要特征
plot_importance(model)
plt.show()
五、使用 SageMaker Training API 开展模型训练
初始化
import sagemaker
import boto3

import numpy as np  # For matrix operations and numerical processing
import pandas as pd  # For munging tabular data
from time import gmtime, strftime
import os

region = boto3.Session().region_name
smclient = boto3.Session().client("sagemaker")

role = sagemaker.get_execution_role()

bucket = sagemaker.Session().default_bucket()
prefix = "sagemaker/DEMO-hpo-xgboost-dm"
数据处理
data = pd.read_csv("./bank-additional/bank-additional-full.csv", sep=";")
pd.set_option("display.max_columns", 500)  # Make sure we can see all of the columns
data["no_previous_contact"] = np.where(
    data["pdays"] == 999, 1, 0
)  # Indicator variable to capture when pdays takes a value of 999
data["not_working"] = np.where(
    np.in1d(data["job"], ["student", "retired", "unemployed"]), 1, 0
)  # Indicator for individuals not actively employed
model_data = pd.get_dummies(data)  # Convert categorical variables to sets of indicators
model_data = model_data.drop(
    ["duration", "emp.var.rate", "cons.price.idx", "cons.conf.idx", "euribor3m", "nr.employed"],
    axis=1,

)
将数据集拆分为训练(70%)、验证(20%)和测试(10%)数据集,并将数据集转换为 SageMaker 内置 XGBoost 算法期望的正确格式。 我们将在训练期间使用训练和验证数据集。测试数据集将在部署到端点后用于评估模型性能。
train_data, validation_data, test_data = np.split(
    model_data.sample(frac=1, random_state=1729),
    [int(0.7 * len(model_data)), int(0.9 * len(model_data))],
)

pd.concat([train_data["y_yes"], train_data.drop(["y_no", "y_yes"], axis=1)], axis=1).to_csv(
    "train.csv", index=False, header=False
)
pd.concat(
    [validation_data["y_yes"], validation_data.drop(["y_no", "y_yes"], axis=1)], axis=1
).to_csv("validation.csv", index=False, header=False)
pd.concat([test_data["y_yes"], test_data.drop(["y_no", "y_yes"], axis=1)], axis=1).to_csv(
    "test.csv", index=False, header=False
)
将生成的数据集上传到 S3,供下一步模型训练时使用。
boto3.Session().resource("s3").Bucket(bucket).Object(
    os.path.join(prefix, "train/train.csv")
).upload_file("train.csv")
boto3.Session().resource("s3").Bucket(bucket).Object(
    os.path.join(prefix, "validation/validation.csv")
).upload_file("validation.csv")


from sagemaker.inputs import TrainingInput

s3_input_train = TrainingInput(
    s3_data="s3://{}/{}/train".format(bucket, prefix), content_type="csv"
)
s3_input_validation = TrainingInput(
    s3_data="s3://{}/{}/validation/".format(bucket, prefix), content_type="csv"
)
生成XGBoost 模型训练报告,这里会比较慢
from sagemaker.debugger import Rule, rule_configs

rules=[
    Rule.sagemaker(rule_configs.create_xgboost_report())
]

sess = sagemaker.Session()

container = sagemaker.image_uris.retrieve("xgboost", boto3.Session().region_name, "1.2-1")

xgb = sagemaker.estimator.Estimator(
    container,
    role,
    instance_count=1,
    instance_type="ml.m4.xlarge",
    base_job_name="bank-dm-xgboost-report",
    output_path="s3://{}/{}/output".format(bucket, prefix),
    sagemaker_session=sess,
    rules=rules
)

xgb.set_hyperparameters(
    max_depth=5,
    eta=0.2,
    gamma=4,
    min_child_weight=6,
    subsample=0.8,
    objective="binary:logistic",
    num_round=500,
)

xgb.fit({"train": s3_input_train, "validation": s3_input_validation})
六、训练任务管理
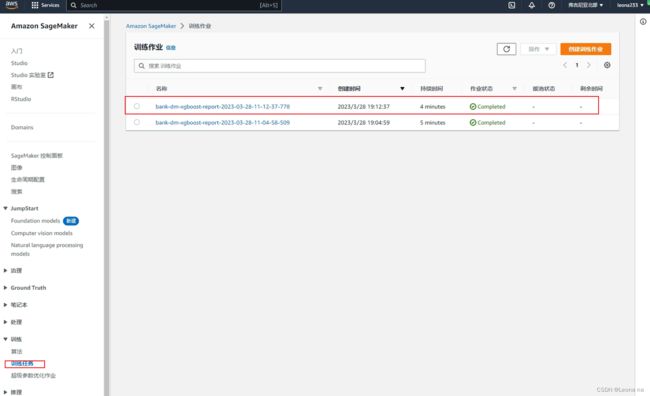
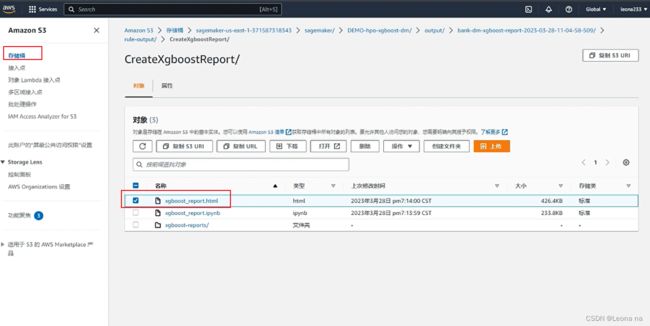
七、AutoGluon 训练模型
AutoGluon安装
# Install AutoGluon
!pip install -U setuptools wheel
!pip install -U "mxnet<2.0.0"
!pip install autogluon
使用 AutoGluon Tabular 训练模型
from autogluon.tabular import TabularDataset, TabularPredictor
ag_data = pd.read_csv("./bank-additional/bank-additional-full.csv", sep=";")
label = 'y'
print("Summary of y variable: \n", ag_data[label].describe())

ag_train_data, ag_test_data = np.split(
    ag_data.sample(frac=1, random_state=1729),
    [int(0.9 * len(model_data)),],
)
使用 AutoGluon,我们无需做数据处理(缺失值处理,独热编码等),AutoGloun 会自动帮我们做这些工作。
ag_test_data_X = ag_test_data.iloc[:,:-1]
ag_test_data_y =ag_test_data.iloc[:,20]

save_path = 'agModels-predictClass'  # specifies folder to store trained models

learner_kwargs = {'ignored_columns':[["duration", "emp.var.rate", "cons.price.idx", "cons.conf.idx", "euribor3m", "nr.employed"]]}

predictor = TabularPredictor(label=label, path=save_path,
                             eval_metric='recall', learner_kwargs=learner_kwargs
                            ).fit(ag_train_data)
predictor = TabularPredictor.load(save_path)  # unnecessary, just demonstrates how to load previously-trained predictor from file

ag_y_pred = predictor.predict(ag_test_data_X)
ag_y_pred_proa = predictor.predict_proba(ag_test_data_X)

print("Predictions:  \n", ag_y_pred)
perf = predictor.evaluate_predictions(y_true=ag_test_data_y, y_pred=ag_y_pred, auxiliary_metrics=True)
# perf = predictor.evaluate_predictions(y_true=ag_test_data_y, y_pred=ag_y_pred_proa, auxiliary_metrics=True) #when eval_metric='auc' in TabularPredictor()
实验结束,记得停止实例,删除所以相关内容如角色、策略、日志组等等
八、总结
整个实验参考亚马逊官方手册部署完成,过程比较简单。但是访问速度很慢。有时候执行一半会卡住,需要重新执行,网络慢的问题希望亚马逊可以改进一下,有点影响使用体验。Sagemaker很方便, Jupyter Notebook、Notebook 实例提供了好几种开发环境PyTorch、Numpy、Pandas 等,减少了安装的时间成本,我一个没有学过机器学习的小白都可以快速上手搭建。降低了机器学习的门槛。这次实验学到很多,部署完毕只是第一步,具体的还需要多看几遍官方部署手册来消化。
九、参考资料
参考文章:亚马逊云科技【云上探索实验室】使用 Amazon SageMaker 构建机器学习应用、构建细粒度情感分析应用、基于Stable Diffusion模型,快速搭建你的第一个AIGC应用
部署文章:https://dev.amazoncloud.cn/column/article/63ff329f4891d26f36585a9c

