React 轮播图详解,封装自定义轮播图组件,实现淡入淡出切换图片效果~
前言
之前已经写了图片跑马灯的基本运行原理,今天我们来优化一下样式和丰富一下功能
提示:以下是本篇文章正文内容,下面案例可供参考
首先我们先看看react的好基友ant design(v4.x)能给我们提供什么样的效果
如图介绍,这是最简单的用法

完整示例代码
import React, { Component } from 'react'
import { Carousel } from 'antd';
const contentStyle = {
	width: '416px',
	height: '160px',
	color: '#fff',
	lineHeight: '160px',
	textAlign: 'center',
	background: '#364d79'
};
export default class index extends Component {
	onChange = (index) => {
		console.log(index)
	}
	render() {
		return (
			<div className='scrollImg'>
				<div className='scroll_box'>
					<Carousel afterChange={this.onChange}>
					<div>
						<h3 style={contentStyle}>1</h3>
					</div>
					<div>
						<h3 style={contentStyle}>2</h3>
					</div>
					<div>
						<h3 style={contentStyle}>3</h3>
					</div>
					<div>
						<h3 style={contentStyle}>4</h3>
					</div>
					</Carousel>
				</div>
			</div>
		)
	}
}
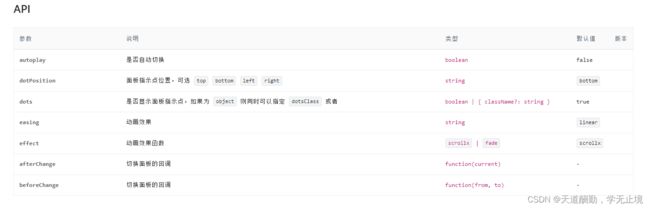
当然我们肯定不会止步于最简单用法,根据官方文档提的API我们可以知道还有以下属性可以自主控制
| 属性 | 属性值 | 简介 |
|---|---|---|
| autoplay | true 或 false | 是否自动轮播,默认不自动轮播 |
| dots | true 或 false 或 Object | 是否显示指示条如果为 Object 还可以指定 dotsClass;例:{ dots: true, className: ‘自定义类名’ },默认为 true |
| dotPosition | top 或 bottom 或 left 或 right | 指定指示条位置,默认 bottom |
| easing | linear 或 ease-in 或 ease-out | 设置动画展示效果,默认linear |
| effect | scrollx 或 fade | 动画效果函数,可以切换动画效果为平移(scrollx) 或 淡入淡出(fade),默认scrollx |
| beforeChange | function(from, to){} | 切换图片前的回调 |
| afterChange | function(current){} | 切换图片后的回调 |
配上官方文档
但是~~
这可能限制性太高或不满足使用需求并不适用于我们工作等实用场景,这时候就需要我们自己封装或是二次封装才能达到项目上使用的效果,这非常不方便,但是谁让我是这么一个乐于助人的牛码农,所以封装什么的就交给我来干吧,你们只需要交出三连就好了!
如果你到了要写轮播图的的时候想必你已经创建好了一个React项目,这次为了兼容React各版本我们不需要引入除了React外的任何插件和框架,当然你其他地方要用的话是可以引入的且完全不会冲突
首先我们先在state中随便添加几个变量(类组件的开发模式,函数类型请自行转换,我后续可能写函数模式的~)
// 图片数组
imgarrar: [],
// 定时器
time: null,
//轮播时间间隔
intervalTime: 2000,
// 控制动画轮流展示
isShow: false,
//是否开启淡入淡出动画
isFead: false
添加变量之后我们开始创建轮播组件,值得一提的是你需要在此设置父盒子的宽高属性,否则默认的宽高可能使你的图片并不能够完美展示
<div className='scroll' style={{width:'416px',height: '260px'}} onMouseOver={this.onMouseOver.bind(this)} onMouseOut={this.onMouseOut.bind(this)}>
	// 轮播模块
    <div className='scroll_box'>
        {this.state.imgarrar.map((item, index) => {
            return (
                <div className='scroll_box_item'>
                    <img className='scroll_box_item_img' src={item} alt="图片加载失败" />
                </div>
            )
        })}
    </div>
	// 指示条
    <div className='scroll_dots'>
        <div className='scroll_dots_item' onClick={this.prev.bind(this)}></div>
        <div className='scroll_dots_item scroll_dots_item_active'></div>
        <div className='scroll_dots_item' onClick={this.next.bind(this)}></div>
    </div>
	// 切换按钮
    <div className='scroll_option'>
        <div className='scroll_option_left' onClick={this.prev.bind(this)}> <img src={leftImg} alt="后退" /> </div>
        <div className='scroll_option_right' onClick={this.next.bind(this)}> <img src={rightImg} alt="前进" /> </div>
    </div>
</div>
在添加了组件代码时不要保存,因为会报错,原因是你还为添加组件中调用的方法,下面的方法应该添加在类组件之中render(包裹着html代码的方法)函数之外的中间部分
// 节点渲染完成后
componentDidMount() {
    this.startFun()
}
// 上一张
prev() {
    let _this = this
    _this.setState({
        time: null
    }, res => {
        _this.unshiftFun(_this.state.imgarrar)
    })
}
// 下一张
next() {
    let _this = this
    _this.setState({
        time: null
    }, res => {
        _this.pushFun(_this.state.imgarrar)
    })
}
// 在数组前插入最后一张
unshiftFun(imgarrar) {
    let _this = this
    let str = imgarrar[imgarrar.length - 1];
    imgarrar.splice(imgarrar.length - 1, 1)
    imgarrar.unshift(str)
    this.animationFun()
    _this.setState({
        imgarrar: imgarrar
    })
}
// 在数组末尾插入第一张
pushFun(imgarrar) {
    let _this = this
    let str = imgarrar[0];
    imgarrar.splice(0, 1)
    imgarrar.push(str)
    this.animationFun()
    _this.setState({
        imgarrar: imgarrar
    })
}
// 悬停清除定时器
onMouseOver() {
    clearInterval(this.state.time)
    this.setState({
        time: null
    })
}
// 离开悬停重启定时器
onMouseOut() {
    this.startFun()
}
// 即将卸载清除定时器
componentWillUnmount() {
    clearInterval(this.state.time)
    this.setState({
        time: null
    })
}
// 启动轮播的方法
startFun = () => {
    let _this = this
    if(_this.state.imgarrar.length > 0){
	    _this.setState({
	        time: setInterval(() => {
	            let str = _this.state.imgarrar[0];
	            _this.state.imgarrar.splice(0, 1)
	            _this.state.imgarrar.push(str)
	            this.animationFun()
	            _this.setState({
	                imgarrar: _this.state.imgarrar
	            })
	        }, this.state.intervalTime)
	    })
    }
}
// 切换展示动画,保证效果
animationFun() {
    let _this = this
    if (_this.state.isFead && _this.state.imgarrar.length > 0) {
        if (_this.state.isShow) {
            document.getElementsByClassName("scroll_box_item_img")[0].className = 'scroll_box_item_img img_active'
        } else {
            document.getElementsByClassName("scroll_box_item_img")[0].className = 'scroll_box_item_img img_actives'
        }
        _this.setState({
            isShow: !_this.state.isShow
        })
    }
}
当你添加了以上的所有方法后,你可以保存页面的改动,但此时无法预览到最终效果,甚至报错,原因是html代码中引用了两张图片,你并没有引入,如果不打算引入的话可以删除掉对应img标签,默认没有图片也可以进行图片切换的操作
不引入图片请忽略,需要你手动添加以下的文件夹和图片并引入(图片可以在阿里图库查找并下载)
import leftImg from './img/left.png'
import rightImg from './img/right.png'
最后一步,让我们创建一个css文件并引入,然后随便写点样式
import './scrollimg.css'
.scroll{
    display: flex;
    justify-content: center;
    margin:0px auto;
    position: relative
}
.scroll_box{
    width: 100%;
    height: 100%;
    display: flex;
    flex-wrap: nowrap;
    overflow: hidden
}
.scroll_box_item{
    width: 100%;
    height: 100%;
    display: inline-block;
    flex-shrink:0;
}
.scroll_box_item_img{
    width: 100%;
    height: 100%;

}
.scroll_dots{
    width: 100%;
    position: absolute;
    bottom: 5px;
    display: flex;
    justify-content: center;
}
.scroll_dots_item{
    width: 15px;
    height: 5px;
    display: inline-block;
    margin: 0 2px;
    background: #ccc;
    border-radius: 3px;
    cursor: pointer;
}
.scroll_dots_item_active{
    width: 20px;
    background: #fff;
}

.scroll_option>div{
    position: absolute;
    width: 35px;
    height: 56px;
    top: 50%;
    transform: translateY(-28px);
    cursor: pointer;
    background: rgba(0,0,0,0);
    display: flex;
    justify-content: center;
    align-items: center;
}
.scroll_option_left{
    left: 0px;
}
.scroll_option_right{
    right: 0px;
}
.scroll:hover .scroll_option>div{
    background: rgba(0,0,0,0.3);
}
.scroll_option>div img{
    width: 20px;
    height: 20px;
}

/* 动画部分 */
.img_active{
    animation: anim 0.5s;
}
.img_actives{
    animation: anims 0.5s;
}
@keyframes anim {
	0% {opacity: 0;}
	100%{opacity:1;}
}
@keyframes anims {
    0% {opacity: 0;}
	100%{opacity:1;}
}
以上就是全部流程,如果按照步骤出错了的话请评论留意或私信我,我会及时回复你,感谢支持,下面贴上完整代码
import React, { Component } from 'react'
import leftImg from './img/left.png'
import rightImg from './img/right.png'
import './scrollimg.css'
export default class index extends Component {
    constructor(props) {
        super(props)
        this.state = {
            // 图片数组
            imgarrar: [],
            // 定时器
            time: null,
            //轮播时间间隔
            intervalTime: 2000,
            // 控制动画轮流展示
            isShow: false,
            // 是否开启淡入淡出动画
            isFead: true
        }
    }
    // 节点渲染完成后
    componentDidMount() {
        this.startFun()
    }
    // 上一张
    prev() {
        let _this = this
        _this.setState({
            time: null
        }, res => {
            _this.unshiftFun(_this.state.imgarrar)
        })
    }
    // 下一张
    next() {
        let _this = this
        _this.setState({
            time: null
        }, res => {
            _this.pushFun(_this.state.imgarrar)
        })
    }
    // 在数组前插入最后一张
    unshiftFun(imgarrar) {
        let _this = this
        let str = imgarrar[imgarrar.length - 1];
        imgarrar.splice(imgarrar.length - 1, 1)
        imgarrar.unshift(str)
        this.animationFun()
        _this.setState({
            imgarrar: imgarrar
        })
    }
    // 在数组末尾插入第一张
    pushFun(imgarrar) {
        let _this = this
        let str = imgarrar[0];
        imgarrar.splice(0, 1)
        imgarrar.push(str)
        this.animationFun()
        _this.setState({
            imgarrar: imgarrar
        })
    }
    // 悬停清除定时器
    onMouseOver() {
        clearInterval(this.state.time)
        this.setState({
            time: null
        })
    }
    // 离开悬停重启定时器
    onMouseOut() {
        this.startFun()
    }
    // 即将卸载清除定时器
    componentWillUnmount() {
        clearInterval(this.state.time)
        this.setState({
            time: null
        })
    }
    // 启动轮播的方法
    startFun = () => {
        let _this = this
        if(_this.state.imgarrar.length > 0){
	        _this.setState({
	            time: setInterval(() => {
	                let str = _this.state.imgarrar[0];
	                _this.state.imgarrar.splice(0, 1)
	                _this.state.imgarrar.push(str)
	                this.animationFun()
	                _this.setState({
	                    imgarrar: _this.state.imgarrar
	                })
	            }, this.state.intervalTime)
	        })
        }

    }
    // 切换展示动画,保证效果
    animationFun() {
        let _this = this
        if (_this.state.isFead && _this.state.imgarrar.length > 0) {
            if (_this.state.isShow) {
                document.getElementsByClassName("scroll_box_item_img")[0].className = 'scroll_box_item_img img_active'
            } else {
                document.getElementsByClassName("scroll_box_item_img")[0].className = 'scroll_box_item_img img_actives'
            }
            _this.setState({
                isShow: !_this.state.isShow
            })
        }
    }
    render() {
        return (
            <div className='scroll' style={{ width: '416px', height: '260px' }} onMouseOver={this.onMouseOver.bind(this)} onMouseOut={this.onMouseOut.bind(this)}>

                <div className='scroll_box'>
                    {this.state.imgarrar.map((item, index) => {
                        return (
                            <div className='scroll_box_item'>
                                <img className='scroll_box_item_img' src={item} alt="图片加载失败" />
                            </div>
                        )
                    })}
                </div>

                <div className='scroll_dots'>
                    <div className='scroll_dots_item' onClick={this.prev.bind(this)}></div>
                    <div className='scroll_dots_item scroll_dots_item_active'></div>
                    <div className='scroll_dots_item' onClick={this.next.bind(this)}></div>
                </div>

                <div className='scroll_option'>
                    <div className='scroll_option_left' onClick={this.prev.bind(this)}> <img src={leftImg} alt="后退" /> </div>
                    <div className='scroll_option_right' onClick={this.next.bind(this)}> <img src={rightImg} alt="前进" /> </div>
                </div>

            </div>
        )
    }
}
如果帮到你的话请点赞收藏加关注!!!
不足之处还请不吝指教。