目标检测 pytorch复现Yolov5目标检测项目
目标检测 pytorch复现Yolov5目标检测项目
- 混淆矩阵
- AP计算
- 置信度原理
- 模型转换成ONNX文件
- 目标回归框
- 网络模型的深度与宽度设置因子
- yolov5网络架构
- Focus模块
- CSPNet模块
- SPP模块
- 数据集配置文件
- 模型配置文件
- 损失函数
- IOU
-
- GIOU
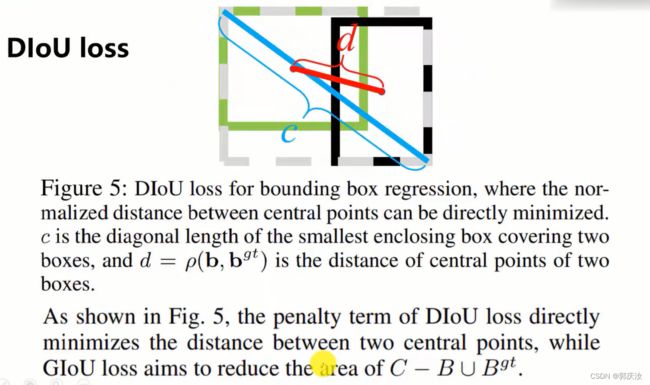
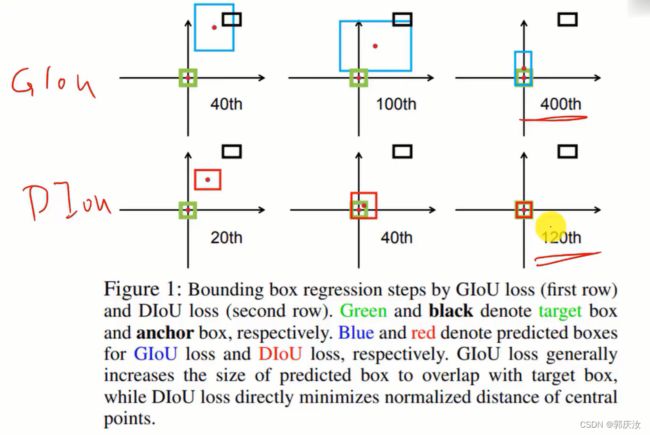
- DIOU
- CIOU
- YoloV5目标框回归与跨网格匹配策略
-
- VOC数据集格式与yolo数据集格式对应关系
- YoloV1~YoloV4目标框回归原理
- YoloV5目标框回归
- YoloV5跨网格匹配策略
- YoloV5训练技巧
-
- 1、训练预热Warmup
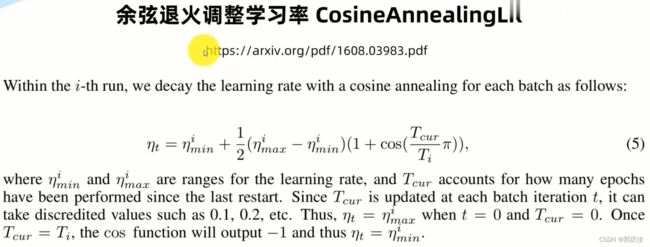
- 2、余弦退火调整学习率
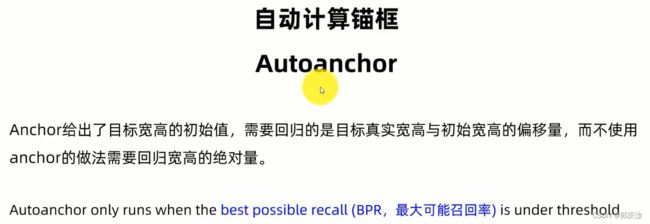
- 3、自动计算锚框
- 4、超参数进化
- 5、自动混合精度训练
- 6、断点续训
- 7、多GPU训练
- YoloV5项目目录
- 激活函数
-
- 1、Swish与Mish激活函数
- 2、Hardwish
- 3、激活函数代码实现
- 网络模型组件相关代码
-
- Focus模块代码实现
- 非极大值抑制处理
- 展平张量操作
- Detect模块类
- 网络模型类构建
- 解析网络模型配置文件并构建模型
- 图像缩放、填充工具函数(保持图片的宽高比例,剩下的部分采用灰色填充)
- 数据增强模块
-
- 进行图像变换数据增强
- 自定义数据集模块代码
- AP计算
- 跨网格搜索模块代码
- IOU模块代码
- FocalLoss代码部分
- Loss损失代码实现
- 非极大值抑制模块代码
- GPU选取模块代码
- 参数初始化模块代码
- detect.py参数说明

混淆矩阵

AP计算

置信度原理

模型转换成ONNX文件

目标回归框

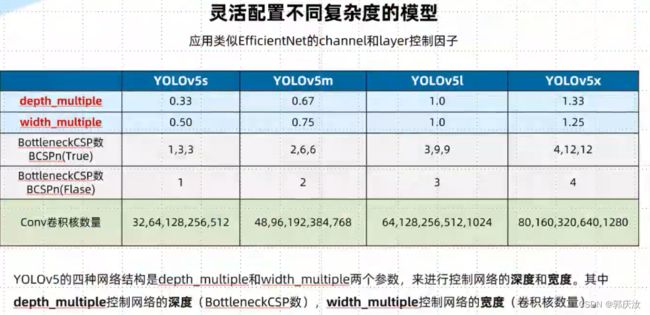
网络模型的深度与宽度设置因子
yolov5网络架构

Focus模块


CSPNet模块

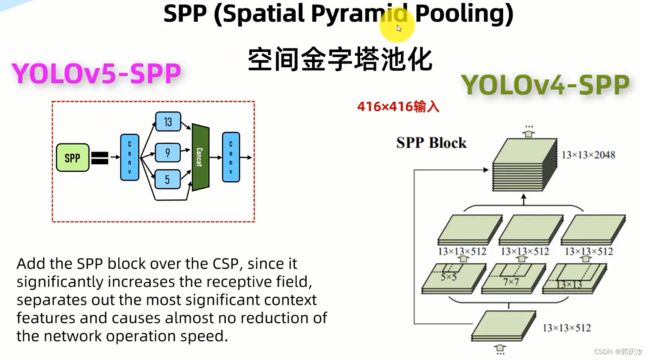
SPP模块
数据集配置文件
![]()
# PASCAL VOC dataset http://host.robots.ox.ac.uk/pascal/VOC/
# Train command: python train.py --data voc.yaml
# Default dataset location is next to /yolov5:
#   /parent_folder
#     /VOC
#     /yolov5


# download command/URL (optional)
#download: bash data/scripts/get_voc.sh

# train and val data as 1) directory: path/images/, 2) file: path/images.txt, or 3) list: [path1/images/, path2/images/]
train: VOC/images/train/  # 16551 images
val: VOC/images/val/  # 4952 images

# number of classes
nc: 20

# class names
names: ['aeroplane', 'bicycle', 'bird', 'boat', 'bottle', 'bus', 'car', 'cat', 'chair', 'cow', 'diningtable', 'dog',
        'horse', 'motorbike', 'person', 'pottedplant', 'sheep', 'sofa', 'train', 'tvmonitor']
模型配置文件
![]()
# parameters
nc: 80  # number of classes 类别数
depth_multiple: 0.33  # model depth multiple 控制模型的深度 (BottleneckCSP数)
width_multiple: 0.50  # layer channel multiple 控制Conv通道个数 (卷积核数量)
# depth_multiple表示BottleneckCSP模块的层缩放因子,将所有的BottleneckCSP模块的Bottleneck乘上该参数得到最终个数。
# width_multiple表示卷积通道的缩放因子,就是将配置里面的backbone和head部分有关Conv通道的设置,全部乘以该系数。
# 通过这两个参数就可以实现不同复杂度的模型设计。

# anchors
anchors:
  - [10,13, 16,30, 33,23]  # P3/8
  - [30,61, 62,45, 59,119]  # P4/16
  - [116,90, 156,198, 373,326]  # P5/32

# YOLOv5 backbone
backbone:
  # [from, number, module, args]
  # from列参数:当前模块输入来自哪一层输出;-1 代表是从上一层获得的输入
  # number列参数:本模块重复次数;1表示只有一个,3表示有三个相同的模块
  [[-1, 1, Focus, [64, 3]],  # 0-P1/2
   [-1, 1, Conv, [128, 3, 2]],  # 1-P2/4; 128表示128个卷积核,3表示3×3的卷积核,2表示步长为2。
   [-1, 3, BottleneckCSP, [128]],
   [-1, 1, Conv, [256, 3, 2]],  # 3-P3/8
   [-1, 9, BottleneckCSP, [256]],
   [-1, 1, Conv, [512, 3, 2]],  # 5-P4/16
   [-1, 9, BottleneckCSP, [512]],
   [-1, 1, Conv, [1024, 3, 2]],  # 7-P5/32
   [-1, 1, SPP, [1024, [5, 9, 13]]],
   [-1, 3, BottleneckCSP, [1024, False]],  # 9
  ]

# YOLOv5 head
# 作者没有分neck模块,所以head部分包含了PANet+Detect部分
head:
  [[-1, 1, Conv, [512, 1, 1]],
   [-1, 1, nn.Upsample, [None, 2, 'nearest']],
   [[-1, 6], 1, Concat, [1]],  # cat backbone P4
   [-1, 3, BottleneckCSP, [512, False]],  # 13

   [-1, 1, Conv, [256, 1, 1]],
   [-1, 1, nn.Upsample, [None, 2, 'nearest']],
   [[-1, 4], 1, Concat, [1]],  # cat backbone P3
   [-1, 3, BottleneckCSP, [256, False]],  # 17 (P3/8-small)

   [-1, 1, Conv, [256, 3, 2]],
   [[-1, 14], 1, Concat, [1]],  # cat head P4
   [-1, 3, BottleneckCSP, [512, False]],  # 20 (P4/16-medium)

   [-1, 1, Conv, [512, 3, 2]],
   [[-1, 10], 1, Concat, [1]],  # cat head P5
   [-1, 3, BottleneckCSP, [1024, False]],  # 23 (P5/32-large)

   [[17, 20, 23], 1, Detect, [nc, anchors]],  # Detect(P3, P4, P5)
  ]
模型训练指令:
python train.py --data data/voc-new.yaml --cfg models/yolov5s-voc.yaml --weights weights/yolov5s.pt --batch-size 16 --epochs 200
训练可视化指令:
tensorboard --logdir=./runs
模型测试指令:
python detect.py --source ./inference/images/ --weights ./weights/yolov5x.pt --conf-thres 0.4
性能测试指令:
python test.py --data data/voc-new.yaml --weights runs/exp0/weights/best.pt --batch-size 16
损失函数

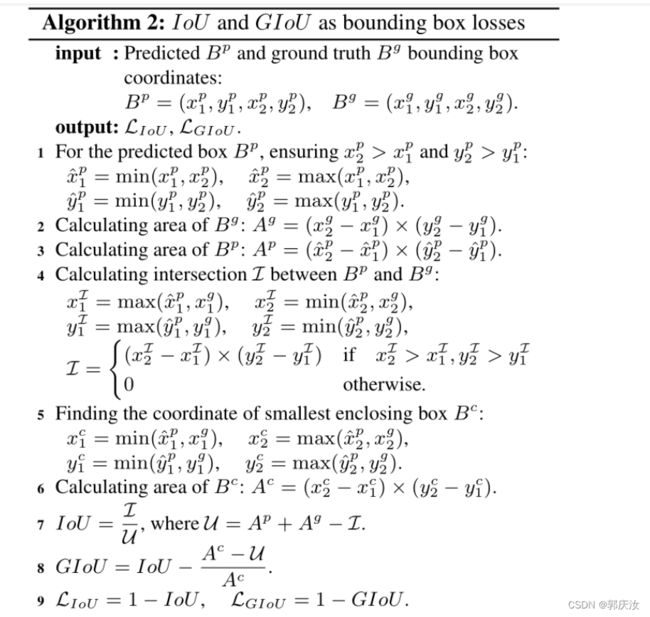
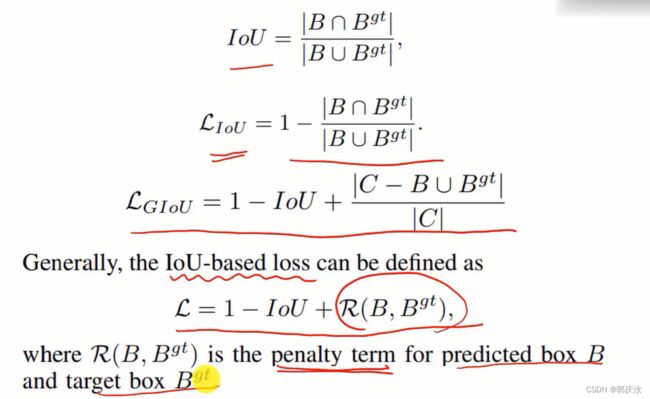
IOU


GIOU

DIOU


CIOU

YoloV5目标框回归与跨网格匹配策略
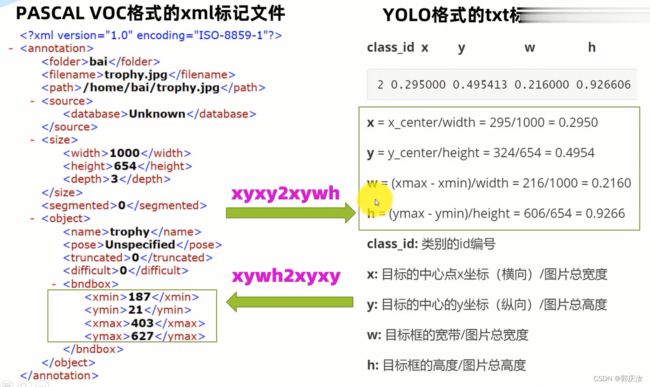
VOC数据集格式与yolo数据集格式对应关系

YoloV1~YoloV4目标框回归原理

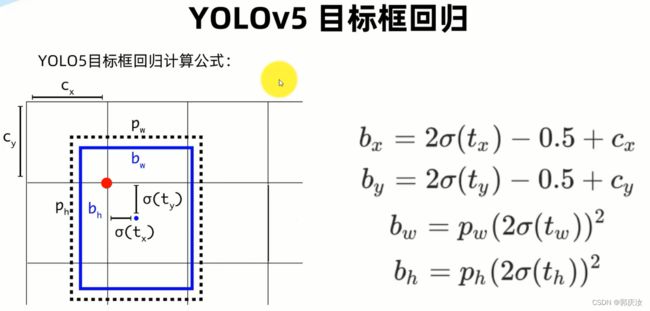
YoloV5目标框回归
YoloV5跨网格匹配策略

YoloV5训练技巧
1、训练预热Warmup

2、余弦退火调整学习率

3、自动计算锚框

4、超参数进化
使用遗传算法进行超参数进化

5、自动混合精度训练


6、断点续训

7、多GPU训练
Single GPU
$ python train.py --batch 64 --data coco.yaml --weights yolov5s.pt --device 0
Multi-GPU DataParallel Mode (⚠️ not recommended)
$ python train.py --batch 64 --data coco.yaml --weights yolov5s.pt --device 0,1
Multi-GPU DistributedDataParallel Mode (✅ recommended)
You will have to pass python -m torch.distributed.run --nproc_per_node, followed by the usual arguments.
$ python -m torch.distributed.run --nproc_per_node 2 train.py --batch 64 --data coco.yaml --weights yolov5s.pt --device 0,1
–nproc_per_node specifies how many GPUs you would like to use. In the example above, it is 2.
–batch is the total batch-size. It will be divided evenly to each GPU. In the example above, it is 64/2=32 per GPU.
The code above will use GPUs 0… (N-1).
Use specific GPUs (click to expand)
You can do so by simply passing --device followed by your specific GPUs. For example, in the code below, we will use GPUs 2,3.
$ python -m torch.distributed.run --nproc_per_node 2 train.py --batch 64 --data coco.yaml --cfg yolov5s.yaml --weights '' --device 2,3
Use SyncBatchNorm (click to expand)
SyncBatchNorm could increase accuracy for multiple gpu training, however, it will slow down training by a significant factor. It is only available for Multiple GPU DistributedDataParallel training.
It is best used when the batch-size on each GPU is small (<= 8).
To use SyncBatchNorm, simple pass --sync-bn to the command like below,
$ python -m torch.distributed.run --nproc_per_node 2 train.py --batch 64 --data coco.yaml --cfg yolov5s.yaml --weights '' --sync-bn
Use Multiple machines (click to expand)
This is only available for Multiple GPU DistributedDataParallel training.
Before we continue, make sure the files on all machines are the same, dataset, codebase, etc. Afterwards, make sure the machines can communicate to each other.
You will have to choose a master machine(the machine that the others will talk to). Note down its address(master_addr) and choose a port(master_port). I will use master_addr = 192.168.1.1 and master_port = 1234 for the example below.
To use it, you can do as the following,
# On master machine 0
$ python -m torch.distributed.run --nproc_per_node G --nnodes N --node_rank 0 --master_addr "192.168.1.1" --master_port 1234 train.py --batch 64 --data coco.yaml --cfg yolov5s.yaml --weights ''
# On machine R
$ python -m torch.distributed.run --nproc_per_node G --nnodes N --node_rank R --master_addr "192.168.1.1" --master_port 1234 train.py --batch 64 --data coco.yaml --cfg yolov5s.yaml --weights ''
where G is number of GPU per machine, N is the number of machines, and R is the machine number from 0…(N-1).
Let’s say I have two machines with two GPUs each, it would be G = 2 , N = 2, and R = 1 for the above.
Training will not start until all N machines are connected. Output will only be shown on master machine!
YoloV5项目目录
D:\yolov5
│  detect.py # 检测脚本
│  hubconf.py # PyTorch Hub相关代码
│  LICENSE # 版权文件
│  README.md # README markdown文件
│  requirements.txt # 项目所需的安装包列表
│  sotabench.py # COCO数据集测试脚本
│  test.py # 模型测试脚本
│  train.py #模型训练脚本
│  tutorial.ipynb # Jupyter Notebook演示代码
│
│
├─data
│  │  coco.yaml # COCO数据集配置文件
│  │  coco128.yaml # COCO128数据集配置文件
│  │  hyp.finetune.yaml # 超参数微调配置文件
│  │  hyp.scratch.yaml # 超参数起始配置文件
│  │  voc.yaml # VOC数据集配置文件
│  │
│  └─scripts
│          get_coco.sh # 下载COCO数据集shell命令
│          get_voc.sh # 下载VOC数据集shell命令
│
├─inference
│  └─images # 示例图片文件夹
│          bus.jpg
│          zidane.jpg
│
├─models
│  │  common.py  # 模型组件定义代码
│  │  experimental.py # 实验性质的代码
│  │  export.py # 模型导出脚本
│  │  yolo.py   # Detect及Model构建代码
│  │  yolov5l.yaml # yolov5l网络模型配置文件
│  │  yolov5m.yaml # yolov5m网络模型配置文件
│  │  yolov5s.yaml # yolov5s网络模型配置文件
│  │  yolov5x.yaml # yolov5x网络模型配置文件
│  │  __init__.py
│  │
│  └─hub
│          yolov3-spp.yaml
│          yolov5-fpn.yaml
│          yolov5-panet.yaml
│
├─runs  #训练结果
│  ├─exp0
│  │  │  events.out.tfevents.1604835533.PC-201807230204.26148.0
│  │  │  hyp.yaml
│  │  │  labels.png
│  │  │  opt.yaml
│  │  │  precision-recall_curve.png
│  │  │  results.png
│  │  │  results.txt
│  │  │  test_batch0_gt.jpg
│  │  │  test_batch0_pred.jpg
│  │  │  train_batch0.jpg
│  │  │  train_batch1.jpg
│  │  │  train_batch2.jpg
│  │  │
│  │  └─weights
│  │          best.pt # 最好权重
│  │          last.pt # 最近权重
│
├─utils
│  │  activations.py # 激活函数定义代码
│  │  datasets.py # Dataset及Dataloader定义代码
│  │  evolve.sh # 超参数进化命令
│  │  general.py # 项目通用函数代码
│  │  google_utils.py # 谷歌云使用相关代码
│  │  torch_utils.py # 辅助程序代码
│  │  __init__.py
│  │
│  └─google_app_engine
│          additional_requirements.txt
│          app.yaml
│          Dockerfile
│
├─VOC  # 数据集目录
│  ├─images # 数据集图片目录
│  │  ├─train # 训练集图片文件夹
│  │  │      000005.jpg
│  │  │      000007.jpg
│  │  │      000009.jpg
│  │  │      000012.jpg
│  │  │      000016.jpg
│  │  │      ......
│  │  │
│  │  └─val  # 验证集图片文件夹
│  │          000001.jpg
│  │          000002.jpg
│  │          000003.jpg
│  │          000004.jpg
│  │          000006.jpg
│  │          ......
│  │
│  └─labels # 数据集标签目录
│      │  train.cache
│      │  val.cache
│      │
│      ├─train # 训练集标签文件夹
│      │      000005.txt
│      │      000007.txt
│      │      000009.txt
│      │      000012.txt
│      │      000016.txt
│      │      ......
│      │
│      └─val  # 测试集标签文件夹
│              000001.txt
│              000002.txt
│              000003.txt
│              000004.txt
│              000006.txt
│              ......
│
└─weights
    download_weights.sh # 下载权重文件命令
    yolov5l.pt # yolov5l权重文件
    yolov5m.pt # yolov5m权重文件
    yolov5s.mlmodel # yolov5s权重文件(Core ML格式)
    yolov5s.onnx # yolov5s权重文件(onnx格式)
    yolov5s.pt # yolov5s权重文件
    yolov5s.torchscript.pt # yolov5s权重文件(torchscript格式)
    yolov5x.pt # yolov5x权重文件
激活函数

1、Swish与Mish激活函数


上图可以对比,Swish与Mish激活函数在激活区与非激活区在过渡时刻更加平滑
2、Hardwish

3、激活函数代码实现
import torch
import torch.nn as nn
import torch.nn.functional as F


# Swish https://arxiv.org/pdf/1905.02244.pdf ---------------------------------------------------------------------------
class Swish(nn.Module):  #
    @staticmethod
    def forward(x):
        return x * torch.sigmoid(x)


class Hardswish(nn.Module):  # export-friendly version of nn.Hardswish()
    @staticmethod
    def forward(x):
        # return x * F.hardsigmoid(x)  # for torchscript and CoreML
        return x * F.hardtanh(x + 3, 0., 6.) / 6.  # for torchscript, CoreML and ONNX

# the Swish activation module implemented using custom ops
class MemoryEfficientSwish(nn.Module):
    class F(torch.autograd.Function):
        @staticmethod
        def forward(ctx, x):
            # save_for_backward函数可以将对象保存起来,用于后续的backward函数
            ctx.save_for_backward(x) # 会保留此input的全部信息, 并提供避免in-place操作导致的input在backward被修改的情况.
            return x * torch.sigmoid(x)

        @staticmethod
        def backward(ctx, grad_output):
            x = ctx.saved_tensors[0] # #ctx.saved_tensors会返回forward函数内存储的对象
            sx = torch.sigmoid(x)
            return grad_output * (sx * (1 + x * (1 - sx)))

    def forward(self, x):
        return self.F.apply(x)


# Mish https://github.com/digantamisra98/Mish --------------------------------------------------------------------------
class Mish(nn.Module):
    @staticmethod
    def forward(x):
        return x * F.softplus(x).tanh()


class MemoryEfficientMish(nn.Module):
    class F(torch.autograd.Function):
        @staticmethod
        def forward(ctx, x):
            ctx.save_for_backward(x)
            return x.mul(torch.tanh(F.softplus(x)))  # x * tanh(ln(1 + exp(x)))

        @staticmethod
        def backward(ctx, grad_output):
            x = ctx.saved_tensors[0]
            sx = torch.sigmoid(x)
            fx = F.softplus(x).tanh()
            return grad_output * (fx + x * sx * (1 - fx * fx))

    def forward(self, x):
        return self.F.apply(x)


# FReLU https://arxiv.org/abs/2007.11824 -------------------------------------------------------------------------------
class FReLU(nn.Module):
    def __init__(self, c1, k=3):  # ch_in, kernel
        super().__init__()
        # nn.Con2d(in_channels, out_channels, kernel_size, stride, padding, dilation=1, groups=1, bias=True)
        self.conv = nn.Conv2d(c1, c1, k, 1, 1, groups=c1)
        self.bn = nn.BatchNorm2d(c1)

    def forward(self, x):
        return torch.max(x, self.bn(self.conv(x)))
网络模型组件相关代码
# This file contains modules common to various models

import math
import numpy as np
import torch
import torch.nn as nn

from utils.datasets import letterbox
from utils.general import non_max_suppression, make_divisible, scale_coords

# 为same卷积或same池化自动扩充
def autopad(k, p=None):  # kernel, padding
    # Pad to 'same'
    if p is None:
        p = k // 2 if isinstance(k, int) else [x // 2 for x in k]  # auto-pad
    return p

# 深度可分离卷积
def DWConv(c1, c2, k=1, s=1, act=True): # k=1是卷积核kenel,s=1是步长stride
    # Depthwise convolution
    return Conv(c1, c2, k, s, g=math.gcd(c1, c2), act=act) # math.gcd() 返回的是最大公约数


class Conv(nn.Module):
    # Standard convolution 标准卷积:conv+BN+hardswish
    def __init__(self, c1, c2, k=1, s=1, p=None, g=1, act=True):  # ch_in, ch_out, kernel, stride, padding, groups
        super(Conv, self).__init__()
        self.conv = nn.Conv2d(c1, c2, k, s, autopad(k, p), groups=g, bias=False)
        self.bn = nn.BatchNorm2d(c2)
        self.act = nn.Hardswish() if act else nn.Identity()

    def forward(self, x):  # 网络的执行顺序是根据 forward 函数来决定的
        return self.act(self.bn(self.conv(x)))

    def fuseforward(self, x):
        return self.act(self.conv(x))


class Bottleneck(nn.Module):
    # Standard bottleneck
    def __init__(self, c1, c2, shortcut=True, g=1, e=0.5):  # ch_in, ch_out, shortcut, groups, expansion
        super(Bottleneck, self).__init__()
        c_ = int(c2 * e)  # hidden channels
        self.cv1 = Conv(c1, c_, 1, 1)
        self.cv2 = Conv(c_, c2, 3, 1, g=g)
        self.add = shortcut and c1 == c2

    def forward(self, x):
        # 根据self.add的值确定是否有shortcut
        return x + self.cv2(self.cv1(x)) if self.add else self.cv2(self.cv1(x))


class BottleneckCSP(nn.Module):
    # CSP Bottleneck https://github.com/WongKinYiu/CrossStagePartialNetworks
    def __init__(self, c1, c2, n=1, shortcut=True, g=1, e=0.5):  # ch_in, ch_out, number, shortcut, groups, expansion
        super(BottleneckCSP, self).__init__()
        c_ = int(c2 * e)  # hidden channels
        self.cv1 = Conv(c1, c_, 1, 1)
        self.cv2 = nn.Conv2d(c1, c_, 1, 1, bias=False)
        self.cv3 = nn.Conv2d(c_, c_, 1, 1, bias=False)
        self.cv4 = Conv(2 * c_, c2, 1, 1)
        self.bn = nn.BatchNorm2d(2 * c_)  # applied to cat(cv2, cv3)
        self.act = nn.LeakyReLU(0.1, inplace=True)
        # *操作符可以把一个list拆开成一个个独立的元素
        self.m = nn.Sequential(*[Bottleneck(c_, c_, shortcut, g, e=1.0) for _ in range(n)])

    def forward(self, x):
        y1 = self.cv3(self.m(self.cv1(x)))
        y2 = self.cv2(x)
        return self.cv4(self.act(self.bn(torch.cat((y1, y2), dim=1))))

# 空间金字塔池化
class SPP(nn.Module):
    # Spatial pyramid pooling layer used in YOLOv3-SPP
    def __init__(self, c1, c2, k=(5, 9, 13)):
        super(SPP, self).__init__()
        c_ = c1 // 2  # hidden channels
        self.cv1 = Conv(c1, c_, 1, 1)
        self.cv2 = Conv(c_ * (len(k) + 1), c2, 1, 1)
        self.m = nn.ModuleList([nn.MaxPool2d(kernel_size=x, stride=1, padding=x // 2) for x in k])

    def forward(self, x):
        x = self.cv1(x)
        return self.cv2(torch.cat([x] + [m(x) for m in self.m], 1))

# Focus: 把宽度w和高度h的信息整合到c空间中
class Focus(nn.Module):
    # Focus wh information into c-space
    def __init__(self, c1, c2, k=1, s=1, p=None, g=1, act=True):  # ch_in, ch_out, kernel, stride, padding, groups
        super(Focus, self).__init__()
        self.conv = Conv(c1 * 4, c2, k, s, p, g, act)

    def forward(self, x):  # x(b,c,w,h) -> y(b,4c,w/2,h/2)
        return self.conv(torch.cat([x[..., ::2, ::2], x[..., 1::2, ::2], x[..., ::2, 1::2], x[..., 1::2, 1::2]], 1))


class Concat(nn.Module):
    # Concatenate a list of tensors along dimension
    def __init__(self, dimension=1):
        super(Concat, self).__init__()
        self.d = dimension # the dimension over which the tensors are concatenated

    def forward(self, x):
        return torch.cat(x, self.d)


class NMS(nn.Module):
    # Non-Maximum Suppression (NMS) module
    conf = 0.25  # confidence threshold
    iou = 0.45  # IoU threshold
    classes = None  # (optional list) filter by class

    def __init__(self):
        super(NMS, self).__init__()

    def forward(self, x):
        return non_max_suppression(x[0], conf_thres=self.conf, iou_thres=self.iou, classes=self.classes)

# 自动调整shape
class autoShape(nn.Module):
    # input-robust model wrapper for passing cv2/np/PIL/torch inputs. Includes preprocessing, inference and NMS
    img_size = 640  # inference size (pixels)
    conf = 0.25  # NMS confidence threshold
    iou = 0.45  # NMS IoU threshold
    classes = None  # (optional list) filter by class

    def __init__(self, model):
        super(autoShape, self).__init__()
        self.model = model

    def forward(self, x, size=640, augment=False, profile=False):
        # supports inference from various sources. For height=720, width=1280, RGB images example inputs are:
        #   opencv:     x = cv2.imread('image.jpg')[:,:,::-1]  # HWC BGR to RGB x(720,1280,3)
        #   PIL:        x = Image.open('image.jpg')  # HWC x(720,1280,3)
        #   numpy:      x = np.zeros((720,1280,3))  # HWC
        #   torch:      x = torch.zeros(16,3,720,1280)  # BCHW
        #   multiple:   x = [Image.open('image1.jpg'), Image.open('image2.jpg'), ...]  # list of images

        p = next(self.model.parameters())  # for device and type
        if isinstance(x, torch.Tensor):  # torch
            return self.model(x.to(p.device).type_as(p), augment, profile)  # inference

        # Pre-process
        if not isinstance(x, list):
            x = [x]
        shape0, shape1 = [], []  # image and inference shapes
        batch = range(len(x))  # batch size
        for i in batch:
            x[i] = np.array(x[i])[:, :, :3]  # up to 3 channels if png
            s = x[i].shape[:2]  # HWC
            shape0.append(s)  # image shape
            g = (size / max(s))  # gain
            shape1.append([y * g for y in s])
        shape1 = [make_divisible(x, int(self.stride.max())) for x in np.stack(shape1, 0).max(0)]  # inference shape
        x = [letterbox(x[i], new_shape=shape1, auto=False)[0] for i in batch]  # pad
        x = np.stack(x, 0) if batch[-1] else x[0][None]  # stack
        x = np.ascontiguousarray(x.transpose((0, 3, 1, 2)))  # BHWC to BCHW
        x = torch.from_numpy(x).to(p.device).type_as(p) / 255.  # uint8 to fp16/32

        # Inference
        x = self.model(x, augment, profile)  # forward
        x = non_max_suppression(x[0], conf_thres=self.conf, iou_thres=self.iou, classes=self.classes) # NMS

        # Post-process
        for i in batch:
            if x[i] is not None:
                x[i][:, :4] = scale_coords(shape1, x[i][:, :4], shape0[i])
        return x

# 展平
class Flatten(nn.Module):
    # Use after nn.AdaptiveAvgPool2d(1) to remove last 2 dimensions
    @staticmethod
    def forward(x):
        return x.view(x.size(0), -1)

# 用于第二级分类
class Classify(nn.Module):
    # Classification head, i.e. x(b,c1,20,20) to x(b,c2)
    def __init__(self, c1, c2, k=1, s=1, p=None, g=1):  # ch_in, ch_out, kernel, stride, padding, groups
        super(Classify, self).__init__()
        self.aap = nn.AdaptiveAvgPool2d(1)  # to x(b,c1,1,1)
        self.conv = nn.Conv2d(c1, c2, k, s, autopad(k, p), groups=g, bias=False)  # to x(b,c2,1,1)
        self.flat = Flatten()

    def forward(self, x):
        z = torch.cat([self.aap(y) for y in (x if isinstance(x, list) else [x])], 1)  # cat if list
        return self.flat(self.conv(z))  # flatten to x(b,c2)
Focus模块代码实现
class Conv(nn.Module):
    # Standard convolution 标准卷积:conv+BN+hardswish
    def __init__(self, c1, c2, k=1, s=1, p=None, g=1, act=True):  # ch_in, ch_out, kernel, stride, padding, groups
        super(Conv, self).__init__()
        self.conv = nn.Conv2d(c1, c2, k, s, autopad(k, p), groups=g, bias=False)
        self.bn = nn.BatchNorm2d(c2)
        self.act = nn.Hardswish() if act else nn.Identity()

    def forward(self, x):  # 网络的执行顺序是根据 forward 函数来决定的
        return self.act(self.bn(self.conv(x)))

    def fuseforward(self, x):
        return self.act(self.conv(x))

# Focus: 把宽度w和高度h的信息整合到c空间中
class Focus(nn.Module):
    # Focus wh information into c-space
    def __init__(self, c1, c2, k=1, s=1, p=None, g=1, act=True):  # ch_in, ch_out, kernel, stride, padding, groups
        super(Focus, self).__init__()
        self.conv = Conv(c1 * 4, c2, k, s, p, g, act)

    def forward(self, x):  # x(b,c,w,h) -> y(b,4c,w/2,h/2)
        return self.conv(torch.cat([x[..., ::2, ::2], x[..., 1::2, ::2], x[..., ::2, 1::2], x[..., 1::2, 1::2]], 1))
非极大值抑制处理
# 非极大抑制算法
def non_max_suppression(prediction, conf_thres=0.1, iou_thres=0.6, merge=False, classes=None, agnostic=False):
    """Performs Non-Maximum Suppression (NMS) on inference results

    Returns:
         detections with shape: nx6 (x1, y1, x2, y2, conf, cls)
    """

    nc = prediction[0].shape[1] - 5  # number of classes
    xc = prediction[..., 4] > conf_thres  # candidates

    # Settings
    min_wh, max_wh = 2, 4096  # (pixels) minimum and maximum box width and height
    max_det = 300  # maximum number of detections per image
    time_limit = 10.0  # seconds to quit after
    redundant = True  # require redundant detections
    multi_label = nc > 1  # multiple labels per box (adds 0.5ms/img)

    t = time.time()
    output = [None] * prediction.shape[0]
    for xi, x in enumerate(prediction):  # image index, image inference
        # Apply constraints
        # x[((x[..., 2:4] < min_wh) | (x[..., 2:4] > max_wh)).any(1), 4] = 0  # width-height
        x = x[xc[xi]]  # confidence

        # If none remain process next image
        if not x.shape[0]:
            continue

        # Compute conf
        x[:, 5:] *= x[:, 4:5]  # 最终的置信度 conf = obj_conf * cls_conf

        # Box (center x, center y, width, height) to (x1, y1, x2, y2)
        box = xywh2xyxy(x[:, :4])

        # Detections matrix nx6 (xyxy, conf, cls)
        if multi_label:
            i, j = (x[:, 5:] > conf_thres).nonzero(as_tuple=False).T
            x = torch.cat((box[i], x[i, j + 5, None], j[:, None].float()), 1)
        else:  # best class only
            conf, j = x[:, 5:].max(1, keepdim=True)
            x = torch.cat((box, conf, j.float()), 1)[conf.view(-1) > conf_thres]

        # Filter by class
        if classes:
            x = x[(x[:, 5:6] == torch.tensor(classes, device=x.device)).any(1)]

        # Apply finite constraint
        # if not torch.isfinite(x).all():
        #     x = x[torch.isfinite(x).all(1)]

        # If none remain process next image
        n = x.shape[0]  # number of boxes
        if not n:
            continue

        # Sort by confidence
        # x = x[x[:, 4].argsort(descending=True)]

        # Batched NMS
        c = x[:, 5:6] * (0 if agnostic else max_wh)  # classes
        boxes, scores = x[:, :4] + c, x[:, 4]  # boxes (offset by class), scores(cls_conf)
        # 函数torch.ops.torchvision.nms
        # 参数:boxes (Tensor[N, 4])) – bounding boxes坐标. 格式:(x1, y1, x2, y2)
        # scores (Tensor[N]) – bounding boxes得分
        # iou_threshold (float) – IoU过滤阈值
        # 返回值:keep :NMS过滤后的bounding boxes索引(降序排列)
        i = torch.ops.torchvision.nms(boxes, scores, iou_thres)
        if i.shape[0] > max_det:  # limit detections
            i = i[:max_det]
        if merge and (1 < n < 3E3):  # Merge NMS (boxes merged using weighted mean)
            # Merge NMS merges boxes using a weighted mean, weighted by their confidences/CIoU predictions
            try:  # update boxes as boxes(i,4) = weights(i,n) * boxes(n,4)
                iou = box_iou(boxes[i], boxes) > iou_thres  # iou matrix
                weights = iou * scores[None]  # box weights 正比于iou和置信度得分
                # 目标框合并
                x[i, :4] = torch.mm(weights, x[:, :4]).float() / weights.sum(1, keepdim=True)  # merged boxes
                if redundant:
                    i = i[iou.sum(1) > 1]  # require redundancy
            except:  # possible CUDA error https://github.com/ultralytics/yolov3/issues/1139
                print(x, i, x.shape, i.shape)
                pass

        output[xi] = x[i]
        if (time.time() - t) > time_limit:
            break  # time limit exceeded

    return output


class NMS(nn.Module):
    # Non-Maximum Suppression (NMS) module
    conf = 0.25  # confidence threshold
    iou = 0.45  # IoU threshold
    classes = None  # (optional list) filter by class

    def __init__(self):
        super(NMS, self).__init__()

    def forward(self, x):
        return non_max_suppression(x[0], conf_thres=self.conf, iou_thres=self.iou, classes=self.classes)
展平张量操作
# 展平
class Flatten(nn.Module):
    # Use after nn.AdaptiveAvgPool2d(1) to remove last 2 dimensions
    @staticmethod
    def forward(x):
        return x.view(x.size(0), -1)
Detect模块类
class Detect(nn.Module):
    stride = None  # strides computed during build
    export = False  # onnx export

    def __init__(self, nc=80, anchors=(), ch=()):  # detection layer    ch:卷积核通道数
        super(Detect, self).__init__()
        self.nc = nc  # number of classes
        self.no = nc + 5  # number of outputs per anchor. VOC: 20+5=25
        self.nl = len(anchors)  # number of detection layers = 3
        self.na = len(anchors[0]) // 2  # number of anchors  =3
        self.grid = [torch.zeros(1)] * self.nl  # init grid
        a = torch.tensor(anchors).float().view(self.nl, -1, 2)
        # 模型中需要保存下来的参数包括两种: 一种是反向传播需要被optimizer更新的,称之为 parameter;
        # 一种是反向传播不需要被optimizer更新,称之为 buffer。
        # 第二种参数我们需要创建tensor, 然后将tensor通过register_buffer()进行注册,
        # 可以通过model.buffers() 返回,注册完后参数也会自动保存到OrderDict中去。
        # 注意:buffer的更新在forward中,optim.step只能更新nn.parameter类型的参数
        self.register_buffer('anchors', a)  # shape(nl,na,2)
        self.register_buffer('anchor_grid', a.clone().view(self.nl, 1, -1, 1, 1, 2))  # shape(nl,1,na,1,1,2)
        self.m = nn.ModuleList(nn.Conv2d(x, self.no * self.na, 1) for x in ch)  # output conv 1*1卷积

    def forward(self, x):
        # x = x.copy()  # for profiling
        z = []  # inference output
        self.training |= self.export
        for i in range(self.nl):
            x[i] = self.m[i](x[i])  # conv
            bs, _, ny, nx = x[i].shape  # x(bs,255,20,20) to x(bs,3,20,20,85)
            x[i] = x[i].view(bs, self.na, self.no, ny, nx).permute(0, 1, 3, 4, 2).contiguous()

            if not self.training:  # inference
                if self.grid[i].shape[2:4] != x[i].shape[2:4]:
                    self.grid[i] = self._make_grid(nx, ny).to(x[i].device)

                y = x[i].sigmoid()
                y[..., 0:2] = (y[..., 0:2] * 2. - 0.5 + self.grid[i].to(x[i].device)) * self.stride[i]  # xy
                y[..., 2:4] = (y[..., 2:4] * 2) ** 2 * self.anchor_grid[i]  # wh
                z.append(y.view(bs, -1, self.no)) # 预测框坐标信息

        return x if self.training else (torch.cat(z, 1), x) # 预测框坐标, obj, cls

    @staticmethod
    def _make_grid(nx=20, ny=20):
        # 划分为单元网格
        yv, xv = torch.meshgrid([torch.arange(ny), torch.arange(nx)])
        return torch.stack((xv, yv), 2).view((1, 1, ny, nx, 2)).float()
网络模型类构建
# 网络模型类
class Model(nn.Module):
    def __init__(self, cfg='yolov5s.yaml', ch=3, nc=None):  # model, input channels, number of classes
        super(Model, self).__init__()
        if isinstance(cfg, dict):
            self.yaml = cfg  # model dict
        else:  # is *.yaml
            import yaml  # for torch hub
            self.yaml_file = Path(cfg).name
            with open(cfg) as f:
                self.yaml = yaml.load(f, Loader=yaml.FullLoader)  # model dict

        # Define model
        if nc and nc != self.yaml['nc']:
            print('Overriding model.yaml nc=%g with nc=%g' % (self.yaml['nc'], nc))
            self.yaml['nc'] = nc  # override yaml value
        self.model, self.save = parse_model(deepcopy(self.yaml), ch=[ch])  # model, savelist, ch_out
        # print([x.shape for x in self.forward(torch.zeros(1, ch, 64, 64))])

        # Build strides, anchors
        m = self.model[-1]  # Detect()
        if isinstance(m, Detect):
            s = 128  # 2x min stride
            # m.stride = [8,16,32]
            m.stride = torch.tensor([s / x.shape[-2] for x in self.forward(torch.zeros(1, ch, s, s))])  # forward
            # anchor大小计算, 例如 [10, 13] --> [1.25, 1.625]
            m.anchors /= m.stride.view(-1, 1, 1)
            check_anchor_order(m) # 检查anchor顺序和stride顺序是否一致
            self.stride = m.stride
            self._initialize_biases()  # 初始化偏置 only run once
            # print('Strides: %s' % m.stride.tolist())

        # Init weights, biases
        initialize_weights(self) # 初始化权重
        self.info()
        print('')

    def forward(self, x, augment=False, profile=False):
        if augment: # TTA (Test Time Augmentation)
            img_size = x.shape[-2:]  # height, width
            s = [1, 0.83, 0.67]  # scales
            f = [None, 3, None]  # flips (2-ud, 3-lr)
            y = []  # outputs
            for si, fi in zip(s, f):
                xi = scale_img(x.flip(fi) if fi else x, si) # 改变图像尺寸
                yi = self.forward_once(xi)[0]  # forward
                # cv2.imwrite('img%g.jpg' % s, 255 * xi[0].numpy().transpose((1, 2, 0))[:, :, ::-1])  # save
                yi[..., :4] /= si  # de-scale
                if fi == 2:
                    yi[..., 1] = img_size[0] - yi[..., 1]  # de-flip ud
                elif fi == 3:
                    yi[..., 0] = img_size[1] - yi[..., 0]  # de-flip lr
                y.append(yi)
            return torch.cat(y, 1), None  # augmented inference, train
        else:
            return self.forward_once(x, profile)  # single-scale inference, train

    def forward_once(self, x, profile=False):
        y, dt = [], []  # outputs
        for m in self.model:
            if m.f != -1:  # if not from previous layer
                x = y[m.f] if isinstance(m.f, int) else [x if j == -1 else y[j] for j in m.f]  # from earlier layers

            if profile:
                try:
                    import thop # THOP: PyTorch-OpCounter 估算PyTorch模型的FLOPs模块
                    o = thop.profile(m, inputs=(x,), verbose=False)[0] / 1E9 * 2 # FLOPS
                except:
                    o = 0
                t = time_synchronized()
                for _ in range(10):
                    _ = m(x)
                dt.append((time_synchronized() - t) * 100)
                print('%10.1f%10.0f%10.1fms %-40s' % (o, m.np, dt[-1], m.type))

            x = m(x)  # 执行网络组件操作
            y.append(x if m.i in self.save else None)  # save output

        if profile:
            print('%.1fms total' % sum(dt))
        return x

    def _initialize_biases(self, cf=None):  # initialize biases into Detect(), cf is class frequency
        # https://arxiv.org/abs/1708.02002 section 3.3
        # cf = torch.bincount(torch.tensor(np.concatenate(dataset.labels, 0)[:, 0]).long(), minlength=nc) + 1.
        m = self.model[-1]  # Detect() module
        for mi, s in zip(m.m, m.stride):  # from
            b = mi.bias.view(m.na, -1)  # conv.bias(255) to (3,85)
            b[:, 4] += math.log(8 / (640 / s) ** 2)  # obj (8 objects per 640 image)
            b[:, 5:] += math.log(0.6 / (m.nc - 0.99)) if cf is None else torch.log(cf / cf.sum())  # cls
            mi.bias = torch.nn.Parameter(b.view(-1), requires_grad=True)

    def _print_biases(self):
        m = self.model[-1]  # Detect() module
        for mi in m.m:  # from
            b = mi.bias.detach().view(m.na, -1).T  # conv.bias(255) to (3,85)
            print(('%6g Conv2d.bias:' + '%10.3g' * 6) % (mi.weight.shape[1], *b[:5].mean(1).tolist(), b[5:].mean()))

    # def _print_weights(self):
    #     for m in self.model.modules():
    #         if type(m) is Bottleneck:
    #             print('%10.3g' % (m.w.detach().sigmoid() * 2))  # shortcut weights

    def fuse(self):  # fuse model Conv2d() + BatchNorm2d() layers
        print('Fusing layers... ')
        for m in self.model.modules():
            if type(m) is Conv and hasattr(m, 'bn'):
                m._non_persistent_buffers_set = set()  # pytorch 1.6.0 compatability
                m.conv = fuse_conv_and_bn(m.conv, m.bn)  # update conv
                delattr(m, 'bn')  # remove batchnorm
                m.forward = m.fuseforward  # update forward
        self.info()
        return self

    def nms(self, mode=True):  # add or remove NMS module
        present = type(self.model[-1]) is NMS  # last layer is NMS
        if mode and not present:
            print('Adding NMS... ')
            m = NMS()  # module
            m.f = -1  # from
            m.i = self.model[-1].i + 1  # index
            self.model.add_module(name='%s' % m.i, module=m)  # add
            self.eval()
        elif not mode and present:
            print('Removing NMS... ')
            self.model = self.model[:-1]  # remove
        return self

    def autoshape(self):  # add autoShape module
        print('Adding autoShape... ')
        m = autoShape(self)  # wrap model
        copy_attr(m, self, include=('yaml', 'nc', 'hyp', 'names', 'stride'), exclude=())  # copy attributes
        return m

    def info(self, verbose=False):  # print model information
        model_info(self, verbose)
解析网络模型配置文件并构建模型
# 解析网络模型配置文件并构建模型
def parse_model(d, ch):  # model_dict, input_channels(3)
    logger.info('\n%3s%18s%3s%10s  %-40s%-30s' % ('', 'from', 'n', 'params', 'module', 'arguments'))
    #将模型结构的depth_multiple,width_multiple提取出,赋值给gd (yolov5s: 0.33),gw (yolov5s:0.50)
    anchors, nc, gd, gw = d['anchors'], d['nc'], d['depth_multiple'], d['width_multiple']
    na = (len(anchors[0]) // 2) if isinstance(anchors, list) else anchors  # number of anchors =3
    no = na * (nc + 5)  # number of outputs = anchors * (classes + 5); VOC : 75

    layers, save, c2 = [], [], ch[-1]  # layers, savelist, ch out = 3
    for i, (f, n, m, args) in enumerate(d['backbone'] + d['head']):  # from, number, module, args
        m = eval(m) if isinstance(m, str) else m  # eval strings
        for j, a in enumerate(args):
            try:
                args[j] = eval(a) if isinstance(a, str) else a  # eval strings
            except:
                pass
        # 控制深度的代码
        n = max(round(n * gd), 1) if n > 1 else n  # depth gain
        if m in [Conv, Bottleneck, SPP, DWConv, MixConv2d, Focus, CrossConv, BottleneckCSP, C3]:
            c1, c2 = ch[f], args[0]

            # Normal
            # if i > 0 and args[0] != no:  # channel expansion factor
            #     ex = 1.75  # exponential (default 2.0)
            #     e = math.log(c2 / ch[1]) / math.log(2)
            #     c2 = int(ch[1] * ex ** e)
            # if m != Focus:

            # 控制宽度(卷积核个数)的代码
            c2 = make_divisible(c2 * gw, 8) if c2 != no else c2

            # Experimental
            # if i > 0 and args[0] != no:  # channel expansion factor
            #     ex = 1 + gw  # exponential (default 2.0)
            #     ch1 = 32  # ch[1]
            #     e = math.log(c2 / ch1) / math.log(2)  # level 1-n
            #     c2 = int(ch1 * ex ** e)
            # if m != Focus:
            #     c2 = make_divisible(c2, 8) if c2 != no else c2

            args = [c1, c2, *args[1:]]
            if m in [BottleneckCSP, C3]:
                args.insert(2, n)
                n = 1
        elif m is nn.BatchNorm2d:
            args = [ch[f]]
        elif m is Concat:
            c2 = sum([ch[-1 if x == -1 else x + 1] for x in f])
        elif m is Detect:
            args.append([ch[x + 1] for x in f])
            if isinstance(args[1], int):  # number of anchors
                args[1] = [list(range(args[1] * 2))] * len(f)
        else:
            c2 = ch[f]

        # *args表示接收任意个数量的参数,调用时会将实际参数打包为一个元组传入实参
        m_ = nn.Sequential(*[m(*args) for _ in range(n)]) if n > 1 else m(*args)  # module
        t = str(m)[8:-2].replace('__main__.', '')  # module type
        np = sum([x.numel() for x in m_.parameters()])  # number params
        m_.i, m_.f, m_.type, m_.np = i, f, t, np  # attach index, 'from' index, type, number params
        logger.info('%3s%18s%3s%10.0f  %-40s%-30s' % (i, f, n, np, t, args))  # print
        save.extend(x % i for x in ([f] if isinstance(f, int) else f) if x != -1)  # append to savelist
        layers.append(m_)
        ch.append(c2)
    return nn.Sequential(*layers), sorted(save)
图像缩放、填充工具函数(保持图片的宽高比例,剩下的部分采用灰色填充)
# 图像缩放: 保持图片的宽高比例,剩下的部分采用灰色填充。
def letterbox(img, new_shape=(640, 640), color=(114, 114, 114), auto=True, scaleFill=False, scaleup=True):
    # Resize image to a 32-pixel-multiple rectangle https://github.com/ultralytics/yolov3/issues/232
    shape = img.shape[:2]  # current shape [height, width]
    if isinstance(new_shape, int):
        new_shape = (new_shape, new_shape)

    # Scale ratio (new / old) # 计算缩放因子
    r = min(new_shape[0] / shape[0], new_shape[1] / shape[1])
    """
    缩放(resize)到输入大小img_size的时候,如果没有设置上采样的话,则只进行下采样
    因为上采样图片会让图片模糊,对训练不友好影响性能。
    """
    if not scaleup:  # only scale down, do not scale up (for better test mAP)
        r = min(r, 1.0)

    # Compute padding
    ratio = r, r  # width, height ratios
    new_unpad = int(round(shape[1] * r)), int(round(shape[0] * r))
    dw, dh = new_shape[1] - new_unpad[0], new_shape[0] - new_unpad[1]  # wh padding
    if auto:  # minimum rectangle # 获取最小的矩形填充
        dw, dh = np.mod(dw, 32), np.mod(dh, 32)  # wh padding
    # 如果scaleFill=True,则不进行填充,直接resize成img_size, 任由图片进行拉伸和压缩
    elif scaleFill:  # stretch
        dw, dh = 0.0, 0.0
        new_unpad = (new_shape[1], new_shape[0])
        ratio = new_shape[1] / shape[1], new_shape[0] / shape[0]  # width, height ratios
    # 计算上下左右填充大小
    dw /= 2  # divide padding into 2 sides
    dh /= 2

    if shape[::-1] != new_unpad:  # resize
        img = cv2.resize(img, new_unpad, interpolation=cv2.INTER_LINEAR)
    top, bottom = int(round(dh - 0.1)), int(round(dh + 0.1))
    left, right = int(round(dw - 0.1)), int(round(dw + 0.1))
    # 进行填充
    img = cv2.copyMakeBorder(img, top, bottom, left, right, cv2.BORDER_CONSTANT, value=color)  # add border
    return img, ratio, (dw, dh)
数据增强模块
YoloV5采用Mosaic数据增强的方式,即将四副图片拼接成一副图像输入网络中
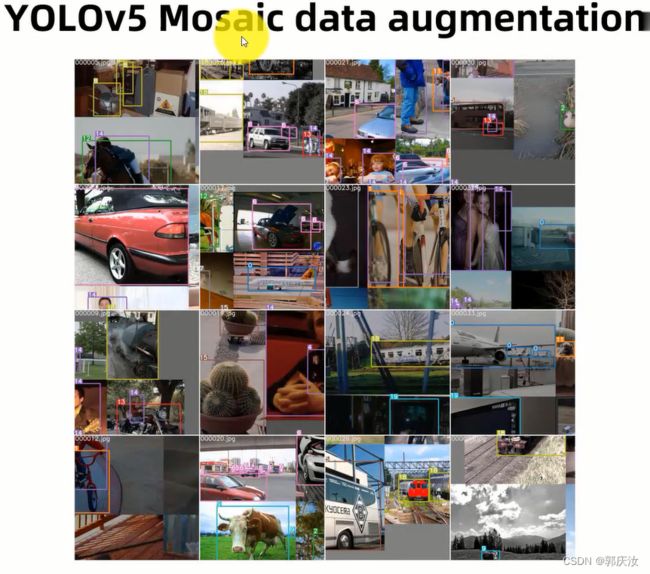
在训练阶段可以使用train.py --rect 参数来省略掉mosaic数据增强;也可以在配置文件中通过设置概率参数来随机进行mosaic数据增强
Mosaic数据增强坐标原理演示效果:

代码部分:
def load_mosaic(self, index):
    # loads images in a mosaic

    labels4 = []
    s = self.img_size
    # 随机取mosaic中心点
    yc, xc = [int(random.uniform(-x, 2 * s + x)) for x in self.mosaic_border]  # mosaic center x, y
    # 随机取其它三张图片的索引
    indices = [index] + [random.randint(0, len(self.labels) - 1) for _ in range(3)]  # 3 additional image indices
    for i, index in enumerate(indices):
        # Load image
        # load_image加载图片并根据设定的输入大小与图片原大小的比例ratio进行resize
        img, _, (h, w) = load_image(self, index)

        # place img in img4
        if i == 0:  # top left
            # 初始化大图
            img4 = np.full((s * 2, s * 2, img.shape[2]), 114, dtype=np.uint8)  # base image with 4 tiles
            # 设置大图上的位置(左上角)
            x1a, y1a, x2a, y2a = max(xc - w, 0), max(yc - h, 0), xc, yc  # xmin, ymin, xmax, ymax (large image)
            # 选取小图上的位置
            x1b, y1b, x2b, y2b = w - (x2a - x1a), h - (y2a - y1a), w, h  # xmin, ymin, xmax, ymax (small image)
        elif i == 1:  # top right 右上角
            x1a, y1a, x2a, y2a = xc, max(yc - h, 0), min(xc + w, s * 2), yc
            x1b, y1b, x2b, y2b = 0, h - (y2a - y1a), min(w, x2a - x1a), h
        elif i == 2:  # bottom left 左下角
            x1a, y1a, x2a, y2a = max(xc - w, 0), yc, xc, min(s * 2, yc + h)
            x1b, y1b, x2b, y2b = w - (x2a - x1a), 0, max(xc, w), min(y2a - y1a, h)
        elif i == 3:  # bottom right 右下角
            x1a, y1a, x2a, y2a = xc, yc, min(xc + w, s * 2), min(s * 2, yc + h)
            x1b, y1b, x2b, y2b = 0, 0, min(w, x2a - x1a), min(y2a - y1a, h)

        # 将小图上截取的部分贴到大图上
        img4[y1a:y2a, x1a:x2a] = img[y1b:y2b, x1b:x2b]  # img4[ymin:ymax, xmin:xmax]
        # 计算小图到大图上时所产生的偏移,用来计算mosaic增强后的标签框的位置
        padw = x1a - x1b
        padh = y1a - y1b

        # Labels
        x = self.labels[index]
        labels = x.copy()
        # 重新调整标签框的位置
        if x.size > 0:  # Normalized xywh to pixel xyxy format
            labels[:, 1] = w * (x[:, 1] - x[:, 3] / 2) + padw
            labels[:, 2] = h * (x[:, 2] - x[:, 4] / 2) + padh
            labels[:, 3] = w * (x[:, 1] + x[:, 3] / 2) + padw
            labels[:, 4] = h * (x[:, 2] + x[:, 4] / 2) + padh
        labels4.append(labels)

    # Concat/clip labels
    if len(labels4):
        # 调整标签框在图片内部
        labels4 = np.concatenate(labels4, 0)
        np.clip(labels4[:, 1:], 0, 2 * s, out=labels4[:, 1:])  # use with random_perspective
        # img4, labels4 = replicate(img4, labels4)  # replicate

    # 进行mosaic的时候将四张图片整合到一起之后shape为[2*img_size, 2*img_size]
    # 对mosaic整合的图片进行随机旋转、平移、缩放、裁剪,并resize为输入大小img_size
    # Augment
    img4, labels4 = random_perspective(img4, labels4,
                                       degrees=self.hyp['degrees'],
                                       translate=self.hyp['translate'],
                                       scale=self.hyp['scale'],
                                       shear=self.hyp['shear'],
                                       perspective=self.hyp['perspective'],
                                       border=self.mosaic_border)  # border to remove

    return img4, labels4
进行图像变换数据增强
对mosaic整合的图片进行随机旋转、平移、缩放、裁剪,并resize为输入大小img_size
知识点:

import cv2
import matplotlib.pyplot as plt

img = cv2.imread('1.png')
rows, cols = img.shape[:2]
# 第一个参数旋转中心,第二个参数旋转角度,第三个参数:缩放比例
M = cv2.getRotationMatrix2D((cols / 2, rows / 2), 45, 1)
# 得到矩阵后得用到图像的仿射变换函数才可以进行最终图像的变化
res1 = cv2.warpAffine(img, M, (cols, rows))

# 画图部分
plt.subplot(121)
plt.imshow(img)
plt.rcParams['font.sans-serif'] = ['SimHei']
plt.rcParams['axes.unicode_minus'] = False
plt.title('原图')
plt.axis(False)
plt.subplot(122)
plt.imshow(res1)
plt.rcParams['font.sans-serif'] = ['SimHei']
plt.rcParams['axes.unicode_minus'] = False
plt.title('绕中心点旋转的图像')
plt.axis(False)
plt.show()
def random_perspective(img, targets=(), degrees=10, translate=.1, scale=.1, shear=10, perspective=0.0, border=(0, 0)):
    # torchvision.transforms.RandomAffine(degrees=(-10, 10), translate=(.1, .1), scale=(.9, 1.1), shear=(-10, 10))
    # targets = [cls, xyxy]

    height = img.shape[0] + border[0] * 2  # shape(h,w,c)
    width = img.shape[1] + border[1] * 2

    # Center
    C = np.eye(3)
    C[0, 2] = -img.shape[1] / 2  # x translation (pixels)
    C[1, 2] = -img.shape[0] / 2  # y translation (pixels)

    # Perspective:透视变换
    P = np.eye(3)
    P[2, 0] = random.uniform(-perspective, perspective)  # x perspective (about y)
    P[2, 1] = random.uniform(-perspective, perspective)  # y perspective (about x)

    # Rotation and Scale # 设置旋转和缩放的仿射矩阵
    R = np.eye(3)
    a = random.uniform(-degrees, degrees)
    # a += random.choice([-180, -90, 0, 90])  # add 90deg rotations to small rotations
    s = random.uniform(1 - scale, 1 + scale)
    # s = 2 ** random.uniform(-scale, scale)
    R[:2] = cv2.getRotationMatrix2D(angle=a, center=(0, 0), scale=s)

    # Shear;设置裁剪的仿射矩阵系数
    S = np.eye(3)
    S[0, 1] = math.tan(random.uniform(-shear, shear) * math.pi / 180)  # x shear (deg)
    S[1, 0] = math.tan(random.uniform(-shear, shear) * math.pi / 180)  # y shear (deg)

    # Translation;设置平移的仿射矩阵系数
    T = np.eye(3)
    T[0, 2] = random.uniform(0.5 - translate, 0.5 + translate) * width  # x translation (pixels)
    T[1, 2] = random.uniform(0.5 - translate, 0.5 + translate) * height  # y translation (pixels)

    # Combined rotation matrix
    # 融合仿射矩阵并作用在图片上; @表示矩阵乘法运算
    M = T @ S @ R @ P @ C  # order of operations (right to left) is IMPORTANT
    if (border[0] != 0) or (border[1] != 0) or (M != np.eye(3)).any():  # image changed
        if perspective:
            # 透视变换函数,可保持直线不变形,但是平行线可能不再平行
            img = cv2.warpPerspective(img, M, dsize=(width, height), borderValue=(114, 114, 114))
        else:  # affine
            # 仿射变换函数,可实现旋转,平移,缩放;变换后的平行线依旧平行
            img = cv2.warpAffine(img, M[:2], dsize=(width, height), borderValue=(114, 114, 114))

    # Visualize
    # import matplotlib.pyplot as plt
    # ax = plt.subplots(1, 2, figsize=(12, 6))[1].ravel()
    # ax[0].imshow(img[:, :, ::-1])  # base
    # ax[1].imshow(img2[:, :, ::-1])  # warped

    # Transform label coordinates
    # 调整框的标签
    n = len(targets)
    if n:
        # warp points
        xy = np.ones((n * 4, 3))
        xy[:, :2] = targets[:, [1, 2, 3, 4, 1, 4, 3, 2]].reshape(n * 4, 2)  # x1y1, x2y2, x1y2, x2y1
        xy = xy @ M.T  # transform
        if perspective:
            xy = (xy[:, :2] / xy[:, 2:3]).reshape(n, 8)  # rescale
        else:  # affine
            xy = xy[:, :2].reshape(n, 8)

        # create new boxes
        x = xy[:, [0, 2, 4, 6]]
        y = xy[:, [1, 3, 5, 7]]
        xy = np.concatenate((x.min(1), y.min(1), x.max(1), y.max(1))).reshape(4, n).T

        # # apply angle-based reduction of bounding boxes
        # radians = a * math.pi / 180
        # reduction = max(abs(math.sin(radians)), abs(math.cos(radians))) ** 0.5
        # x = (xy[:, 2] + xy[:, 0]) / 2
        # y = (xy[:, 3] + xy[:, 1]) / 2
        # w = (xy[:, 2] - xy[:, 0]) * reduction
        # h = (xy[:, 3] - xy[:, 1]) * reduction
        # xy = np.concatenate((x - w / 2, y - h / 2, x + w / 2, y + h / 2)).reshape(4, n).T

        # clip boxes
        # 去除进行上面一系列操作后被裁剪过小的框;reject warped points outside of image
        xy[:, [0, 2]] = xy[:, [0, 2]].clip(0, width)
        xy[:, [1, 3]] = xy[:, [1, 3]].clip(0, height)

        # filter candidates
        i = box_candidates(box1=targets[:, 1:5].T * s, box2=xy.T)
        targets = targets[i]
        targets[:, 1:5] = xy[i]

    return img, targets
自定义数据集模块代码
import glob
import os
import random
import shutil
import time
from pathlib import Path
from threading import Thread
import cv2
import math
import numpy as np
import torch
from PIL import Image, ExifTags
from torch.utils.data import Dataset
from tqdm import tqdm
from utils.general import xyxy2xywh, xywh2xyxy, torch_distributed_zero_first
help_url = 'https://github.com/ultralytics/yolov5/wiki/Train-Custom-Data'
# 支持的图像格式
img_formats = ['.bmp', '.jpg', '.jpeg', '.png', '.tif', '.tiff', '.dng']
# 支持的视频格式
vid_formats = ['.mov', '.avi', '.mp4', '.mpg', '.mpeg', '.m4v', '.wmv', '.mkv']
# Get orientation exif tag
'''
可交换图像文件格式(Exchangeable image file format,简称Exif),
是专门为数码相机的照片设定的,可以记录数码照片的属性信息和拍摄数据。
'''
for orientation in ExifTags.TAGS.keys():
if ExifTags.TAGS[orientation] == 'Orientation':
break
# 返回文件列表的hash值
def get_hash(files):
# Returns a single hash value of a list of files
return sum(os.path.getsize(f) for f in files if os.path.isfile(f))
# 获取图片的宽、高信息
# check Exif Orientation metadata and rotate the images if needed.
def exif_size(img):
# Returns exif-corrected PIL size
s = img.size # (width, height)
try:
rotation = dict(img._getexif().items())[orientation] # 调整数码相机照片方向
if rotation == 6: # rotation 270
s = (s[1], s[0])
elif rotation == 8: # rotation 90
s = (s[1], s[0])
except:
pass
return s
# 利用自定义的数据集(LoadImagesAndLabels)创建dataloader
def create_dataloader(path, imgsz, batch_size, stride, opt, hyp=None, augment=False, cache=False, pad=0.0, rect=False,
rank=-1, world_size=1, workers=8):
"""
参数解析:
path:包含图片路径的txt文件或者包含图片的文件夹路径
imgsz:网络输入图片大小
batch_size: 批次大小
stride:网络下采样步幅
opt:调用train.py时传入的参数,这里主要用到opt.single_cls,是否是单类数据集
hyp:网络训练时的一些超参数,包括学习率等,这里主要用到里面一些关于数据增强(旋转、平移等)的系数
augment:是否进行数据增强(Mosaic以外)
cache:是否提前缓存图片到内存,以便加快训练速度
pad:设置矩形训练的shape时进行的填充
rect:是否进行ar排序矩形训练(为True不做Mosaic数据增强)
"""
# Make sure only the first process in DDP(DistributedDataParallel) process the dataset first,
# and the following others can use the cache.
with torch_distributed_zero_first(rank):
dataset = LoadImagesAndLabels(path, imgsz, batch_size,
augment=augment, # augment images
hyp=hyp, # augmentation hyperparameters
rect=rect, # rectangular training
cache_images=cache,
single_cls=opt.single_cls,
stride=int(stride),
pad=pad,
rank=rank)
batch_size = min(batch_size, len(dataset))
nw = min([os.cpu_count() // world_size, batch_size if batch_size > 1 else 0, workers]) # number of workers
# 给每个rank对应的进程分配训练的样本索引
sampler = torch.utils.data.distributed.DistributedSampler(dataset) if rank != -1 else None
# 实例化InfiniteDataLoader
dataloader = InfiniteDataLoader(dataset,
batch_size=batch_size,
num_workers=nw,
sampler=sampler,
pin_memory=True,
collate_fn=LoadImagesAndLabels.collate_fn) # torch.utils.data.DataLoader()
return dataloader, dataset
# Dataloader takes a chunk of time at the start of every epoch to start worker processes.
# We only need to initialize it once at first epoch through this InfiniteDataLoader class
# which subclasses the DataLoader class.
# 定义DataLoader(一个python生成器)
class InfiniteDataLoader(torch.utils.data.dataloader.DataLoader):
""" Dataloader that reuses workers.
Uses same syntax as vanilla DataLoader.
"""
def __init__(self, *args, **kwargs):
super().__init__(*args, **kwargs)
object.__setattr__(self, 'batch_sampler', _RepeatSampler(self.batch_sampler))
self.iterator = super().__iter__()
def __len__(self):
return len(self.batch_sampler.sampler)
def __iter__(self): # 实现了__iter__方法的对象是可迭代的
for i in range(len(self)):
yield next(self.iterator)
# 定义生成器 _RepeatSampler
class _RepeatSampler(object):
""" Sampler that repeats forever.
Args:
sampler (Sampler)
"""
def __init__(self, sampler):
self.sampler = sampler
def __iter__(self):
while True:
yield from iter(self.sampler)
# 定义迭代器 LoadImages;用于detect.py
class LoadImages: # for inference
def __init__(self, path, img_size=640):
p = str(Path(path)) # os-agnostic
# os.path.abspath(p)返回p的绝对路径
p = os.path.abspath(p) # absolute path;完整路径
# 如果采用正则化表达式提取图片/视频,可使用glob获取文件路径
if '*' in p:
files = sorted(glob.glob(p, recursive=True)) # glob
elif os.path.isdir(p): # 如果path是一个文件夹,使用glob获取全部文件路径
files = sorted(glob.glob(os.path.join(p, '*.*'))) # dir
elif os.path.isfile(p): # 如果是文件则直接获取
files = [p] # files
else:
raise Exception('ERROR: %s does not exist' % p)
# os.path.splitext分离文件名和后缀(后缀包含.)
# 分别提取图片和视频文件路径
images = [x for x in files if os.path.splitext(x)[-1].lower() in img_formats]
videos = [x for x in files if os.path.splitext(x)[-1].lower() in vid_formats]
# 获得图片与视频数量
ni, nv = len(images), len(videos)
self.img_size = img_size # 输入图片size
self.files = images + videos # 整合图片和视频路径到一个列表
self.nf = ni + nv # number of files;总的文件数量
# 设置判断是否为视频的bool变量,方便后面单独对视频进行处理
self.video_flag = [False] * ni + [True] * nv
# 初始化模块信息,代码中对于mode=images与mode=video有不同处理
self.mode = 'images'
if any(videos): # 如果包含视频文件,则初始化opencv中的视频模块,cap=cv2.VideoCapture等
self.new_video(videos[0]) # new video
else:
self.cap = None
# nf如果小于0,则打印提示信息
assert self.nf > 0, 'No images or videos found in %s. Supported formats are:\nimages: %s\nvideos: %s' % \
(p, img_formats, vid_formats)
def __iter__(self):
self.count = 0
return self
def __next__(self):
if self.count == self.nf: # self.count == self.nf表示数据读取完了
raise StopIteration
path = self.files[self.count] # 获取文件路径
if self.video_flag[self.count]: # 如果该文件为视频
# Read video
self.mode = 'video' # 修改mode为video
ret_val, img0 = self.cap.read() # 获取当前帧画面,ret_val为一个bool变量,直到视频读取完毕之前都为True
if not ret_val: # 如果当前视频读取结束,则读取下一个视频
self.count += 1
self.cap.release() # 释放视频对象
if self.count == self.nf: # last video; self.count == self.nf表示视频已经读取完了
raise StopIteration
else:
path = self.files[self.count]
self.new_video(path)
ret_val, img0 = self.cap.read()
self.frame += 1 # 当前读取的帧数
print('video %g/%g (%g/%g) %s: ' % (self.count + 1, self.nf, self.frame, self.nframes, path), end='')
else:
# Read image
self.count += 1
img0 = cv2.imread(path) # BGR格式
assert img0 is not None, 'Image Not Found ' + path
print('image %g/%g %s: ' % (self.count, self.nf, path), end='')
# Padded resize
img = letterbox(img0, new_shape=self.img_size)[0] # 对图片进行resize+pad
# Convert
# opencv读入的图像BGR->RGB操作; BGR转为RGB格式,并且把channel轴换到前面
# img[:,:,::-1]的作用就是实现RGB到BGR通道的转换;对于列表img进行img[:,:,::-1]的作用是列表数组左右翻转
# torch.Tensor 高维矩阵的表示: (nSample)x C x H x W
# numpy.ndarray 高维矩阵的表示: H x W x C
# 把channel轴换到前面使用transpose() 方法 。
img = img[:, :, ::-1].transpose(2, 0, 1) # BGR to RGB, to 3x640x640
img = np.ascontiguousarray(img) # 将数组内存转为连续,提高运行速度
# cv2.imwrite(path + '.letterbox.jpg', 255 * img.transpose((1, 2, 0))[:, :, ::-1]) # save letterbox image
return path, img, img0, self.cap # 返回:路径,resize+pad的图片,原始图片,视频对象
def new_video(self, path):
self.frame = 0 # frame用来记录帧数
self.cap = cv2.VideoCapture(path) # 初始化视频对象
self.nframes = int(self.cap.get(cv2.CAP_PROP_FRAME_COUNT)) # 视频文件中的总帧数
def __len__(self):
return self.nf # number of files
# 定义迭代器 LoadWebcam; 未使用
class LoadWebcam: # for inference
def __init__(self, pipe=0, img_size=640):
self.img_size = img_size
if pipe == '0':
pipe = 0 # local camera
# pipe = 'rtsp://192.168.1.64/1' # IP camera
# pipe = 'rtsp://username:[email protected]/1' # IP camera with login
# pipe = 'rtsp://170.93.143.139/rtplive/470011e600ef003a004ee33696235daa' # IP traffic camera
# pipe = 'http://wmccpinetop.axiscam.net/mjpg/video.mjpg' # IP golf camera
# https://answers.opencv.org/question/215996/changing-gstreamer-pipeline-to-opencv-in-pythonsolved/
# pipe = '"rtspsrc location="rtsp://username:[email protected]/1" latency=10 ! appsink' # GStreamer
# https://answers.opencv.org/question/200787/video-acceleration-gstremer-pipeline-in-videocapture/
# https://stackoverflow.com/questions/54095699/install-gstreamer-support-for-opencv-python-package # install help
# pipe = "rtspsrc location=rtsp://root:[email protected]:554/axis-media/media.amp?videocodec=h264&resolution=3840x2160 protocols=GST_RTSP_LOWER_TRANS_TCP ! rtph264depay ! queue ! vaapih264dec ! videoconvert ! appsink" # GStreamer
self.pipe = pipe
self.cap = cv2.VideoCapture(pipe) # video capture object
self.cap.set(cv2.CAP_PROP_BUFFERSIZE, 3) # set buffer size
def __iter__(self):
self.count = -1
return self
def __next__(self):
self.count += 1
if cv2.waitKey(1) == ord('q'): # q to quit
self.cap.release()
cv2.destroyAllWindows()
raise StopIteration
# Read frame
if self.pipe == 0: # local camera
ret_val, img0 = self.cap.read() # cap.read() 结合grab和retrieve的功能,抓取下一帧并解码
img0 = cv2.flip(img0, 1) # flip left-right
else: # IP camera
n = 0
while True:
n += 1
self.cap.grab() # cap.grab()从设备或视频获取下一帧
if n % 30 == 0: # skip frames
ret_val, img0 = self.cap.retrieve() # cap.retrieve() 在grab后使用,对获取到的帧进行解码
if ret_val:
break
# Print
assert ret_val, 'Camera Error %s' % self.pipe
img_path = 'webcam.jpg'
print('webcam %g: ' % self.count, end='')
# Padded resize
img = letterbox(img0, new_shape=self.img_size)[0]
# Convert
img = img[:, :, ::-1].transpose(2, 0, 1) # BGR to RGB, to 3x640x640
img = np.ascontiguousarray(img)
return img_path, img, img0, None
def __len__(self):
return 0
# 定义迭代器 LoadStreams;用于detect.py
"""
cv2视频读取函数:
cap.grap() 从设备或视频获取下一帧,获取成功返回true否则false
cap.retrieve(frame) 在grab后使用,对获取到的帧进行解码,也返回true或false
cap.read(frame) 结合grab和retrieve的功能,抓取下一帧并解码
"""
class LoadStreams: # multiple IP or RTSP cameras
def __init__(self, sources='streams.txt', img_size=640):
self.mode = 'images' # 初始化mode为images
self.img_size = img_size
# 如果sources为一个保存了多个视频流的文件
# 获取每一个视频流,保存为一个列表
if os.path.isfile(sources):
with open(sources, 'r') as f:
sources = [x.strip() for x in f.read().splitlines() if len(x.strip())]
else:
sources = [sources]
n = len(sources)
self.imgs = [None] * n
self.sources = sources # 视频流个数
for i, s in enumerate(sources):
# Start the thread to read frames from the video stream
print('%g/%g: %s... ' % (i + 1, n, s), end='') # 打印当前视频,总视频数,视频流地址
cap = cv2.VideoCapture(eval(s) if s.isnumeric() else s) # 如果source=0则打开摄像头,否则打开视频流地址
assert cap.isOpened(), 'Failed to open %s' % s
w = int(cap.get(cv2.CAP_PROP_FRAME_WIDTH)) # 获取视频的宽度信息
h = int(cap.get(cv2.CAP_PROP_FRAME_HEIGHT)) # 获取视频的高度信息
fps = cap.get(cv2.CAP_PROP_FPS) % 100 # 获取视频的帧率
_, self.imgs[i] = cap.read() # guarantee first frame;读取当前画面
# 创建多线程读取视频流,daemon=True表示主线程结束时子线程也结束
thread = Thread(target=self.update, args=([i, cap]), daemon=True)
print(' success (%gx%g at %.2f FPS).' % (w, h, fps))
thread.start()
print('') # newline
# check for common shapes
# 获取进行resize+pad之后的shape,letterbox函数默认(参数auto=True)是按照矩形推理形状进行填充
s = np.stack([letterbox(x, new_shape=self.img_size)[0].shape for x in self.imgs], 0) # inference shapes
self.rect = np.unique(s, axis=0).shape[0] == 1 # rect inference if all shapes equal
if not self.rect:
print('WARNING: Different stream shapes detected. For optimal performance supply similarly-shaped streams.')
def update(self, index, cap):
# Read next stream frame in a daemon thread
n = 0
while cap.isOpened():
n += 1
# _, self.imgs[index] = cap.read()
cap.grab()
if n == 4: # read every 4th frame; 每4帧读取一次
_, self.imgs[index] = cap.retrieve()
n = 0
time.sleep(0.01) # wait time
def __iter__(self):
self.count = -1
return self
def __next__(self):
self.count += 1
img0 = self.imgs.copy()
if cv2.waitKey(1) == ord('q'): # q to quit
cv2.destroyAllWindows()
raise StopIteration
# Letterbox
# 对图片进行resize+pad
img = [letterbox(x, new_shape=self.img_size, auto=self.rect)[0] for x in img0]
# Stack
img = np.stack(img, 0) # 将读取的图片拼接到一起
# Convert
img = img[:, :, :, ::-1].transpose(0, 3, 1, 2) # BGR to RGB, to bsx3x640x640
img = np.ascontiguousarray(img)
return self.sources, img, img0, None
def __len__(self):
return 0 # 1E12 frames = 32 streams at 30 FPS for 30 years
# 自定义的数据集
# 定义LoadImagesAndLabels类, 继承Dataset, 重写抽象方法:__len()__, __getitem()__
class LoadImagesAndLabels(Dataset): # for training/testing
def __init__(self, path, img_size=640, batch_size=16, augment=False, hyp=None, rect=False, image_weights=False,
cache_images=False, single_cls=False, stride=32, pad=0.0, rank=-1):
self.img_size = img_size # 输入图片分辨率大小
self.augment = augment # 数据增强
self.hyp = hyp # 超参数
self.image_weights = image_weights # 图片采样权重
self.rect = False if image_weights else rect # 矩形训练
# mosaic数据增强
self.mosaic = self.augment and not self.rect # load 4 images at a time into a mosaic (only during training)
# mosaic增强的边界值
self.mosaic_border = [-img_size // 2, -img_size // 2]
self.stride = stride # 模型下采样的步长
def img2label_paths(img_paths):
# Define label paths as a function of image paths
sa, sb = os.sep + 'images' + os.sep, os.sep + 'labels' + os.sep # /images/, /labels/ substrings
return [x.replace(sa, sb, 1).replace(os.path.splitext(x)[-1], '.txt') for x in img_paths]
try:
f = [] # image files
for p in path if isinstance(path, list) else [path]:
# 获取数据集路径path,包含图片路径的txt文件或者包含图片的文件夹路径
# 使用pathlib.Path生成与操作系统无关的路径,因为不同操作系统路径的‘/’会有所不同
p = str(Path(p)) # os-agnostic
parent = str(Path(p).parent) + os.sep # 获取数据集路径的上级父目录,os.sep为路径里的分隔符(不同系统路径分隔符不同,os.sep根据系统自适应)
# 系统路径中的分隔符:Windows系统通过是“\\”,Linux类系统如Ubuntu的分隔符是“/”,而苹果Mac OS系统中是“:”。
if os.path.isfile(p): # file; 如果路径path为包含图片路径的txt文件
with open(p, 'r') as t:
t = t.read().splitlines() # 获取图片路径,更换相对路径
f += [x.replace('./', parent) if x.startswith('./') else x for x in t] # local to global path
elif os.path.isdir(p): # folder; 如果路径path为包含图片的文件夹路径
f += glob.iglob(p + os.sep + '*.*')
# glob.iglob() 函数获取一个可遍历对象,使用它可以逐个获取匹配的文件路径名。
# 与glob.glob()的区别是:glob.glob()可同时获取所有的匹配路径,而glob.iglob()一次只能获取一个匹配路径。
else:
raise Exception('%s does not exist' % p)
# 分隔符替换为os.sep,os.path.splitext(x)将文件名与扩展名分开并返回一个列表
self.img_files = sorted(
[x.replace('/', os.sep) for x in f if os.path.splitext(x)[-1].lower() in img_formats])
assert len(self.img_files) > 0, 'No images found'
except Exception as e:
raise Exception('Error loading data from %s: %s\nSee %s' % (path, e, help_url))
# Check cache
self.label_files = img2label_paths(self.img_files) # labels
cache_path = str(Path(self.label_files[0]).parent) + '.cache' # cached labels
if os.path.isfile(cache_path):
cache = torch.load(cache_path) # load
if cache['hash'] != get_hash(self.label_files + self.img_files): # dataset changed
cache = self.cache_labels(cache_path) # re-cache
else:
cache = self.cache_labels(cache_path) # cache
# Read cache
cache.pop('hash') # remove hash
labels, shapes = zip(*cache.values())
self.labels = list(labels)
self.shapes = np.array(shapes, dtype=np.float64)
self.img_files = list(cache.keys()) # update
self.label_files = img2label_paths(cache.keys()) # update
n = len(shapes) # number of images 数据集的图片文件数量
bi = np.floor(np.arange(n) / batch_size).astype(np.int) # batch index 获取batch的索引
nb = bi[-1] + 1 # number of batches: 一个epoch(轮次)batch的数量
self.batch = bi # batch index of image
self.n = n
# ar排序矩形训练
# Rectangular Training https://github.com/ultralytics/yolov3/issues/232
if self.rect:
# Sort by aspect ratio
s = self.shapes # wh
ar = s[:, 1] / s[:, 0] # aspect ratio
irect = ar.argsort() # 获取根据ar从小到大排序的索引
# 根据索引排序数据集与标签路径、shape、h/w
self.img_files = [self.img_files[i] for i in irect]
self.label_files = [self.label_files[i] for i in irect]
self.labels = [self.labels[i] for i in irect]
self.shapes = s[irect] # wh
ar = ar[irect]
# Set training image shapes
shapes = [[1, 1]] * nb # 初始化shapes,nb为一轮批次batch的数量
for i in range(nb):
ari = ar[bi == i]
mini, maxi = ari.min(), ari.max()
if maxi < 1: # 如果一个batch中最大的h/w小于1,则此batch的shape为(img_size*maxi, img_size)
shapes[i] = [maxi, 1]
elif mini > 1: # 如果一个batch中最小的h/w大于1,则此batch的shape为(img_size, img_size/mini)
shapes[i] = [1, 1 / mini]
self.batch_shapes = np.ceil(np.array(shapes) * img_size / stride + pad).astype(np.int) * stride
# Check labels
create_datasubset, extract_bounding_boxes, labels_loaded = False, False, False
nm, nf, ne, ns, nd = 0, 0, 0, 0, 0 # number missing, found, empty, datasubset, duplicate
pbar = enumerate(self.label_files)
if rank in [-1, 0]:
pbar = tqdm(pbar)
for i, file in pbar:
l = self.labels[i] # label
if l is not None and l.shape[0]:
assert l.shape[1] == 5, '> 5 label columns: %s' % file
assert (l >= 0).all(), 'negative labels: %s' % file
assert (l[:, 1:] <= 1).all(), 'non-normalized or out of bounds coordinate labels: %s' % file
if np.unique(l, axis=0).shape[0] < l.shape[0]: # duplicate rows
nd += 1 # print('WARNING: duplicate rows in %s' % self.label_files[i]) # duplicate rows
if single_cls:
l[:, 0] = 0 # force dataset into single-class mode
self.labels[i] = l
nf += 1 # file found
# Create subdataset (a smaller dataset)
if create_datasubset and ns < 1E4:
if ns == 0:
create_folder(path='./datasubset')
os.makedirs('./datasubset/images')
exclude_classes = 43
if exclude_classes not in l[:, 0]:
ns += 1
# shutil.copy(src=self.img_files[i], dst='./datasubset/images/') # copy image
with open('./datasubset/images.txt', 'a') as f:
f.write(self.img_files[i] + '\n')
# Extract object detection boxes for a second stage classifier
if extract_bounding_boxes:
p = Path(self.img_files[i])
img = cv2.imread(str(p))
h, w = img.shape[:2]
for j, x in enumerate(l):
f = '%s%sclassifier%s%g_%g_%s' % (p.parent.parent, os.sep, os.sep, x[0], j, p.name)
if not os.path.exists(Path(f).parent):
os.makedirs(Path(f).parent) # make new output folder
b = x[1:] * [w, h, w, h] # box
b[2:] = b[2:].max() # rectangle to square
b[2:] = b[2:] * 1.3 + 30 # pad
b = xywh2xyxy(b.reshape(-1, 4)).ravel().astype(np.int)
b[[0, 2]] = np.clip(b[[0, 2]], 0, w) # clip boxes outside of image
b[[1, 3]] = np.clip(b[[1, 3]], 0, h)
assert cv2.imwrite(f, img[b[1]:b[3], b[0]:b[2]]), 'Failure extracting classifier boxes'
else:
ne += 1 # print('empty labels for image %s' % self.img_files[i]) # file empty
# os.system("rm '%s' '%s'" % (self.img_files[i], self.label_files[i])) # remove
if rank in [-1, 0]:
pbar.desc = 'Scanning labels %s (%g found, %g missing, %g empty, %g duplicate, for %g images)' % (
cache_path, nf, nm, ne, nd, n)
if nf == 0: # No labels found
s = 'WARNING: No labels found in %s. See %s' % (os.path.dirname(file) + os.sep, help_url)
print(s)
assert not augment, '%s. Can not train without labels.' % s
# Cache images into memory for faster training (WARNING: large datasets may exceed system RAM)
# 初始化图片与标签,为缓存图片、标签做准备
self.imgs = [None] * n
if cache_images:
gb = 0 # Gigabytes of cached images
pbar = tqdm(range(len(self.img_files)), desc='Caching images')
self.img_hw0, self.img_hw = [None] * n, [None] * n
for i in pbar: # max 10k images
self.imgs[i], self.img_hw0[i], self.img_hw[i] = load_image(self, i) # img, hw_original, hw_resized
gb += self.imgs[i].nbytes
pbar.desc = 'Caching images (%.1fGB)' % (gb / 1E9)
# 缓存标签
def cache_labels(self, path='labels.cache'):
# Cache dataset labels, check images and read shapes
x = {} # dict
pbar = tqdm(zip(self.img_files, self.label_files), desc='Scanning images', total=len(self.img_files))
for (img, label) in pbar:
try:
l = []
im = Image.open(img)
im.verify() # PIL verify
shape = exif_size(im) # image size
assert (shape[0] > 9) & (shape[1] > 9), 'image size <10 pixels'
if os.path.isfile(label):
with open(label, 'r') as f:
l = np.array([x.split() for x in f.read().splitlines()], dtype=np.float32) # labels
if len(l) == 0:
l = np.zeros((0, 5), dtype=np.float32)
x[img] = [l, shape]
except Exception as e:
print('WARNING: Ignoring corrupted image and/or label %s: %s' % (img, e))
x['hash'] = get_hash(self.label_files + self.img_files)
torch.save(x, path) # save for next time
return x
def __len__(self):
return len(self.img_files)
# def __iter__(self):
# self.count = -1
# print('ran dataset iter')
# #self.shuffled_vector = np.random.permutation(self.nF) if self.augment else np.arange(self.nF)
# return self
def __getitem__(self, index):
if self.image_weights: # 如果存在image_weights,则获取新的下标
index = self.indices[index]
"""
self.indices在train.py中设置, 要配合着train.py中的代码使用
image_weights为根据标签中每个类别的数量设置的图片采样权重
如果image_weights=True,则根据图片采样权重获取新的下标
"""
hyp = self.hyp # 超参数
mosaic = self.mosaic and random.random() < hyp['mosaic']
# image mosaic (probability),默认为1
if mosaic:
# Load mosaic
img, labels = load_mosaic(self, index) # 使用mosaic数据增强方式加载图片和标签
shapes = None
# MixUp https://arxiv.org/pdf/1710.09412.pdf
# Mixup数据增强
if random.random() < hyp['mixup']:
img2, labels2 = load_mosaic(self, random.randint(0, len(self.labels) - 1))
r = np.random.beta(8.0, 8.0) # mixup ratio, alpha=beta=8.0
img = (img * r + img2 * (1 - r)).astype(np.uint8) # mixup
labels = np.concatenate((labels, labels2), 0)
else:
# Load image 加载图片并根据设定的输入大小与图片原大小的比例ratio进行resize
img, (h0, w0), (h, w) = load_image(self, index)
# Letterbox
shape = self.batch_shapes[self.batch[index]] if self.rect else self.img_size # final letterboxed shape
img, ratio, pad = letterbox(img, shape, auto=False, scaleup=self.augment)
shapes = (h0, w0), ((h / h0, w / w0), pad) # for COCO mAP rescaling
# Load labels
labels = []
x = self.labels[index]
if x.size > 0:
# Normalized xywh to pixel xyxy format
# 根据pad调整框的标签坐标,并从归一化的xywh->未归一化的xyxy
labels = x.copy()
labels[:, 1] = ratio[0] * w * (x[:, 1] - x[:, 3] / 2) + pad[0] # pad width
labels[:, 2] = ratio[1] * h * (x[:, 2] - x[:, 4] / 2) + pad[1] # pad height
labels[:, 3] = ratio[0] * w * (x[:, 1] + x[:, 3] / 2) + pad[0]
labels[:, 4] = ratio[1] * h * (x[:, 2] + x[:, 4] / 2) + pad[1]
if self.augment:
# Augment imagespace
if not mosaic: # 需要做数据增强但没使用mosaic: 则随机对图片进行旋转,平移,缩放,裁剪
img, labels = random_perspective(img, labels,
degrees=hyp['degrees'],
translate=hyp['translate'],
scale=hyp['scale'],
shear=hyp['shear'],
perspective=hyp['perspective'])
# Augment colorspace # 随机改变图片的色调(H),饱和度(S),亮度(V)
augment_hsv(img, hgain=hyp['hsv_h'], sgain=hyp['hsv_s'], vgain=hyp['hsv_v'])
# Apply cutouts
# if random.random() < 0.9:
# labels = cutout(img, labels)
nL = len(labels) # number of labels
if nL: # 调整框的标签,xyxy->xywh(归一化)
labels[:, 1:5] = xyxy2xywh(labels[:, 1:5]) # convert xyxy to xywh
# 重新归一化标签0 - 1
labels[:, [2, 4]] /= img.shape[0] # normalized height 0~1
labels[:, [1, 3]] /= img.shape[1] # normalized width 0~1
if self.augment:
# flip up-down # 图片随机上下翻转
if random.random() < hyp['flipud']:
img = np.flipud(img)
if nL:
labels[:, 2] = 1 - labels[:, 2]
# flip left-right # 图片随机左右翻转
if random.random() < hyp['fliplr']:
img = np.fliplr(img)
if nL:
labels[:, 1] = 1 - labels[:, 1]
# 初始化标签框对应的图片序号,配合下面的collate_fn使用
labels_out = torch.zeros((nL, 6))
if nL:
labels_out[:, 1:] = torch.from_numpy(labels)
# Convert
# img[:,:,::-1]的作用就是实现BGR到RGB通道的转换; 对于列表img进行img[:,:,::-1]的作用是列表数组左右翻转
# channel轴换到前面
# torch.Tensor 高维矩阵的表示: (nSample)x C x H x W
# numpy.ndarray 高维矩阵的表示: H x W x C
img = img[:, :, ::-1].transpose(2, 0, 1) # BGR to RGB, to 3x640x640
img = np.ascontiguousarray(img)
return torch.from_numpy(img), labels_out, self.img_files[index], shapes
# pytorch的DataLoader打包一个batch的数据集时要经过函数collate_fn进行打包
# 例如:通过重写此函数实现标签与图片对应的划分,一个batch中哪些标签属于哪一张图片
@staticmethod
def collate_fn(batch): # 整理函数:如何取样本的,可以定义自己的函数来实现想要的功能
img, label, path, shapes = zip(*batch) # transposed
for i, l in enumerate(label):
l[:, 0] = i # add target image index for build_targets()
return torch.stack(img, 0), torch.cat(label, 0), path, shapes
# Ancillary functions --------------------------------------------------------------------------------------------------
# load_image加载图片并根据设定的输入大小与图片原大小的比例ratio进行resize
def load_image(self, index):
# loads 1 image from dataset, returns img, original hw, resized hw
img = self.imgs[index]
if img is None: # not cached
path = self.img_files[index]
img = cv2.imread(path) # BGR
assert img is not None, 'Image Not Found ' + path
h0, w0 = img.shape[:2] # orig hw
r = self.img_size / max(h0, w0) # resize image to img_size
# 根据ratio选择不同的插值方式
if r != 1: # always resize down, only resize up if training with augmentation
interp = cv2.INTER_AREA if r < 1 and not self.augment else cv2.INTER_LINEAR
img = cv2.resize(img, (int(w0 * r), int(h0 * r)), interpolation=interp)
return img, (h0, w0), img.shape[:2] # img, hw_original, hw_resized
else:
return self.imgs[index], self.img_hw0[index], self.img_hw[index] # img, hw_original, hw_resized
# HSV色彩空间做数据增强
def augment_hsv(img, hgain=0.5, sgain=0.5, vgain=0.5):
# 随机取-1到1三个实数,乘以hyp中的hsv三通道的系数;HSV(Hue, Saturation, Value)
r = np.random.uniform(-1, 1, 3) * [hgain, sgain, vgain] + 1 # random gains
# 分离通道
hue, sat, val = cv2.split(cv2.cvtColor(img, cv2.COLOR_BGR2HSV))
dtype = img.dtype # uint8
# 随机调整hsv
x = np.arange(0, 256, dtype=np.int16)
lut_hue = ((x * r[0]) % 180).astype(dtype) # 色调H
lut_sat = np.clip(x * r[1], 0, 255).astype(dtype) # 饱和度S
lut_val = np.clip(x * r[2], 0, 255).astype(dtype) # 明度V
# 随机调整hsv之后重新组合通道
img_hsv = cv2.merge((cv2.LUT(hue, lut_hue), cv2.LUT(sat, lut_sat), cv2.LUT(val, lut_val))).astype(dtype)
# 将hsv格式转为BGR格式
cv2.cvtColor(img_hsv, cv2.COLOR_HSV2BGR, dst=img) # no return needed
# Histogram equalization
# if random.random() < 0.2:
# for i in range(3):
# img[:, :, i] = cv2.equalizeHist(img[:, :, i])
# 生成一个mosaic增强的图片
def load_mosaic(self, index):
# loads images in a mosaic
labels4 = []
s = self.img_size
# 随机取mosaic中心点
yc, xc = [int(random.uniform(-x, 2 * s + x)) for x in self.mosaic_border] # mosaic center x, y
# 随机取其它三张图片的索引
indices = [index] + [random.randint(0, len(self.labels) - 1) for _ in range(3)] # 3 additional image indices
for i, index in enumerate(indices):
# Load image
# load_image加载图片并根据设定的输入大小与图片原大小的比例ratio进行resize
img, _, (h, w) = load_image(self, index)
# place img in img4
if i == 0: # top left
# 初始化大图
img4 = np.full((s * 2, s * 2, img.shape[2]), 114, dtype=np.uint8) # base image with 4 tiles
# 设置大图上的位置(左上角)
x1a, y1a, x2a, y2a = max(xc - w, 0), max(yc - h, 0), xc, yc # xmin, ymin, xmax, ymax (large image)
# 选取小图上的位置
x1b, y1b, x2b, y2b = w - (x2a - x1a), h - (y2a - y1a), w, h # xmin, ymin, xmax, ymax (small image)
elif i == 1: # top right 右上角
x1a, y1a, x2a, y2a = xc, max(yc - h, 0), min(xc + w, s * 2), yc
x1b, y1b, x2b, y2b = 0, h - (y2a - y1a), min(w, x2a - x1a), h
elif i == 2: # bottom left 左下角
x1a, y1a, x2a, y2a = max(xc - w, 0), yc, xc, min(s * 2, yc + h)
x1b, y1b, x2b, y2b = w - (x2a - x1a), 0, max(xc, w), min(y2a - y1a, h)
elif i == 3: # bottom right 右下角
x1a, y1a, x2a, y2a = xc, yc, min(xc + w, s * 2), min(s * 2, yc + h)
x1b, y1b, x2b, y2b = 0, 0, min(w, x2a - x1a), min(y2a - y1a, h)
# 将小图上截取的部分贴到大图上
img4[y1a:y2a, x1a:x2a] = img[y1b:y2b, x1b:x2b] # img4[ymin:ymax, xmin:xmax]
# 计算小图到大图上时所产生的偏移,用来计算mosaic增强后的标签框的位置
padw = x1a - x1b
padh = y1a - y1b
# Labels
x = self.labels[index]
labels = x.copy()
# 重新调整标签框的位置
if x.size > 0: # Normalized xywh to pixel xyxy format
labels[:, 1] = w * (x[:, 1] - x[:, 3] / 2) + padw
labels[:, 2] = h * (x[:, 2] - x[:, 4] / 2) + padh
labels[:, 3] = w * (x[:, 1] + x[:, 3] / 2) + padw
labels[:, 4] = h * (x[:, 2] + x[:, 4] / 2) + padh
labels4.append(labels)
# Concat/clip labels
if len(labels4):
# 调整标签框在图片内部
labels4 = np.concatenate(labels4, 0)
np.clip(labels4[:, 1:], 0, 2 * s, out=labels4[:, 1:]) # use with random_perspective
# img4, labels4 = replicate(img4, labels4) # replicate
# 进行mosaic的时候将四张图片整合到一起之后shape为[2*img_size, 2*img_size]
# 对mosaic整合的图片进行随机旋转、平移、缩放、裁剪,并resize为输入大小img_size
# Augment
img4, labels4 = random_perspective(img4, labels4,
degrees=self.hyp['degrees'],
translate=self.hyp['translate'],
scale=self.hyp['scale'],
shear=self.hyp['shear'],
perspective=self.hyp['perspective'],
border=self.mosaic_border) # border to remove
return img4, labels4
def replicate(img, labels):
# Replicate labels
h, w = img.shape[:2]
boxes = labels[:, 1:].astype(int)
x1, y1, x2, y2 = boxes.T
s = ((x2 - x1) + (y2 - y1)) / 2 # side length (pixels)
for i in s.argsort()[:round(s.size * 0.5)]: # smallest indices
x1b, y1b, x2b, y2b = boxes[i]
bh, bw = y2b - y1b, x2b - x1b
yc, xc = int(random.uniform(0, h - bh)), int(random.uniform(0, w - bw)) # offset x, y
x1a, y1a, x2a, y2a = [xc, yc, xc + bw, yc + bh]
img[y1a:y2a, x1a:x2a] = img[y1b:y2b, x1b:x2b] # img4[ymin:ymax, xmin:xmax]
labels = np.append(labels, [[labels[i, 0], x1a, y1a, x2a, y2a]], axis=0)
return img, labels
# 图像缩放: 保持图片的宽高比例,剩下的部分采用灰色填充。
def letterbox(img, new_shape=(640, 640), color=(114, 114, 114), auto=True, scaleFill=False, scaleup=True):
# Resize image to a 32-pixel-multiple rectangle https://github.com/ultralytics/yolov3/issues/232
shape = img.shape[:2] # current shape [height, width]
if isinstance(new_shape, int):
new_shape = (new_shape, new_shape)
# Scale ratio (new / old) # 计算缩放因子
r = min(new_shape[0] / shape[0], new_shape[1] / shape[1])
"""
缩放(resize)到输入大小img_size的时候,如果没有设置上采样的话,则只进行下采样
因为上采样图片会让图片模糊,对训练不友好影响性能。
"""
if not scaleup: # only scale down, do not scale up (for better test mAP)
r = min(r, 1.0)
# Compute padding
ratio = r, r # width, height ratios
new_unpad = int(round(shape[1] * r)), int(round(shape[0] * r))
dw, dh = new_shape[1] - new_unpad[0], new_shape[0] - new_unpad[1] # wh padding
if auto: # minimum rectangle # 获取最小的矩形填充
dw, dh = np.mod(dw, 32), np.mod(dh, 32) # wh padding
# 如果scaleFill=True,则不进行填充,直接resize成img_size, 任由图片进行拉伸和压缩
elif scaleFill: # stretch
dw, dh = 0.0, 0.0
new_unpad = (new_shape[1], new_shape[0])
ratio = new_shape[1] / shape[1], new_shape[0] / shape[0] # width, height ratios
# 计算上下左右填充大小
dw /= 2 # divide padding into 2 sides
dh /= 2
if shape[::-1] != new_unpad: # resize
img = cv2.resize(img, new_unpad, interpolation=cv2.INTER_LINEAR)
top, bottom = int(round(dh - 0.1)), int(round(dh + 0.1))
left, right = int(round(dw - 0.1)), int(round(dw + 0.1))
# 进行填充
img = cv2.copyMakeBorder(img, top, bottom, left, right, cv2.BORDER_CONSTANT, value=color) # add border
return img, ratio, (dw, dh)
# 随机透视变换
# 计算方法为坐标向量和变换矩阵的乘积
def random_perspective(img, targets=(), degrees=10, translate=.1, scale=.1, shear=10, perspective=0.0, border=(0, 0)):
# torchvision.transforms.RandomAffine(degrees=(-10, 10), translate=(.1, .1), scale=(.9, 1.1), shear=(-10, 10))
# targets = [cls, xyxy]
height = img.shape[0] + border[0] * 2 # shape(h,w,c)
width = img.shape[1] + border[1] * 2
# Center
C = np.eye(3)
C[0, 2] = -img.shape[1] / 2 # x translation (pixels)
C[1, 2] = -img.shape[0] / 2 # y translation (pixels)
# Perspective:透视变换
P = np.eye(3)
P[2, 0] = random.uniform(-perspective, perspective) # x perspective (about y)
P[2, 1] = random.uniform(-perspective, perspective) # y perspective (about x)
# Rotation and Scale # 设置旋转和缩放的仿射矩阵
R = np.eye(3)
a = random.uniform(-degrees, degrees)
# a += random.choice([-180, -90, 0, 90]) # add 90deg rotations to small rotations
s = random.uniform(1 - scale, 1 + scale)
# s = 2 ** random.uniform(-scale, scale)
R[:2] = cv2.getRotationMatrix2D(angle=a, center=(0, 0), scale=s)
# Shear;设置裁剪的仿射矩阵系数
S = np.eye(3)
S[0, 1] = math.tan(random.uniform(-shear, shear) * math.pi / 180) # x shear (deg)
S[1, 0] = math.tan(random.uniform(-shear, shear) * math.pi / 180) # y shear (deg)
# Translation;设置平移的仿射矩阵系数
T = np.eye(3)
T[0, 2] = random.uniform(0.5 - translate, 0.5 + translate) * width # x translation (pixels)
T[1, 2] = random.uniform(0.5 - translate, 0.5 + translate) * height # y translation (pixels)
# Combined rotation matrix
# 融合仿射矩阵并作用在图片上; @表示矩阵乘法运算
M = T @ S @ R @ P @ C # order of operations (right to left) is IMPORTANT
if (border[0] != 0) or (border[1] != 0) or (M != np.eye(3)).any(): # image changed
if perspective:
# 透视变换函数,可保持直线不变形,但是平行线可能不再平行
img = cv2.warpPerspective(img, M, dsize=(width, height), borderValue=(114, 114, 114))
else: # affine
# 仿射变换函数,可实现旋转,平移,缩放;变换后的平行线依旧平行
img = cv2.warpAffine(img, M[:2], dsize=(width, height), borderValue=(114, 114, 114))
# Visualize
# import matplotlib.pyplot as plt
# ax = plt.subplots(1, 2, figsize=(12, 6))[1].ravel()
# ax[0].imshow(img[:, :, ::-1]) # base
# ax[1].imshow(img2[:, :, ::-1]) # warped
# Transform label coordinates
# 调整框的标签
n = len(targets)
if n:
# warp points
xy = np.ones((n * 4, 3))
xy[:, :2] = targets[:, [1, 2, 3, 4, 1, 4, 3, 2]].reshape(n * 4, 2) # x1y1, x2y2, x1y2, x2y1
xy = xy @ M.T # transform
if perspective:
xy = (xy[:, :2] / xy[:, 2:3]).reshape(n, 8) # rescale
else: # affine
xy = xy[:, :2].reshape(n, 8)
# create new boxes
x = xy[:, [0, 2, 4, 6]]
y = xy[:, [1, 3, 5, 7]]
xy = np.concatenate((x.min(1), y.min(1), x.max(1), y.max(1))).reshape(4, n).T
# # apply angle-based reduction of bounding boxes
# radians = a * math.pi / 180
# reduction = max(abs(math.sin(radians)), abs(math.cos(radians))) ** 0.5
# x = (xy[:, 2] + xy[:, 0]) / 2
# y = (xy[:, 3] + xy[:, 1]) / 2
# w = (xy[:, 2] - xy[:, 0]) * reduction
# h = (xy[:, 3] - xy[:, 1]) * reduction
# xy = np.concatenate((x - w / 2, y - h / 2, x + w / 2, y + h / 2)).reshape(4, n).T
# clip boxes
# 去除进行上面一系列操作后被裁剪过小的框;reject warped points outside of image
xy[:, [0, 2]] = xy[:, [0, 2]].clip(0, width)
xy[:, [1, 3]] = xy[:, [1, 3]].clip(0, height)
# filter candidates
i = box_candidates(box1=targets[:, 1:5].T * s, box2=xy.T)
targets = targets[i]
targets[:, 1:5] = xy[i]
return img, targets
def box_candidates(box1, box2, wh_thr=2, ar_thr=20, area_thr=0.1): # box1(4,n), box2(4,n)
# Compute candidate boxes: box1 before augment, box2 after augment, wh_thr (pixels), aspect_ratio_thr, area_ratio
w1, h1 = box1[2] - box1[0], box1[3] - box1[1]
w2, h2 = box2[2] - box2[0], box2[3] - box2[1]
ar = np.maximum(w2 / (h2 + 1e-16), h2 / (w2 + 1e-16)) # aspect ratio
return (w2 > wh_thr) & (h2 > wh_thr) & (w2 * h2 / (w1 * h1 + 1e-16) > area_thr) & (ar < ar_thr) # candidates
# cutout数据增强(即随机的去处图像中的某些部分)
def cutout(image, labels):
# Applies image cutout augmentation https://arxiv.org/abs/1708.04552
h, w = image.shape[:2]
def bbox_ioa(box1, box2):
# Returns the intersection over box2 area given box1, box2. box1 is 4, box2 is nx4. boxes are x1y1x2y2
box2 = box2.transpose()
# Get the coordinates of bounding boxes
b1_x1, b1_y1, b1_x2, b1_y2 = box1[0], box1[1], box1[2], box1[3]
b2_x1, b2_y1, b2_x2, b2_y2 = box2[0], box2[1], box2[2], box2[3]
# Intersection area
inter_area = (np.minimum(b1_x2, b2_x2) - np.maximum(b1_x1, b2_x1)).clip(0) * \
(np.minimum(b1_y2, b2_y2) - np.maximum(b1_y1, b2_y1)).clip(0)
# box2 area
box2_area = (b2_x2 - b2_x1) * (b2_y2 - b2_y1) + 1e-16
# Intersection over box2 area
return inter_area / box2_area
# create random masks
scales = [0.5] * 1 + [0.25] * 2 + [0.125] * 4 + [0.0625] * 8 + [0.03125] * 16 # image size fraction
for s in scales:
mask_h = random.randint(1, int(h * s))
mask_w = random.randint(1, int(w * s))
# box
xmin = max(0, random.randint(0, w) - mask_w // 2)
ymin = max(0, random.randint(0, h) - mask_h // 2)
xmax = min(w, xmin + mask_w)
ymax = min(h, ymin + mask_h)
# apply random color mask
image[ymin:ymax, xmin:xmax] = [random.randint(64, 191) for _ in range(3)]
# return unobscured labels
if len(labels) and s > 0.03:
box = np.array([xmin, ymin, xmax, ymax], dtype=np.float32)
ioa = bbox_ioa(box, labels[:, 1:5]) # intersection over area
labels = labels[ioa < 0.60] # remove >60% obscured labels
return labels
def reduce_img_size(path='path/images', img_size=1024): # from utils.datasets import *; reduce_img_size()
# creates a new ./images_reduced folder with reduced size images of maximum size img_size
path_new = path + '_reduced' # reduced images path
create_folder(path_new)
for f in tqdm(glob.glob('%s/*.*' % path)):
try:
img = cv2.imread(f)
h, w = img.shape[:2]
r = img_size / max(h, w) # size ratio
if r < 1.0:
img = cv2.resize(img, (int(w * r), int(h * r)), interpolation=cv2.INTER_AREA) # _LINEAR fastest
fnew = f.replace(path, path_new) # .replace(Path(f).suffix, '.jpg')
cv2.imwrite(fnew, img)
except:
print('WARNING: image failure %s' % f)
def recursive_dataset2bmp(dataset='path/dataset_bmp'): # from utils.datasets import *; recursive_dataset2bmp()
# Converts dataset to bmp (for faster training)
formats = [x.lower() for x in img_formats] + [x.upper() for x in img_formats]
for a, b, files in os.walk(dataset):
for file in tqdm(files, desc=a):
p = a + '/' + file
s = Path(file).suffix
if s == '.txt': # replace text
with open(p, 'r') as f:
lines = f.read()
for f in formats:
lines = lines.replace(f, '.bmp')
with open(p, 'w') as f:
f.write(lines)
elif s in formats: # replace image
cv2.imwrite(p.replace(s, '.bmp'), cv2.imread(p))
if s != '.bmp':
os.system("rm '%s'" % p)
def imagelist2folder(path='path/images.txt'): # from utils.datasets import *; imagelist2folder()
# Copies all the images in a text file (list of images) into a folder
create_folder(path[:-4])
with open(path, 'r') as f:
for line in f.read().splitlines():
os.system('cp "%s" %s' % (line, path[:-4]))
print(line)
def create_folder(path='./new'):
# Create folder
if os.path.exists(path):
shutil.rmtree(path) # delete output folder
os.makedirs(path) # make new output folder
AP计算
# 根据PR曲线计算AP
def compute_ap(recall, precision):
    """ Compute the average precision, given the recall and precision curves.
    Source: https://github.com/rbgirshick/py-faster-rcnn.
    # Arguments
        recall:    The recall curve (list).
        precision: The precision curve (list).
    # Returns
        The average precision as computed in py-faster-rcnn.
    """

    # Append sentinel values to beginning and end
    # 把recall开放的区间给补上,补成了闭合的区间
    mrec = recall  # np.concatenate(([0.], recall, [recall[-1] + 1E-3]))
    # mpre也是做了对应的补偿
    mpre = precision  # np.concatenate(([0.], precision, [0.]))

    # Compute the precision envelope
    # 人为地把pre-rec曲线变成单调递减的;把这个曲线给填的鼓了起来
    # numpy.maximum.accumulate(numpy.array([11,12,13,20,19,18,17,18,23,21]))
    # 输出:array([11, 12, 13, 20, 20, 20, 20, 20, 23, 23])
    mpre = np.flip(np.maximum.accumulate(np.flip(mpre)))

    # Integrate area under curve
    method = 'interp'  # methods: 'continuous', 'interp'
    if method == 'interp':
        x = np.linspace(0, 1, 101)  # 101-point interp (COCO)
        # np.interp:One-dimensional linear interpolation.
        # np.trapz:Integrate along the given axis using the composite trapezoidal rule. Integrate y(x) along given axis.
        ap = np.trapz(np.interp(x, mrec, mpre), x)  # integrate
    else:  # 'continuous'
        i = np.where(mrec[1:] != mrec[:-1])[0]  # points where x axis (recall) changes;获取rec区间变化的点
        ap = np.sum((mrec[i + 1] - mrec[i]) * mpre[i + 1])  # area under curve

    return ap, mpre, mrec

# 计算类别的AP
def ap_per_class(tp, conf, pred_cls, target_cls, plot=False, fname='precision-recall_curve.png'):
    """ Compute the average precision, given the recall and precision curves.
    Source: https://github.com/rafaelpadilla/Object-Detection-Metrics.
    # Arguments
        tp:    True positives (nparray, nx1 or nx10).
        conf:  Objectness value from 0~1 (nparray).  目标得分的值
        pred_cls: Predicted object classes (nparray).  预测物体的类别
        target_cls: True object classes (nparray).     真正物体的类别
        plot:  Plot precision-recall curve at [email protected]
        fname:  Plot filename
    # Returns
        The average precision as computed in py-faster-rcnn.
    """

    # Sort by objectness
    i = np.argsort(-conf)
    tp, conf, pred_cls = tp[i], conf[i], pred_cls[i]

    # Find unique classes
    unique_classes = np.unique(target_cls)

    # Create Precision-Recall curve and compute AP for each class
    px, py = np.linspace(0, 1, 1000), []  # for plotting
    pr_score = 0.1  # score to evaluate P and R https://github.com/ultralytics/yolov3/issues/898
    s = [unique_classes.shape[0], tp.shape[1]] # number class, number iou thresholds (i.e. 10 for mAP0.5...0.95)
    ap, p, r = np.zeros(s), np.zeros(s), np.zeros(s)
    for ci, c in enumerate(unique_classes):
        i = pred_cls == c
        n_gt = (target_cls == c).sum()  # Number of ground truth objects
        n_p = i.sum()  # Number of predicted objects

        if n_p == 0 or n_gt == 0:
            continue
        else:
            # Accumulate FPs and TPs
            fpc = (1 - tp[i]).cumsum(0)
            tpc = tp[i].cumsum(0)

            # Recall
            recall = tpc / (n_gt + 1e-16)  # recall curve
            r[ci] = np.interp(-pr_score, -conf[i], recall[:, 0])  # r at pr_score, negative x, xp because xp decreases

            # Precision
            precision = tpc / (tpc + fpc)  # precision curve
            p[ci] = np.interp(-pr_score, -conf[i], precision[:, 0])  # p at pr_score

            # AP from recall-precision curve
            for j in range(tp.shape[1]):
                ap[ci, j], mpre, mrec = compute_ap(recall[:, j], precision[:, j])
                if j == 0:
                    py.append(np.interp(px, mrec, mpre))  # precision at [email protected]

    # Compute F1 score (harmonic mean of precision and recall)
    f1 = 2 * p * r / (p + r + 1e-16)

    if plot:
        py = np.stack(py, axis=1)
        fig, ax = plt.subplots(1, 1, figsize=(5, 5))
        ax.plot(px, py, linewidth=0.5, color='grey')  # plot(recall, precision)
        ax.plot(px, py.mean(1), linewidth=2, color='blue', label='all classes %.3f [email protected]' % ap[:, 0].mean())
        ax.set_xlabel('Recall')
        ax.set_ylabel('Precision')
        ax.set_xlim(0, 1)
        ax.set_ylim(0, 1)
        plt.legend()
        fig.tight_layout()
        fig.savefig(fname, dpi=200)

    return p, r, ap, f1, unique_classes.astype('int32')
跨网格搜索模块代码
'''
build_targets函数用于获得在训练时计算loss函数所需要的目标框,即被认为是正样本
与yolov3/v4的不同:yolov5支持跨网格预测
对于任何一个bbox,三个输出预测特征层都可能有先验框anchors匹配;
该函数输出的正样本框比传入的targets(GT框)数目多
具体处理过程:
(1)对于任何一层计算当前bbox和当前层anchor的匹配程度,不采用iou,而是shape比例;
   如果anchor和bbox的宽高比差距大于4,则认为不匹配,此时忽略相应的bbox,即当做背景;
(2)然后对bbox计算落在的网格所有anchors都计算loss(并不是直接和GT框比较计算loss)
  注意此时落在网格不再是一个,而是附近的多个,这样就增加了正样本数,可能存在有些bbox在三个尺度都预测的情况;
  另外,yolov5也没有conf分支忽略阈值(ignore_thresh)的操作,而yolov3/v4有。
'''
def build_targets(p, targets, model):
    """
    Args:
        p: 网络输出,List[torch.tensor * 3], p[i].shape = (b, 3, h, w, nc+5),
        hw分别为特征图的长宽,b为batch-size,
        targets: GT框;targets.shape = (nt, 6) , 6=icxywh,i表示第i+1张图片,c为类别,然后为坐标xywh
        model: 模型

    Returns:

    """

    # Build targets for compute_loss(), input targets(image,class,x,y,w,h)
    # 获取检测层
    det = model.module.model[-1] if is_parallel(model) else model.model[-1]  # Detect() module
    # anchor数量和标签框数量
    # targets nx6,其中n是batch内所有的图片label拼接而成
    # 6的第0维度表示当前是第几张图片的label =index,后面是classid xywh
    na, nt = det.na, targets.shape[0]  # number of anchors, number of targets
    tcls, tbox, indices, anch = [], [], [], []
    gain = torch.ones(7, device=targets.device)  # normalized to gridspace gain
    # ai.shape = (na, nt) 生成anchor索引
    # anchor索引,后面有用,用于表示当前bbox和当前层的哪个anchor匹配
    ai = torch.arange(na, device=targets.device).float().view(na, 1).repeat(1, nt)  # same as .repeat_interleave(nt)
    # 先repeat targets和当前层anchor个数一样,相当于每个bbox变成了三个,然后和3个anchor单独匹配
    targets = torch.cat((targets.repeat(na, 1, 1), ai[:, :, None]), 2)  # append anchor indices

    # 设置网格中心偏移量
    g = 0.5  # bias
    # 附近的4个网格
    off = torch.tensor([[0, 0],
                        [1, 0], [0, 1], [-1, 0], [0, -1],  # j,k,l,m
                        # [1, 1], [1, -1], [-1, 1], [-1, -1],  # jk,jm,lk,lm
                        ], device=targets.device).float() * g  # offsets

    # 对每个检测层进行处理
    for i in range(det.nl): # 三个尺度的预测特征图输出分支
        anchors = det.anchors[i]  # 当前分支的anchor大小(已经除以了当前特征图对应的stride)
        """
        p[i].shape = (b, 3, h, w,nc+5), hw分别为特征图的长宽
        gain = [1, 1, w, h, w, h, 1]
        """
        # p是网络输出值
        gain[2:6] = torch.tensor(p[i].shape)[[3, 2, 3, 2]]  # xyxy gain

        # Match targets to anchors
        # 将标签框的xywh从基于0~1映射到基于特征图;targets的xywh本身是归一化尺度,故需要变成特征图尺度
        t = targets * gain
        # 对每个输出层单独匹配
        # 首先将targets变成anchor尺度,方便计算;
        # 然后将target wh shape和anchor的wh计算比例,如果比例过大,则说明匹配度不高,将该bbox过滤,在当前层认为是bg
        if nt:
            # Matches
            """
            预测的wh与anchor的wh做匹配,筛选掉比值大于hyp['anchor_t']的,从而更好的回归。
            作者采用新的wh回归方式: (wh.sigmoid() * 2) ** 2 * anchors[i]
            原来yolov3/v4为anchors[i] * exp(wh)。
            将标签框与anchor的倍数控制在0~4之间;hyp.scratch.yaml中的超参数anchor_t=4,用于判定anchors与标签框契合度;
            """
            # 计算当前target的wh和anchor的wh比例值
            # 如果最大比例大于预设值model.hyp['anchor_t']=4,则当前target和anchor匹配度不高,不强制回归,而把target丢弃
            # 计算比值ratio
            r = t[:, :, 4:6] / anchors[:, None]  # wh ratio; 不考虑xy坐标
            # 筛选满足1 / hyp['anchor_t'] < targets_wh/anchor_wh < hyp['anchor_t']的框;
            j = torch.max(r, 1. / r).max(2)[0] < model.hyp['anchor_t']  # compare
            # j = wh_iou(anchors, t[:, 4:6]) > model.hyp['iou_t']  # iou(3,n)=wh_iou(anchors(3,2), gwh(n,2))
            # 筛选过后的t.shape = (M, 7),M为筛选过后的数量
            t = t[j]  # filter; 注意过滤规则没有考虑xy,也就是当前bbox的wh是和所有anchor计算的

            gxy = t[:, 2:4]  # grid xy; label的中心点坐标
            # 得到中心点相对于当前特征图的坐标, (M, 2)
            gxi = gain[[2, 3]] - gxy  # inverse
            # ((gxy % 1. < g) & (gxy > 1.)).T shape为(2, M)
            # jklm shape为(M, )
            """
            把相对于各个网格左上角x<0.5,y<0.5和相对于右下角的x<0.5,y<0.5的框提取出来,也就是j,k,l,m;
            在选取gij(也就是标签框分配给的网格)的时候对这2个部分的框都做一个偏移(减去上面的offsets),
            也就是下面的gij = (gxy - offsets).long()操作;
            再将这2个部分的框与原始的gxy拼接在一起,总共就是3个部分;
            yolov3/v4仅仅采用当前网格的anchor进行回归;yolov4也有解决网格跑偏的措施,即通过对sigmoid限制输出;
            yolov5中心点回归从yolov3/v4的0~1的范围变成-0.5~1.5的范围;
            中心点回归的公式变为:
            xy.sigmoid() * 2. - 0.5 + cx  (其中对原始中心点网格坐标扩展两个邻居像素)
            """
            # 对于筛选后的bbox,计算其落在哪个网格内,同时找出邻近的网格,将这些网格都认为是负责预测该bbox的网格
            # 浮点数取模的数学定义:对于两个浮点数a和b,a % b = a - n * b,其中n为不超过a / b的最大整数。
            j, k = ((gxy % 1. < g) & (gxy > 1.)).T
            # j.shape = (5, M)
            l, m = ((gxi % 1. < g) & (gxi > 1.)).T
            j = torch.stack((torch.ones_like(j), j, k, l, m))
            # 5是因为预设的off是5个
            t = t.repeat((5, 1, 1))[j]
            # 添加偏移量
            offsets = (torch.zeros_like(gxy)[None] + off[:, None])[j] # 选择出最近的3个(包括自己)
        else:
            t = targets[0]
            offsets = 0

        # Define
        """
        对每个bbox找出对应的正样本anchor,
        其中包括b表示当前bbox属于batch内部的第几张图片,
        a表示当前bbox和当前层的第几个anchor匹配上,
        gi,gj是对应的负责预测该bbox的网格坐标,
        gxy是不考虑offset或者说yolov3/v4里面设定的该bbox的负责预测网格中心点坐标xy,
        gwh是对应的bbox wh,
        c是该bbox类别
        """
        b, c = t[:, :2].long().T  # image, class
        # 中心点回归标签
        gxy = t[:, 2:4]  # grid xy
        # 宽高回归标签
        gwh = t[:, 4:6]  # grid wh
        gij = (gxy - offsets).long() # 当前label落在哪个网格上
        gi, gj = gij.T  # grid xy indices(索引值); gridx,gridy

        # Append
        # a为anchor的索引
        a = t[:, 6].long()  # anchor indices
        # 添加索引,方便计算损失的时候取出对应位置的输出
        indices.append((b, a, gj, gi))  # image, anchor, grid indices
        tbox.append(torch.cat((gxy - gij, gwh), 1))  # box 坐标值
        anch.append(anchors[a])  # anchors 尺寸
        tcls.append(c)  # class

    return tcls, tbox, indices, anch
IOU模块代码
# 计算两个框的特定iou(DIoU, GIoU, CIoU)

def bbox_iou(box1, box2, x1y1x2y2=True, GIoU=False, DIoU=False, CIoU=False, eps=1e-9):
    # Returns the IoU of box1 to box2. box1 is 4, box2 is nx4
    box2 = box2.T

    # Get the coordinates of bounding boxes
    if x1y1x2y2:  # x1, y1, x2, y2 = box1
        b1_x1, b1_y1, b1_x2, b1_y2 = box1[0], box1[1], box1[2], box1[3]
        b2_x1, b2_y1, b2_x2, b2_y2 = box2[0], box2[1], box2[2], box2[3]
    else:  # transform from xywh to xyxy
        b1_x1, b1_x2 = box1[0] - box1[2] / 2, box1[0] + box1[2] / 2
        b1_y1, b1_y2 = box1[1] - box1[3] / 2, box1[1] + box1[3] / 2
        b2_x1, b2_x2 = box2[0] - box2[2] / 2, box2[0] + box2[2] / 2
        b2_y1, b2_y2 = box2[1] - box2[3] / 2, box2[1] + box2[3] / 2

    # Intersection area
    """
       edge of intersect rectangle:

       left_line = max(box1[1], box2[1])
       right_line = min(box1[3], box2[3])
       top_line = max(box1[0], box2[0])
       bottom_line = min(box1[2], box2[2])

       intersect = (right_line - left_line) * (bottom_line - top_line)
    """
    inter = (torch.min(b1_x2, b2_x2) - torch.max(b1_x1, b2_x1)).clamp(0) * \
            (torch.min(b1_y2, b2_y2) - torch.max(b1_y1, b2_y1)).clamp(0)

    # Union Area
    w1, h1 = b1_x2 - b1_x1, b1_y2 - b1_y1 + eps
    w2, h2 = b2_x2 - b2_x1, b2_y2 - b2_y1 + eps
    union = w1 * h1 + w2 * h2 - inter + eps

    iou = inter / union
    if GIoU or DIoU or CIoU:
        cw = torch.max(b1_x2, b2_x2) - torch.min(b1_x1, b2_x1)  # convex (smallest enclosing box) width
        ch = torch.max(b1_y2, b2_y2) - torch.min(b1_y1, b2_y1)  # convex height
        if CIoU or DIoU:  # Distance or Complete IoU https://arxiv.org/abs/1911.08287v1
            c2 = cw ** 2 + ch ** 2 + eps  # convex diagonal squared
            rho2 = ((b2_x1 + b2_x2 - b1_x1 - b1_x2) ** 2 +
                    (b2_y1 + b2_y2 - b1_y1 - b1_y2) ** 2) / 4  # center distance squared
            if DIoU:
                return iou - rho2 / c2  # DIoU
            elif CIoU:  # https://github.com/Zzh-tju/DIoU-SSD-pytorch/blob/master/utils/box/box_utils.py#L47
                v = (4 / math.pi ** 2) * torch.pow(torch.atan(w2 / h2) - torch.atan(w1 / h1), 2)
                with torch.no_grad():
                    alpha = v / ((1 + eps) - iou + v)
                return iou - (rho2 / c2 + v * alpha)  # CIoU
        else:  # GIoU https://arxiv.org/pdf/1902.09630.pdf
            c_area = cw * ch + eps  # convex area
            return iou - (c_area - union) / c_area  # GIoU
    else:
        return iou  # IoU

# 计算两个框的iou
def box_iou(box1, box2):
    # https://github.com/pytorch/vision/blob/master/torchvision/ops/boxes.py
    """
    Return intersection-over-union (Jaccard index) of boxes.
    Both sets of boxes are expected to be in (x1, y1, x2, y2) format.
    Arguments:
        box1 (Tensor[N, 4])
        box2 (Tensor[M, 4])
    Returns:
        iou (Tensor[N, M]): the NxM matrix containing the pairwise
            IoU values for every element in boxes1 and boxes2
    """

    def box_area(box):
        # box = 4xn
        return (box[2] - box[0]) * (box[3] - box[1])

    area1 = box_area(box1.T)
    area2 = box_area(box2.T)

    # inter(N,M) = (rb(N,M,2) - lt(N,M,2)).clamp(0).prod(2)
    inter = (torch.min(box1[:, None, 2:], box2[:, 2:]) - torch.max(box1[:, None, :2], box2[:, :2])).clamp(0).prod(2)
    return inter / (area1[:, None] + area2 - inter)  # iou = inter / (area1 + area2 - inter)
FocalLoss代码部分
# Focal loss主要是为了解决one-stage目标检测中正负样本比例严重失衡的问题。该损失函数降低了大量简单负样本在训练中所占的权重。
class FocalLoss(nn.Module):
    # Wraps focal loss around existing loss_fcn(), i.e. criteria = FocalLoss(nn.BCEWithLogitsLoss(), gamma=1.5)
    def __init__(self, loss_fcn, gamma=1.5, alpha=0.25):
        super(FocalLoss, self).__init__()
        self.loss_fcn = loss_fcn  # must be nn.BCEWithLogitsLoss()
        self.gamma = gamma
        self.alpha = alpha
        self.reduction = loss_fcn.reduction
        self.loss_fcn.reduction = 'none'  # required to apply FL to each element

    def forward(self, pred, true):
        loss = self.loss_fcn(pred, true)
        # p_t = torch.exp(-loss)
        # loss *= self.alpha * (1.000001 - p_t) ** self.gamma  # non-zero power for gradient stability

        # TF implementation https://github.com/tensorflow/addons/blob/v0.7.1/tensorflow_addons/losses/focal_loss.py
        pred_prob = torch.sigmoid(pred)  # prob from logits
        p_t = true * pred_prob + (1 - true) * (1 - pred_prob)
        alpha_factor = true * self.alpha + (1 - true) * (1 - self.alpha)
        modulating_factor = (1.0 - p_t) ** self.gamma
        loss *= alpha_factor * modulating_factor

        if self.reduction == 'mean':
            return loss.mean()
        elif self.reduction == 'sum':
            return loss.sum()
        else:  # 'none'
            return loss
Loss损失代码实现
分类损失+置信度损失+框坐标回归损失
# 计算损失(分类损失+置信度损失+框坐标回归损失)
def compute_loss(p, targets, model):  # predictions, targets, model
    """
    Args:
        p: 网络输出,List[torch.tensor * 3], p[i].shape = (b, 3, h, w, nc+5), hw分别为特征图的长宽,b为batch-size
        targets: targets.shape = (nt, 6) , 6=icxywh,i=0表示第一张图片,c为类别,然后为坐标xywh
        model: 模型

    Returns:

    """
    # 获取设备
    device = targets.device
    # 初始化各个部分损失
    lcls, lbox, lobj = torch.zeros(1, device=device), torch.zeros(1, device=device), torch.zeros(1, device=device)
    # 获得标签分类,边框,索引,anchors
    tcls, tbox, indices, anchors = build_targets(p, targets, model)  # targets
    # 获取超参数
    h = model.hyp  # hyperparameters

    # Define criteria
    # 定义类别和目标性得分损失函数
    BCEcls = nn.BCEWithLogitsLoss(pos_weight=torch.Tensor([h['cls_pw']])).to(device)
    BCEobj = nn.BCEWithLogitsLoss(pos_weight=torch.Tensor([h['obj_pw']])).to(device)

    # Class label smoothing https://arxiv.org/pdf/1902.04103.pdf eqn 3
    # 标签平滑,eps默认为0,其实是没用上。
    cp, cn = smooth_BCE(eps=0.0)

    # Focal loss
    # 如果设置了fl_gamma参数,就使用focal loss,默认没有使用
    g = h['fl_gamma']  # focal loss gamma
    if g > 0:
        BCEcls, BCEobj = FocalLoss(BCEcls, g), FocalLoss(BCEobj, g)

    # Losses
    nt = 0  # number of targets
    np = len(p)  # number of outputs
    # 设置三个特征图对应输出的损失系数
    balance = [4.0, 1.0, 0.4] if np == 3 else [4.0, 1.0, 0.4, 0.1]  # P3-5 or P3-6
    # 遍历每个预测输出
    for i, pi in enumerate(p):  # layer index, layer predictions
        # 根据indices获取索引,方便找到对应网格的输出
        b, a, gj, gi = indices[i]  # image, anchor, gridy, gridx
        tobj = torch.zeros_like(pi[..., 0], device=device)  # target obj

        n = b.shape[0]  # number of targets
        if n:
            nt += n  # cumulative targets
            # 找到对应网格的输出, 取出对应位置预测值
            ps = pi[b, a, gj, gi]  # prediction subset corresponding to targets

            # Regression
            # 对输出xywh做反算
            pxy = ps[:, :2].sigmoid() * 2. - 0.5
            pwh = (ps[:, 2:4].sigmoid() * 2) ** 2 * anchors[i]
            pbox = torch.cat((pxy, pwh), 1).to(device)  # predicted box
            # 计算边框损失,注意这个CIoU=True,计算的是ciou损失
            iou = bbox_iou(pbox.T, tbox[i], x1y1x2y2=False, CIoU=True)  # iou(prediction, target)
            lbox += (1.0 - iou).mean()  # iou loss

            # Objectness
            # 根据model.gr设置objectness的标签值; 有目标的conf分支权重
            # 不同anchor和gt bbox匹配度不一样,预测框和gt bbox 的匹配度也不一样,如果权重设置一样肯定不是最优的,
            # 故将预测框和bbox的iou作为权重乘到conf分支,用于表征预测质量。
            tobj[b, a, gj, gi] = (1.0 - model.gr) + model.gr * iou.detach().clamp(0).type(tobj.dtype)  # iou ratio

            # Classification
            # 设置如果类别数大于1才计算分类损失
            if model.nc > 1:  # cls loss (only if multiple classes)
                t = torch.full_like(ps[:, 5:], cn, device=device)  # targets
                t[range(n), tcls[i]] = cp
                lcls += BCEcls(ps[:, 5:], t)  # BCE; 每个类单独计算Loss

            # Append targets to text file
            # with open('targets.txt', 'a') as file:
            #     [file.write('%11.5g ' * 4 % tuple(x) + '\n') for x in torch.cat((txy[i], twh[i]), 1)]

        # 计算objectness的损失
        lobj += BCEobj(pi[..., 4], tobj) * balance[i]  # obj loss

    # loss尺度缩放 s=1
    s = 3 / np  # output count scaling
    # 根据超参数设置的各个部分损失的系数获取最终损失
    lbox *= h['box'] * s
    lobj *= h['obj'] * s * (1.4 if np == 4 else 1.)
    lcls *= h['cls'] * s
    bs = tobj.shape[0]  # batch size

    loss = lbox + lobj + lcls
    # scaling the loss by bs, otherwise different models and batch sizes would show different losses, making comparisons impossible.
    return loss * bs, torch.cat((lbox, lobj, lcls, loss)).detach()
非极大值抑制模块代码
# 非极大抑制算法
def non_max_suppression(prediction, conf_thres=0.1, iou_thres=0.6, merge=False, classes=None, agnostic=False):
    """Performs Non-Maximum Suppression (NMS) on inference results

    Returns:
         detections with shape: nx6 (x1, y1, x2, y2, conf, cls)
    """

    nc = prediction[0].shape[1] - 5  # number of classes
    xc = prediction[..., 4] > conf_thres  # candidates

    # Settings
    min_wh, max_wh = 2, 4096  # (pixels) minimum and maximum box width and height
    max_det = 300  # maximum number of detections per image   每个图像最多检测的物体是max_det个
    time_limit = 10.0  # seconds to quit after   设置加测时间限制
    redundant = True  # require redundant detections
    multi_label = nc > 1  # multiple labels per box (adds 0.5ms/img)

    t = time.time()
    output = [None] * prediction.shape[0]
    for xi, x in enumerate(prediction):  # image index, image inference
        # Apply constraints
        # x[((x[..., 2:4] < min_wh) | (x[..., 2:4] > max_wh)).any(1), 4] = 0  # width-height
        x = x[xc[xi]]  # confidence

        # If none remain process next image
        if not x.shape[0]:
            continue

        # Compute conf
        x[:, 5:] *= x[:, 4:5]  # 最终的置信度 conf = obj_conf * cls_conf

        # Box (center x, center y, width, height) to (x1, y1, x2, y2)
        box = xywh2xyxy(x[:, :4])

        # Detections matrix nx6 (xyxy, conf, cls)
        if multi_label:
            i, j = (x[:, 5:] > conf_thres).nonzero(as_tuple=False).T
            x = torch.cat((box[i], x[i, j + 5, None], j[:, None].float()), 1)
        else:  # best class only
            conf, j = x[:, 5:].max(1, keepdim=True)
            x = torch.cat((box, conf, j.float()), 1)[conf.view(-1) > conf_thres]

        # Filter by class
        if classes:
            x = x[(x[:, 5:6] == torch.tensor(classes, device=x.device)).any(1)]

        # Apply finite constraint
        # if not torch.isfinite(x).all():
        #     x = x[torch.isfinite(x).all(1)]

        # If none remain process next image
        n = x.shape[0]  # number of boxes
        if not n:
            continue

        # Sort by confidence
        # x = x[x[:, 4].argsort(descending=True)]

        # Batched NMS
        c = x[:, 5:6] * (0 if agnostic else max_wh)  # classes
        boxes, scores = x[:, :4] + c, x[:, 4]  # boxes (offset by class), scores(cls_conf)   # 加上c值是为了扩充不同类别框之间的距离
        # 函数torch.ops.torchvision.nms
        # 参数:boxes (Tensor[N, 4])) – bounding boxes坐标. 格式:(x1, y1, x2, y2)
        # scores (Tensor[N]) – bounding boxes得分
        # iou_threshold (float) – IoU过滤阈值
        # 返回值:keep :NMS过滤后的bounding boxes索引(降序排列)
        i = torch.ops.torchvision.nms(boxes, scores, iou_thres)
        if i.shape[0] > max_det:  # limit detections
            i = i[:max_det]
        if merge and (1 < n < 3E3):  # Merge NMS (boxes merged using weighted mean)
            # Merge NMS merges boxes using a weighted mean, weighted by their confidences/CIoU predictions
            try:  # update boxes as boxes(i,4) = weights(i,n) * boxes(n,4)
                iou = box_iou(boxes[i], boxes) > iou_thres  # iou matrix
                weights = iou * scores[None]  # box weights 正比于iou和置信度得分
                # 目标框合并
                x[i, :4] = torch.mm(weights, x[:, :4]).float() / weights.sum(1, keepdim=True)  # merged boxes
                if redundant:
                    i = i[iou.sum(1) > 1]  # require redundancy
            except:  # possible CUDA error https://github.com/ultralytics/yolov3/issues/1139
                print(x, i, x.shape, i.shape)
                pass

        output[xi] = x[i]
        if (time.time() - t) > time_limit:
            break  # time limit exceeded

    return output
GPU选取模块代码
# 选择设备
def select_device(device='', batch_size=None):
    # device = 'cpu' or '0' or '0,1,2,3'
    cpu_request = device.lower() == 'cpu'
    if device and not cpu_request:  # if device requested other than 'cpu'
        os.environ['CUDA_VISIBLE_DEVICES'] = device  # set environment variable 设定使用的 GPU 显卡
        # 确认有可用GPU
        assert torch.cuda.is_available(), 'CUDA unavailable, invalid device %s requested' % device  # check availablity

    cuda = False if cpu_request else torch.cuda.is_available()
    if cuda:
        c = 1024 ** 2  # bytes to MB
        ng = torch.cuda.device_count() # 可用GPU数量
        if ng > 1 and batch_size:  # check that batch_size is compatible with device_count
            assert batch_size % ng == 0, 'batch-size %g not multiple of GPU count %g' % (batch_size, ng)
        x = [torch.cuda.get_device_properties(i) for i in range(ng)]   # 获取每块GPU的属性
        s = 'Using CUDA '
        for i in range(0, ng):
            if i == 1:
                s = ' ' * len(s)
            logger.info("%sdevice%g _CudaDeviceProperties(name='%s', total_memory=%dMB)" %
                        (s, i, x[i].name, x[i].total_memory / c))
    else:
        logger.info('Using CPU')

    logger.info('')  # skip a line
    return torch.device('cuda:0' if cuda else 'cpu')
参数初始化模块代码
# 初始化权重
def initialize_weights(model):
    for m in model.modules():
        t = type(m)
        if t is nn.Conv2d:
            pass  # nn.init.kaiming_normal_(m.weight, mode='fan_out', nonlinearity='relu')
        elif t is nn.BatchNorm2d:
            m.eps = 1e-3
            m.momentum = 0.03
        elif t in [nn.Hardswish, nn.LeakyReLU, nn.ReLU, nn.ReLU6]:
            m.inplace = True
detect.py参数说明
![]()
# 建立参数解析对象parser
    parser = argparse.ArgumentParser()
    """
    weights: 训练的权重
    source: 测试数据,可以是图片/视频路径,也可以是'0'(电脑自带摄像头),也可以是rtsp等视频流
    img-size: 网络输入图片大小
    conf-thres: 置信度阈值
    iou-thres: 做nms的iou阈值
    device: 设置设备
    view-img: 是否展示预测之后的图片/视频,默认False
    save-txt: 是否将预测的框坐标以txt文件形式保存,默认False
    save-conf: 是否将预测的框置信度以txt文件形式保存,默认False
    save-dir: 网络预测之后的图片/视频的保存路径
    classes: 设置只保留某一部分类别,形如0或者0 2 3
    agnostic-nms: 进行nms是否也去除不同类别之间的框,默认False
    augment: 推理的时候进行多尺度,翻转等操作(TTA)推理
    update: 如果为True,则对所有模型进行strip_optimizer操作,去除pt文件中的优化器等信息,默认为False
    """
    # 添加属性:给xx实例增加一个aa属性,如 xx.add_argument("aa")
    # nargs - 应该读取的命令行参数个数。*号,表示0或多个参数;+号表示1或多个参数。
    # action - 命令行遇到参数时的动作。action=‘store_true’,只要运行时该变量有传参就将该变量设为True。
    parser.add_argument('--weights', nargs='+', type=str, default='yolov5s.pt', help='model.pt path(s)')
    parser.add_argument('--source', type=str, default='inference/images', help='source')  # file/folder, 0 for webcam
    parser.add_argument('--img-size', type=int, default=640, help='inference size (pixels)')
    parser.add_argument('--conf-thres', type=float, default=0.25, help='object confidence threshold')
    parser.add_argument('--iou-thres', type=float, default=0.45, help='IOU threshold for NMS')
    parser.add_argument('--device', default='', help='cuda device, i.e. 0 or 0,1,2,3 or cpu')
    parser.add_argument('--view-img', action='store_true', help='display results')
    parser.add_argument('--save-txt', action='store_true', help='save results to *.txt')
    parser.add_argument('--save-conf', action='store_true', help='save confidences in --save-txt labels')
    parser.add_argument('--save-dir', type=str, default='inference/output', help='directory to save results')
    parser.add_argument('--classes', nargs='+', type=int, help='filter by class: --class 0, or --class 0 2 3')
    parser.add_argument('--agnostic-nms', action='store_true', help='class-agnostic NMS')
    parser.add_argument('--augment', action='store_true', help='augmented inference')
    parser.add_argument('--update', action='store_true', help='update all models')
    # 采用parser对象的parse_args函数获取解析的参数
    opt = parser.parse_args()
    print(opt)

    with torch.no_grad(): # 一个上下文管理器,被该语句wrap起来的部分将不会track梯度
        if opt.update:  # update all models (to fix SourceChangeWarning)
            for opt.weights in ['yolov5s.pt', 'yolov5m.pt', 'yolov5l.pt', 'yolov5x.pt']:
                detect()
                # 去除pt文件中的优化器等信息
                strip_optimizer(opt.weights)
        else:
            detect()