activiti学习(七)——命令模式和职责链模式在activiti中的应用
activiti中很多api的调用,最终会把这个调用封装成一个命令,使用命令模式去调用。另外还会把命令放在调用链上,当调用该命令时会依次调用职责链上的每一个拦截器(Interceptor),例如日志、事务相关拦截器,然后调用指定的命令。本章先对这两种设计模式进行介绍
命令模式
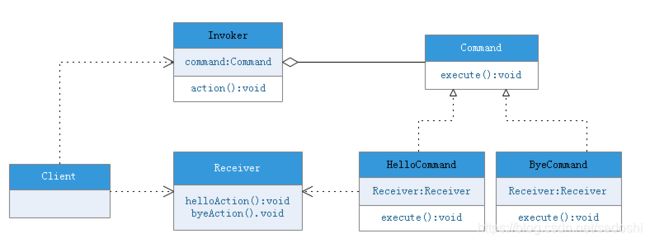
命令模式其作用是为了对“行为请求者”和“行为实现者”这两者进行解耦。下图是命令模式的UML图。其中HelloCommand和ByeCommand是具体命令,Receiver是命令的实际执行者。Invoker是提供给客户端进行调用的类。
Command.java:
public interface Command {
	void execute();
}
HelloCommand.java:
public class HelloCommand implements Command {

	private Receiver receiver = null;

	public HelloCommand(Receiver receiver) {
		super();
		this.receiver = receiver;
	}

	public void execute() {
		receiver.helloAction();
	}
}
ByeCommand.java:
public class ByeCommand implements Command {

	private Receiver receiver = null;

	public ByeCommand(Receiver receiver) {
		super();
		this.receiver = receiver;
	}

	public void execute() {
		receiver.byeAction();
	}
}
Receiver.java:
public class Receiver {

	public void helloAction() {
		System.out.println("hello");
	}

	public void byeAction() {
		System.out.println("good bye");
	}
}
Invoker.java:
public class Invoker {

	private Command command = null;

	public Invoker(Command command) {
		this.command = command;
	}

	public void action() {
		command.execute();
	}

	public Command getCommand() {
		return command;
	}

	public void setCommand(Command command) {
		this.command = command;
	}
}
Client.java:
public class Client {

	public static void main(String[] args) {
		Receiver receiver = new Receiver();
		HelloCommand helloCommand = new HelloCommand(receiver);
		ByeCommand byeCommand = new ByeCommand(receiver);
		Invoker invoker = new Invoker(helloCommand);
		invoker.action();
		invoker.setCommand(byeCommand);
		invoker.action();
	}
}
有时候命令模式可能省略Receiver,直接在Command实例的execute方法中处理具体逻辑,activiti便是如此。
职责链模式
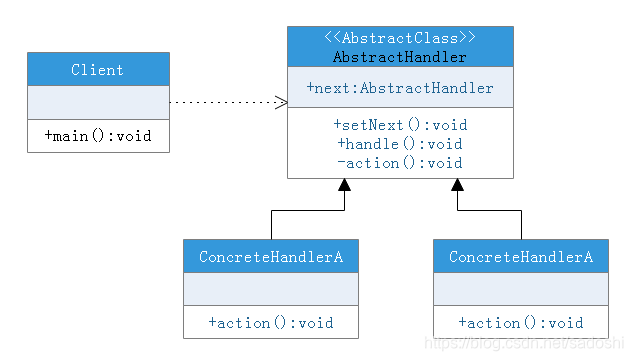
责任链模式(Chain of Responsibility Pattern)为请求创建了一个接收者对象的链。避免请求发送者与接收者耦合在一起,让多个对象都有可能接收请求,将这些对象连接成一条链,并且沿着这条链传递请求,直到有对象处理它为止。
AbstractHandler.java
public abstract class AbstractHandler {

	AbstractHandler next = null;

	public void setNext(AbstractHandler next) {
		this.next = next;
	}

	public void handle() {
		action();
		if(next != null) {
			next.handle();
		}
	}

	public abstract void action();
}
ConcreteHandlerA.java
public class ConcreteHandlerA extends AbstractHandler{

	public void action() {
		System.out.println("handle A");
	}
}
ConcreateHandlerB.java
public class ConcreteHandlerB extends AbstractHandler{

	public void action() {
		System.out.println("handle B");
	}
}
Client.java
public class Client {

	public static AbstractHandler initChain() {
		ConcreteHandlerA concreteHandlerA = new ConcreteHandlerA();
		ConcreteHandlerB concreteHandlerB = new ConcreteHandlerB();
		concreteHandlerA.setNext(concreteHandlerB);
		return concreteHandlerA;
	}

	public static void main(String[] args) {
		AbstractHandler handlerChain = initChain();
		handlerChain.handle();
	}
}
activiti命令相关类
activiti命令相关的类首先在ProcessEngineConfigurationImpl.java中初始化:
  protected void initCommandExecutors() {
    initDefaultCommandConfig();    //初始化默认命令配置类
    initSchemaCommandConfig();    //初始化schema配置类
    initCommandInvoker();        //初始化命令调用类
    initCommandInterceptors();    //初始化拦截器
    initCommandExecutor();        //初始化命令执行器
  }
初始化命令配置类
ProcessEngineConfigurationImpl.java:
  protected void initDefaultCommandConfig() {
    if (defaultCommandConfig==null) {
      defaultCommandConfig = new CommandConfig();
    }
  }

  private void initSchemaCommandConfig() {
    if (schemaCommandConfig==null) {
      schemaCommandConfig = new CommandConfig().transactionNotSupported();
    }
  }
配置类的相关代码CommandConfig.java,contextReusePossible表示命令上下文是否可重用,propagation与spring事务传播相关,defaultCommandConfig 使用了默认命令配置类,而schemaCommandConfig则使用transactionNotSupported方法创建的命令配置类:
public class CommandConfig {

  private boolean contextReusePossible;
  private TransactionPropagation propagation;

  public CommandConfig() {
    this.contextReusePossible = true;
    this.propagation = TransactionPropagation.REQUIRED;
  }

//.....省略

  public CommandConfig transactionNotSupported() {
    CommandConfig config = new CommandConfig();
    config.contextReusePossible = false;
    config.propagation = TransactionPropagation.NOT_SUPPORTED;
    return config;
  }
}
初始化命令调用类
接下来看看初始化命令调用类,先看ProcessEngineConfigurationImpl.java,如果没有自定义命令调用类,则创建默认的:
  protected void initCommandInvoker() {
    if (commandInvoker==null) {
      commandInvoker = new CommandInvoker();
    }
  }
默认的命令调用类CommandInvoker.java。可以看到execute方法,就是执行我们传入的具体命令类的execute方法,并把上下文作为参数传入:
public class CommandInvoker extends AbstractCommandInterceptor {

  @Override
  public  T execute(CommandConfig config, Command command) {
    return command.execute(Context.getCommandContext());
  }

  @Override
  public CommandInterceptor getNext() {
    return null;
  }

  @Override
  public void setNext(CommandInterceptor next) {
    throw new UnsupportedOperationException("CommandInvoker must be the last interceptor in the chain");
  }
}
初始化拦截器
拦截器的初始化,也是activiti为职责链而初始化拦截器列表。先看ProcessEngineConfigurationImpl.java:
  protected List commandInterceptors;

  protected void initCommandInterceptors() {
    if (commandInterceptors==null) {
      commandInterceptors = new ArrayList();
      if (customPreCommandInterceptors!=null) {
        commandInterceptors.addAll(customPreCommandInterceptors);
      }
      commandInterceptors.addAll(getDefaultCommandInterceptors());
      if (customPostCommandInterceptors!=null) {
        commandInterceptors.addAll(customPostCommandInterceptors);
      }
      commandInterceptors.add(commandInvoker);
    }
  }

  protected Collection< ? extends CommandInterceptor> getDefaultCommandInterceptors() {
    List interceptors = new ArrayList();
    interceptors.add(new LogInterceptor());

    CommandInterceptor transactionInterceptor = createTransactionInterceptor();
    if (transactionInterceptor != null) {
      interceptors.add(transactionInterceptor);
    }

    interceptors.add(new CommandContextInterceptor(commandContextFactory, this));
    return interceptors;
} 第5行流程引擎先创建一个list,第7行添加用户自定义前置拦截器,第9行添加默认拦截器,第11行添加后置拦截器,第13行添加命令调用类,命令调用类是职责链的最后一个环节,所以之前初始化CommandInvoker时,看到代码getNext()为null,而setNext()会抛出异常。
第17-28行初始化默认拦截器,19行先添加日志拦截器LogInterceptor,21-24行添加事务拦截器transactionInterceptor,根据不同的流程引擎配置类,createTransactionInterceptor创建的事务拦截器各有不同。StandaloneProcessEngineConfiguration创建的事务拦截器是null,而SpringProcessEngineConfiguration则是SpringTransactionInterceptor。最后26行添加上下文拦截器。
接下来分析日志拦截器LogInterceptor.java。它的代码很简单,就是执行职责链下一个拦截器的execute方法,如果配置了log,就会在调用链的前后输出debug日志:
public class LogInterceptor extends AbstractCommandInterceptor {

  private static Logger log = LoggerFactory.getLogger(LogInterceptor.class);

  public  T execute(CommandConfig config, Command command) {
    if (!log.isDebugEnabled()) {
      // do nothing here if we cannot log
      return next.execute(config, command);
    }
    log.debug("\n");
    log.debug("--- starting {} --------------------------------------------------------", command.getClass().getSimpleName());
    try {

      return next.execute(config, command);

    } finally {
      log.debug("--- {} finished --------------------------------------------------------", command.getClass().getSimpleName());
      log.debug("\n");
    }
  }
}
接下来看命令上下文拦截器CommandContextInterceptor.java:
public class CommandContextInterceptor extends AbstractCommandInterceptor {
  private static final Logger log = LoggerFactory.getLogger(CommandContextInterceptor.class);

  protected CommandContextFactory commandContextFactory;
  protected ProcessEngineConfigurationImpl processEngineConfiguration;

  public CommandContextInterceptor() {
  }

  //......省略

  public  T execute(CommandConfig config, Command command) {
    CommandContext context = Context.getCommandContext();

    boolean contextReused = false;

    if (!config.isContextReusePossible() || context == null || context.getException() != null) {
    	context = commandContextFactory.createCommandContext(command);
    }
    else {
    	log.debug("Valid context found. Reusing it for the current command '{}'", command.getClass().getCanonicalName());
    	contextReused = true;
    }
    try {
      Context.setCommandContext(context);
      Context.setProcessEngineConfiguration(processEngineConfiguration);
      return next.execute(config, command);
    } catch (Exception e) {
      context.exception(e);
    } finally {
      try {
    	  if (!contextReused) {
    		  context.close();
    	  }
      } finally {
    	  Context.removeCommandContext();
    	  Context.removeProcessEngineConfiguration();
    	  Context.removeBpmnOverrideContext();
      }
    }
    return null;
  }

//......省略
}
13-23行先获取或创建一个CommandContext,24-27行把当前的上下文和流程引擎配置压入栈中,再执行职责链的下一个对象的execute方法。执行完之后,36-38行把压入栈中的context和processEngineConfiguration清除:
初始化命令执行器
初始化命令执行器的过程,同时也进行职责链的初始化。先看ProcessEngineConfigurationImpl.java
  protected void initCommandExecutor() {
    if (commandExecutor==null) {
      CommandInterceptor first = initInterceptorChain(commandInterceptors);
      commandExecutor = new CommandExecutorImpl(getDefaultCommandConfig(), first);
    }
  }

  protected CommandInterceptor initInterceptorChain(List chain) {
    if (chain==null || chain.isEmpty()) {
      throw new ActivitiException("invalid command interceptor chain configuration: "+chain);
    }
    for (int i = 0; i < chain.size()-1; i++) {
      chain.get(i).setNext( chain.get(i+1) );
    }
    return chain.get(0);
  }
第3行获取拦截器调用链的头部,这条调用链通过8-16行生成。第4行创建新的任务执行器
CommandExecutorImpl.java:
public class CommandExecutorImpl implements CommandExecutor {

  private final CommandConfig defaultConfig;
  private final CommandInterceptor first;

  public CommandExecutorImpl(CommandConfig defaultConfig, CommandInterceptor first) {
    this.defaultConfig = defaultConfig;
    this.first = first;
  }

  public CommandInterceptor getFirst() {
    return first;
  }

  @Override
  public CommandConfig getDefaultConfig() {
    return defaultConfig;
  }

  @Override
  public  T execute(Command command) {
    return execute(defaultConfig, command);
  }

  @Override
  public  T execute(CommandConfig config, Command command) {
    return first.execute(config, command);
  }
}
当流程引擎开始运行后,程序中调用CommandExecutor的execute方法时,即调用26行,职责链中的拦截器便会一个接一个执行。
至此,我们已经分析了activiti如何调度拦截器和命令的原理,可以结合本文的原理,回头看流程部署的源码,思考一下DeployCmd的调用逻辑。下一章,我们可以自定义命令和拦截器进行测试。

