C/C++编程:libssh2学习(windows + vs2019 + cmake + vcpkg)

准备

vcpkg安装libssh2

1、vcpkg:win10安装使用 vcpkg

2、安装libssh2

vcpkg install libssh2:x64-windows
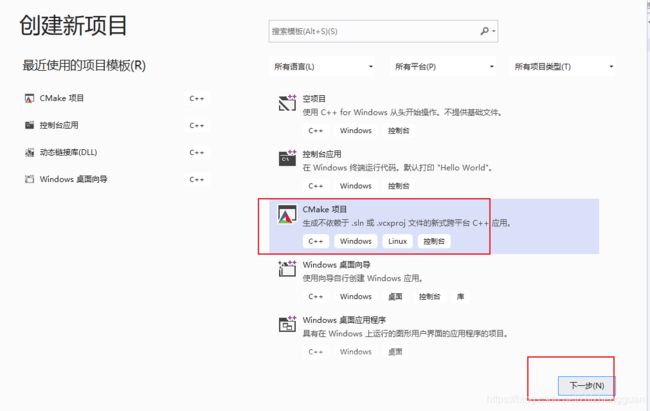
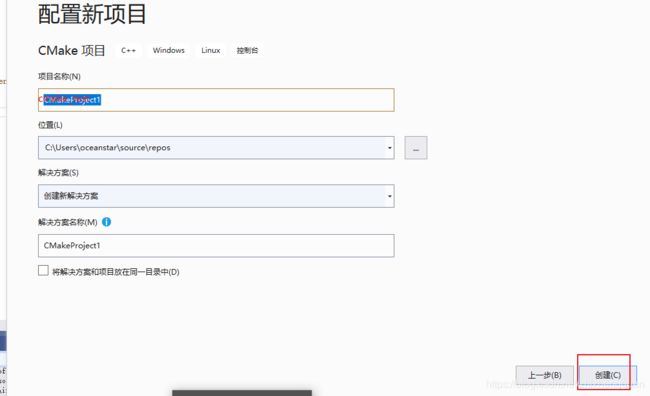
vs中创建一个工程

C/C++编程:libssh2学习(windows + vs2019 + cmake + vcpkg)_第1张图片
C/C++编程:libssh2学习(windows + vs2019 + cmake + vcpkg)_第2张图片

使用

1、cmakelist.txt

SET(CMAKE_TOOLCHAIN_FILE "C:/Users/oceanstar/vcpkg/win/vcpkg/scripts/buildsystems/vcpkg.cmake")


find_package(Libssh2 CONFIG REQUIRED)
target_link_libraries(cmake_test PRIVATE Libssh2::libssh2)
  • 错误:
 Add the installation prefix of "Libssh2" to CMAKE_PREFIX_PATH or set
  "Libssh2_DIR" to a directory containing one of the above files.  If
  "Libssh2" provides a separate development package or SDK, be sure it has
  been installed.	
  • 解决:“集成到全局”
 .\vcpkg integrate install

或者:

# CMakeList.txt: cmake_test 的 CMake 项目,在此处包括源代码并定义
# 项目特定的逻辑。
#
cmake_minimum_required (VERSION 3.8)


# SET(CMAKE_TOOLCHAIN_FILE "C:/Users/oceanstar/vcpkg/win/vcpkg/scripts/buildsystems/vcpkg.cmake")

include_directories("C:/Users/oceanstar/vcpkg/win/vcpkg/installed/x64-windows/include")
link_directories("C:/Users/oceanstar/vcpkg/win/vcpkg/installed/x64-windows/lib")


# 将源代码添加到此项目的可执行文件。
add_executable (cmake_test "cmake_test.cpp" "cmake_test.h")

# TODO: 如有需要,请添加测试并安装目标。

target_link_libraries(cmake_test PRIVATE libssh2.lib)

2、测试代码


#include 
#include 
#include 
#include 
#include 
#include 
#include 


int main(int argc, char* argv[])
{


    if (!libssh2_version(LIBSSH2_VERSION_NUM)) {
        fprintf(stderr, "Runtime libssh2 version too old!");
        exit(1);
    }
    printf("libssh2 version: %s", libssh2_version(0));
    return 0;
}

/*
 *显示如何进行SSH2连接的示例。
 *
 *示例代码具有主机名,用户名,密码
 *和复制路径的默认值,但是您可以在命令行上指定它们,例如:
 *
 * "ssh2 host user password [-p|-i|-k]"
 */

#pragma comment(lib, "ws2_32.lib")
#include 
#include 

#ifdef HAVE_WINDOWS_H
#include 
#endif
#ifdef HAVE_WINSOCK2_H
#include 
#endif
#ifdef HAVE_SYS_SOCKET_H
#include 
#endif
#ifdef HAVE_NETINET_IN_H
#include 
#endif
#ifdef HAVE_UNISTD_H
#include 
#endif
#ifdef HAVE_ARPA_INET_H
#include 
#endif

#include 
#include 
#include 
#include 
#include 


const char* keyfile1 = "~/.ssh/id_rsa.pub";
const char* keyfile2 = "~/.ssh/id_rsa";
const char* username = "username";
const char* password = "password";


static void kbd_callback(const char* name, int name_len,
    const char* instruction, int instruction_len,
    int num_prompts,
    const LIBSSH2_USERAUTH_KBDINT_PROMPT* prompts,
    LIBSSH2_USERAUTH_KBDINT_RESPONSE* responses,
    void** abstract)
{
    (void)name;
    (void)name_len;
    (void)instruction;
    (void)instruction_len;
    if (num_prompts == 1) {
        responses[0].text = strdup(password);
        responses[0].length = strlen(password);
    }
    (void)prompts;
    (void)abstract;
} /* kbd_callback */


int main(int argc, char* argv[])
{
    unsigned long hostaddr;
    int rc, sock, i, auth_pw = 0;
    struct sockaddr_in sin;
    const char* fingerprint;
    char* userauthlist;
    LIBSSH2_SESSION* session;
    LIBSSH2_CHANNEL* channel;

#ifdef WIN32
    WSADATA wsadata;
    int err;

    err = WSAStartup(MAKEWORD(2, 0), &wsadata);
    if (err != 0) {
        fprintf(stderr, "WSAStartup failed with error: %d\n", err);
        return 1;
    }
#endif

    if (argc > 1) {
        hostaddr = inet_addr(argv[1]);
    }
    else {
        hostaddr = htonl(0x7F000001);
    }

    if (argc > 2) {
        username = argv[2];
    }
    if (argc > 3) {
        password = argv[3];
    }


    rc = libssh2_init(0);

    if (rc != 0) {
        fprintf(stderr, "libssh2 initialization failed (%d)\n", rc);
        return 1;
    }

    /* Ultra basic "connect to port 22 on localhost".
     *     负责创建建立连接的socket
     */
    sock = socket(AF_INET, SOCK_STREAM, 0);

    sin.sin_family = AF_INET;
    sin.sin_port = htons(22);
    sin.sin_addr.s_addr = hostaddr;
    if (connect(sock, (struct sockaddr*)(&sin),
        sizeof(struct sockaddr_in)) != 0) {
        fprintf(stderr, "failed to connect!\n");
        return -1;
    }

    /*
     * 创建一个会话实例并启动它:初始化一个ssh连接
     */
    session = libssh2_session_init();
    if (libssh2_session_handshake(session, sock)) {
        fprintf(stderr, "无法建立SSH会话\n");
        return -1;
    }

    /*至此,我们尚未通过身份验证。
     * 要做的第一件事是针对我们已知的主机检查主机密钥的指纹
     */
    fingerprint = libssh2_hostkey_hash(session, LIBSSH2_HOSTKEY_HASH_SHA1);
    fprintf(stderr, "Fingerprint: ");
    for (i = 0; i < 20; i++) {
        fprintf(stderr, "%02X ", (unsigned char)fingerprint[i]);
    }
    fprintf(stderr, "\n");

    /* 检查可用的身份验证方法 */
    userauthlist = libssh2_userauth_list(session, username, strlen(username));
    fprintf(stderr, "身份验证方法: %s\n", userauthlist);
    if (strstr(userauthlist, "password") != NULL) {
        auth_pw |= 1;
    }
    if (strstr(userauthlist, "keyboard-interactive") != NULL) {
        auth_pw |= 2;
    }
    if (strstr(userauthlist, "publickey") != NULL) {
        auth_pw |= 4;
    }

    /* 如果在参数列表中设置了认证方式,则将认证方式设为命令中的方式(前提是该方式是通过上个步骤检测可用的) */

    if (argc > 4) {
        if ((auth_pw & 1) && !_stricmp(argv[4], "-p")) {
            auth_pw = 1;
        }
        if ((auth_pw & 2) && !_stricmp(argv[4], "-i")) {
            auth_pw = 2;
        }
        if ((auth_pw & 4) && !_stricmp(argv[4], "-k")) {
            auth_pw = 4;
        }
    }

    // 根据上一步选定的认证方式开始认证。
    if (auth_pw & 1) {
        /* We could authenticate via password */
        if (libssh2_userauth_password(session, username, password)) {

            fprintf(stderr, "\tAuthentication by password failed!\n");
            goto shutdown;
        }
        else {
            fprintf(stderr, "\tAuthentication by password succeeded.\n");
        }
    }
    else if (auth_pw & 2) {
        /* Or via keyboard-interactive */
        if (libssh2_userauth_keyboard_interactive(session, username,

            &kbd_callback)) {
            fprintf(stderr,
                "\tAuthentication by keyboard-interactive failed!\n");
            goto shutdown;
        }
        else {
            fprintf(stderr,
                "\tAuthentication by keyboard-interactive succeeded.\n");
        }
    }
    else if (auth_pw & 4) {
        /* Or by public key */
        if (libssh2_userauth_publickey_fromfile(session, username, keyfile1,

            keyfile2, password)) {
            fprintf(stderr, "\tAuthentication by public key failed!\n");
            goto shutdown;
        }
        else {
            fprintf(stderr, "\t通过公钥验证成功.\n");
        }
    }
    else {
        fprintf(stderr, "未找到支持的身份验证方法!\n");
        goto shutdown;
    }

    /* 请求一个shell */
    channel = libssh2_channel_open_session(session);

    if (!channel) {
        fprintf(stderr, "无法打开会话\n");
        goto shutdown;
    }

    /* 设置一些环境变量,并上传给服务器
     */
    libssh2_channel_setenv(channel, "FOO", "bar");


    /* 请求一个vanilla的终端模拟
     * 有关更多选项,请参见/etc/termcap
     */
    if (libssh2_channel_request_pty(channel, "vanilla")) {

        fprintf(stderr, "请求pty失败\n");
        goto skip_shell;
    }

    /* 在上一步请求的pty上开启SHELL */
    if (libssh2_channel_shell(channel)) {

        fprintf(stderr, "无法在分配的pty上请求shell \n");
        goto shutdown;
    }

    /* 至此,可以交互使用shell了
     * libssh2_channel_read()
     * libssh2_channel_read_stderr()
     * libssh2_channel_write()
     * libssh2_channel_write_stderr()
     *
     * Blocking mode may be (en|dis)abled with(打开或关闭阻塞模式): libssh2_channel_set_blocking()
     * 如果服务器发送EOF, libssh2_channel_eof() 将返回非0
     * 要向服务器发送EOF,请使用: libssh2_channel_send_eof()
     * 可以使用以下命令关闭通道: libssh2_channel_close()
     * 可以使用以下命令释放通道: libssh2_channel_free()
     */

skip_shell:
    if (channel) {
        libssh2_channel_free(channel);
        channel = NULL;
    }

    /* 通过以下方式支持其他通道类型:
     * libssh2_scp_send()
     * libssh2_scp_recv2()
     * libssh2_channel_direct_tcpip()
     */

     //ssh交互完成后,关闭会话并释放会话
shutdown:

    libssh2_session_disconnect(session,  "正常关机,感谢您的参与");
    libssh2_session_free(session);


    //关闭sock并退出libssh2
#ifdef WIN32
    closesocket(sock);
#else
    close(sock);
#endif
    fprintf(stderr, "全部完成!\n");

    libssh2_exit();


    return 0;
}

#Windows库编译# libssh2
Windows VS2015 编译 libssh2 1.7.0


可以使用命令行方式生成vc项目:

编写好CMakelists.txt
执行cmake命令:

cmake …"-DCMAKE_TOOLCHAIN_FILE=D:\vcpkg-master\vcpkg\scripts\buildsystems\vcpkg.cmake" -G"Visual Studio 14"

你可能感兴趣的:(C++)