Spring学习笔记 —— AOP(面向切面编程) 之AspectJ
- 引言
- AspectJ AOP实例
- AspectJ AOP实现分析
- AOP名字空间解析
- AOP代理对象的创建
- 小结
- 参考文章
引言
在上一篇文章, Spring学习笔记 —— AOP(面向切面编程) 之Spring内置AOP中,我们简单介绍了AOP的概念,也分析了Spring中使用proxyFactroyBean生成代理对象的实现原理。
当我们只需要对一个对象进行代理的时候,使用proxyFactoryBean是方便的,但是,当我们需要代理多个对象的时候,如果每个对象都需要先声明一个自身的bean,再声明一个proxy bean,无疑会使配置文件变的复杂,也会让人感到疑惑而不知道到底应该使用哪一个bean。
因此,今天介绍一个更为简洁的AOP实例——基于AspectJ的AOP。AspectJ的AOP方便在于,我们只需要在配置文件上进行一次定义,再声明一个切面类就够了。但这并不代表AspectJ用了什么特殊的方法实现AOP,只不过是Spring AOP框架自动化地实现了相关的类。
这篇文章会分成两部分,第一部分会给大家介绍如何使用AspectJ,第二部分分析其实现原理。
AspectJ AOP实例
直接上例子吧,首先还是一个TargetObjectSample.java
public class TargetObjectSample {
    public void getMessage() {
        System.out.println("getMsg!");
    }

    public void getPointCutMessage() {
        System.out.println("get point cut Msg!");
    }
}
依旧声明了两个方法,区分AOP与非AOP。
AspectJ AOP与Spring AOP的区别是,我们不再需要显示地声明Advisor, PointCut这些类了,只需要声明一个Aspect类,这个类中包含有代理方法即可。
AspectSample.java
public class AspectSample {
    public void beforeExecute() {
        System.out.println("before execute");
    }
}
而相对应的,在配置文件里面,也变得更为简单清晰。Spring中更多的是为一个类声明对应的代理对象,而这里则是针对切面做声明。我们声明一个特定的切面,并且确定这个切面将会应用到哪些连接点上。
<beans xmlns="http://www.springframework.org/schema/beans"
    xmlns:xsi="http://www.w3.org/2001/XMLSchema-instance"
    xmlns:aop="http://www.springframework.org/schema/aop"
    xsi:schemaLocation="http://www.springframework.org/schema/beans
    http://www.springframework.org/schema/beans/spring-beans-3.0.xsd
    http://www.springframework.org/schema/aop
    http://www.springframework.org/schema/aop/spring-aop-3.0.xsd ">

   <aop:config>
      <aop:aspect id="sample" ref="aspectSample">

         <aop:pointcut id="pointCutSample" expression="execution(public void com.study.AspectJ.TargetObjectSample.getPointCutMessage(..))"/>
         <aop:before pointcut-ref="pointCutSample" method="beforeExecute"/>
      aop:aspect>
   aop:config>

   <bean id="aspectSample" class="com.study.AspectJ.AspectSample" scope="singleton">
   bean>

   <bean id="targetObjectSample" class="com.study.AspectJ.TargetObjectSample" scope="singleton">
   bean>

beans>因为这个时候我们需要使用AspectJ的库,要添加对应的maven依赖。
<dependencies>

    <dependency>
        <groupId>org.springframeworkgroupId>
        <artifactId>spring-contextartifactId>
        <version>4.2.6.RELEASEversion>
    dependency>

    <dependency>
        <groupId>org.aspectjgroupId>
        <artifactId>aspectjweaverartifactId>
        <version>1.8.9version>
    dependency>

dependencies>最后,就是main.java了
public class Main {
    public static void main(String args[]) {
        ApplicationContext applicationConText = new ClassPathXmlApplicationContext("AspectBeans.xml");
        //在这里也不需要根据特定id,而是可以直接根据class获取bean实例(当然,前提是这个class对应的bean有且只有一个。
        TargetObjectSample obj = applicationConText.getBean(TargetObjectSample.class);
        obj.getMessage();
        //getMsg!
        obj.getPointCutMessage();
        //before method execution!
        //get point cut Msg!
    }
}
AspectJ AOP实现分析
在Spring里面,AspectJ的AOP实现可以分成以下几个部分
- AOP名字空间的注册
- 使用AspectJ AOP生成Bean的流程解析
AOP名字空间解析
首先我们引起我们注意的应该是切面的声明方式:
<aop:config>
      <aop:aspect id="sample" ref="aspectSample">

         <aop:pointcut id="pointCutSample" expression="execution(public void com.study.AspectJ.TargetObjectSample.getPointCutMessage(..))"/>
         <aop:before pointcut-ref="pointCutSample" method="beforeExecute"/>
      aop:aspect>
   aop:config>
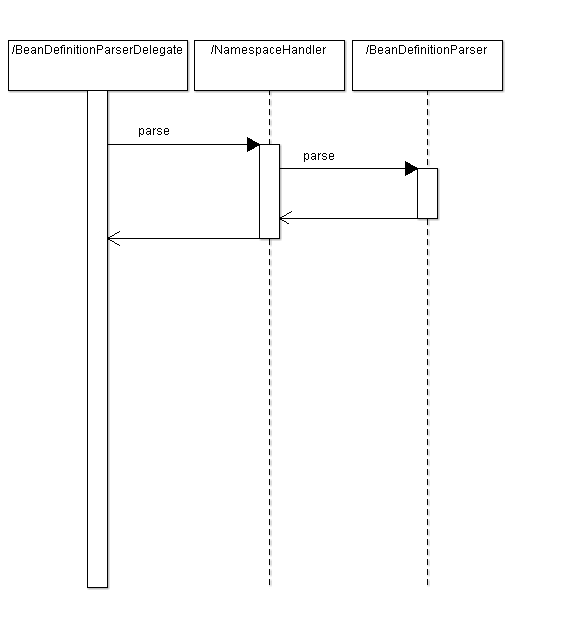
这里看到的标签并不是一个bean的标签,而是一个以aop作为名字空间的标签,因此在parse的时候,也必须要有对应的handler。而关于handler,spring中将所有扩展名称空间的解析器都放在了META-INF/spring.handlers中。
而我们,也能够spring-aop-4.2.6.RELEASE.jar中对应的目录文件看到
http\://www.springframework.org/schema/aop=org.springframework.aop.config.AopNamespaceHandler这就代表着,AOP名字空间下的相关定义(即所有定义为aop:xx形式的标签),会由AopNamespaceHandler来完成。具体解析的流程则变成了如下图所示
而我们看到具体代码,AopNamespaceHandler.init
public void init() {
        //注册'config'标签的解析器,包含了aspect,pointcut,before等我们声明切面使用的标签
        registerBeanDefinitionParser("config", new ConfigBeanDefinitionParser());
        //注册'spectj-autoproxy'标签的解析器
        registerBeanDefinitionParser("aspectj-autoproxy", new AspectJAutoProxyBeanDefinitionParser());
        //注册'scoped-proxy`的解析器
        registerBeanDefinitionDecorator("scoped-proxy", new ScopedProxyBeanDefinitionDecorator());
        //注册'spring-configured'的解析器
        registerBeanDefinitionParser("spring-configured", new SpringConfiguredBeanDefinitionParser());
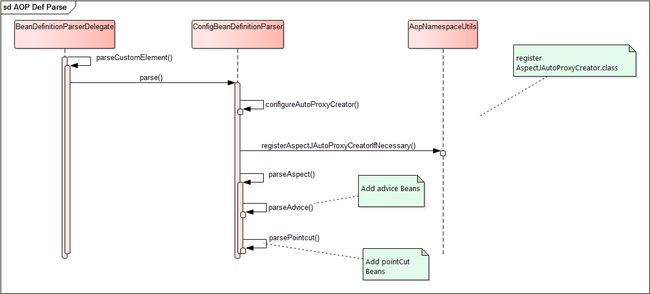
}由上图可以看到,对于AOP空间的XML元素,我们首先会注册AspectJAwareAdvisorAutoProxyCreator这个Bean的definition,然后再根据定义的aop:aspcet元素,生成advice和pointCutAdvisor的Bean definition,并进行注册。
我们来具体分析一下,几个parse方法。
首先是解析aop:aspect标签的parseAspect
private void parseAspect(Element aspectElement, ParserContext parserContext) {
String aspectId = aspectElement.getAttribute(ID);
String aspectName = aspectElement.getAttribute(REF);
try {
this.parseState.push(new AspectEntry(aspectId, aspectName));
List beanDefinitions = new ArrayList();
List beanReferences = new ArrayList();
List declareParents = DomUtils.getChildElementsByTagName(aspectElement, DECLARE_PARENTS);
for (int i = METHOD_INDEX; i < declareParents.size(); i++) {
Element declareParentsElement = declareParents.get(i);
beanDefinitions.add(parseDeclareParents(declareParentsElement, parserContext));
}
// 遍历所有子节点
NodeList nodeList = aspectElement.getChildNodes();
boolean adviceFoundAlready = false;
for (int i = 0; i < nodeList.getLength(); i++) {
Node node = nodeList.item(i);
//找出所有声明为aop:before/aop:after等的具体Advice节点
if (isAdviceNode(node, parserContext)) {
if (!adviceFoundAlready) {
adviceFoundAlready = true;
if (!StringUtils.hasText(aspectName)) {
parserContext.getReaderContext().error(
" tag needs aspect bean reference via 'ref' attribute when declaring advices." ,
aspectElement, this.parseState.snapshot());
return;
}
//保存bean的引用,后续用于创建ComponentDefinition
beanReferences.add(new RuntimeBeanReference(aspectName));
}
AbstractBeanDefinition advisorDefinition = parseAdvice(
aspectName, i, aspectElement, (Element) node, parserContext, beanDefinitions, beanReferences);
beanDefinitions.add(advisorDefinition);
}
}
AspectComponentDefinition aspectComponentDefinition = createAspectComponentDefinition(
aspectElement, aspectId, beanDefinitions, beanReferences, parserContext);
parserContext.pushContainingComponent(aspectComponentDefinition);
//解析所有的pointCut
List pointcuts = DomUtils.getChildElementsByTagName(aspectElement, POINTCUT);
for (Element pointcutElement : pointcuts) {
parsePointcut(pointcutElement, parserContext);
}
parserContext.popAndRegisterContainingComponent();
}
finally {
this.parseState.pop();
}
} 然后是parseAdvice
private AbstractBeanDefinition parseAdvice(
            String aspectName, int order, Element aspectElement, Element adviceElement, ParserContext parserContext,
            List beanDefinitions, List beanReferences) {

        try {
            this.parseState.push(new AdviceEntry(parserContext.getDelegate().getLocalName(adviceElement)));

            //这里首先针对Advice中的方法,创建一个Bean的定义(因为是在parse,所以不生成具体的bean)。最后要根据这个MethodLocatingFacatoryBean来获取真正的代理执行方法。
            RootBeanDefinition methodDefinition = new RootBeanDefinition(MethodLocatingFactoryBean.class);
            methodDefinition.getPropertyValues().add("targetBeanName", aspectName);
            methodDefinition.getPropertyValues().add("methodName", adviceElement.getAttribute("method"));
            methodDefinition.setSynthetic(true);

            // 同时也要保存对Aspcet Bean的引用,因为最后的方法来自于Aspcet Bean对象
            RootBeanDefinition aspectFactoryDef =
                    new RootBeanDefinition(SimpleBeanFactoryAwareAspectInstanceFactory.class);
            aspectFactoryDef.getPropertyValues().add("aspectBeanName", aspectName);
            aspectFactoryDef.setSynthetic(true);

            // 有了method和aspect bean,就能够创建依赖于这两个bean的Advice了。但这里的Advice特别在于,Advice中包含了pointCut的引用。具体可以看到createAdviceDefinition里面的parsePointcutProperty
            AbstractBeanDefinition adviceDef = createAdviceDefinition(
                    adviceElement, parserContext, aspectName, order, methodDefinition, aspectFactoryDef,
                    beanDefinitions, beanReferences);

            // 有了Advice,Advice里面又包含有poinCut,我们就能够创建Advisor了
            RootBeanDefinition advisorDefinition = new RootBeanDefinition(AspectJPointcutAdvisor.class);
            advisorDefinition.setSource(parserContext.extractSource(adviceElement));
            advisorDefinition.getConstructorArgumentValues().addGenericArgumentValue(adviceDef);
            if (aspectElement.hasAttribute(ORDER_PROPERTY)) {
                advisorDefinition.getPropertyValues().add(
                        ORDER_PROPERTY, aspectElement.getAttribute(ORDER_PROPERTY));
            }

            //注册Advisor
    parserContext.getReaderContext().registerWithGeneratedName(advisorDefinition);

            return advisorDefinition;
        }
        finally {
            this.parseState.pop();
        }
} 最后是parsePointCut,因为在parseAdvice中只是保存了poincut的引用,因此我们还需要真正地把pointCut的定义从XML定义转化成bean的定义。
private AbstractBeanDefinition parsePointcut(Element pointcutElement, ParserContext parserContext) {
        String id = pointcutElement.getAttribute(ID);
        String expression = pointcutElement.getAttribute(EXPRESSION);

        AbstractBeanDefinition pointcutDefinition = null;

        try {
            this.parseState.push(new PointcutEntry(id));
            //解析出来的Bean定义默认scope是prototype的。
            pointcutDefinition = createPointcutDefinition(expression);
            pointcutDefinition.setSource(parserContext.extractSource(pointcutElement));

            String pointcutBeanName = id;
            if (StringUtils.hasText(pointcutBeanName)) {
                parserContext.getRegistry().registerBeanDefinition(pointcutBeanName, pointcutDefinition);
            }
            else {
                pointcutBeanName = parserContext.getReaderContext().registerWithGeneratedName(pointcutDefinition);
            }

            parserContext.registerComponent(
                    new PointcutComponentDefinition(pointcutBeanName, pointcutDefinition, expression));
        }
        finally {
            this.parseState.pop();
        }

        return pointcutDefinition;
    }
所有这些Bean的定义都准备好了之后,就可以进行下一步,AOP代理对象的创建了。
AOP代理对象的创建
谈到AOP代理对象的创建,我们就绕不开AspectJAwareAdvisorAutoProxyCreator这个类。 这个类实现了BeanPostProcessor这个接口。也就是说,这个类里包含了Bean创建前/后的相关处理逻辑。
而这个类,也是在postProcessAfterInstantiation这个方法中,完成代理的。
@Override
    public Object postProcessAfterInitialization(Object bean, String beanName) throws BeansException {
        if (bean != null) {
            Object cacheKey = getCacheKey(bean.getClass(), beanName);
            if (!this.earlyProxyReferences.contains(cacheKey)) {
                return wrapIfNecessary(bean, beanName, cacheKey);
            }
        }
        return bean;
}再进一步往下看AbstractAutoProxyCreator.wrapIfNecessary
protected Object wrapIfNecessary(Object bean, String beanName, Object cacheKey) {
        if (beanName != null && this.targetSourcedBeans.contains(beanName)) {
            return bean;
        }
        if (Boolean.FALSE.equals(this.advisedBeans.get(cacheKey))) {
            return bean;
        }
        if (isInfrastructureClass(bean.getClass()) || shouldSkip(bean.getClass(), beanName)) {
            this.advisedBeans.put(cacheKey, Boolean.FALSE);
            return bean;
        }

        // 为这个类找到对应的Advisor,原理是先通过beanFactory找到所有实现了Advisor.class接口的类,然后再根据Advisor中的PointCut来进行classFilter和MethodMatcher
        Object[] specificInterceptors = getAdvicesAndAdvisorsForBean(bean.getClass(), beanName, null);
        if (specificInterceptors != DO_NOT_PROXY) {
            this.advisedBeans.put(cacheKey, Boolean.TRUE);
            //进行代理对象的创建
            Object proxy = createProxy(
                    bean.getClass(), beanName, specificInterceptors, new SingletonTargetSource(bean));
            this.proxyTypes.put(cacheKey, proxy.getClass());
            return proxy;
        }

        this.advisedBeans.put(cacheKey, Boolean.FALSE);
        return bean;
    }
最后,就能够获得生成的代理对象了。
小结
这篇文章分析了Spring中AspectJ的AOP实现。相比于使用proxyFactory进行实现,AspectJ AOP的配置要更为简洁,而且需要声明的类也更少。但在实际过程中,生成的类对象并没有变少。在解析aop:aspect标签的时候,我们仍然生成了pointCut, pointCutAdvisor,Advice这三个类的对应Bean定义。
AspectJ AOP做的改变就是,在Bean的创建后置处理函数中,判断这个Bean是否属于被代理的,如果是,则使用pointCutAdvisor以及Advice生成对应的代理对象。如果不是,则直接返回。
参考文章
- Spring bean定义解析源码分析
- Spring AOP实现原理

