【JavaEE+servlet】Servlet API 详解
目录✅
- 1. HttpServlet
- 2. HttpServletRequest
-
- 2.1 代码示例: 获取 GET 请求中的参数 :
- 2.2 代码示例: 获取 POST 请求中的参数(通过form表单) :
- 2.3 代码示例: 获取 POST 请求中的参数(通过Jackson解析)
- 3. HttpServletResponse
-
- 3.1 代码示例: 设置状态码:
- 3.2 代码示例: 自动刷新
- 3.3 代码示例: 重定向
1. HttpServlet
在写 Servlet 代码的时候, 首先第一步就是先创建类, 继承自 HttpServlet, 并重写其中的某些方法.
核心方法:
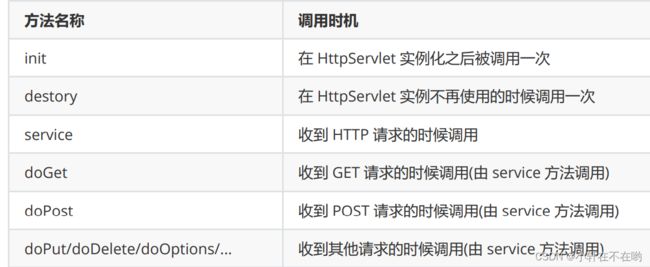
在实际开发的时候主要重写 doXXX 方法, 很少会重写 init / destory / service .
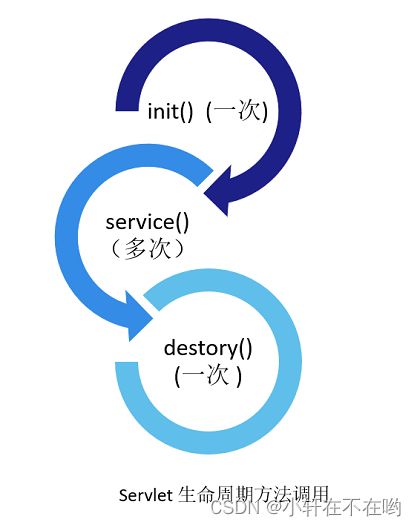
这些方法的调用时机, 就称为 “Servlet 生命周期”. (也就是描述了一个 Servlet 实例从生到死的过程)
servlet生命周期方法调用:
- init() 一次
- service() 多次
- destory() 一次
注意: HttpServlet 的实例只是在程序启动时创建一次. 而不是每次收到 HTTP 请求都重新创建实例.
2. HttpServletRequest
当 Tomcat 通过 Socket API 读取 HTTP 请求(字符串), 并且按照 HTTP 协议的格式把字符串解析成
HttpServletRequest 对象.
核心方法:

通过这些方法可以获取到一个请求中的各个方面的信息.
注意: 请求对象是服务器收到的内容, 不应该修改. 因此上面的方法也都只是 “读” 方法, 而不是 “写” 方法.
2.1 代码示例: 获取 GET 请求中的参数 :
GET 请求中的参数一般都是通过 query string 传递给服务器的. 形如
https://v.bitedu.vip/personInf/student?userId=1111&classId=100
此时浏览器通过 query string 给服务器传递了两个参数, userId 和 classId, 值分别是 1111 和 100
在服务器端就可以通过 getParameter 来获取到参数的值.
@WebServlet("/getParameter")
public class GetParameterServlet extends HttpServlet {
    @Override
    protected void doGet(HttpServletRequest req, HttpServletResponse resp) throws ServletException, IOException {
        String userId=req.getParameter("userId");
        String classId=req.getParameter("classId");
        resp.getWriter().write("userId="+userId+", classId="+classId);
    }
}
此时访问相应路径时:

当没有 query string的时候, getParameter 获取的值为 null.
如果通过 http://localhost:8080/hello102/getParameter?userId=123&classId=456 访问, 可以看到

此时说明服务器已经获取到客户端传递过来的参数.
(getParameter 的返回值类型为 String. 必要的时候需要手动把 String 转成 int. )
2.2 代码示例: 获取 POST 请求中的参数(通过form表单) :
POST 请求的参数一般通过 body 传递给服务器. body 中的数据格式有很多种. 如果是采用 form 表单的
形式, 仍然可以通过 getParameter 获取参数的值.
@WebServlet("/postGetParameter")
public class PostParameter extends HttpServlet {
    @Override
    protected void doPost(HttpServletRequest req, HttpServletResponse resp)
throws ServletException, IOException {
        resp.setContentType("text/html; charset=utf-8");
        String userId = req.getParameter("userId");
        String classId = req.getParameter("classId");
        resp.getWriter().write("userId: " + userId + ", " + "classId: " +classId);
   }
}
创建 testPost.html, 放到 webapp 目录中
<form action="postParameter" method="POST">
    <input type="text" name="userId">
    <input type="text" name="classId">
    <input type="submit" value="提交">
</form>
重新部署程序, 通过 URL http://localhost:8080/hello102/testPost.html 访问, 可以看到 HTML

在输入框中输入内容, 点击提交,可以看到跳转到了新的页面, 并显示出了刚刚传入的数据

此时通过抓包可以看到, form 表单构造的 body 数据的格式为:

Content-Type: application/x-www-form-urlencoded, 对应的 body 数据格式就形userId=123&classId=456
2.3 代码示例: 获取 POST 请求中的参数(通过Jackson解析)
引入 Jackson 这个库, 进行 JSON 解析.
<dependency>
    <groupId>com.fasterxml.jackson.core</groupId>
    <artifactId>jackson-databind</artifactId>
    <version>2.12.3</version>
</dependency>
- 在postJson 类中修改代码
class User{
    public int userId;
    public int classId;
}
@WebServlet("/postJson")
public class PostJsonServlet extends HttpServlet {
    private ObjectMapper objectMapper=new ObjectMapper();
    @Override
    protected void doPost(HttpServletRequest req, HttpServletResponse resp) throws ServletException, IOException {
        User user=objectMapper.readValue(req.getInputStream(),User.class);
        resp.getWriter().write("userId:"+user.userId+", classId: "+user.classId);
    }
}
注意 :
JsonData(User) 类用来表示解析之后生成的 JSON 对象. 这个类的属性的名字和类型要和 JSON 字符串的 key 相对应.- Jackson 库的核心类为
ObjectMapper. 其中的readValue方法把一个 JSON 字符串转成 Java 对
象. 其中的writeValueAsString方法把一个 Java 对象转成 JSON 格式字符串. readValue的第二个参数为JsonData的 类对象. 通过这个类对象, 在readValue的内部就可以借
助反射机制来构造出JsonData对象, 并且根据 JSON 中key 的名字, 把对应的 value 赋值给JsonData 的对应字段.
编写前端页面ajax发送post请求代码 :
 <script src="http://code.jquery.com/jquery-2.1.1.min.js">script>

    <input type="text" id="userId">
    <input type="text" id="classId">
    <input type="button"  id="submit" value="提交">
    <script>
        let userIdInput=document.querySelector('#userId');
        let classIdInput=document.querySelector('#classId');
        let button=document.querySelector('#submit');
        button.onclick=function(){
            $.ajax({
                type: 'post',
                url: 'postJson',
                contentType: 'application/json',
                data: JSON.stringify({
                    userId: userIdInput.value,
                    classId: classIdInput.value
                }),
                success: function(body){
                    console.log(body);
                }
            });
        };
    script>
打开页面,点击提交 :

此时通过f12打开浏览器控制台界面可以看到:

post请求解析成功~
3. HttpServletResponse
Servlet 中的 doXXX 方法的目的就是根据请求计算得到相应, 然后把响应的数据设置到
HttpServletResponse 对象中.
然后 Tomcat 就会把这个 HttpServletResponse 对象按照 HTTP 协议的格式, 转成一个字符串, 并通过
Socket 写回给浏览器.
核心方法:

注意: 响应对象是服务器要返回给浏览器的内容, 这里的重要信息都是我们自己设置的. 因此上面的方法都是 “写” 方法.
注意: 对于状态码/响应头的设置要放到 getWriter / getOutputStream 之前. 否则可能设置失效.
3.1 代码示例: 设置状态码:
实现一个程序, 用户在浏览器通过参数指定要返回响应的状态码.
@WebServlet("/status")
public class StatusServlet extends HttpServlet {
    @Override
    protected void doGet(HttpServletRequest req, HttpServletResponse resp) throws ServletException, IOException {
        String status=req.getParameter("status");
        if (status!=null){
            resp.setStatus(Integer.parseInt(status));
        }
        resp.getWriter().write(status);
    }
}
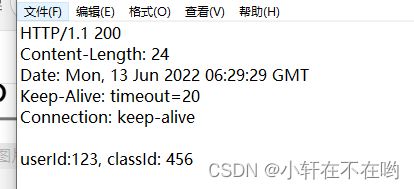
部署程序,通过 URL:http://localhost:8080/hello102/status?status=200 可以看到

抓包结果:
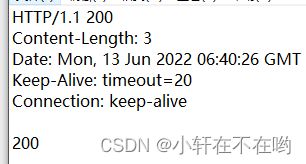
变换不同的 status 的值, 就可以看到不同的响应结果.
3.2 代码示例: 自动刷新
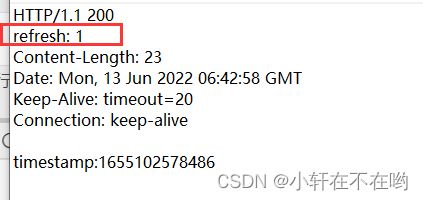
实现一个程序, 让浏览器每秒钟自动刷新一次. 并显示当前的时间戳
@WebServlet("/autoRefresh")
public class autoRefreshServlet extends HttpServlet {
    @Override
    protected void doGet(HttpServletRequest req, HttpServletResponse resp) throws ServletException, IOException {
        resp.setHeader("refresh","1");//设置一秒一次刷新
        resp.getWriter().write("timestamp:"+System.currentTimeMillis());
    }
}
- 通过 HTTP 响应报头中的 Refresh 字段, 可以控制浏览器自动刷新的时机.
- 通过
System.currentTimeMillis()方法可以获取到当前时刻的毫秒级时间戳
3.3 代码示例: 重定向
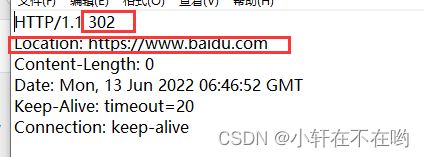
实现一个程序, 返回一个重定向 HTTP 响应, 自动跳转到另外一个页面.
@WebServlet("/redirect")
public class RedirectServlet extends HttpServlet {
    @Override
    protected void doGet(HttpServletRequest req, HttpServletResponse resp) throws ServletException, IOException {
        //构造302重定向
        resp.setStatus(302);
        resp.setHeader("Location","https://www.baidu.com");
    }
}
写法2(推荐):
@WebServlet("/redirect")
public class RedirectServlet extends HttpServlet {
    @Override
    protected void doGet(HttpServletRequest req, HttpServletResponse resp) throws ServletException, IOException {
        resp.sendRedirect("https://www.baidu.com");
    }
}
- over ~ ✨
