Unity3D Attributes用法小结(二)
本文的Attribute总结,是在Unity3D Attributes用法小结(一)基础上继续完成的,Unity Editor属性位于UnityEditor命名空间下面,主要在Unity引擎想Editors情况下使用的。本文参考的API版本为2018.3,它的UnityEditor的Attributes如下:
- 1.CallbackOrderAttribute
- 2.CanEditMultipleObjects
- 3.CustomEditor
- 4.CustomEditorForRenderPipelineAttribute
- 5.CustomPreviewAttribute
- 6.CustomPropertyDrawer
- 7.DrawGizmo
- 8.GridPaintSortingAttribute
- 9.InitializeOnLoadAttribute
- 10.InitializeOnLoadMethodAttribute
- 11.LightingExplorerExtensionAttribute
- 12.MenuItem
- 13.PreferenceItem
- 14.SettingsProviderAttribute
- 15.SettingsProviderGroupAttribute
- 16.ShaderIncludePathAttribute (已经被弃用了)
1.CallbackOrderAttribute
定义Callback的顺序,具体用法不明。2.CanEditMultipleObjects
Editor同时编辑多个Component的功能3.CustomEditor
声明一个Class为自定义Editor的Class4.CustomEditorForRenderPipelineAttribute
为自定义编辑器在更改RenderPipeline时,需要将此属性放在该类上。5.CustomPreviewAttribute
在Inspector中为指定的类型添加额外预览,也可以使用此属性将自定义预览添加到任何可以检查的对象。using System.Collections;
using System.Collections.Generic;
using UnityEngine;
using UnityEditor;
[CustomPreview(typeof(GameObject))]//使用该属性时,需要指定类型
public class TestPreview : ObjectPreview
{
///
/// 能否在当前状态下预览此组件?
///
/// true 表示可以,false表示不可以
public override bool HasPreviewGUI()
{
//return base.HasPreviewGUI();
return true;
}
///
/// 实现为Editor的预览区域创建自己的自定义预览,
///
/// 用于绘制的预览矩形
/// 背景图
public override void OnPreviewGUI(Rect r, GUIStyle background)
{
GUI.Label(r, target.name + " is being previewed");
}
}
6.CustomPropertyDrawer
并不需要将其放入Editor文件夹中,该属性有两个用途:1. 定制Serializable类的每个实例的GUI。2.定制自定义PropertyAttributes脚本的成员的GUI。 下面先介绍第一种用途:参考官网代码示例,给出一个序列化类Ingredient.using System;
using UnityEngine;
public enum IngredientUnit { Spoon, Cup, Bowl, Piece }
// Custom serializable class
[Serializable]
public class Ingredient
{
public string name;
public int amount = 1;
public IngredientUnit unit;
}
//测试类
public class Recipe : MonoBehaviour
{
public Ingredient potionResult;
public Ingredient[] potionIngredients;
}
此时,使用自定义的CustomPropertyDrawer时,序列化类Ingredient每个实例的外观都在Inspector中改变。此时有两种实现方式:(1)通过采用UIElements的方式自定义CustomPropertyDrawer,此时重写 PropertyDrawer类的CreatePropertyGUI()的方法即可。(2)通过采用IMGUI的方式,此时重写PropertyDrawer类的OnGUI()的方法即可.
第一种方式:(在测试时,自己用下面一段官方示例的代码报错,原因在于PropertyDrawer类中没有CreatePropertyGUI方法,也就无法重写;另外,UIElements的头文件也有问题),如果有相关解决方法,还请大佬留言,谢谢!
using UnityEditor;
using UnityEditor.UIElements;//using UnityEditor.Experimental.UIElements;
using UnityEngine.UIElements;//using UnityEngine.Experimental.UIElements;

// IngredientDrawerUIE
[CustomPropertyDrawer(typeof(Ingredient))]
public class IngredientDrawerUIE : PropertyDrawer
{
    public override VisualElement CreatePropertyGUI(SerializedProperty property)
    {
        // Create property container element.
        var container = new VisualElement();

        // Create property fields.
        var amountField = new PropertyField(property.FindPropertyRelative("amount"));
        var unitField = new PropertyField(property.FindPropertyRelative("unit"));
        var nameField = new PropertyField(property.FindPropertyRelative("name"), "Fancy Name");

        // Add fields to the container.
        container.Add(amountField);
        container.Add(unitField);
        container.Add(nameField);

        return container;
    }
}
第二种方式:(成功)
using UnityEditor;
using UnityEngine;

// IngredientDrawer
//采用IMGUI创建自定义PropertyDrawer的方式(重写PropertyDrawer类上的PropertyDrawer.OnGUI即可)。
[CustomPropertyDrawer(typeof(Ingredient))]
public class IngredientDrawer : PropertyDrawer
{
    // Draw the property inside the given rect
    public override void OnGUI(Rect position, SerializedProperty property, GUIContent label)
    {
        // Using BeginProperty / EndProperty on the parent property means that
        // prefab override logic works on the entire property.
        EditorGUI.BeginProperty(position, label, property);

        // Draw label
        position = EditorGUI.PrefixLabel(position, GUIUtility.GetControlID(FocusType.Passive), label);

        // Don't make child fields be indented
        var indent = EditorGUI.indentLevel;
        EditorGUI.indentLevel = 0;

        // Calculate rects
        var amountRect = new Rect(position.x, position.y, 30, position.height);
        var unitRect = new Rect(position.x + 35, position.y, 50, position.height);
        var nameRect = new Rect(position.x + 90, position.y, position.width - 90, position.height);

        // Draw fields - passs GUIContent.none to each so they are drawn without labels
        EditorGUI.PropertyField(amountRect, property.FindPropertyRelative("amount"), GUIContent.none);
        EditorGUI.PropertyField(unitRect, property.FindPropertyRelative("unit"), GUIContent.none);
        EditorGUI.PropertyField(nameRect, property.FindPropertyRelative("name"), GUIContent.none);

        // Set indent back to what it was
        EditorGUI.indentLevel = indent;

        EditorGUI.EndProperty();
    }
}
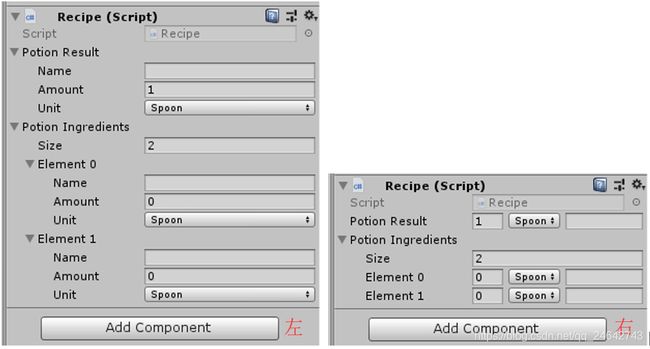
未自定义的CustomPropertyDrawer时(左),和使用自定义的CustomPropertyDrawer(右)的效果对比图如下:
再介绍第二种用途:参考官网代码示例,给出一个测试类ExampleClass.
using UnityEngine;
using System.Collections;

public class ExampleClass : MonoBehaviour
{
    // Show this float in the Inspector as a slider between 0 and 10
    [Range(0.0F, 10.0F)]
    public float myFloat = 0.0F;
}
若是我们想要在编辑时改变myFloat的外观,比如:将其限制在特定的范围,这时,我们需要自定义一个属性,我自定义了一个RangeAttribute属性:
using UnityEngine;

// This is not an editor script. The property attribute class should be placed in a regular script file.
public class RangeAttribute : PropertyAttribute
{
    public float min;
    public float max;

    public RangeAttribute(float min, float max)
    {
        this.min = min;
        this.max = max;
    }
}
现在,我们有了RangeAttribute属性,再只需要创建一个RangeDrawer类来绘制RangeAttribute属性,但它必须继承自PropertyDrawer类,而且需要告诉RangeDrawer类是一个RangeAttribute属性类,然将RangeDrawer实现类放在Editor文件下,示例代码如下:
// The property drawer class should be placed in an editor script, inside a folder called Editor.

// Tell the RangeDrawer that it is a drawer for properties with the RangeAttribute.
using UnityEngine;
using UnityEditor;
using System;

[CustomPropertyDrawer(typeof(RangeAttribute))]
public class RangeDrawer : PropertyDrawer
{
    // Draw the property inside the given rect
    public override void OnGUI(Rect position, SerializedProperty property, GUIContent label)
    {
        // First get the attribute since it contains the range for the slider
        RangeAttribute range = attribute as RangeAttribute;

        // Now draw the property as a Slider or an IntSlider based on whether it's a float or integer.
        if (property.propertyType == SerializedPropertyType.Float)
            EditorGUI.Slider(position, property, range.min, range.max, label);
        else if (property.propertyType == SerializedPropertyType.Integer)
            EditorGUI.IntSlider(position, property, Convert.ToInt32(range.min), Convert.ToInt32(range.max), label);
        else
            EditorGUI.LabelField(position, label.text, "Use Range with float or int.");
    }
}
未使用CustomPropertyDrawer功能(左),使用CustomPropertyDrawer功能(右),最后的实验效果如下图:

7.DrawGizmo
该属性允许你为任何一个Component提供一个gizmo渲染器。渲染器的函数必须是静态的,无需继承自MonoBehaviour类,但是需要两个参数:正在绘制的Gizmo的对象,以及指示正在绘制Gizmo的GizmoType。渲染器的函数可以在任意的函数内,包括Editor文件,这样你不必放在组件脚本中,也不会被包含在工程中。官方示例代码如下:using System.Collections;
using System.Collections.Generic;
using UnityEngine;
using UnityEditor;
public class MyScriptGizmoDrawer : MonoBehaviour
{
///
/// 允许你为任何一个Component提供一个gizmo渲染器。
///
/// 正在绘制的Gizmo的对象
/// 正在绘制Gizmo的GizmoType
[DrawGizmo(GizmoType.Selected | GizmoType.Active)]
static void DrawGizmoForMyScript(DrawGizmoTest scr, GizmoType gizmoType)//渲染器的函数必须是静态的
{
Vector3 position = scr.transform.position;
//Gizmos.color = Color.red;
//Gizmos.DrawSphere(position, 10);
if (Vector3.Distance(position, Camera.current.transform.position) > 10f)
{
//Gizmo的图片需要放入Assets/Gizmo目录中。
//Gizmos.DrawIcon(position, "MyScript Gizmo.tiff", true);
Gizmos.DrawLine(position,new Vector3(0,0,10));
}
}
}
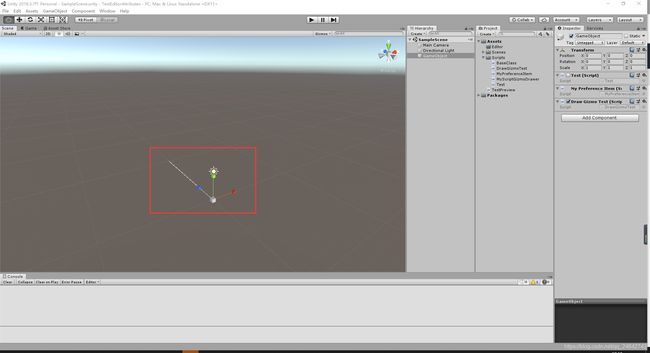
效果图如下:
8.GridPaintSortingAttribute
在平铺调色板(Tile Palette)窗口的Active Tilemaps list中,使用此属性可以自定义Active Targets 的排序。此属性需要附加到继承自IComparer 的类或创建IComparer 的方法上才能使用。可以使用该属性生成的IComparer实例用于比较和排序Active Tilemaps列表中的Active Target GameObjects。示例代码如下:using System;
using System.Collections.Generic;
using UnityEngine;
using UnityEditor;
//继承自IComparer 的类上使用
[GridPaintSorting]
class Alphabetical : IComparer<GameObject>
{
public int Compare(GameObject go1, GameObject go2)
{
return String.Compare(go1.name, go2.name);
}
}
//翻转上述所有比较的结果
class ReverseAlphabeticalComparer : IComparer<GameObject>
{
public int Compare(GameObject go1, GameObject go2)
{
return -String.Compare(go1.name, go2.name);
}
//在创建IComparer 的方法上使用
[GridPaintSorting]
public static IComparer<GameObject> ReverseAlphabetical()
{
return new ReverseAlphabeticalComparer();
}
}
注意:在平铺调色板子类别(Tile Palette’ subcategory)(菜单:编辑>首选项> 2D>平铺调色板)(menu: Edit > Preferences > 2D > Tile Palette)中找到“平铺调色板活动目标排序模式(Tile Palette Active Targets Sorting Mode)”设置,使用此属性的功能将出现在它的下方。从下拉菜单中选择所需的排序方法,n能在“平铺调色板”窗口中使用自定义排序。实验结果如下图:

9.InitializeOnLoadAttribute
在Class上使用,可以在Unity启动的时候运行Editor脚本。需要该Class拥有静态的构造函数,还是最好将该Class需要放置在Editor文件中。代码示例如下:using System.Collections;
using System.Collections.Generic;
using UnityEngine;
using UnityEditor;
[InitializeOnLoad]
public class InitializeOnLoadTest : MonoBehaviour
{
//注意构造函数必须为静态的。当Unity启动的时候,会自动运行里面的代码块。
//同时也可以指定一些编辑器里的其他操作。
static InitializeOnLoadTest()
{
Debug.Log("Up and running");
EditorApplication.update += Update;
}
static void Update()
{
Debug.Log("Updating");
}
}
实验效果如下图:

10.InitializeOnLoadAttribute
同上,针对Method上使用,是InitializeOnLoad的Method版本。Method必须是static的。示例代码如下:using UnityEngine;
using UnityEditor;
//无需挂载在游戏对象身上,也会执行
public class InitializeOnLoadMethodAttributeTest : MonoBehaviour
{
[InitializeOnLoadMethod]
public static void Test()
{
Debug.Log("Test!");
}
}
效果就是在控制台,输出"Test!"。
11.LightingExplorerExtensionAttribute
用于标记Lighting Explorer的扩展类的属性。注意,每个渲染管道仅支持一个。public LightingExplorerExtensionAttribute(Type renderPipeline);
12.MenuItem
在方法上使用,可以在Editor中创建一个菜单项,点击后执行该方法,可以利用该属性做很多扩展功能。 MenuItem属性可以将任何静态函数转换为菜单命令。 只有静态函数才能使用MenuItem属性。如果想要创建一个热键,可以使用特殊的组合键。热键文本必须以空格字符开头(“MyMenu/Do_g”不会被解释为热键,而“MyMenu/Do _g”可以被解释).官方API中的代码示例如下:using UnityEditor;
using UnityEngine;
//添加一个MyMenu菜单栏
public class MenuTest : MonoBehaviour
{
// Add a menu item named "Do Something" to MyMenu in the menu bar.
//MyMenu菜单栏子项1 功能1
[MenuItem("MyMenu/Do Something")]
static void DoSomething()
{
Debug.Log("Doing Something...");
}
// Validated menu item.
// Add a menu item named "Log Selected Transform Name" to MyMenu in the menu bar.
// We use a second function to validate the menu item
// so it will only be enabled if we have a transform selected.
//MyMenu菜单栏子项2 选择一个transform物体后,可以执行下面功能
[MenuItem("MyMenu/Log Selected Transform Name")]
static void LogSelectedTransformName()
{
Debug.Log("Selected Transform is on " + Selection.activeTransform.gameObject.name + ".");
}
// Validate the menu item defined by the function above.
// The menu item will be disabled if this function returns false.
// MyMenu菜单栏子项2 如果这个函数返回为false,该菜单子项不会被启用
[MenuItem("MyMenu/Log Selected Transform Name", true)]//作为Log Selected Transform Name功能的有效验证
static bool ValidateLogSelectedTransformName()
{
// Return false if no transform is selected.
return Selection.activeTransform != null;
}
// Add a menu item named "Do Something with a Shortcut Key" to MyMenu in the menu bar
// and give it a shortcut (ctrl-g on Windows, cmd-g on macOS).
// MyMenu菜单栏子项3 创建一个热键Crtl+G
[MenuItem("MyMenu/Do Something with a Shortcut Key %g")]
static void DoSomethingWithAShortcutKey()
{
Debug.Log("Doing something with a Shortcut Key...");
}
// Add a menu item called "Double Mass" to a Rigidbody's context menu.
//添加一个Double Mass菜单选项到Rigidbody的上下文菜单(选择Rigidbody组件右键弹出菜单)
[MenuItem("CONTEXT/Rigidbody/Double Mass")]
static void DoubleMass(MenuCommand command)
{
Rigidbody body = (Rigidbody)command.context;
body.mass = body.mass * 2;
Debug.Log("Doubled Rigidbody's Mass to " + body.mass + " from Context Menu.");
}
// Add a menu item to create custom GameObjects.
// Priority 1 ensures it is grouped with the other menu items of the same kind
// and propagated to the hierarchy dropdown and hierarchy context menus.
[MenuItem("GameObject/MyCategory/Custom Game Object", false, 10)]
static void CreateCustomGameObject(MenuCommand menuCommand)
{
// Create a custom game object
GameObject go = new GameObject("Custom Game Object");
// Ensure it gets reparented if this was a context click (otherwise does nothing)
GameObjectUtility.SetParentAndAlign(go, menuCommand.context as GameObject);
// Register the creation in the undo system
Undo.RegisterCreatedObjectUndo(go, "Create " + go.name);
Selection.activeObject = go;
}
}
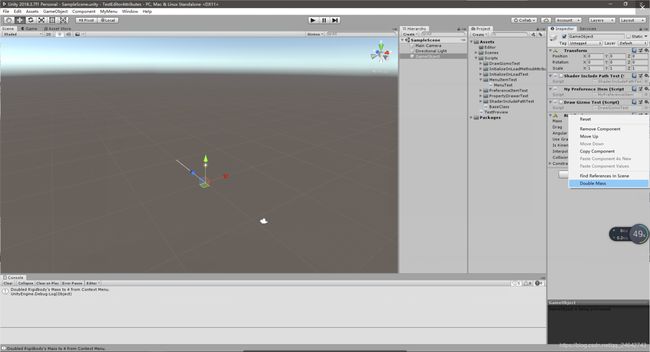
功能1-3的测试结果如下图:

功能4的测试结果如下图:
13.PreferenceItem
这个特性是在Preference界面新加一个选项。示例代码如下:using System.Collections;
using System.Collections.Generic;
using UnityEngine;
using UnityEditor;
public class MyPreferenceItem : MonoBehaviour
{
// Have we loaded the prefs yet
private static bool prefsLoaded = false;
// The Preferences
public static bool boolPreference = false;
// Add preferences section named "My Preferences" to the Preferences window
[PreferenceItem("My Preferences")]
public static void PreferencesGUI() //该方法必须是静态的
{
// Load the preferences
if (!prefsLoaded)
{
boolPreference = EditorPrefs.GetBool("BoolPreferenceKey", false);
prefsLoaded = true;
}
// Preferences GUI
boolPreference = EditorGUILayout.Toggle("Bool Preference", boolPreference);
// Save the preferences
if (GUI.changed)
EditorPrefs.SetBool("BoolPreferenceKey", boolPreference);
}
}
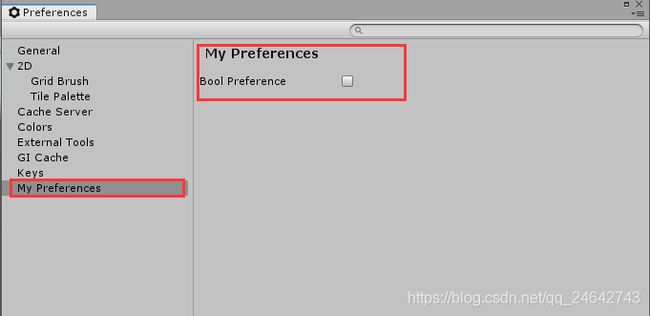
注意,这段代码并不需要强制继承自MonoBehaviour,但方法必须是静态方法。在Editor里面选择Preference菜单,可以看到如下效果图:
14.SettingsProviderAttribute
该属性用于注册新的SettingsProvider。使用此属性来修饰返回SettingsProvider实例的函数。 如果函数返回null,则Settings窗口中不会显示任何SettingsProvider。示例代码如下:using System.IO;
using UnityEditor;
//编写一个新的SettingsProvider
class MyCustomSettingsProvider : SettingsProvider
{
const string k_MyCustomSettingsPath = "Resources/MyCustomSettings.asset";
public MyCustomSettingsProvider(string path, SettingsScope scope)
: base(path, scope) { }
public static bool IsSettingsAvailable()
{
return File.Exists(k_MyCustomSettingsPath);
}
//如果Resources目录下存在MyCustomSettings.asset则返回一个自定义的SettingsProvider
//否则返回空,此时不在Settings window显示
[SettingsProvider]
public static SettingsProvider CreateMyCustomSettingsProvider()
{
if (IsSettingsAvailable())
{
return new MyCustomSettingsProvider("MyCustomSettings", SettingsScope.Project);
}
// Settings Asset doesn't exist yet. No need to display anything in the Settings window.
return null;
}
}
15.SettingsProviderGroupAttribute
该属性用于注册多个SettingsProvider。使用此属性来修饰返回SettingsProvider实例数组的函数。如果函数返回null,则“设置”窗口中不会显示任何SettingsProvider。代码示例如下:using System.IO;
using System.Linq;
using UnityEditor;
class XRSettings : SettingsProvider
{
const string k_XRSettingsFolder = "Assets/Editor/XRSettings";
public XRSettings(string path, SettingsScope scope = SettingsScope.Project)
: base(path, scope)
{
}
[SettingsProviderGroup]
public static SettingsProvider[] CreateProviders()
{
var files = Directory.GetFileSystemEntries(k_XRSettingsFolder, "*.json");
return files.Select(entry =>
{
// First parameter is the path of the settings in the Settings window.
return new XRSettings("Project/XRSettings/" + Path.GetFileNameWithoutExtension(entry));
}).ToArray();
}
}
16.ShaderIncludePathAttribute
这个特性在2018.3中被弃用了,当我们尝试些一个shader库的时候,会经常需要include一些存在任意位置的文件,这个特性允许你返回一些列的shader include路径。以官方代码(2018.3的API中没有)为例,在Start方法中测试:using System.Collections;
using System.Collections.Generic;
using UnityEngine;
using UnityEditor;
public class ShaderIncludePathTest : MonoBehaviour
{
internal static class DefaultShaderIncludes
{
[ShaderIncludePath] //(新版本中已经被弃用了)
public static string[] GetPaths()
{
return new[]
{
"Assets/ScriptableRenderPipeline/",
"Assets/SRP/ScriptableRenderPipeline/LightweightPipeline/Shaders"
};
}
}
// Start is called before the first frame update
void Start()
{
foreach (string str in DefaultShaderIncludes.GetPaths())
{
Debug.Log(str);
}
}
}
运行效果去下图:

特别声明,本文在撰写时,参考了以下资料:
[1]https://docs.unity3d.com/ScriptReference/CallbackOrderAttribute.html
[2]https://www.cnblogs.com/cangxw/p/8303171.html