在Flutter / Dart中创建一个笔记app
Flutter是由谷歌开发的一个开源的跨平台移动开发框架。用Dart编写的应用程序。Flutter预先配备了Material Design组件,使创建具有良好外观和感觉的应用程序变得容易。在Flutter中,一切都是无状态或有状态的小部件。笔记应用程序首先要具有可用的设计和功能。
如果您尚未安装Flutter和受支持的IDE,则可以在此处找到说明。
首先,让我们设置项目:
从Android Studio创建flutter项目,或在终端/ cmd中输入命令“ flutter create notes ”。
在main.dart中,删除homePage类,并使用扩展Stateful Widget的我们自己的HomePage类创建一个新文件。此类将包含我们的脚手架。
创建另一个有状态的Widget类。这将生成包含“主页交错视图”的正文。我们将其称为“ StaggeredGridPage ”。
让我们发挥创意,尝试以错开的错觉呈现笔记。
我们将使用此dart包创建交错的网格视图。
https://pub.dartlang.org/packages/flutter_staggered_grid_view
和SQLite将注释数据存储在设备上。
以下是pubspec.yaml的代码片段,其中 列出了所需的依赖项。添加它们,保存文件,然后使用flutter命令“ flutter package get ”来解决新添加的依赖项。
dependencies:
  flutter:
    sdk: flutter

  cupertino_icons: ^0.1.2
  flutter_staggered_grid_view: ^0.2.7
  auto_size_text: ^1.1.2
  sqflite:
  path:
  intl: ^0.15.7
  share: ^0.6.1
为笔记创建一个类。我们需要toMap函数来进行数据库查询。
class Note {
  int id;
  String title;
  String content;
  DateTime date_created;
  DateTime date_last_edited;
  Color note_color;
  int is_archived = 0;

  Note(this.id, this.title, this.content, this.date_created, this.date_last_edited,this.note_color);

  Map toMap(bool forUpdate) {
    var data = {
//      'id': id,  since id is auto incremented in the database we don't need to send it to the insert query.
      'title': utf8.encode(title),
      'content': utf8.encode( content ),
      'date_created': epochFromDate( date_created ),
      'date_last_edited': epochFromDate( date_last_edited ),
      'note_color': note_color.value,
      'is_archived': is_archived  //  for later use for integrating archiving
    };
    if(forUpdate){  data["id"] = this.id;  }
    return data;
  }

// Converting the date time object into int representing seconds passed after midnight 1st Jan, 1970 UTC
int epochFromDate(DateTime dt) {  return dt.millisecondsSinceEpoch ~/ 1000; }

void archiveThisNote(){ is_archived = 1; }
}
从此处获取用于注释类和表的SQLite数据库查询代码。
现在,您的Material App的主目录应具有HomePage.dart 的Scaffold,其主体应为StaggeredGridView。在支架的AppBar中,放置一个操作按钮,使用户可以在列表视图和交错视图之间切换。别忘了将机身包裹在SafeArea中,我们希望该应用程序在最新手机上保持友好状态。
交错视图库要求视图具有跨轴计数,我们将根据显示尺寸的宽度动态提供该视图。这是告诉我们要并排显示的笔记视图数量所必需的。在手机或平板电脑屏幕上的横向模式下,我们将使其水平排列3个音符,在纵向模式下为手机排列2个音符。
import 'dart:convert';
import 'package:flutter/material.dart';
import 'package:flutter_staggered_grid_view/flutter_staggered_grid_view.dart';
import '../Models/Note.dart';
import '../Models/SqliteHandler.dart';
import '../Models/Utility.dart';
import '../Views/StaggeredTiles.dart';
import 'HomePage.dart';

class StaggeredGridPage extends StatefulWidget {
  final notesViewType;
  const StaggeredGridPage({Key key, this.notesViewType}) : super(key: key);
  @override
  _StaggeredGridPageState createState() => _StaggeredGridPageState();
}

class _StaggeredGridPageState extends State {

  var  noteDB = NotesDBHandler();
  List> _allNotesInQueryResult = [];
  viewType notesViewType ;

@override
  void initState() {
    super.initState();
    this.notesViewType = widget.notesViewType;
  }

@override void setState(fn) {
    super.setState(fn);
    this.notesViewType = widget.notesViewType;
  }

  @override
  Widget build(BuildContext context) {
    GlobalKey _stagKey = GlobalKey();
    if(CentralStation.updateNeeded) {  retrieveAllNotesFromDatabase();  }
    return Container(child: Padding(padding:  _paddingForView(context) , child:
      new StaggeredGridView.count(key: _stagKey,
        crossAxisSpacing: 6, mainAxisSpacing: 6,
        crossAxisCount: _colForStaggeredView(context),
        children: List.generate(_allNotesInQueryResult.length, (i){ return _tileGenerator(i); }),
      staggeredTiles: _tilesForView() ,
          ),
        )
      );
  }

  int _colForStaggeredView(BuildContext context) {
      if (widget.notesViewType == viewType.List) { return 1; }
      // for width larger than 600, return 3 irrelevant of the orientation to accommodate more notes horizontally
      return MediaQuery.of(context).size.width > 600 ? 3 : 2 ;
  }

 List _tilesForView() { // Generate staggered tiles for the view based on the current preference.
  return List.generate(_allNotesInQueryResult.length,(index){ return StaggeredTile.fit( 1 ); }
  ) ;
}

EdgeInsets _paddingForView(BuildContext context){
  double width = MediaQuery.of(context).size.width;
  double padding ;
  double top_bottom = 8;
  if (width > 500) {
    padding = ( width ) * 0.05 ; // 5% padding of width on both side
  } else {
    padding = 8;
  }
  return EdgeInsets.only(left: padding, right: padding, top: top_bottom, bottom: top_bottom);
}


 MyStaggeredTile _tileGenerator(int i){
 return MyStaggeredTile(  Note(
      _allNotesInQueryResult[i]["id"],
      _allNotesInQueryResult[i]["title"] == null ? "" : utf8.decode(_allNotesInQueryResult[i]["title"]),
      _allNotesInQueryResult[i]["content"] == null ? "" : utf8.decode(_allNotesInQueryResult[i]["content"]),
     DateTime.fromMillisecondsSinceEpoch(_allNotesInQueryResult[i]["date_created"] * 1000),
     DateTime.fromMillisecondsSinceEpoch(_allNotesInQueryResult[i]["date_last_edited"] * 1000),
      Color(_allNotesInQueryResult[i]["note_color"] ))
  );
  }

  void retrieveAllNotesFromDatabase() {
  // queries for all the notes from the database ordered by latest edited note. excludes archived notes.
    var _testData = noteDB.testSelect();
    _testData.then((value){
        setState(() {
          this._allNotesInQueryResult = value;
          CentralStation.updateNeeded = false;
        });
    });
  }
}
此视图需要图块以显示注释。我们为视图设计的图块必须预览注释的标题和内容。为了处理图块中不同长度的文本,我们将使用一个库来创建自动展开的文本视图。我们只需要定义行数限制,小部件将自动扩展以容纳内容直到该限制。
就像iOS中的segue和Android中的Intent一样,我们使用Navigator在Flutter中的页面之间导航。
import 'package:flutter/material.dart';
import 'package:auto_size_text/auto_size_text.dart';
import '../ViewControllers/NotePage.dart';
import '../Models/Note.dart';
import '../Models/Utility.dart';

class MyStaggeredTile extends StatefulWidget {
  final Note note;
  MyStaggeredTile(this.note);
  @override
  _MyStaggeredTileState createState() => _MyStaggeredTileState();
}

class _MyStaggeredTileState extends State {

  String _content ;
  double _fontSize ;
  Color tileColor ;
  String title;

  @override
  Widget build(BuildContext context) {

    _content = widget.note.content;
    _fontSize = _determineFontSizeForContent();
    tileColor = widget.note.note_color;
    title = widget.note.title;

    return GestureDetector(
      onTap: ()=> _noteTapped(context),
      child: Container(
      decoration: BoxDecoration(
        border: tileColor == Colors.white ?   Border.all(color: CentralStation.borderColor) : null,
          color: tileColor,
          borderRadius: BorderRadius.all(Radius.circular(8))),
      padding: EdgeInsets.all(8),
      child:  constructChild(),) ,
    );
  }

  void _noteTapped(BuildContext ctx) {
    CentralStation.updateNeeded = false;
    Navigator.push(ctx, MaterialPageRoute(builder: (ctx) => NotePage(widget.note)));
  }

  Widget constructChild() {
    List contentsOfTiles = [];

    if(widget.note.title.length != 0) {
      contentsOfTiles.add(
        AutoSizeText(title,
          style: TextStyle(fontSize: _fontSize,fontWeight: FontWeight.bold),
          maxLines: widget.note.title.length == 0 ? 1 : 3,
          textScaleFactor: 1.5,
        ),
      );
      contentsOfTiles.add(Divider(color: Colors.transparent,height: 6,),);
    }

    contentsOfTiles.add(
        AutoSizeText(
          _content,
          style: TextStyle(fontSize: _fontSize),
          maxLines: 10,
          textScaleFactor: 1.5,)
    );
    return Column(
        crossAxisAlignment: CrossAxisAlignment.start,
        mainAxisAlignment: MainAxisAlignment.start,
        children:     contentsOfTiles
    );
  }

 double _determineFontSizeForContent() {
    int charCount = _content.length + widget.note.title.length ;
    double fontSize = 20 ;
    if (charCount > 110 ) { fontSize = 12; }
    else if (charCount > 80) {  fontSize = 14;  }
    else if (charCount > 50) {  fontSize = 16;  }
    else if (charCount > 20) {  fontSize = 18;  }
    return fontSize;
  }
}
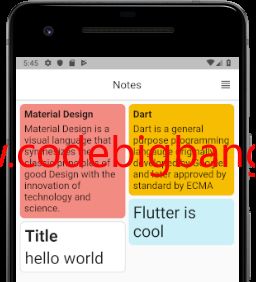
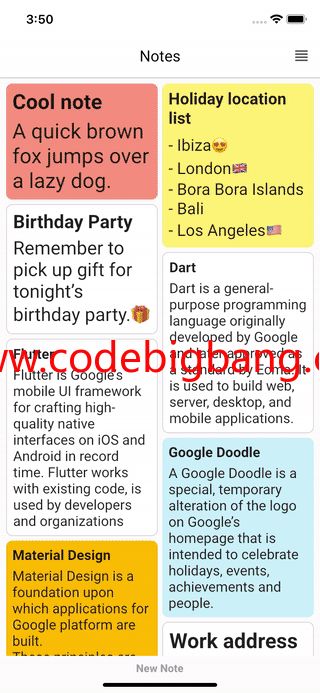
视图中的图块将看起来像这样。
现在我们需要一个视图来编辑/创建注释。它还将在AppBar中拥有各种有用的操作来撤消,存档等。更多操作将显示一个底部工作表,其中包含诸如共享,重复,永久删除和可水平滚动的颜色选择器之类的选项,通过它们我们可以更改该特定音符的背景颜色。
我们将分隔NotePage,BottomSheet和ColorSlider小部件到不同的类和文件中,以保持代码的清洁和可管理。要在用户从ColorSlider中选择新颜色时更改所有颜色,我们需要更新状态。我们可以通过回调函数连接这三个小部件以响应更改,以便它们可以自我更新。
import 'package:flutter/material.dart';

class ColorSlider extends StatefulWidget {
  final void Function(Color)  callBackColorTapped ;
  final Color noteColor ;
  ColorSlider({@required this.callBackColorTapped, @required this.noteColor});
  @override
  _ColorSliderState createState() => _ColorSliderState();
}

class _ColorSliderState extends State {

  final colors = [
    Color(0xffffffff), // classic white
    Color(0xfff28b81), // light pink
    Color(0xfff7bd02), // yellow
    Color(0xfffbf476), // light yellow
    Color(0xffcdff90), // light green
    Color(0xffa7feeb), // turquoise
    Color(0xffcbf0f8), // light cyan
    Color(0xffafcbfa), // light blue
    Color(0xffd7aefc), // plum
    Color(0xfffbcfe9), // misty rose
    Color(0xffe6c9a9), // light brown
    Color(0xffe9eaee)  // light gray
  ];

   final Color borderColor = Color(0xffd3d3d3);
   final Color foregroundColor = Color(0xff595959);

  final _check = Icon(Icons.check);
  Color noteColor;

  int indexOfCurrentColor;
  @override void initState() {
    super.initState();
    this.noteColor = widget.noteColor;
    indexOfCurrentColor = colors.indexOf(noteColor);
  }

  @override
  Widget build(BuildContext context) {
    return ListView(
      scrollDirection: Axis.horizontal,
      children:
      List.generate(colors.length, (index)
      {
        return
          GestureDetector(
              onTap: ()=> _colorChangeTapped(index),
              child: Padding(
                  padding: EdgeInsets.only(left: 6, right: 6),
                  child:Container(
                  child: new CircleAvatar(
                    child: _checkOrNot(index),
                    foregroundColor: foregroundColor,
                    backgroundColor: colors[index],
                  ),
                  width: 38.0,
                  height: 38.0,
                  padding: const EdgeInsets.all(1.0), // border width
                  decoration: new BoxDecoration(
                    color: borderColor, // border color
                    shape: BoxShape.circle,
                  )
              ) )
          );
      })
      ,);
  }

  void _colorChangeTapped(int indexOfColor) {
    setState(() {
      noteColor = colors[indexOfColor];
      indexOfCurrentColor = indexOfColor;
      widget.callBackColorTapped(colors[indexOfColor]);
    });
  }

  Widget _checkOrNot(int index){
    if (indexOfCurrentColor == index) {
      return _check;
    }
    return null;
  }

}
我还添加了一些方便的功能来撤消更改,存档,共享,重复和永久删除笔记。
该应用的整个代码库可以在我的资料库中找到Github上,Gitlab。随意下车,亲自尝试一下。


