Filebeat + Logstash + Kafka + Elasticsearch 架构部署详细步骤
·
节点信息
| hostname | IP | 软件 |
|---|---|---|
| elk-web | 10.0.30.30 | kibana-7.9.1、kafka-eagle-2.0.5、cerebro-0.9.4、mariadb-10.2.15 |
| elk-kafka01 | 10.0.30.31 | zookeeper-3.4.13、kafka-2.12.1 |
| elk-kafka02 | 10.0.30.32 | zookeeper-3.4.13、kafka-1.0.0 |
| elk-kafka03 | 10.0.30.33 | zookeeper-3.4.13、kafka-1.0.0 |
| elk-elasticsearch01 | 10.0.30.34 | elasticsearch-7.9.1 |
| elk-elasticsearch02 | 10.0.30.35 | elasticsearch-7.9.1 |
| elk-elasticsearch03 | 10.0.30.36 | elasticsearch-7.9.1 |
| elk-logstash | 10.0.30.37 | logstash-7.9.1 |
·
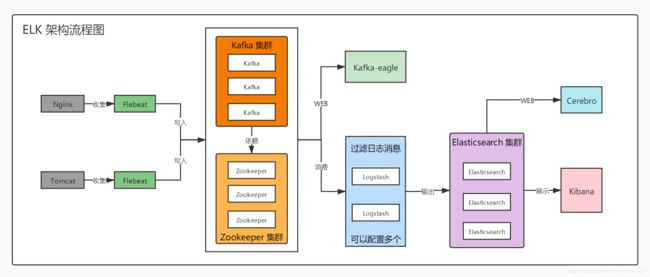
架构图
搭建过程中遇到的问题
所有服务器采用的是双网卡,第一个网卡(eth0)走的是默认路由,第二个网卡(eth1)配置了静态路由。路由信息如下图:

初次搭建时,所有侦听地址使用的是 eth1,在进行到测试 kafka 集群的步骤时,发现连接 zookeeper 和 kafka 时会比较慢,偶尔还会出现连接失败的现象。在安装 kafka-eagle 的步骤时,一直启动失败,观察日志发现了大量连接 zookeeper 的超时报错,最后将所有侦听地址修改为 eth0 后,没有出现此状况。
疑虑:在同一个网段中调用,不应该不走网关吗?为什么会出现这种情况?难道和 xshell 是在 172.168.20.0/24 网段有关系?
由于网络方面的知识欠缺,就没有深入研究此种状况网络方面的原因和修复方法,如果有知道的小伙伴欢迎评论区留言,感谢!!!。
·
部署 Kafka 集群
官网:http://kafka.apache.org/
由于 Kafka 依赖 zookeeper,所以先部署一套 zookeeper 集群。
·
部署 Zookeeper 集群
官网:https://zookeeper.apache.org/
下载地址:https://archive.apache.org/dist/zookeeper/
·
PS:zookeeper 集群配置中,除了 myid 必须唯一以外,其余配置均可一致。
·
1 配置 Java 环境
tar -xvf jdk-8u281-linux-x64.tar.gz -C /usr/local/
ln -vs /usr/local/jdk1.8.0_281/bin/java* /usr/bin/
·
2 下载&解压 Zookeeper
tar -xvf zookeeper-3.4.13.tar.gz -C /usr/local/
·
3 设置 JVM 堆大小
cd /usr/local/zookeeper-3.4.13

vim conf/java.env
#添加
#!/bin/sh
export JVMFLAGS="-Xms2g -Xmx2g"
·
4 创建配置文件(文件名任意即可,启动时默认加载 conf/zoo.cfg)
vim conf/zoo.cfg
#主要关注以下配置
tickTime=2000

#允许follower连接并同步至leader的时间,以tickTime为单位
initLimit=5
#允许follower与Zookeeper同步的时间,以tickTime为单位
syncLimit=2

#数据快照存储位置
dataDir=/data/zookeeper/zkdata/
#事务日志存储位置
dataLogDir=/data/zookeeper/zklog/

#侦听端口
clientPort=2181

#自动清除168小时之前的快照和事务日志
autopurge.purgeInterval=168

#zookeeper 集群组
server.31=10.0.30.31:2888:3888
server.32=10.0.30.32:2888:3888
server.33=10.0.30.33:2888:3888
·
5 创建依赖目录
mkdir -p /data/zookeeper/zkdata/ /data/zookeeper/zklog/
·
6 编辑 myid 文件
注意: myid 文件位于服务器的数据目录(dataDir)中,它由一行仅包含该机器的 id 文本组成。server.1 的 myid 将只包含文本 1 而没有其他内容,id 在 zookeeper 集群中必须是唯一的,并且应该在 1 到 255 之间。
# elk-kafka01 的 myid
echo 31 > /data/zookeeper/zkdata/myid
# elk-kafka02 的 myid
echo 32 > /data/zookeeper/zkdata/myid
# elk-kafka03 的 myid
echo 33 > /data/zookeeper/zkdata/myid
·
7 启动 Zookeeper
cd /usr/local/zookeeper-3.4.13

#./bin/zkServer.sh start conf/zoo.cfg
./bin/zkServer.sh start

#停止:./bin/zkServer.sh stop
·
8 验证 zk 集群是否成功
# 查看状态
./bin/zkServer.sh status
PS: 只启动第一个 zk 节点(myid 31),查看状态会提示 "Error contacting service. It is probably not running.";启动第二个 zk 节点(myid 32)后,查看状态会发现它的状态为 leader,这时返回查看第一个 zk 节点的状态会发现它的状态变为 follower;最后启动第三个 zk 节点(myid 33),查看状态会发现它的状态为 follower。当 leader 故障后,第三个节点会变为新 leader。
·
开始安装 Kafka
PS:kafka 集群配置中,除了 broker.id 和侦听地址(listeners)不相同外,其余配置均可一致。
·
1 配置 Java 环境
步骤忽略…。部署 zookeeper 集群时,已经配置。
·
2 下载&解压 Kafka
tar -xvf kafka_2.12-1.0.0.tgz -C /usr/local/
·
3 修改配置文件
cd /usr/local/kafka_2.12-1.0.0
vim config/server.properties
#### 主要修改以下配置 ####

#代理 ID,集群内唯一
broker.id=31

#侦听地址
listeners=PLAINTEXT://10.0.30.31:9092

#数据存储位置
log.dirs=/data/kafka/kkdata

#每个主题的默认日志分区数(这里3个节点,设置3个分区)
num.partitions=3

#zookeeper 集群列表
zookeeper.connect=10.0.30.31:2181,10.0.30.32:2181,10.0.30.33:2181

#### 下面的配置需要手动添加 ####
#开启自动创建主题
auto.create.topics.enable=true

#开启删除主题功能
delete.topic.enable=true

#最小副本数。此值大于 1 时,使用 --bootstrap-server 无法消费,会报错。
#+ 因为 kafka 生成的 __consumer_offsets 主题的副本数为 1。
min.insync.replicas=1

#并发数
queued.max.requests=500

#主题的默认副本数
default.replication.factor=2

#如果在这段时间内,follower没有同步leader的数据,那么将此follower从isr中删除
replica.lag.time.max.ms=10000
·
4 JVM 优化
官方建议使用最新发布的 JDK 1.8 版本,因为较旧的免费可用版本已经披露了安全漏洞。如果您决定使用 G1 收集器(当前的默认值),并且您仍然使用 JDK 1.7,请确保您使用的是 u51 或更新版本。
vim bin/kafka-server-start.sh
#修改
if [ "x$KAFKA_HEAP_OPTS" = "x" ]; then
    export KAFKA_HEAP_OPTS="-Xmx1G -Xms1G"
fi
# 改为
...
if [ "x$KAFKA_HEAP_OPTS" = "x" ]; then
    # 官方测试的最大堆为:-Xmx6g,初始化堆为:-Xms6g
    export KAFKA_HEAP_OPTS="-Xmx4g -Xms4g -XX:MetaspaceSize=96m -XX:+UseG1GC -XX:MaxGCPauseMillis=20 -XX:InitiatingHeapOccupancyPercent=35 -XX:G1HeapRegionSize=16M -XX:MinMetaspaceFreeRatio=50 -XX:MaxMetaspaceFreeRatio=80"
    #JMX 端口供 kafka eagle 监控使用
    export JMX_PORT="8888"
fi
...
·
5 创建依赖路径
mkdir -p /data/kafka/kkdata
·
6 启动
./bin/kafka-server-start.sh -daemon config/server.properties
# -daemon:以守护进程方式启动
·
7 验证 Kafka 集群是否正常
# 创建 test 主题
bin/kafka-topics.sh --zookeeper 10.0.30.31:2181,10.0.30.32:2181,10.0.30.33:2181 \
--create \
--partitions 3 \
--replication-factor 2 \
--topic test
# 查看 test 主题详细信息
bin/kafka-topics.sh --describe \
--zookeeper 10.0.30.31:2181,10.0.30.32:2181,10.0.30.33:2181 \
--topic test
Topic:test	PartitionCount:3	ReplicationFactor:2	Configs:
	Topic: test	Partition: 0	Leader: 31	Replicas: 31,32	Isr: 31,32
	Topic: test	Partition: 1	Leader: 32	Replicas: 32,33	Isr: 32,33
	Topic: test	Partition: 2	Leader: 33	Replicas: 33,31	Isr: 33,31
# 为 test 主题生产数据
bin/kafka-console-producer.sh --broker-list 10.0.30.31:9092,10.0.30.32:9092,10.0.30.33:9092 \
--topic test
>123
>456
>789
>bye
#消费 test 主题
bin/kafka-console-consumer.sh --zookeeper 10.0.30.31:2181,10.0.30.32:2181,10.0.30.33:2181 \
--from-beginning \
--topic test
Using the ConsoleConsumer with old consumer is deprecated and will be removed in a future major release. Consider using the new consumer by passing [bootstrap-server] instead of [zookeeper].
789
456
123
bye
# 或者
bin/kafka-console-consumer.sh --bootstrap-server 10.0.30.31:9092,10.0.30.32:9092,10.0.30.33:9092 \
--from-beginning \
--topic test
456
789
123
bye
# 删除 test 主题
bin/kafka-topics.sh  --zookeeper 10.0.30.31:2181,10.0.30.32:2181,10.0.30.33:2181 \
--delete \
--topic test
# 查看主题列表
bin/kafka-topics.sh --zookeeper 10.0.30.31:2181,10.0.30.32:2181,10.0.30.33:2181 \
--list
·
部署 Elasticsearch 集群
详细信息可参考官方相关文档。
·
操作系统优化
·
1 设置打开的文件句柄数和线程数
vim /etc/security/limits.conf
#添加
# soft:软限制;hard:硬限制
# nproc:单个用户可打开的进程最大数
# nofile:单个进程打开文件最大数
# as:地址空间限制(unlimited:无限)
# fsize:最大文件大小
# memlock:最大锁定内存地址空间
*               soft    nproc           65536
*               hard    nproc           65536
*               soft    nofile          65536
*               hard    nofile          65536
*               -       as              unlimited
*               -       fsize           unlimited
*               -       memlock         unlimited
·
2 关闭 swap 交换空间
swapoff -a && sed -i '/swap/s/^.*$/#&/' /etc/fstab
·
3 设置虚拟内存大小和 TCP 超时重传次数
vim /etc/sysctl.conf
#添加
vm.max_map_count=262144
net.ipv4.tcp_retries2=5
#默认情况下 TCP keepalive 时间为 60 秒,超时重传 15 次。

sysctl -p
·
开始安装 Elasticsearch
PS:elasticsearch 集群配置中,除了node.name和侦听地址(network.host)不相同外,其余配置均可一致。
·
1 配置主机名解析
cat << "EOF" >>  /etc/hosts
10.0.30.34 elk-elasticsearch01
10.0.30.35 elk-elasticsearch02
10.0.30.36 elk-elasticsearch03
EOF
·
2 下载&解压 Elasticsearch
tar -xvf elasticsearch-7.9.1-linux-x86_64.tar.gz -C /usr/local/
·
3 创建 esuser 用户
useradd -u 9200 esuser
echo "111111" | passwd --stdin esuser
chown -R esuser:esuser /usr/local/elasticsearch-7.9.1
·
4 生成证书和私钥供 xpack 使用(只在一个节点上操作)
cd /usr/local/elasticsearch-7.9.1

# 创建一个 CA 机构
./bin/elasticsearch-certutil ca

# 生成证书和私钥
./bin/elasticsearch-certutil cert --ca elastic-stack-ca.p12

# 放到规划的目录下
mkdir ./config/certs/
mv elastic-certificates.p12 ./config/certs/

# 将 elastic-certificates.p12 传输到 ES 集群内的其他节点上
scp -r ./config/certs/ esuser@elk-elasticsearch02:/usr/local/elasticsearch-7.9.1/config
scp -r ./config/certs/ esuser@elk-elasticsearch03:/usr/local/elasticsearch-7.9.1/config
·
5 修改配置文件
vim config/elasticsearch.yml
#### 主要关注以下配置 ####
#集群名称
cluster.name: vlan30-log-collection-system
#节点名称
node.name: elk-elasticsearch01

#一些路径定义
path.data: /data/elasticsearch/es_data
path.logs: /data/elasticsearch/logs
#path.plugins: /data/elasticsearch/plugins
#path.scripts: /data/elasticsearch/scripts

#侦听 IP
network.host: 10.0.30.34
#http 端口
http.port: 9200
#elasticsearch 集群内部通信端口
transport.port: 9300

#elasticsearch 集群节点列表
discovery.seed_hosts: ["10.0.30.34:9300", "10.0.30.35:9300", "10.0.30.36:9300"]
#初始化 elasticsearch 集群时,master 节点列表(建议只写一个)
cluster.initial_master_nodes: ["10.0.30.34:9300"]

#锁定初始堆大小
bootstrap.memory_lock: true

#下面配置是开启 xpack
xpack.security.enabled: true
xpack.security.transport.ssl.enabled: true
xpack.security.transport.ssl.verification_mode: certificate
xpack.security.transport.ssl.keystore.path: certs/elastic-certificates.p12
xpack.security.transport.ssl.truststore.path: certs/elastic-certificates.p12

# HTTPS 相关配置暂未成功
#xpack.security.http.ssl.enabled: true
#xpack.security.http.ssl.keystore.path: certs/elastic-certificates.p12
#xpack.security.http.ssl.truststore.path: certs/elastic-certificates.p12
·
6 JVM 优化
vim config/jvm.options
#### 主要关注以下配置 ####
-Xms4g   #-Xms 和 -Xmx 大小最好相同。
-Xmx4g   #-Xmx 不要超过物理内存的 50%,最大不超过 32G。
-XX:HeapDumpPath=/data/elasticsearch/jvm/heapdump
-XX:ErrorFile=/data/elasticsearch/logs/hs_err_pid%p.log
-Xloggc:/data/elasticsearch/logs/gc.log
# 8:-Xloggc:/data/elasticsearch/logs/gc.log
#+ 前面的 8: 表示 JVM 版本为 8 时,才匹配。
·
7 声明临时路径变量
echo "export ES_TMPDIR=/data/elasticsearch/temp/" >> /etc/profile
source /etc/profile
·
8 创建需要的路径并授权
mkdir -p /data/elasticsearch/{es_data,logs,temp}
mkdir -p /data/elasticsearch/jvm/heapdump
chown -R esuser:esuser /data/elasticsearch

mkdir /usr/local/elasticsearch-7.9.1/temp
chown -R esuser:esuser /usr/local/elasticsearch-7.9.1/
·
9 启动 elasticsearch
su - esuser
cd /usr/local/elasticsearch-7.9.1
./bin/elasticsearch -d -p temp/elasticsearch.pid
·
10 所有节点都启动后,在 master 节点激活内置用户密码
./bin/elasticsearch-setup-passwords interactive
future versions of Elasticsearch will require Java 11; your Java version from [/usr/local/jdk1.8.0_281/jre] does not meet this requirement
Initiating the setup of passwords for reserved users elastic,apm_system,kibana,kibana_system,logstash_system,beats_system,remote_monitoring_user.
You will be prompted to enter passwords as the process progresses.
Please confirm that you would like to continue [y/N]y


Enter password for [elastic]:
Reenter password for [elastic]:
Enter password for [apm_system]:
Reenter password for [apm_system]:
Enter password for [kibana_system]:
Reenter password for [kibana_system]:
Enter password for [logstash_system]:
Reenter password for [logstash_system]:
Enter password for [beats_system]:
Reenter password for [beats_system]:
Enter password for [remote_monitoring_user]:
Reenter password for [remote_monitoring_user]:
Changed password for user [apm_system]
Changed password for user [kibana_system]
Changed password for user [kibana]
Changed password for user [logstash_system]
Changed password for user [beats_system]
Changed password for user [remote_monitoring_user]
Changed password for user [elastic]
·
11 验证集群是否正常
PS: 开启 xpack 后,需要用户认证,使用 elastic 用户。
·
部署 Kibana
详细信息可参考官方相关文档。
·
1 下载&解压 Kibana
tar -xvf kibana-7.9.1-linux-x86_64.tar.gz -C /usr/local
·
2 修改配置文件
cd /usr/local/kibana-7.9.1-linux-x86_64
vim config/kibana.yml
#### 主要关注以下配置 ####
server.port: 5601
server.host: "172.168.30.30"
elasticsearch.hosts: ["http://10.0.30.34:9200","http://10.0.30.35:9200","http://10.0.30.36:9200"]
elasticsearch.username: "kibana"
elasticsearch.password: "111111"
pid.file: /usr/local/kibana-7.9.1-linux-x86_64/temp/kibana.pid
i18n.locale: "zh-CN"
·
3 创建 kibana 用户和依赖目录,并授权
useradd -u 5601 kibana
mkdir /usr/local/kibana-7.9.1-linux-x86_64/temp
chown -R kibana:kibana /usr/local/kibana-7.9.1-linux-x86_64
·
4 启动 Kibana
su - kibana
cd /usr/local/kibana-7.9.1-linux-x86_64
./bin/kibana
#后台启动
#nohup ./bin/kibana > /dev/null &
PS: 当启动报如下错误(The Reporting plugin encountered issues launching Chromium in a self-test. You may have trouble generating reports.)

参考官方文档,安装依赖包:
yum -y install ipa-gothic-fonts xorg-x11-fonts-100dpi xorg-x11-fonts-75dpi xorg-x11-utils xorg-x11-fonts-cyrillic xorg-x11-fonts-Type1 xorg-x11-fonts-misc fontconfig freetype
·
5 验证配置是否正常
URL:http://IP:5601
PS: 开启 xpack 后,需要用户认证,使用 elastic 用户。

·
部署 Cerebro
Github 地址:https://github.com/lmenezes/cerebro
Cerebro 是一个开源的 Elasticsearch WEB 管理工具,使用 Scala、Play 框架、AngularJS 和 Bootstrap 构建。
·
1 下载&解压 Cerebro
tar -xvf cerebro-0.9.4.tgz -C /usr/local/
·
2 配置 Java 环境
tar -xvf jdk-8u281-linux-x64.tar.gz -C /usr/local/

#Cerebro 必须以软连接的方式配置 Java 环境
ln -vs /usr/local/jdk1.8.0_281/bin/java* /usr/bin/
·
3 修改配置文件
cd /usr/local/cerebro-0.9.4
vim conf/application.conf
### 主要关注如下配置 ####

#指定 pid 文件
pidfile.path=/usr/local/cerebro-0.9.4/temp/cerebro.pid

#修改命令历史记录(默认50)
rest.history.size = 100

#配置自己常用的 Elasticsearch 地址,方便使用
hosts = [
  {
    host = "http://10.0.30.34:9200"   # host 只支持字符串,不支持列表
    name = "vlan30-log-collection-system"
    auth = {
      username = "elastic"
      password = "111111"
    }
    headers-whitelist = [ "x-proxy-user", "x-proxy-roles", "X-Forwarded-For" ]
  }
]
·
4 创建依赖目录
mkdir /usr/local/cerebro-0.9.4/temp
·
5 编写启动脚本
cat << "EOF" > /usr/lib/systemd/system/cerebro.service
[Unit]
Description=cerebro
Documentation=https://github.com/lmenezes/cerebro
After=network-online.target
Wants=network-online.target

[Service]
EnvironmentFile=/usr/local/cerebro-0.9.4/conf/application.conf
ExecStart=/usr/local/cerebro-0.9.4/bin/cerebro
KillMode=process
Restart=on-failure
RestartSec=42s

[Install]
WantedBy=multi-user.target
EOF
·
6 启动 cerebro
systemctl daemon-reload
systemctl start cerebro && systemctl enable cerebro
·
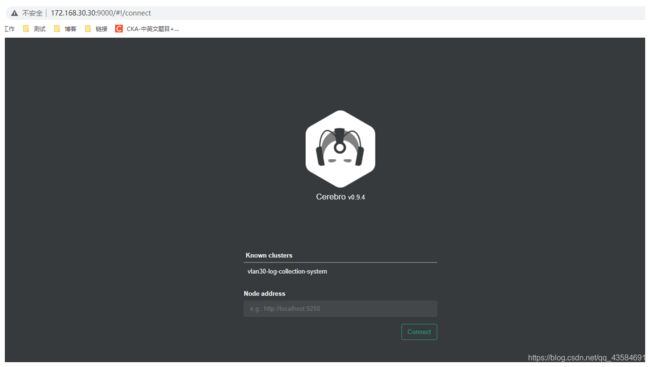
7 访问&连接 Elasticsearch
·
部署 Kafka-eagle
官网:https://www.kafka-eagle.org/
下载地址:http://download.kafka-eagle.org/
GitHub:https://github.com/smartloli/kafka-eagle
·
环境配置
1 安装 MySQL
步骤省略…,需要的小伙伴可以参考文章:MariaDB 的二进制包安装方式
·
2 创建 ke 库
CREATE DATABASE ke DEFAULT CHARACTER SET utf8mb4 COLLATE utf8mb4_unicode_ci;
·
3 创建&授权 kafka_eagle 用户/密码
grant all on ke.* to kafka_eagle@"10.0.30.%" identified by "123456";
·
4 需要开启 kafka 的 JMX 端口,不然获取不到监控数据
PS: 部署 kafka 集群的时候已经开启。
·
开始安装 Kafka-eagle
·
1 配置 Java 环境
步骤省略…,安装 cerebro 的时候已经配置。
·
2 下载&解压 Kafka-eagle
tar -xvf kafka-eagle-bin-2.0.5.tar.gz
cd kafka-eagle-bin-2.0.5
tar -xvf kafka-eagle-web-2.0.5-bin.tar.gz -C /usr/local/
cd /usr/local/
mv kafka-eagle-web-2.0.5 kafka-eagle
·
3 配置 Kafka-eagle 环境
cat << "EOF" > /etc/profile.d/kafka-eagle.sh
export KE_HOME=/usr/local/kafka-eagle
export PATH=$PATH:$KE_HOME/bin
EOF

source /etc/profile
·
4 修改 Kafka-eagle 配置文件
cd /usr/local/kafka-eagle/
vim conf/system-config.properties
#### 主要关注以下配置 ####

#kafka 集群别名(多个用逗号分隔,最好就用cluster1,不然对应的配置都需要改)
kafka.eagle.zk.cluster.alias=cluster1

#kafka 集群的 zk 地址列表
cluster1.zk.list=10.0.30.31:2181,10.0.30.32:2181,10.0.30.33:2181

#kafka broker 大小列表
cluster1.kafka.eagle.broker.size=20

#Zookeeper 客户端的 Kafka Eagle 最大连接数
kafka.zk.limit.size=32

# kafka eagle 端口
kafka.eagle.webui.port=8048

# kafka 集群的 offset 存储位置
cluster1.kafka.eagle.offset.storage=kafka

#开启 metrics
kafka.eagle.metrics.charts=true
#保留 metrics 的时间(天)
kafka.eagle.metrics.retain=15

#使用 eagle 删除主题时的 token
kafka.eagle.topic.token=keadmin

#连接 MySQL 的配置
kafka.eagle.driver=com.mysql.cj.jdbc.Driver
kafka.eagle.url=jdbc:mysql://10.0.30.30:3306/ke?useUnicode=true&characterEncoding=UTF-8&zeroDateTimeBehavior=convertToNull
kafka.eagle.username=kafka_eagle
kafka.eagle.password=123456
·
5 启动 Kafka-eagle
cd /usr/local/kafka-eagle
chmod +x bin/ke.sh

./bin/ke.sh start

#重启:./bin/ke.sh restart
#关闭:./bin/ke.sh stop
·
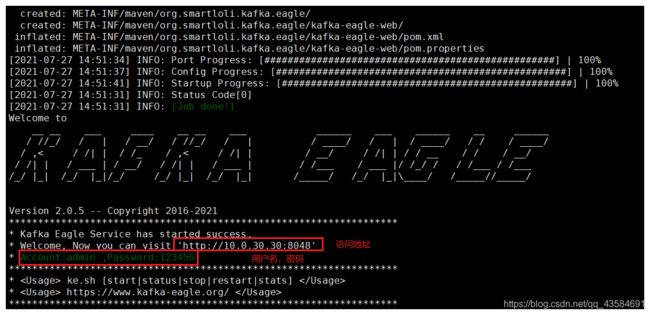
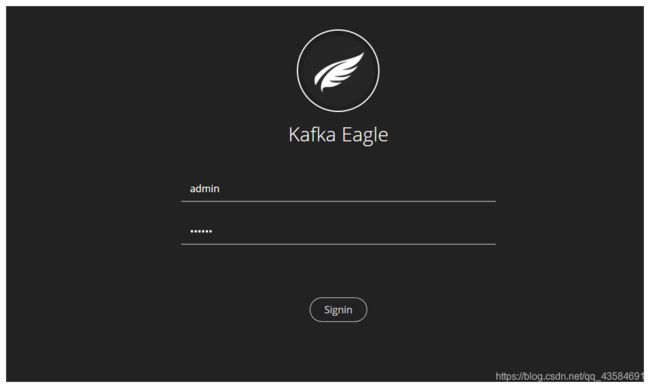
6 访问 Kafka-eagle
·
部署 Filebeat
详细信息可参考官方相关文档。
·
1 下载&解压 Filebeat
tar -xvf filebeat-7.9.1-linux-x86_64.tar.gz -C /usr/local/
·
2 编写配置文件(文件名任意即可)
PS: 我需要收集的日志是多个节点的 /app/node1-8080/logs/*.log 和 /app/node2-8090/logs/*.log,所以添加了 fields 的 project 和 label,在 output 中通过使用 project 来区分项目;在 kibana 中 通过使用 label 来区分负载节点,当出现报错时,便于定位。
cd /usr/local/filebeat-7.9.1-linux-x86_64
vi wpf-test-filebeat.yml

filebeat.inputs:
- type: log
  enabled: true
  paths:
    - /app/node1-8080/logs/wpf-test-*.log

  # 添加字段
  fields:
    project: wpf-test
    label: 71-8080
  feilds_under_root: true

#### 收集 Java 报错日志的正则匹配
  #定义第一行以 202 开头,日期格式为:%Y-%m-%d %H:%M:%S ......
  #+ (2021-07-28 14:30:18 ......)
  multiline.pattern: '^202'
  #定义是否对上面的正则匹配取反
  #+ 为 true 时,表示取反,即不以 202 开头的行合并到上一行
  #+ 为 false 时,表示不取反。一般都为 true。
  multiline.negate: true
  #定义合并到行尾(after)还是行首(before)。一般都为 after。
  multiline.match: after


- type: log
  enabled: true
  paths:
    - /app/node2-8090/logs/wpf-test-*.log

  fields:
    project: wpf-test
    label: 71-8090
  feilds_under_root: true

  multiline.pattern: '^202'
  multiline.negate: true
  multiline.match: after


#### 输出至 kafka 集群
output.kafka:
  enabled: true
  hosts: ["10.0.30.31:9092", "10.0.30.32:9092", "10.0.30.33:9092"]

  #主题名可以引用上面增加的字段
  topic: '%{[fields.project]}-topic'

  #reachable_only为 true 时,事件将仅发布到可用分区,会导致分布不均
  partition.round_robin:
    reachable_only: false
  required_acks: 1

  compression: gzip
  compression_level: 4
·
3 启动 filebeat
./filebeat -e -c wpf-test-filebeat.yml
# -c:指定配置文件
# -e:输出日志到终端
# 后面使用 supervisor 管理 filebeat 进程
PS: 在测试阶段,如果想要 filebeat 多次从头读取日志,可以在你的 filebeat 路径下面的 data 中查找 registry 文件,它记录了读取文件的位置信息。里面有 log.json 和 meta.json 两个文档,删除 log.json 即可。
·
4 查看 Kafka-eagle,看主题是否正常写入。
5 使用 supervisor 管理 filebeat 进程
#安装 Supervisor
yum -y install supervisor

#编辑配置文件:主配置文件是 /etc/supervisord.conf
#增加 filebeat 子配置文件
vim /etc/supervisord.d/filebeat.ini
[program:filebeat]
command=/usr/local/filebeat-7.9.1-linux-x86_64/filebeat -e -c /usr/local/filebeat-7.9.1-linux-x86_64/wpf-test-filebeat.yml
directory=/usr/local/filebeat-7.9.1-linux-x86_64/
autostart=true
autorestart=true
stdout_logfile=/var/log/supervisor/filebeat.log
redirect_stderr=true
user=root

#启动&自启 supervisord
systemctl start supervisord && systemctl enable supervisord

#查看状态
supervisorctl status
·
部署 Logstash
详细信息可参考官方相关文档。
·
1 下载&解压 Logstash
tar -xvf logstash-7.9.1.tar.gz -C /usr/local/
·
2 配置 Java 环境
tar -xvf jdk-8u281-linux-x64.tar.gz -C /usr/local/
ln -vs /usr/local/jdk1.8.0_281/bin/java* /usr/bin/
·
3 编辑配置文件(文件名任意即可)
cd /usr/local/logstash-7.9.1/
vim config/wpf-test-logstash.conf
#消费 kafka 的配置
input{
    kafka {
        bootstrap_servers => "10.0.30.31:9092,10.0.30.32:9092,10.0.30.33:9092"
        topics => "wpf-test-topic"
        group_id => "vlan30-logstash"
        decorate_events => true
        consumer_threads => 3
        auto_offset_reset => "earliest"
        codec => "json"
    }
}

#先直接输出到终端,进行调试
output {
  stdout {
    codec => "rubydebug"
  }
}
·
4 启动 logstash
cd /usr/local/logstash-7.9.1
./bin/logstash -f config/wpf-test-logstash.conf
# 后面使用 supervisor 管理 logstash 进程
·
5 输出没问题后,修改配置文件输出至 Elasticsearch
PS: 我这里收集的 Java 日志,暂时只是供开发人员进行故障排查时使用,使用场景简单,所以不需要配置 filter 模块。
#消费 kafka 的配置
input{
    kafka {
        bootstrap_servers => "10.0.30.31:9092,10.0.30.32:9092,10.0.30.33:9092"
        topics => "wpf-test-topic"
        group_id => "vlan30-logstash"
        decorate_events => true
        consumer_threads => 3
        auto_offset_reset => "earliest"
        codec => "json"
    }
}

#多个项目日志可根据 if 判断输出不同的索引
output{
    if [fields][project] == "wpf-test"{
        elasticsearch {
            hosts => ["10.0.30.34:9200","10.0.30.35:9200","10.0.30.36:9200"]
            index => "log-wpf-test-%{+YYYY.MM.dd}"
            user => "elastic"
            password => "vlan30-elastic"
        }
        #stdout{
        #    codec=>rubydebug
        #}
    }
}
·
附加:自定义索引模板
PS: 我这里创建了一个索引模板,只是将 logstash 索引模板的分片数和副本数更改。
#在 kibana 的开发工具中查看 logstash 模板信息
GET _template/logstash

#复制 logstash 模板信息,将外层的 logstash {} 结构删除
...

#创建新的 logstash 模板
PUT _template/logstash-new
{
    "order" : 0,
    "version" : 60001,
    "index_patterns" : [
      "log-*"      #匹配的索引名称(logstash输出时配置索引名以"log-"开头)
    ],
    "settings" : {
      "index" : {
        "number_of_shards" : "3",     #分片数
        "refresh_interval" : "5s",
        "number_of_replicas": "0"     #副本数
      }
    },
    "mappings" : {
......
·
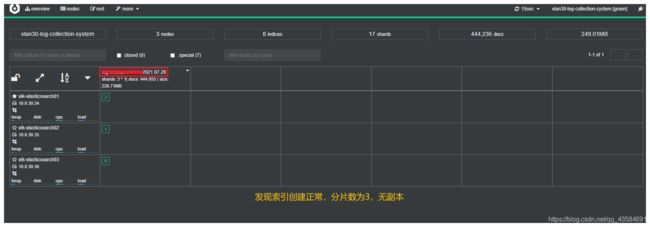
6 查看 cerebro,看索引是否正常创建
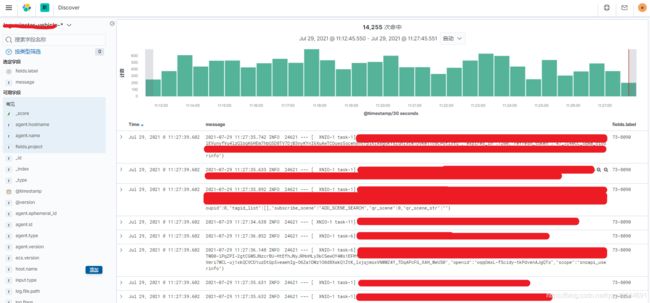
7 最后在 kibana 上查看日志信息
8 使用 supervisor 管理 logstash 进程
#安装 Supervisor
yum -y install supervisor

#编辑配置文件:主配置文件是 /etc/supervisord.conf
#增加 logstash 子配置文件
vim /etc/supervisord.d/logstash.ini
[program:logstash]
command=/usr/local/logstash-7.9.1/bin/logstash -f /usr/local/logstash-7.9.1/config/wpf-test-logstash.conf
directory=/usr/local/logstash-7.9.1
autostart=true
autorestart=true
stdout_logfile=/var/log/supervisor/logstash.log
redirect_stderr=true
user=root

#启动&自启 supervisord
systemctl start supervisord && systemctl enable supervisord

#查看状态
supervisorctl status
至此,ELK + Kafka 部署完毕。
·
附加:收集 Nginx 日志的相关配置文件
·
配置 Nginx 的日志格式为 json
......
http {
    #获取 clientRealIp
    map $http_x_forwarded_for  $clientRealIp {
        ""    $remote_addr;
        ~^(?P<firstAddr>[0-9\.]+),?.*$    $firstAddr;
    }
......
     #自定义日志格式
    log_format main_json '{"accessip_list":"$proxy_add_x_forwarded_for","client_ip":"$clientRealIp","http_host":"$host","@timestamp":"$time_iso8601","method":"$request_method","url":"$request_uri","status":"$status","http_referer":"$http_referer","body_bytes_sent":"$body_bytes_sent","request_time":"$request_time","http_user_agent":"$http_user_agent","total_bytes_sent":"$bytes_sent","server_ip":"$server_addr"}';
......
    #使用自定义的日志
    location /test1 {
        root html;
        index index.html;
        access_log  /var/log/nginx/test1-access.log  main_json;
    }

    location /test2 {
        root html;
        index index.html;
        access_log  /var/log/nginx/test2-access.log  main_json;
    }
......
·
日志格式详解
{
	"accessip_list": "172.168.20.253",
	"client_ip": "172.168.20.253",
	"http_host": "172.168.30.126",
	"@timestamp": "2021-06-17T17:15:39+08:00",
	"method": "GET",
	"url": "/test1/",
	"status": "200",
	"http_referer": "-",
	"body_bytes_sent": "16",
	"request_time": "0.000",
	"http_user_agent": "Mozilla/5.0 (Windows NT 10.0; Win64; x64) AppleWebKit/537.36 (KHTML, like Gecko) Chrome/91.0.4472.106 Safari/537.36",
	"total_bytes_sent": "252",
	"server_ip": "172.168.30.126"
}
#accessip_list : 输出时代理叠加而成的 IP 地址列表
#client_ip : 客户端访问真实 IP
#http_host : 客户端请求的地址。也就是浏览器输入的 IP or 域名
#@timestamp : 表示请求的时间
#method : 表示 HTTP 请求方法(GET or POST)
#url : 表示客户端请求参数的原始 URL
#status : 表示状态码
#http_reserer : 表示来源页面,即从哪个页面请求过来的,专业名称叫 referer
#body_bytes_sent : 表示发送客户端的字节数,不包括响应头的大小
#request_time : 表示请求处理时间(单位为秒,精度毫秒)
#http_user_agent : 表示用户浏览器信息。例如浏览器版本、类型等
#total_bytes_sent : 表示传输给客户端字节数
#server_ip : 表示本地服务器的 IP 地址信息
·
Filebeat 配置文件
filebeat.inputs:
- type: log
  enabled: true
  paths:
    - /var/log/nginx/test1-access.log

#添加字段,用来区分项目
  fields:
    service: nginx
    project: test1
  feilds_under_root: true

- type: log
  enabled: true
  paths:
    - /var/log/nginx/test2-access.log

#添加字段,用来区分项目
  fields:
    service: nginx
    project: test2
  feilds_under_root: true

#可以先输出到控制台,验证日志收集是否正常
#output.console:
#  pretty: true

#输出至 kafka 配置
output.kafka:
  enabled: true
  hosts: ["10.0.30.31:9092", "10.0.30.32:9092", "10.0.30.33:9092"]
  #主题名可以引用上面增加的字段
  topic: '%{[fields.service]}-topic'

  #reachable_only为 true 时,事件将仅发布到可用分区,会导致分布不均
  partition.round_robin:
    reachable_only: false

  required_acks: 1

  compression: gzip
  compression_level: 4
·
Logstash 配置文件
#消费 kafka 的配置
input{
    kafka {
        bootstrap_servers => "10.0.30.31:9092,10.0.30.32:9092,10.0.30.33:9092"
        topics => "nginx-topic"
        group_id => "logstash"
        decorate_events => true
        consumer_threads => 3
        auto_offset_reset => "earliest"
        codec => "json"
    }
}

#将 message 转换为 json 格式
filter {
    json {
        source => "message"
        remove_field => "message"
    }
}

# fields.project 为 test1 的写入 nginx-test1-* 索引
# fields.project 为 test2 的写入 nginx-test2-* 索引
output{
    if [fields][project] == "test1"{
        elasticsearch {
            hosts => ["10.0.30.31:9200","10.0.30.32:9200","10.0.30.33:9200"]
            index => "nginx-test1-%{+YYYY.MM.dd}"
            user => "elastic"
            password => "111111"
        }
    }
    if [fields][project] == "test2" {
        elasticsearch {
            hosts => ["10.0.30.31:9200","10.0.30.32:9200","10.0.30.33:9200"]
            index => "nginx-test2-%{+YYYY.MM.dd}"
            user => "elastic"
            password => "111111"
        }
    }
}
