微前端qiankun一步步教你做个超级无敌简单吊炸天的小栗子,不会你来打我
开始之前想问几个问题:
- 什么是微前端?有哪几种常见的解决方案?
- 为什么要是使用微前端,有什么样的场景使用微前端?
- qiankun方案怎么实现微前端?
前两个答案网上一大堆,可以自己去捞,捞不到大鱼的来找我,伸手党我来喂你。
qiankun方案怎么实现微前端才是本文重点,细细来探讨。
本文教程我用的是vue3,注意vue3和vue2在qinkun中的有部分代码是有差异的,别自己用的是vue3,在网上捞vue2的配置在qiankun中用,那我可以很肯定的告诉你,你绝逼会哭。
本文内容:
- qiankun的使用与技术栈无关,同时子应用也是可以自由选择开发框架的,可以自己制定开发规范。
- qiankun在开发环境下,主项目和全部子项目都会运行起来,如果子项目没有运行起来,当主项目菜单切到该子项目的时候,会打不开。所以在开发环境就会跑起多个服务。
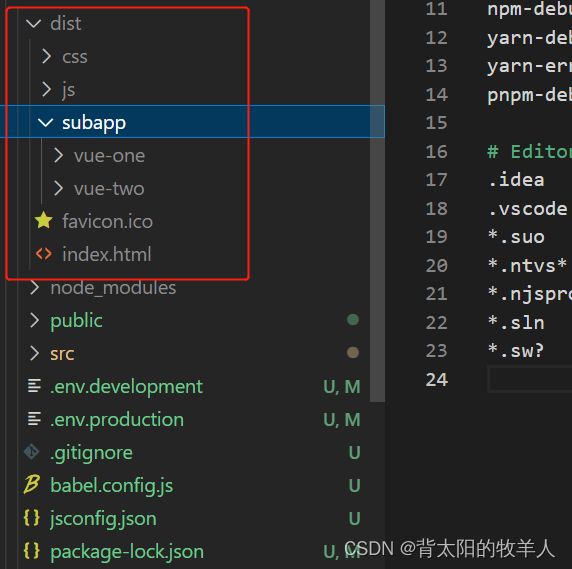
- 部署的时候,主项目和子项目都需要分别打包,通常在主项目创建一个文件夹,子项目都打包后,放在主项目文件夹下面。这样之后跑起一个服务,同时可以使用子项目的路径,独自运行子项目。
一、初始化项目
1,创建一个文件夹qiankun-demo,并初始化。
npm init --yes
2,安装npm-run-all,只是一个辅助开发用的库,所以加上-dev
npm i npm-run-all --save-dev
npm-run-all 提供了多种运行多个命令的方式,常用的有以下几个:
–parallel: 并行运行多个命令,例如:npm-run-all --parallel lint build
–serial: 多个命令按排列顺序执行,例如:npm-run-all --serial clean lint build:**
–continue-on-error: 是否忽略错误,添加此参数 npm-run-all 会自动退出出错的命令,继续运行正常的
–race: 添加此参数之后,只要有一个命令运行出错,那么 npm-run-all 就会结束掉全部的命
2,接着在这个文件夹里面创建主项目main、两个子项目vue-one、vue-two
vue create main
vue create vue-one
vue create vue-two
老铁们,下面就是重点了。
配置主文件
1,子项目的端口号必须固定,不然端口号不同导致匹配不上。
新建2个环境配置文件
.env.development配置开发环境
VUE_APP_VUE_ONE=http://localhost:5501
VUE_APP_VUE_TWO=http://localhost:5502
.env.production配置生产环境
VUE_APP_VUE_ONE=http://localhost:5050/subapp/vue-one/
VUE_APP_VUE_TWO=http://localhost:5050/subapp/vue-two/
这里将开发环境子应用端口固定好,并将生产环境(http://localhost:5050)中的域名和子应用的访问路径写好(这里之所以有/subapp/vue-one/,是因为后面会新建个subapp文件夹并存放打包后的子项目)
2、主项目安装qiankun,子项目不需要
cd main && npm i qiankun --save
同时顺便也固定主项目的端口(可选),修改下主项目的vue.config.js
module.exports = {
  devServer: {
    port: 5500,
  },
  chainWebpack: config => {
    config.plugin('html')
      .tap((args) => {
        args[0].title = 'qiankun-test'
        return args
      })
  }
};
3、注册子项目。
在main主项目的src下新建micro-app.js:
const microApps = [
    {
        name: 'vue-one',
        entry: process.env.VUE_APP_VUE_ONE,
        activeRule: '/vue-one'
    },
    {
        name: 'vue-two',
        entry: process.env.VUE_APP_VUE_TWO,
        activeRule: '/vue-two'
    }
]

const apps = microApps.map(item => {
    return {
        ...item,
        container: '#subapp-viewport', // 子应用挂载的div
        props: {
            routerBase: item.activeRule, // 下发基础路由
        }
    }
})

export default apps
- 建议name与子项目的package里的name字段保持一致,保持唯一性
- entry是子项目入口,生产环境和开发环境地址是不一样的,这里使用了main文件中我们之前创建的环境文件中的值
- activeRule是子项目在主项目中的路由地址,建议后面也是项目名,统一一下会没那么乱
- container是主项目中的挂载容器id
- routerBase是主项目下发到子项目,可以在子项目中获取的到,这个到时候在子应用的路由中需要用到,用于设置路由的base路径

4、主项目main.js加载qiankun配置并启动
import { createApp } from "vue";
import App from './App.vue'
import { registerMicroApps, start, setDefaultMountApp } from 'qiankun'
import microApps from './micro-app'

const app = createApp(App);
app.mount("#app");

const config = {
    beforeLoad: [
        app => {
            console.log("%c before load",
                'background:#0f0 ; padding: 1px; border-radius: 3px;  color: #fff',
                app);
        }
    ], // 挂载前回调
    beforeMount: [
        app => {
            console.log("%c before mount",
                'background:#f1f ; padding: 1px; border-radius: 3px;  color: #fff',
                app);
        }
    ], // 挂载后回调
    afterUnmount: [
        app => {
            console.log("%c after unload",
                'background:#a7a ; padding: 1px; border-radius: 3px;  color: #fff',
                app);
        }
    ] // 卸载后回调
}
registerMicroApps(microApps, config)
setDefaultMountApp(microApps[0].activeRule) // 默认打开第一个子项目
start()
5、主项目公共菜单切换部分和容器部分
修改主项目的App.vue
<template>
  <div id="app">
    <div class="layout-header">
      <div class="logo">QIANKUN-WUZHIQUAN</div>
      <ul class="sub-apps">
        <li v-for="item in microApps" :class="{ active: item.activeRule === current }" :key="item.name"
          @click="goto(item)">{{ item.name }}</li>
      </ul>
    </div>
    <div id="subapp-viewport"></div>
  </div>
</template>

<script>
import microApps from './micro-app'

export default {
  name: 'App',
  data() {
    return {
      microApps,
      current: '/sub-vue'
    }
  },
  methods: {
    goto(item) {
      console.log(item)
      this.current = item.activeRule
      history.pushState(null, item.activeRule, item.activeRule) // 没引入路由,所以不能用路由切换
    },
  },
  created() {
    const path = window.location.pathname
    if (this.microApps.findIndex(item => item.activeRule === path) >= 0) {
      this.current = path
    }
  },
}
</script>

<style>
html,
body {
  margin: 0 !important;
  padding: 0;
}

.layout-header {
  height: 50px;
  width: 100%;
  box-shadow: 0 2px 8px rgba(0, 0, 0, 0.1);
  line-height: 50px;
  position: relative;
}

.logo {
  float: left;
  margin: 0 50px;
}

.sub-apps {
  list-style: none;
  margin: 0;
  overflow: hidden;
}

.sub-apps li {
  list-style: none;
  padding: 0 20px;
  cursor: pointer;
  float: left;
}

.sub-apps li.active {
  color: #42b983;
  text-decoration: underline;
}
</style>
至此主项目关键地方就搞完了,接着搞子项目。
配置子文件
子应用主要修改3个文件,vue.config.js、main.js,还有router下的index.js。
1、vue.config.js
const port = 5501;//端口要和main里面配置的入口一致
const { name } = require('../package.json')
module.exports = {
  publicPath: "./",
  devServer: {
    port,
    headers: {
      'Access-Control-Allow-Origin': '*'//需要支持跨域
    }
  },
  configureWebpack: {
    output: {
      // 把子应用打包成 umd 库格式
      library: `${name}-[name]`,
      libraryTarget: 'umd',
      chunkLoadingGlobal: `webpackJsonp_${name}`
    }
  }
};
- qiankun 是通过 fetch 去获取子应用注册时配置的静态资源url,所有静态资源必须是支持跨域的,那就得设置允许源了
- 涉及到子应用名称的,都统一使用package中的name字段,官方也是推荐使用的这个name
- 需要打包成umd格式,是为了让 qiankun 拿到子应用export 的生命周期函数
2、src/router/index.js改为只暴露routes,new Router改到main.js中声明
import HomeView from '../views/HomeView.vue'

const routes = [
  {
    path: '/',
    name: 'home',
    component: HomeView
  },
  {
    path: '/about',
    name: 'about',
    // route level code-splitting
    // this generates a separate chunk (about.[hash].js) for this route
    // which is lazy-loaded when the route is visited.
    component: () => import(/* webpackChunkName: "about" */ '../views/AboutView.vue')
  }
]

// const router = createRouter({
//   history: createWebHistory(process.env.BASE_URL),
//   routes
// })


export default routes;
3、main.js
import { createApp } from "vue";
import App from "./App.vue";
import routes from "./router";
import store from "./store";
import { createRouter, createWebHistory } from 'vue-router'

import "./styles/index.css"

let install = null;
function render(props = {}) {
    const { container, routerBase } = props;
    const router = createRouter({
        history: createWebHistory(window.__POWERED_BY_QIANKUN__ ? routerBase : process.env.BASE_URL),
        routes
    })

    install = createApp(App).use(store).use(router).mount(container ? container.querySelector("#app") : "#app")
}
if (window.__POWERED_BY_QIANKUN__) {
    // eslint-disable-next-line
    __webpack_public_path__ = window.__INJECTED_PUBLIC_PATH_BY_QIANKUN__;
} else {
    render();
}

export async function bootstrap() { }

export async function mount(props) {
    render(props);
}
console.log('install===', install)
export async function unmount() {
    console.log('install===', install)
    // install.unmount();
    // install._container.innerHTML = '';
    install = null;

}
- 需要暴露qiankun的生命周期函数
- 注意销毁,防止内存泄漏
- history模式下需要设置路由的base,值是子项目中的activeRule对应的值,在qiankun环境下使用。
- 子应用独立运行时
window.__POWERED_BY_QIANKUN__为false,执行render创建vue对象; - 运行在qiankun中时
window.__POWERED_BY_QIANKUN__为true,会执行mount周期函数,在mount这里创建vue对象
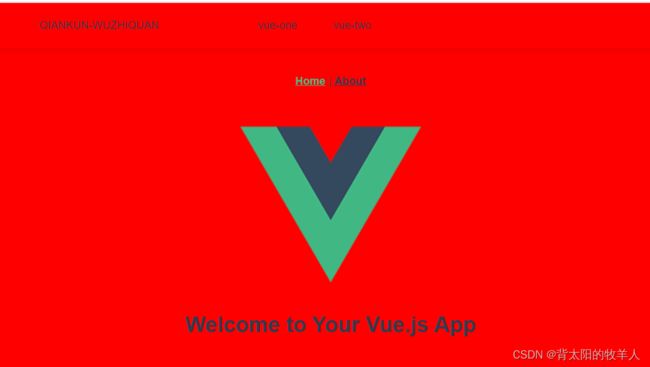
至此,本地开发的主项目和子项目都已经配置完了,分别将各个目录都跑起来,然后在浏览器中通过http://localhost:5500/就可以访问页面了。

点击下载源码学习
项目部署
我们在main项目的.env.production文件中配置了线上地址是http://localhost:5050,子项目存放在subapp文件夹下面,我们分别对main、sub-vue和sub-react进行打包,回到qiankun-demo执行npm run build即可

启动一个http://localhost:5050服务,将代码跑起来就好了。
用Nginx将本地vue打包的dist包运行起来
1,安装nginx,下载nginx选择Stable version稳定版即可,下载下来以后解压。
2,将dist包放入解压好的nginx文件夹中,如图所示

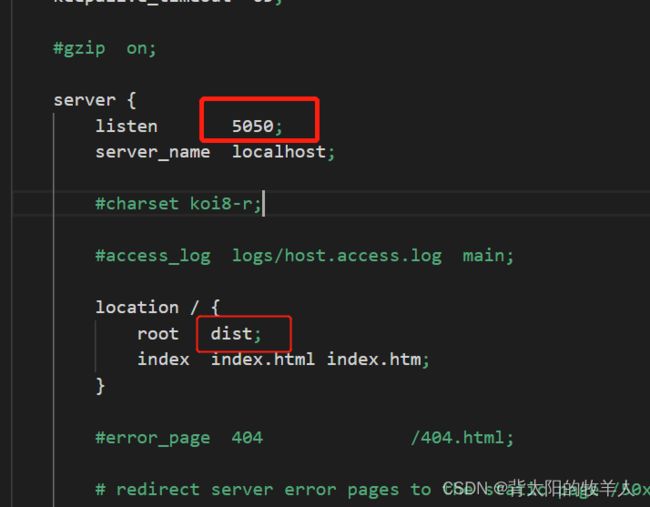
3,修改conf文件夹下的nginx.conf文件,修改两处即可,第一个为监听的端口号,第二个为dist,将文件保存(如果你打包到服务器上一般默认写80端口),这里我们主目录里面配置的是5050端口,所以就改成5050端口。

4.来到之前有nginx.exe的项目目录下,在此处运行命令提示符,运行start nginx将服务启动,就可以将打包好的dist文件跑起来了,localhost: + 你刚刚监听的端口号(localhost:5050)

what?刷新页面或者手动输入地址http://localhost:5050/vue-two/会显示404,这是因为我们的路由配置是history模式,在使用history路由模式的时候,相当于我们直接去请求服务器上当前接口,如果服务器上并没有这个接口,那么就会报错(hash模式并不会有这个问题,因为hash #后不会被添加到url请求中)
解决办法:
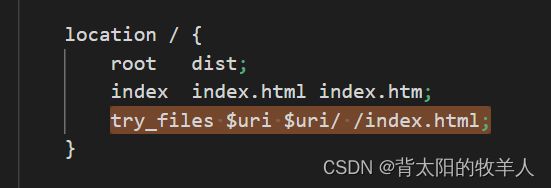
只需要在 location 模块添加一行配置: try_files $uri $uri/ /index.html

重新配置完以后再重启ngixn,以管理员身份运行命令nginx -s reload

接着再回去刷新我们的页面就不会再404了。