ospf路由选路及路由汇总
一、知识补充
1、ABR和ASBR
1.1 ABR
ABR指的是边界路由,通常位于两个或多个区域之间,用于在不同的OSPF区域之间传递信息。当一个路由器同时连接到两个或多个区域时,它就成为了ABR,它需要维护每个区域的拓扑信息和路由表,并在不同区域之间进行信息传递和路由交换。
1.2 ASBR
ASBR是指自治系统边界路由器,它是连接不同自治系统之间的路由器,用于在不同的自治系统之间传递路由信息。当一个路由器连接到不同的自治系统时,它就成为了ASBR,它需要维护每个自治系统的拓扑信息和路由表,并在不同自治系统之间进行信息传递和路由交换。
2、路由汇总
2.1 介绍
- 路由汇总( Route Aggregation ),又称路由聚合(Route Summarization),指的是把一组明细路由汇聚成一条汇总路由条目的操作
- 路由汇总能够减少路由条目数量、减小路由表规模,从而减轻路由器的资源消耗
- RIP、BGP等协议支持自动或者手工路由汇总,但OSPF仅支持手工路由汇总
- OSPF支持两种汇总:
- 部署在ABR上,域间路由汇总
- 部署在ASBR上,域外路由汇总
域内路由汇总
router ospf 1
area 2 range x.x.x.x y.y.y.y cost *
// x.x.x.x 汇总后的网段
// y.y.y.y 汇总后的子网掩码{非反掩码}
域外路由汇总
router ospf 1
summary-address x.x.x.x y.y.y.y
// x.x.x.x 汇总后的网段
// y.y.y.y 汇总后的子网掩码{非反掩码}
2.2汇总路由的计算
2.2.1例1 计算下述题目中的路由
loopback1-loopback6
lo1:10.1.1.1/24
lo2:10.1.2.1/24
lo3:10.1.3.1/24
lo4:10.1.4.1/24
lo5:10.1.5.1/24
lo6:10.1.6.1/24
1、首先将这6个IP地址转换为二进制,分别对齐排列,观察二进制地址。
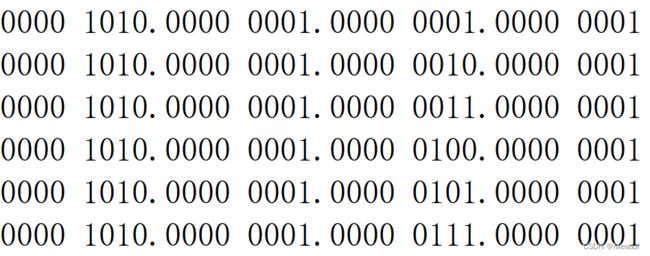
2、可以发现,前21位二进制数都一致,由此可以可以得出,前21位二进制数作网络位,剩余位数作主机位。

3、将主机位全部置为0,得出的二进制数转换为十进制,就得网络地址,一共有21个网络位,也就是掩码的简写为21位。
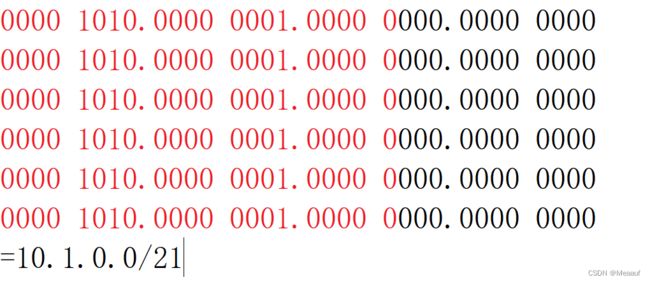
4、由此我们可以得出,汇总路由为10.1.0.0/21
例2 计算R2上的汇总路由
loopback1-loopback6
lo1:10.1.11.1/24
lo2:10.1.12.1/24
lo3:10.1.13.1/24
lo4:10.1.14.1/24
lo5:10.1.15.1/24
lo6:10.1.16.1/24
1、有一个技巧,我们只需要取地址区间的首尾两个地址作运算即可。【这里取10.1.11.1/24 10.1.16.1/24】

2、可以发现前面19位数一致,前19位作网络位,剩余位数作主机位。

3、将主机位全部置为0,转换为十进制,得出网络地址;相同位数即为子网掩码的缩写

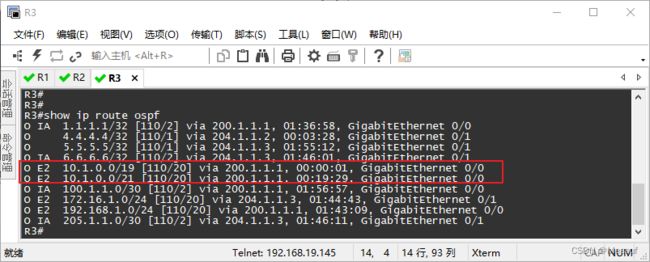
4、得出汇总路由为10.1.0.0/19
3、ospf区域认证
- 加密方式分为明文认证和加密认证
- 明文认证:密码在报文中可见
- 密文认证:密码在报文中不可见
- 验证方式分为接口认证、区域认证和虚链路认证
- 接口认证:仅针对一条链路上进行验证
- 区域认证:将路由器上属于某个特定区域的接口全部都激活相应的验证方式
- 虚链路认证:针对虚链路进行认证
接口认证–明文
int g0/0
ip ospf authentication   // 为该接口开启明文认证
ip ospf message-digest-key ruijie   // 接口下配置明文密钥“ruijie”
exit
接口认证–密文
int g0/0
ip ospf authentication message-digest  // 为该接口开启加密认证
ip ospf message-digest-key 1 md5 ruijie  // 接口下开启md5密钥“ruijie”
exit
区域认证–明文
router ospf 1
area 0 authentication   // 在ospf进程1的骨干区域开启区域认证
exit
int g0/0
ip ospf authentication-key ruijie   // 在所有属于骨干区域的接口下配置明文密钥"ruijie"
exit
区域认证–密文
router ospf 1
area 0 authentication message-digest  // 在ospf进程1的骨干区域中开启区域认证
exit
int g0/0
ip ospf message-digest-key 1 md5 ruijie  // 接口下开启md5密钥“ruijie”
exit
虚链路认证–明文
router ospf 1
area 0 virtual-link x.x.x.x authentication   // 开启明文认证
area 0 virtual-link x.x.x.x authentication-key ruijie  // 配置md5密钥
exit
虚链路认证–密文
router ospf 1
area 0 virtual-link x.x.x.x authentication message-digest  // 开启明文认证
area 0 virtual-link x.x.x.x authentication-key 1 md5 ruijie  // 配置md5密钥
exit
4、路由选路
OSPF协议中的"cost"值是指路由器到达目的地的开销,也可以理解为路径的代价。在OSPF协议中,每条链路都会被分配一个开销值,这个开销值取决于链路的带宽。一般来说,带宽越大,开销值就越小,表示该链路的优先级更高,路由器更倾向于通过这样的链路进行数据传输。开销值越小则越优先。
在标准的RFC2328中规定了不同速率链路的默认开销值,一般情况下:
- 10 Mbps链路的默认开销值为 1
- 100 Mbps链路的默认开销值为 1
- 1 Gbps链路的默认开销值为 1
因此,根据链路的带宽,可以计算出其对应的成本值。在实际网络部署中,也可以手动配置链路的成本值,以便根据具体网络情况进行调整和优化。
在路由器计算最短路径时,会考虑到各条路径上的开销值,选择总成本最小的路径作为最佳路径进行数据传输。因此,成本值在OSPF协议中扮演着重要的角色,影响着路由器的路由计算和数据传输路径选择。
二、配置需求及拓扑图
配置需求
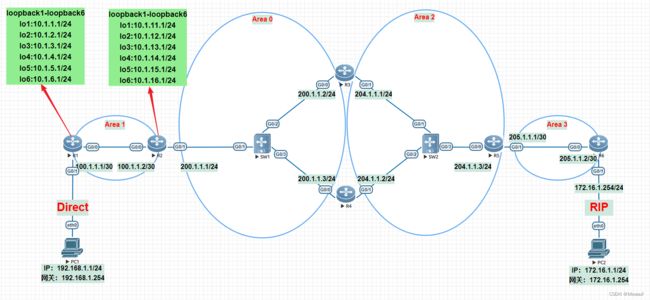
1、三层设备间配置ospf路由,进程号为1;R1需要引入本地直连路由;R6、PC2间配置RIP路由;在R6上配置重分发,将RIP发布到OSPF中;OSPF都需要宣告loopback地址。
2、在R1和R2上添加6个loopback地址,,模拟本地用户网段,宣告汇总路由。
3、在R1、R2间配置接口认证,明文密钥为Test@123 ;在R2、R3、R4、R5、R6间配置区域认证,使用md5加密,加密密钥为Test@456。
3、修改相关属性,PC1与PC2互通主链路为R1-R2-R4-R5;主链路故障时可以自动切换到备用链路。
三、配置步骤
基础配置不作描述
1、ospf的配置
R1
R1(config)#router ospf 1
R1(config-router)#router-id 1.1.1.1
Change router-id and update OSPF process! [yes/no]:y
R1(config-router)#network 100.1.1.1 0.0.0.3 area 1
R1(config-router)#netw
R1(config-router)#network 1.1.1.1 0.0.0.0 area 1
R1(config-router)#exit
R2
R2(config)#router ospf 1
R2(config-router)#router-id 2.2.2.2
Change router-id and update OSPF process! [yes/no]:y
R2(config-router)#netw
R2(config-router)#network 100.1.1.2 0.0.0.3 area 1
R2(config-router)#network 200.1.1.1 0.0.0.255 area 0
R2(config-router)#network 2.2.2.2 0.0.0.0 area 0
R2(config-router)#exit
R3
R3(config)#router ospf 1
R3(config-router)#router-id 3.3.3.3
Change router-id and update OSPF process! [yes/no]:y
R3(config-router)#network 200.1.1.2 0.0.0.255 area 0
R3(config-router)#network 3.3.3.3 0.0.0.0 area 0
R3(config-router)#network 204.1.1.1 0.0.0.255 area 2
R3(config-router)#exit
R4
R4(config)#router ospf 1
R4(config-router)#router-id 4.4.4.4
Change router-id and update OSPF process! [yes/no]:y
R4(config-router)#network 4.4.4.4 0.0.0.0 area 0
R4(config-router)#network 100.1.1.3 0.0.0.255 area 0
R4(config-router)#network 204.1.1.2 0.0.0.255 area 2
R4(config-router)#exit
R5
R5(config)#router ospf 1
R5(config-router)#router-id 5.5.5.5
Change router-id and update OSPF process! [yes/no]:y
R5(config-router)#network 5.5.5.5 0.0.0.0 area 2
R5(config-router)#network 204.1.1.3 0.0.0.255 area 2
R5(config-router)#network 205.1.1.1 0.0.0.3 area 3
R5(config-router)#exit
R6
R6(config)#router ospf 1
R6(config-router)#router-id 6.6.6.6
Change router-id and update OSPF process! [yes/no]:y
R6(config-router)#network 6.6.6.6 0.0.0.0 area 3
R6(config-router)#network 205.1.1.2 0.0.0.3 area 3
R6(config-router)#exit
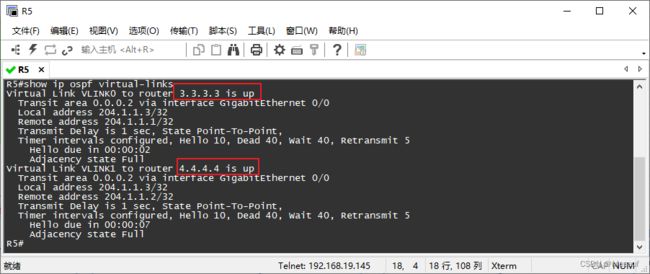
2、ospf虚链路
R3
R3(config)#router ospf 1
R3(config-router)#area 2 virtual-link 5.5.5.5    // 需要配置的为对端路由器ospf的Router-id,如果虚链路没有配置成功,可以查看Router-id是否匹配
R3(config-router)#exit
R4
R4(config)#router ospf 1
R4(config-router)#area 2 virtual-link 5.5.5.5
R4(config-router)#exit
R5
R5(config)#router ospf 1
R5(config-router)#area 2 virtual-link 3.3.3.3
R5(config-router)#area 2 virtual-link 4.4.4.4
R5(config-router)#exit
查看虚链路状态
3、RIP路由的配置及路由引入
重分发的路由必须是本地
show ip route可以看到的路由
R6
R6(config)#router rip
R6(config-router)#version 2
R6(config-router)#no auto-summary
R6(config-router)#network 172.16.1.0
R6(config-router)#exit
R6(config)#router ospf 1
R6(config-router)#redistribute rip subnets   // 重分发RIP路由
R6(config-router)#exit
R1
R1(config)#router ospf 1
R1(config-router)#redistribute connected subnets  // 重分发直连路由
R1(config-router)#exit
4、宣告汇总路由
R1
R1(config)#router ospf 1
R1(config-router)#summary-address 10.1.0.0 255.255.248.0  // 这里使用汇总的掩码,不需要换算为反掩码
R1(config-router)#exit
R2
R2(config)#router ospf 1
R2(config-router)#redistribute connected subnets   // 需要先引入直连路由,否则宣告汇总路由无效
R2(config-router)#summary-address 10.1.0.0 255.255.224.0  // 宣告汇总路由
R2(config-router)#exit
5、区域认证
5.1 明文接口认证
R1
R1(config)#int g0/0
R1(config-if-GigabitEthernet 0/0)#ip ospf authentication
R1(config-if-GigabitEthernet 0/0)#ip ospf authentication-key Test@123
R1(config-if-GigabitEthernet 0/0)#exit
R2
R2(config)#int g0/0
R2(config-if-GigabitEthernet 0/0)#ip ospf authentication
R2(config-if-GigabitEthernet 0/0)#ip ospf authentication-key Test@123
R2(config-if-GigabitEthernet 0/0)#exit
5.2 区域md5认证
R2
R3(config)#router ospf 1
R3(config-router)#area 0 authentication message-digest   // 开启区域认证
R3(config-router)#exit
R3(config)#int g0/1
R3(config-if-GigabitEthernet 0/1)#ip ospf message-digest-key 1 md5 5 Test@456  // 属于该区域的接口上配置md5密钥
R3(config-if-GigabitEthernet 0/1)#exit
R3
R3(config)#
R3(config)#router ospf 1
R3(config-router)#area 0 authentication message-digest
R3(config-router)#area 2 authentication message-digest
R3(config-router)#exit
R3(config)#int range g0/0-1
R3(config-if-range)#ip ospf message-digest-key 1 md5 Test@456
R3(config-if-range)#exit
R4
R4(config)#router ospf 1
R4(config-router)#area 0 authentication message-digest
R4(config-router)#area 2 authentication message-digest
R4(config-router)#exit
R4(config)#int range g0/0-1
R4(config-if-range)#ip ospf message-digest-key 1 md5 Test@456
R4(config-if-range)#exit
R5
R5(config)#router ospf 1
R5(config-router)#area 2 authentication message-digest
R5(config-router)#area 3 authentication message-digest
R5(config-router)#exit
R5(config)#int range g0/0-1
R5(config-if-range)#ip ospf message-digest-key 1 md5 Test@456
R5(config-if-range)#exit
R6
R6(config)#router ospf 1
R6(config-router)#area 3 authentication message-digest
R6(config-router)#exit
R6(config)#int g0/0
R6(config-if-GigabitEthernet 0/0)#ip ospf message-digest-key 1 md5 Test@456
R6(config-if-GigabitEthernet 0/0)#exit
5.3 虚链路认证
R3
R3(config)#router ospf 1
R3(config-router)#area 2 virtual-link 5.5.5.5 message-digest-key 1 md5 Test@456
R3(config-router)#exit
R4
R4(config)#router ospf 1
R4(config-router)#area 2 virtual-link 5.5.5.5 message-digest-key 1 md5 Test@456
R4(config-router)#exit
R5
R5(config)#router ospf 1
R5(config-router)#area 2 virtual-link 3.3.3.3 authentication message-digest
R5(config-router)#area 2 virtual-link 4.4.4.4 authentication message-digest
R5(config-router)#area 2 virtual-link 3.3.3.3 message-digest-key 1 md5 Test@456
R5(config-router)#area 2 virtual-link 4.4.4.4 message-digest-key 1 md5 Test@456
R5(config-router)#exit
6、路由选路
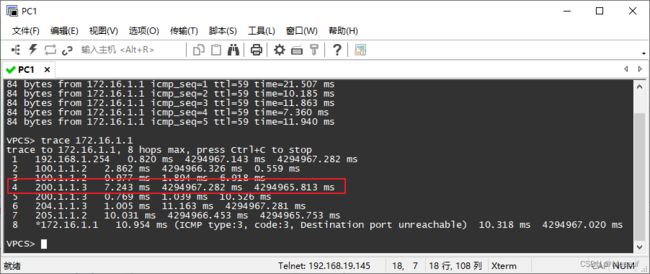
查看PC1、PC2的默认路径,可以看到默认走的R3
修改R3的开销值
R3(config)#int range g0/0-1
R3(config-if-range)#ip ospf cost 10  // 同时修改开销值为10
R3(config-if-range)#exit


