ESPHome不经过HA设备1直接控制设备2
目录
- 1.公共配置文件
- 2.设备2:台灯
- 3.控制器(http.post)
- 4.获取状态(http.get)
- 5.提取Json数据(`string`类型)
- 6.提取Json数据(`int`类型)
- `注意`
1.公共配置文件
#wifi.yaml
wifi:
  networks:
    - ssid: "123"
      password: "www.123.com"
    - ssid: "456"
      password: "www.123.com"


  # 当连接不上指定wifi,开启热点配网
  ap:
    ssid: "设备配网"

# 强制门户
captive_portal:

# web界面
web_server:
  port: 80
2.设备2:台灯
主要是控制一个IO口
substitutions: { desc: 台灯, devicename: sensor }

esphome:
  name: $devicename
  platform: ESP8266
  board: nodemcuv2
  arduino_version: latest

# Enable logging
logger:

# Enable Home Assistant API
api:
  encryption:
    key: "MhXiJqKKyCXTqjZWqtegaP1tQSUpPtbnXP9iV1i2TzE="

ota:
  password: "8e9c493c1fda598d0789f514507f3538"

packages:
  wifi: !include common/wifi.yaml

output:
  - pin: 2
    id: led_pin2
    platform: gpio

light:
  - id: led
    output: led_pin2
    platform: binary
    name: "${devicename}_led" # ${devicename}_led 的实际参数是 sensor_led
3.控制器(http.post)
esphome:
  name: http
  friendly_name: http

esp8266:
  board: nodemcuv2

# Enable logging
logger:

# Enable Home Assistant API
api:
  encryption:
    key: "hGNx5NzLL+UnGsUWxs6tvYghEZDgVfQjOcsMQaMgrg4="

ota:
  password: "65290e2cae0c69b31b50bdb80bcd4f4c"

packages:
  wifi: !include common/wifi.yaml

http_request:
  useragent: esphome/device
  id: my_request
  timeout: 10s

interval:
  - interval: 2s
    then:
      - http_request.post: http://sensor.local/light/sensor_led/toggle
interval启动了一个定时器,2s执行一次http_request.post动作
当你的设备2:台灯正常连接上网络,在局域网中,可以访问
http://sensor.local/light/sensor_led/toggle
获取设备2:台灯的状态

因为我们使用的浏览器是get,只能获取设备的状态,并不能控制设备
想要控制设备,就要使用到post
- http_request.post: http://sensor.local/light/sensor_led/toggle
4.获取状态(http.get)
如果是想获取设备的状态,并不是控制设备,可以使用get
esphome:
  name: http
  friendly_name: http

esp8266:
  board: nodemcuv2

# Enable logging
logger:

# Enable Home Assistant API
api:
  encryption:
    key: "hGNx5NzLL+UnGsUWxs6tvYghEZDgVfQjOcsMQaMgrg4="

ota:
  password: "65290e2cae0c69b31b50bdb80bcd4f4c"

packages:
  wifi: !include common/wifi.yaml

http_request:
  useragent: esphome/device
  id: my_request
  timeout: 10s


interval:
  - interval: 10s
    then:
      # - http_request.post: http://sensor.local/light/sensor_led/toggle
      - http_request.get:
          url: "http://sensor.local/light/sensor_led"
          on_response:
            - lambda: |-
                ESP_LOGD("http_request", "data: %s", id(my_request).get_string());
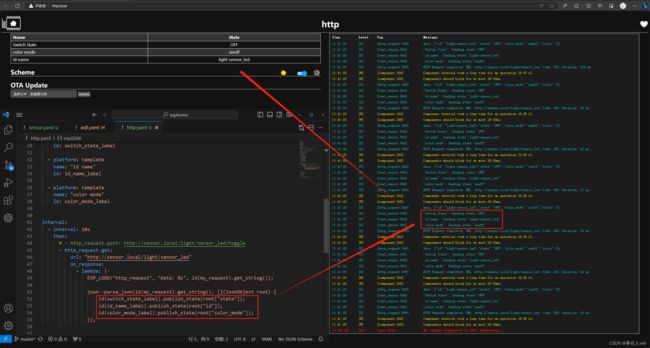
5.提取Json数据(string类型)
已经获取到Json数据,肯定需要将里面的数据提取出来
esphome:
  name: http
  friendly_name: http

esp8266:
  board: nodemcuv2

# Enable logging
logger:

# Enable Home Assistant API
api:
  encryption:
    key: "hGNx5NzLL+UnGsUWxs6tvYghEZDgVfQjOcsMQaMgrg4="

ota:
  password: "65290e2cae0c69b31b50bdb80bcd4f4c"

packages:
  wifi: !include common/wifi.yaml

http_request:
  useragent: esphome/device
  id: my_request
  timeout: 10s

text_sensor:
  - platform: template
    name: "Switch State"
    id: switch_state_label

  - platform: template
    name: "id name"
    id: id_name_label

  - platform: template
    name: "color mode"
    id: color_mode_label


interval:
  - interval: 10s
    then:
      # - http_request.post: http://sensor.local/light/sensor_led/toggle
      - http_request.get:
          url: "http://sensor.local/light/sensor_led"
          on_response:
            - lambda: |-
                ESP_LOGD("http_request", "data: %s", id(my_request).get_string());

                json::parse_json(id(my_request).get_string(), [](JsonObject root) {
                    id(switch_state_label).publish_state(root["state"]);
                    id(id_name_label).publish_state(root["id"]);
                    id(color_mode_label).publish_state(root["color_mode"]);
                });
6.提取Json数据(int类型)
例如Json是下面的例子,把value的值提取出来
{
    "id": "number-sensor_time",
    "value": 100,
    "state": "100"
}
sensor:
  - platform: template
    name: "My Sensor Time"
    id: my_value

interval:
  - interval: 10s
    then:
      - http_request.get:
          url: "http://sensor.local/number/sensor_time"
          on_response:
            - lambda: |-
                std::string json_string = id(my_request).get_string();

                // 打印 JSON 字符串
                ESP_LOGI("Rx", "%s", json_string.c_str());

                // 尝试解析 JSON
                json::parse_json(json_string.c_str(), [](JsonObject root) {
                  id(my_value).publish_state(root["value"]);
                });
注意
ESP8266 和 ESP32 是有区别的
ESP32 只能调用一次id(my_request).get_string(),第二次调用的时候就是空(NULL)的了
稍微更改一下,使用json_string 来缓存Json数据
interval:
  - interval: 5s
    then:
      - http_request.get:
          url: "http://sensor.local/number/sensor_time"
          on_response:
            - lambda: |-
                std::string json_string = id(my_request).get_string();

                // 打印 JSON 字符串
                ESP_LOGI("Rx", "%s", json_string.c_str());

                // 尝试解析 JSON
                json::parse_json(json_string.c_str(), [](JsonObject root) {
                  id(my_sensor_time).publish_state(root["state"].as::string>());
                });


